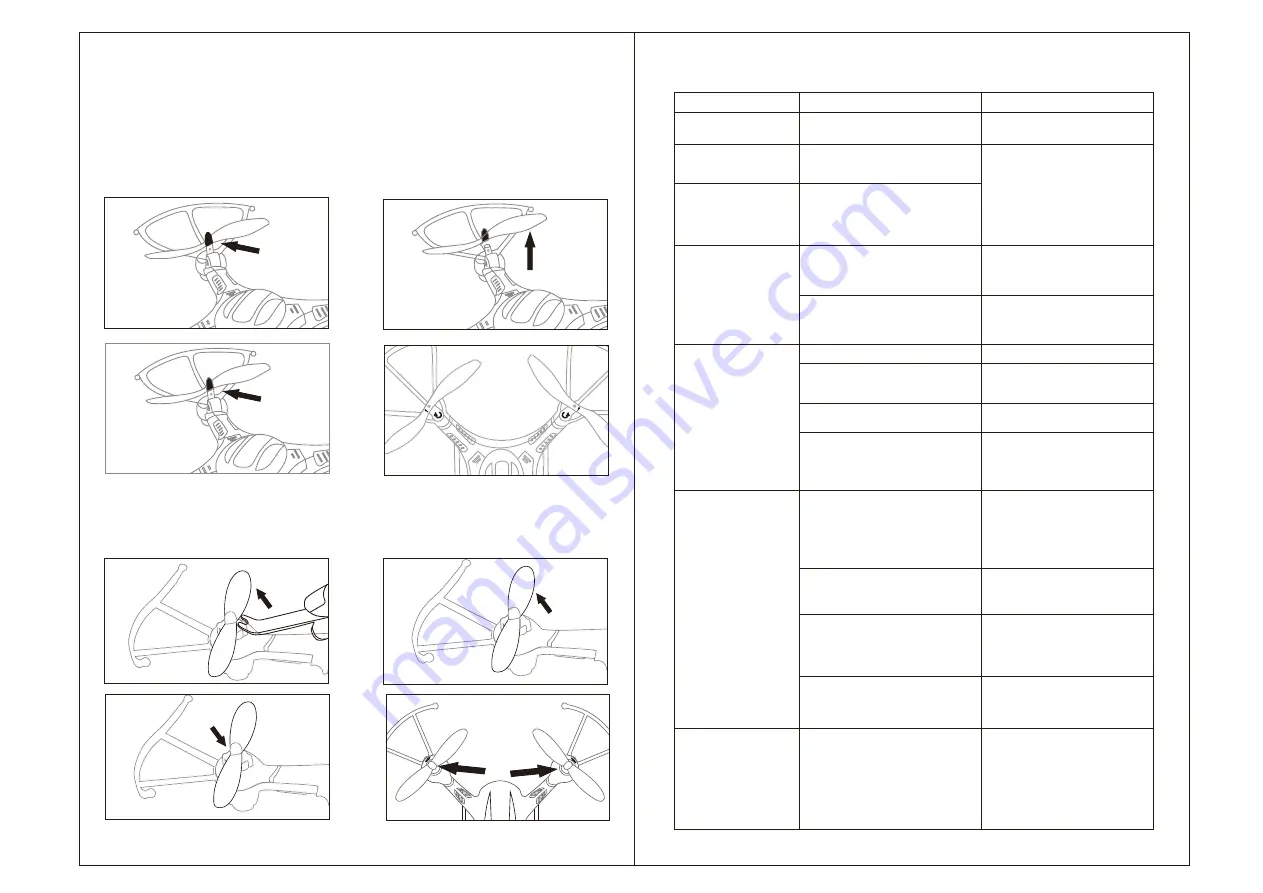
Installation Blades
19
181/186WH
-
EN
20
Problem phenomenon
Cause
Solution
One or more blades
stop spinging
One or more motors were damaged
Swap with new motors
blades spin slowly or
can't spin.
The larger white gear and the mental
motor gear are not meshed together,
it usually result from a strong crash.
Grindy sound from the
gear shaft
The gears were worn out. The gear
shaft disformed after crahses
that result in tight mesh of the blades
gear with the motor gear, further
ware out the gears.
Change the gears and
base.
Fly to one side
The original program of the aircraft
has changed slightly during
operation, or the gyro is not reset
after a violent impact.
The motor has been crashed
damaged.
If it can't be fixed by fine tuning or
c a l i b r a t i o n r e s e t t i n g , t h e n the
motors should have been damaged,
please replace the abnormal parts.
Use the tuning button on the
transmitter or calibration function,
please refer to the User Manual
for how.
Can't lift off ground
The blades are severely deformed.
Change with the same type blades.
The drone battery is low in power.
Charge the battery follow the
instruction or try again with another
fresh battery.
incorrect installation of the props.
Reinstall the blades in accordance
with the instruction.
The drone won't be ready to fly until
you press the Start/Landing button
Switchover button) after successful
pairing.
Before take flight, press the left
rear button on the remote control
to make the blades rotate. More
details please refer to the User
Manual.
There is no pictures
showingon the phone.
Loose connection of the camera
wire with the drone.
Ensure that the camera wire has
been strickly connected with the
drone wire at the bottom, if there's
no issue with the camera, there
will be solid blue indicator light lit
up in the camera box when t h e
drone is powered on.
The camera is damaged(No blue
light in t h e c a m e r a b o x e v e n i f i t
has been full attached to the drone
bottom and the drone is powered on)
Change with a new camera.
There's interference signal around
that affect the transmission of the
drone signal.
Avoid flying the drone in fields around
with power lines,radar and others
that could release radio signal.Play
in a clear wide field with no to little
interference.
Failed connection between the
phone and drone WIFI.
Open phone "setting",turn off the
WIFI and restart,the wifi signal of
drone will show up on the the
searching column,reconnect with it.
Can't bind.
There's signal interferences nearby.
The interval between switch on the
transmitter and the drone is too long
(more than 8 seconds).The drone
battery or transmitter battery is
low in power.
Please try again in area with no
s i g n a l i n t e r f e n c e ; R e s t a r t t h e
d r o n e a n d t h e t r a n s m i t t e r, t u r n
o n t h e t r a n s m i t t e r fi r s t a n d t h e n
turn on the drone, t h e two steps
should be done quickly(no longer
t h a n 4 s e c o n d s ) ; e n s u r e t h e r e ' s
enough power in the drone battery
a n d t h e m o n i t o r.
Problems Guidance
1.Remove the screws by counterclockwise rotate the screwdriver.
2.Upwards pull out the blades.
3.Install the blades with the same rotate direction,then tighten the screws by clockwise
rotate the screwdriver.
4.Make sure the blade be accordant with its rotate direction
C
1
D
1
F186 Blades Installation
1. Put the blade changer to the base of the blades.
2.Push up the blades.
3.Put the new blades into its correct position.
4.Make sure the blade be accordant with its rotate direction
F181 Blades Installation


