background image

iQ200 User’s Manual                                                                                                                                          Chapter 2: Setup and Use 


                                                                                                                                                                                9 

2.2.3


Loading the Media 

iQ printer can be operated under four different modes: Standard Mode, Tear-off Mode, Cutter Mode, 
and Peeler Mode. 


In Standard Mode, the printer stops and goes into standby as soon as the print job is complete. 


In Tear-off Mode, after the print job is finished, the printer will feed the label until the edge of 
it aligns with the edge of the Tear-off Bar allowing easy tear off for the user. 


In Cutter Mode, the printer stops and cuts the printed label(s) (Only available on models with 
cutter installed). 


In  Peeler  Mode,  printer  stops and waits  for the printed and peeled off label  to  be taken  away 
before resuming the print job (Only available on models with peeler installed). 


Standard Mode 

To load media into the iQ printer while under Standard Mode, follow the steps below: 
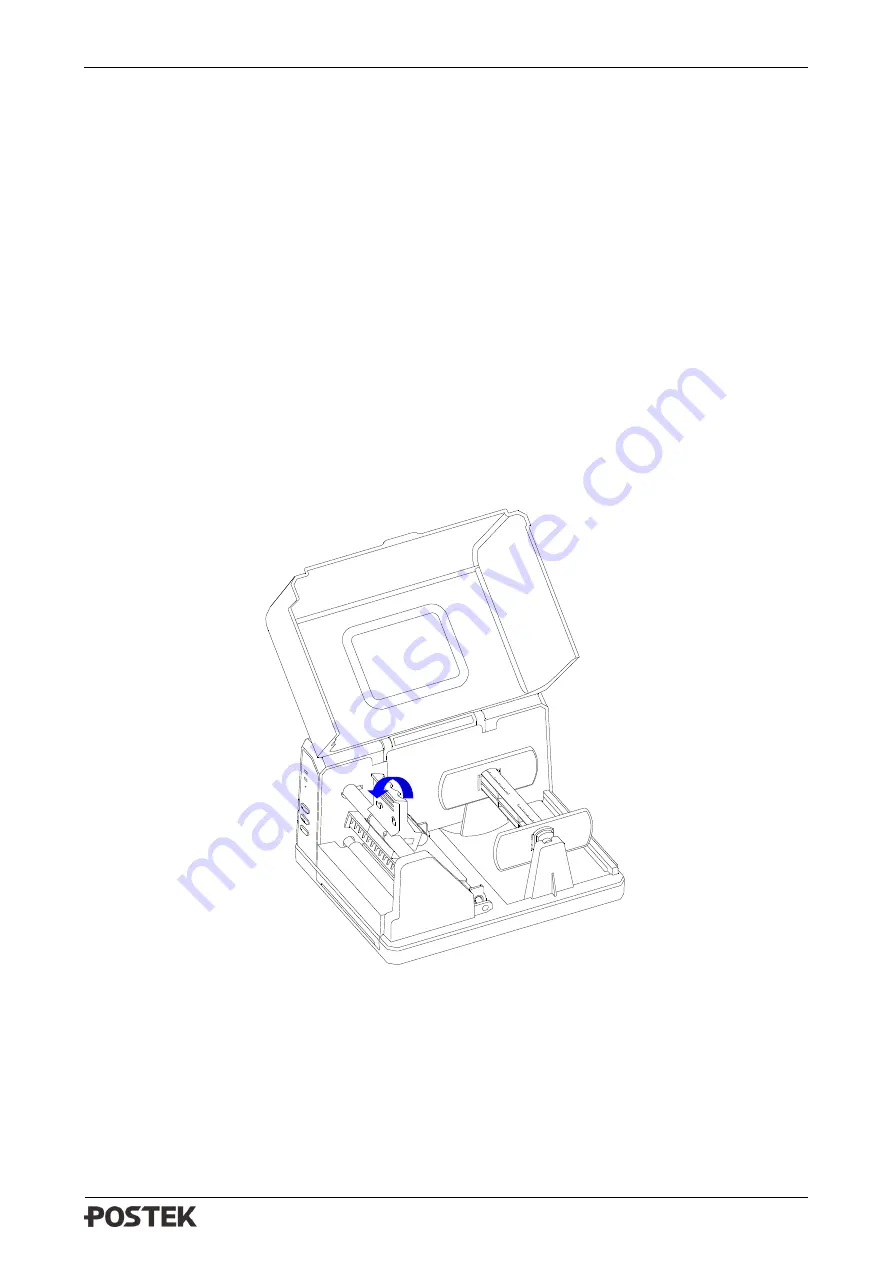
 

1.


Lift the right cover of the printer and lift the Handle of the Printhead, as shown in Figure 2-4. 


Figure 2-4 Lift the Handle 


2.


Load  a  roll  of  media  (labels  facing  up)  on  the  Media  Spindle,  then  slide  the  two  Media  Roll 
Guides, with smooth sides facing toward the media, onto the Media Spindle from each end until 
both  Media  Roll  Guides  touch  the  media.  When  placing  a  roll  of  media  with  a  3″  ID  core, 
please slide the two Core Adapters onto the Media Spindle first, as shown in Figure 2-5. 


Содержание iQ200

Страница 1: ......

Страница 2: ...pyright 2021 by Postek Electronics Co Ltd All rights reserved Under the copyright laws this manual cannot be reproduced in any form without the prior written permission of POSTEK No patent liability i...

Страница 3: ...put of the power adapter is 24VDC and your power source matches the rating listed on the power adapter Be certain your power source is grounded To avoid getting an electric shock do not use a worn or...

Страница 4: ...g the Position of Reflective Media Sensor 17 Chapter 3 Operations and Settings 20 3 1 Basic Operations 20 3 1 1 Power Switch 20 3 1 2 The Front Panel 20 3 1 3 Advanced Functions 22 3 1 4 DIP Switches...

Страница 5: ...ions The symbols that may be found in this document are defined as follows Symbol Description Alerts you to a medium or low risk hazard that could if not avoided result in moderate or minor injury Ale...

Страница 6: ...ter can automatically cut the label after printing However automatic cutters pose a safety hazard since the blades are very sharp To prevent injuries and cutter failures while using one of the many ty...

Страница 7: ...CC 128 etc 2D Barcode MaxiCode PDF417 Data Matrix QR Code etc Interfaces RS 232 Serial USB DEVICE 2 0 Power Adapter Input AC100 240 V 50 60 Hz Output DC 24 V 2 5 A Weight 3 97 lbs 1 8 kgs Dimensions W...

Страница 8: ...ect the shipping carton s for possible shipping damage if damage is discovered notify the shipping company to report the nature and extent of the damage Please check the items according to the Quick S...

Страница 9: ...and Structures 2 1 1 Front View Figure 2 1 Front View Table 2 1 Front View Description Number Description 1 READY Indicator 2 MEDIA Indicator 3 WIFI Indicator 4 PAUSE Self Test Button 5 FEED Calibrat...

Страница 10: ...2 Internal View Figure 2 2 shows the detailed structure of the printer Figure 2 2 Internal View Table 2 2 Internal View Description Number Description 1 Handle 2 Printhead Assembly 3 Platen Roller 4...

Страница 11: ...2 1 3 Rear View The printer is equipped with multiple interfaces See Figure 2 3 Figure 2 3 Rear View Table 2 3 Rear View Description Number Description 1 RS232 Serial Port 2 DIP Switch 3 USB Port 4 W...

Страница 12: ...printer port can be obtained from the self test report see 3 1 3 Advanced Functions Obtaining Printer Configuration Information Cable configurations for Serial RS 232C interface can be found in Append...

Страница 13: ...stalled In Peeler Mode printer stops and waits for the printed and peeled off label to be taken away before resuming the print job Only available on models with peeler installed Standard Mode To load...

Страница 14: ...unit into the printer s Media Compartment 4 Position the media roll in the middle of the Spindle using the ruler on the Media Spindle for alignment See Figure 2 6 Figure 2 6 Load the Media Media Roll...

Страница 15: ...his can be checked with the ruler on the Tear off Bar See Figure 2 7 Figure 2 7 Media Loaded 7 Press down the Handle of the Printhead to lock the Printhead See Figure 2 7 8 Turn on the printer press a...

Страница 16: ...d Label Roll To load label roll on External Media Stand follow the steps below 1 Place the front part of the External Media Stand under the printer making sure the two rear rubber feet of the printer...

Страница 17: ...ia Spindle from each end until both Media Roll Guides touch the media When placing a roll of media with a 3 ID core please slide the two Core Adapters onto the Media Spindle first as shown in Figure 2...

Страница 18: ...ia Guide Rod over and pass the Platen Roller to the front of the printer 8 Slide the Media Guides to the edge of the media making sure that the media remains flat and is placed in the middle of the Te...

Страница 19: ...Place the front part of the External Media Stand under the printer making sure the two rear rubber feet of the printer are fitted into the two holes on the media stand see Figure 2 14 Figure 2 14 Pla...

Страница 20: ...nd pass the Platen Roller to the front of the printer 4 Slide the Media Guides to the edge of the media making sure that the media remains flat and is placed in the middle of the Tear off Bar This can...

Страница 21: ...cover Figure 2 18 Change the Reflective Media Sensor Position Technically the Transmissive Sensor is designed to detect a gap hole or notch between labels the Reflective Sensor is for detecting black...

Страница 22: ...ia Sensor Position When media rolls are produced the media end would be fixed to the media core by duct tape or scotch tape If your printer cannot detect Media Out signal well please refer to Figure 2...

Страница 23: ...ade known to user to avoid positioning Media Sensors over the tape area The position of the tape should be made known to user to avoid positioning Media Sensors over the tape area Hole Media gap Black...

Страница 24: ...e defined as follows stands for power on stands for power off 3 1 2 The Front Panel The Front Panel of the printer consists of Three Indicators READY MEDIA and WIFI Three multi function buttons PAUSE...

Страница 25: ...ates the Wi Fi function is disabled Panel Buttons The three buttons on the front of the printer please refer to Table 3 2 below for details regarding their functionality Table 3 2 Panel Button Descrip...

Страница 26: ...READY and MEDIA indicators will blink once and then return to a steady state the printer will print a self test page with detailed information regarding the printer s configuration then return to stan...

Страница 27: ...r off Mode ON Tear off Mode enabled OFF Tear off Mode disabled 3 Set Cutter Mode Only available on models with Cutter installed ON Cutter Mode enabled OFF Cutter Mode disabled 4 Set Peeler Mode Only a...

Страница 28: ...tions and Settings 24 Position Corresponding Functions 7 OFF 8 ON 38400 7 ON 8 ON 57600 Before making changes to the switches please make sure the printer is powered off All the switches should be off...

Страница 29: ...in the label editing software and click at Print to send the print task to the printer Printing pauses until the peeled off label is removed 5 The peeling position can be adjusted by Peel Offset in Ut...

Страница 30: ...r Cutter Mode See Figure 3 3 Figure 3 3 Cutter Mode The default cutter type is rotary cutter If guillotine cutter is installed please send the command UM CU2 in Utility tool to the printer and restart...

Страница 31: ...ease scan the QR code on the Quick Start Guide or visit POSTEK website http www postekchina com Each printer also comes with a BarTender UltraLite edition software To access to the software and the di...

Страница 32: ...label media use To clean the Printhead 1 Turn off the printer 2 Lift the right cover 3 Lift the Handle of the Printhead 4 Use a cotton swab dipped in anhydrous isopropyl alcohol Wipe the Printhead fr...

Страница 33: ...in order to prevent the accumulated debris from damaging internal parts To clean the printer interior use a cotton swabs dipped into anhydrous isopropyl alcohol and remove any debris 4 4 Cleaning the...

Страница 34: ...f the media sensor and confirm it could detect the media gap hole notch or black mark If the media being used is continuous media no locator present on the label Then please set the media to Continuou...

Страница 35: ...lem Possible Cause Recommended Solution Vertical Blank Lines Appear Printhead is dirty Clean the Printhead Follow the recommended maintenance guidelines for cleaning the Printhead Data Sent but Not Pr...

Страница 36: ...stop bit Flow control None If you are using software or drivers under the Windows environment the flow control must be set to hardware Any communications port can transmit data from the host RS232 Et...

Страница 37: ...P p 1 SOH XON 1 A Q a q 2 STX 2 B R b r 3 XOFF 3 C S c s 4 4 D T d t 5 NAK 5 E U e u 6 ACK 6 F V f v 7 BEL 7 G W g w 8 BS 8 H X h x 9 9 I Y i y A LF J Z j z B ESC K k C FF L l D CR M m E SO RS N n F...

Страница 38: ......

Отзывы: