background image


13 

For TM-31XXE Models with P-CAP Touchscreen


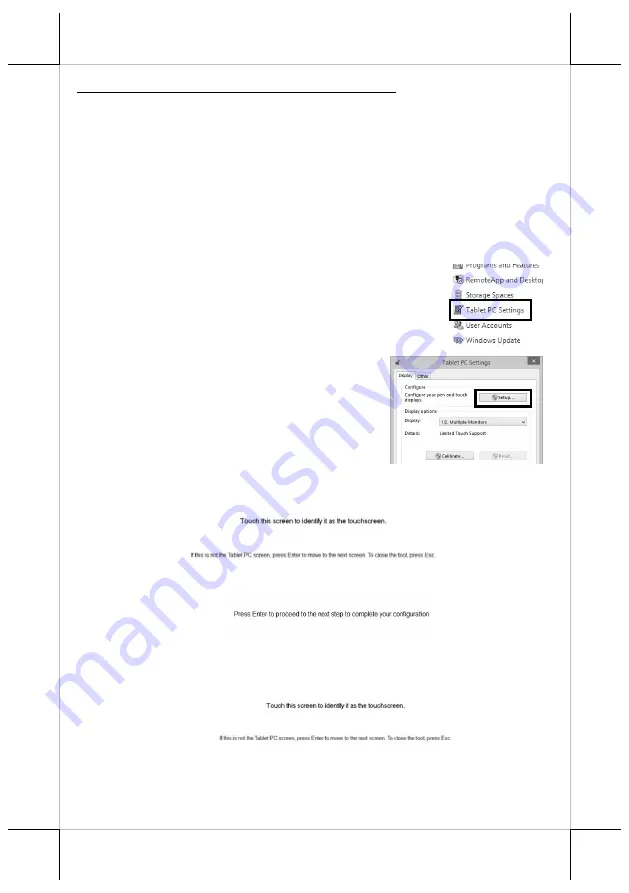
If your monitors are TM-31XXE models, you may configure the display 
settings from Control Panel in Microsoft Windows to identify the monitor as 
the secondary touchscreen monitor. Please go through the below steps to 
complete configuration. 

1.


Make sure that the monitor is well connected to your POS terminal 
with USB type A to B cable. 

2.


Go to 

Control Panel>Display Settings

, change your display settings 

to extended mode. 

3.


Go to 

Control Panel

, and then click on 

Tablet PC Settings

 item. 


4.


In 

Tablet PC Settings

 dialogue box, 

click on 

Setup

 button. 


5.


Following the instruction shown on the screen, click on the screen 
that you want to identify as the primary touchscreen display. 


6.


Press 

Enter

 button to proceed the configuration. 


7.


Click on the screen you want to use as the secondary touchscreen 
display. 


Содержание LM-31 E Series

Страница 1: ...im bezel type design 9 7 or 15 TFT LCD panel or 14 wide screen TFT LCD panel VESA mounting support For TM 31XXE 33XXE models TM 31XXE with slim bezel free design TM 33XXE with slim design 9 7 or 15 TFT LCD panel or 14 wide screen TFT LCD panel P CAP touch panel for TM 31XXE 5 wire resistive touch panel for TM 3315E VESA mounting support Optional side attachment support for LM TM 3X15E SL 105 Optio...

Страница 2: ...ews of LM TM 3X10E Front View Rear View OSD Control Button Neck Cover Cable Exit OSD button EXT button button button Power button 9 7 LM 3310E LCD Panel 9 7 LM 3110E LCD Panel 9 7 TM 3110E P Cap Touch Panel ...

Страница 3: ...3 Bottom View I O Ports of LM 3X10E I O Ports of TM 3X10E Rubber Pad Rubber Pad VGA Port DC IN Power Jack Power LED Indicator VGA Port USB Type B Port DC IN Power Jack Power LED Indicator ...

Страница 4: ...bber Feet with Fixing Screw Rubber Feet with Fixing Screw Cable Holder OSD Control Button Side Mount Cover Neck Cover Cable Cover Cable Exit Gen 7L Base 14 LM 3114E LCD Panel 14 TM 3114E P Cap Touch Panel Cable Exit OSD button EXT button button button Power button ...

Страница 5: ...Neck Cover Cable Cover Cable Exit 15 LM 3315E LCD Panel 15 TM 3315E Resistive Touch Panel Gen 7L Base 15 LM 3115E LCD Panel 15 TM 3115E P Cap Touch Panel LED indicator LED indicator OSD button EXT button button button Power button VGA Port USB Type B Port DC IN Power Jack USB Port Power LED Indicator ...

Страница 6: ...o set up the tilt angle Please refer to below suggestion to tilt your monitors To find the ideal viewing angle for 9 7 LM TM series monitors please adjust the monitor up or down in the direction indicated by the arrow Be careful NOT to touch the panel while tilting the screen Rubber Feet with Fixing Screw Rubber Feet with Fixing Screw Cable Holder VGA Port USB Type B Port DC IN Power Jack Cable Ex...

Страница 7: ...Gen 7L Base Flat folded mode Low profile mode Full extended mode LM TM 31XXE 33XXE will be set up beforehand in flat folded mode before being packaged into the box for shipping After it is unpacked you may re adjust the monitor in either low profile mode or full extended mode according to your situation The following describes the steps of adjusting Gen 7L base connected to the monitor among diffe...

Страница 8: ...t press on the LCD panel while setting up the tilt angle 4 Restore your monitor to Flat Folded mode from Full Extended mode 4 1 Tilt your screen in a horizontal position Then remove the cable cover from the base stand 4 2 Support the screen with one hand holding onto its bottom edge While pulling the lever backwards move the screen downwards until the lever is lifted off the hook as shown in the f...

Страница 9: ...ting VGA and USB Cables The following section will provide the instructions on how to connect power adapter VGA and USB type A to B cables and introduce helpful cable routing tips you may need to use while organizing cables For TM 31XXE 33XXE users please note that USB type A to B cable needs to be well attached to both of your monitor and terminal to allow touch screen function to work normally 1...

Страница 10: ...over and then neck cover in the direction shown by the arrow 3 After adjusting the screen to the horizontal position take one end of the VGA cable and have it passed through the cable exit 9 7 LM TM 3110E 3310E 14 or 15 LM TM 31XXE 33XXE 4 Secure the VGA cable to the VGA port at the bottom I O plate of your monitor 5 Grab Type B connector of USB cable to route it through the cable and then insert ...

Страница 11: ...irst push back the neck cover and then slide back the cable cover 8 Properly attach Type A connector of USB cable and VGA cable to your POS terminal Installing an Magnetic Stripe Reader Optional To expand functionality of your monitors it allows you to additionally mount an optional magnetic stripe reader MSR SL 104 for LM TM 3114E models or SL 105 for LM TM 3X15E models Before installing the peri...

Страница 12: ...to complete installation of The Dual Touch Manager a tool designed to allow your monitor to work as a secondary touchscreen monitor in extended mode 1 Make sure that the monitor is well connected to your POS terminal with USB type A to B cable 2 Insert the Peripheral Information CD which is included in the package into your CD ROM Locate and double click the index file 3 Click on Peripheral Driver...

Страница 13: ... connected to your POS terminal with USB type A to B cable 2 Go to Control Panel Display Settings change your display settings to extended mode 3 Go to Control Panel and then click on Tablet PC Settings item 4 In Tablet PC Settings dialogue box click on Setup button 5 Following the instruction shown on the screen click on the screen that you want to identify as the primary touchscreen display 6 Pr...

Страница 14: ...rs it is required to manually enable the VGA output of the terminals in BIOS settings so that the monitor is able to extract power from the Posiflex terminals However if the monitor you are using is not manufactured by Posiflex it is strongly suggested to deactivate the VGA port of your terminal in preventing your device from being damaged The following will describe the steps required to enable V...

Страница 15: ...nge System Standby OFF System power OFF 15 LM TM 3X15E Status Description ON solid blue System power ON ON solid green System Standby OFF System power OFF Setting up Display Resolution for Your Monitor The below chart defines the list of recommended display settings for LM TM 31XXE 33XXE Improper display configuration will prevent the monitor from properly displaying the image and lead to a warnin...

Страница 16: ...sers in adjusting a variety of monitor related settings depending on personal preference Through this section it is expected to familiarize you with the options which are accessible via OSD menu and to optimize your experiences with LM TM 31XXE 33XXE Power OSD Buttons Power OSD buttons are available on the rear right hand side of the LCD monitor Each of four OSD controls works differently in vario...

Страница 17: ... suggested to go through 1 Firstly press the OSD button to access the OSD menu 2 Scroll through OSD menu options using either the or button 3 Press the OSD button to select the particular menu option of interest It will lead you to its sub menu page if the selected menu option contains sub menu items 4 Under the selected menu item with available sub menu items use the or button to switch among dif...

Страница 18: ...n to decrease contrast Sharpness Press the button to increase sharpness Press the button to decrease sharpness Display Auto Adjustment Execute the auto tune function for OSD menu which will automatically perform fine tune of the image quality for optimizing screen performance H Position Press the button to move the screen to the right Press the button to move the screen to the left V Position Pres...

Страница 19: ... menu back to the default setting Menu Time Specify the length of time for OSD menu to stay active on the screen Language Specify the language used in the OSD menu Information Display information regarding display resolution horizontal vertical sync frequency pixel clock PCLK etc ...

Страница 20: ...31XXE 33XXE Models TM 3110E TM 3114E TM 3115E TM 3315E Display LCD Panel 9 7 TFT LCD 14 TFT LCD 15 TFT LCD Resolution H x V 1024 x 768 1366 x 768 1024 x 768 Contrast Ratio 500 1 650 1 600 1 Brightness 270 cd m2 200 cd m2 350cd m2 300cd m2 Touch Touch type Bezel free P CAP touch panel 5 wire Resistive touch panel Interface USB General Specification Display Interface VGA Power Supply 12V 18W 12V 40W...

Отзывы: