background image

MX5 Manual                                                                                                                                                                                Rev. D 

22 

Creating a Setup Card


In order to create a setup card  you will require a magnetic card encoder and a blank track 1 magnetic card. Using the MX5 

Utility  you  will  need  to  install  the  desired  firmware  into  the  MX5  device.    You  will  also  need  to  configure  all  the  desired 

settings  to  meet  your  application  requirements.    Save  the  settings  to  the  device  by  pressing  the 

Save  Settings  to  Device


Button.  Now  you  can  press  the 

Make  Setup  Card

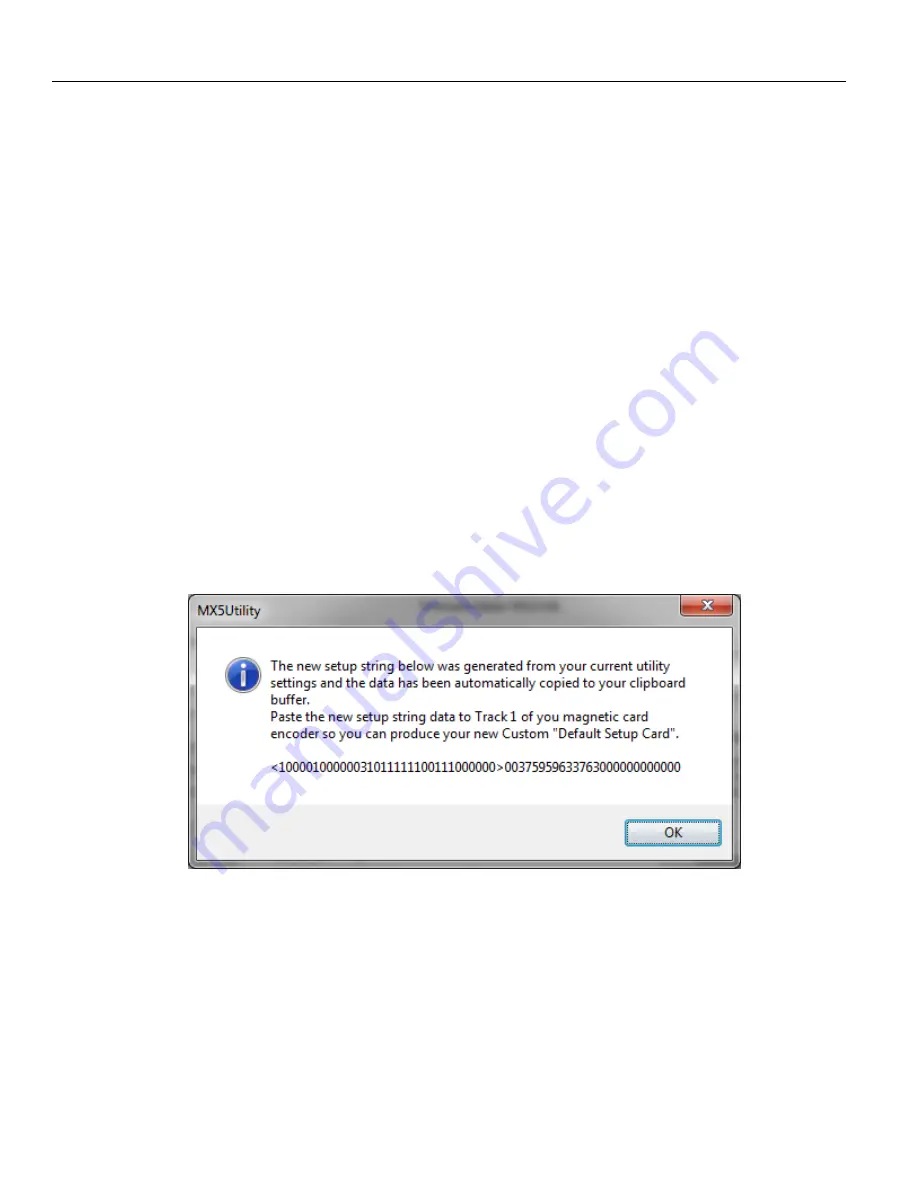
  Button  to  generate  a  special  data  string  which  represents  your  current 

configuration on the screen.    The Data string is automatically copied to your clipboard memory. Now using your Magnetic 

card  encoder  and  the  encoder  application,  paste  the  data  string  into  the  data  field  for  track  1.  Encode  the  data  to  a  blank 

magnetic  card.    Your  new  setup  card  is  now  done.  Mark  the  card  using  a  permanent  marker  to  identify  it  as  your  special 

setup card.    Now you are ready to test your new card.   


Using the MX5 Utility and your MX5 Device,  read your setup card.  Your MX5 Device should respond with one long beep 

(No Data will be seen when using a setup card). The MX5 Device has now accepted the settings saved on the setup card and 

saved the settings into its flash memory.    Open the MX5 Utility if you have not done so already and press the 

Get Settings 

from Device

 Button. The screen will update with the device‟s current saved settings. Verify your settings and you are done.   

You do not need to use the MX5 Utility to configure your MX53 Device. If the desired firmware is installed you simply need 

to  read  the  setup  card  and  all  your  settings  are  automatically  flashed  into  your  MX53  device.  This  function  is  Ideal  for 

hardware  deployment  or  returning  your  hardware  to  a  known  state.    The  window  below  shows  the  dialog  box  which  is 

opened once you press the 

Make Setup Card

 Button. 


A factory default card is included with your MX53 Device. Use this card to restore your device back to factory default. 

The settings will be automatically saved to the Flash memory of the MX53 device. Should you not have a default card 

then using the MX5 Utility you can select press the Reset To Factory Defaults Button and the screen will be set to the 

factory  default.  Note  that  each  firmware  has  a  different  factory  default.  Make  sure  you  have  selected  the  desired 

firmware before you save your defaults. Once the defaults are shown  you will need to save the settings to the MX53 

device  by  pressing  Save  Settings  to  Device  Button.  This  will  save  your  current  settings  to  your  MX53  device  Flash 

Memory. A long beep will be heard from your device indicating a successful save

.   

Содержание MX5 Series

Страница 1: ...MX5 Manual Rev D 1 MX5 Series Magnetic Stripe Card Reader RFID SC Reader Writer Manual Revision D 2011 07 13...

Страница 2: ...Y SOFTWARE 12 System Requirements 12 MX5 Utility Installation 12 MX5 Utility General Information 13 Definitions of Settings 13 MX Device Firmware Upgrade Menu 20 Creating a Setup Card 22 Hardware Moun...

Страница 3: ...ct specifications Warranty All the MX5 products are backed by a two year parts and labour limited warranty Should you have problems with your MX5 device please contact the dealer from whom you purchas...

Страница 4: ...ISO magnetic card standards and AAMVA CADMV drivers license standards We can also provide support for non standard magnetic decoding methods and Cut Paste of Magnetic data on the fly Data encryption c...

Страница 5: ...step Default setup card Customizable Boot Load Flash Upgradable Memory Yes Selectable Tracks Yes Separate Track selection for both ISO AAMVA Selectable Available Tracks 1 2 3 Track Swipe Rates 2 125...

Страница 6: ...p card Customizable Flash Memory Upgrade Yes Selectable Tracks Yes Separate Track selection for both ISO AAMVA Selectable Available Tracks 1 2 3 Track Swipe Rates 2 125 ips at 75 bpi 1 3 60 ips at 210...

Страница 7: ...midity 10 90 relative humidity Set up Utility Yes Flash Memory Upgrade Yes Programmable Sound On Off Yes Programmable Carriage Return Yes Programmable Inter character Delay Yes Programmable SS ES Sele...

Страница 8: ...10 x 82 x 27 mm Total Weight 120 g Operating Temp 20 C to 55 C Humidity 10 90 relative humidity Set up Utility Yes Frequency RFID LF 125 KHz and HF 13 56 MHz Prog Sound On Off Yes Prog Carriage Return...

Страница 9: ...MX5 Manual Rev D 9 Dimension Views MX53 USB MX53 COMBO USB MX5C USB MX5T USB Connection Views...

Страница 10: ...ently with your keyboard The card information is transferred to your computer as if someone had manually typed the information In order to change any settings of the device you must connect the device...

Страница 11: ...u have placed the MX5 Device in upgrade mode you can select from an extensive list of various firmware upgrades located on your CD Select the upgrade based on the device type you are using Each device...

Страница 12: ...display 2 Any of the following operating systems Windows 2000 XP VISTA and Windows 7 3 256K available conventional memory 4 A free USB port MX5 Utility Installation Use the following steps below in or...

Страница 13: ...dialog boxes will be updated with the selected device settings The Device Info Section will display the internal device serial number the device name and the version installed in the device selected Y...

Страница 14: ...inel You can also select your own ES by using the pull down Draw bar Use default settings unless otherwise notified by your application vendor All the tracks will share the same ES You may also add a...

Страница 15: ...between the MX Device and the computer Select this option if you need to generate the Setup Card Data String of the current settings The string will be copied to the clipboard buffer Paste this data...

Страница 16: ...otified otherwise by your application vendor Send CR You may add a CR to the UID read from the RFID data card UID Output Options Decimal Hex The UID can optionally be output to any waiting software in...

Страница 17: ...the Test Card button is pressed the last card read report will be sent to the application This option is only available when you are using a HID version firmware for a reader Display Swipe Strings If...

Страница 18: ...ault is FF FF press the Login button If the password is successful the Save Password and Data Write option will be Un grayed If the wrong password is entered then an error screen will pop up Save Pass...

Страница 19: ...the card You can read any data from the card without logging in Clear This option will clear all the data in the data window This will not affect or change the information on the memory card If you ha...

Страница 20: ...d MX Device current settings The Device Info area will display the MX5 Device s current information stored in its flash memory If you do not wish to change the firmware press the ReActivate button and...

Страница 21: ...ld damage or lock up the MX5 Device An overide option is available The password required for changing a MX Device to a new Product ID within the Model s Options is MASTER This is Advanced Mode 1 If fo...

Страница 22: ...flash memory Open the MX5 Utility if you have not done so already and press the Get Settings from Device Button The screen will update with the device s current saved settings Verify your settings and...

Страница 23: ...the head once a week for heavy use and once a month for light use Cleaning the head will improve successful read rates and ensure long life of the reading head The same cleaning card can also be used...

Страница 24: ...es on Mag Tek Compatible Report Format The MX HID USB device decimal ID numbers are Vendor ID 0x0980 Product ID 0x9025 Revision ID 0x0100 The HID card swipe reports 337 ASCII characters in the followi...

Страница 25: ...ad 1 Read Error 2 Track 3 decode status 0 Good Read 1 Read Error 3 Track 1 data length Up to 110 Characters 4 Track 2 data length Up to 110 Characters 5 Track 3 data length Up to 110 Characters 6 Card...

Страница 26: ...POS for NET library from the following link http www microsoft com downloads en details aspx FamilyID EAAE202A 0FCC 406A 8FDE 35713D7841CA displ aylang en 2 Install POS for NET by clicking on the set...

Страница 27: ...5 Manual Rev D 27 3 Copy MX5_MSR_SO dll from the CDROM in this location CDdrive MX5 POS NET to the Microsoft UPOS folder C Program Files Common Files Microsoft Shared Point Of Service Control Assembli...

Страница 28: ...MX5 Manual Rev D 28 4 Run the test application to test POS on MX5 HID devices CDdrive pos for net install folder PosFor Net Files SDK Samples Sample Application TestApp exe...

Страница 29: ...t there are two entries of the Magnetic reader This is due to there being two logical devices in the MX5 Always pick the first one to test with otherwise you will receive an UNABLE TO ENABLE DEVICE er...

Страница 30: ...evice work with POS NET 1 Click on Open 2 Click on Claim 3 Click on the checkbox of DeviceEnabled 4 To see the report on a card click on the DataEventEnabled checkbox and swipe a card through the read...

Страница 31: ...you install the MX5 Utility My System reports a Device error when I install my MX5 Solution Do Not unplug your MX5 from your computer Open your device manager of your OS and list the device in questio...

Страница 32: ...c card option of the MX5 and only use the RFID or SC option of the firmware By doing so you will not be able to read any magnetic cards Reversely you can also turn off the RFID or SC of your MX5 devic...

Страница 33: ...to use this file Open your device Manager for your OS and locate the device which did not install properly You will see and or beside the device in question Right Click your mouse cursor over the dev...

Страница 34: ...the location See illustration below Click Next once you have selected the location The system will then install the INF file for the MX5 Device The system may ask you if you want to install this devi...

Страница 35: ...o a known factory default mode You can have your own Custom versions of the QuickSet setup card to meet your system and software requirements This feature is ideal for hardware deployment and setting...

Страница 36: ...ached to a Com port Use the MX5 INF install file to automatically install the appropriate Microsoft Drivers provided with the OS The MX5 setup utility when installed will provide this INF file No addi...

Страница 37: ...with Mifare S50 ID reader Keyboard output Use this firmware on the MX53 with a Mifare 13 56 MHz RFID M2 add on Module only The three track magnetic card reader option can be turned off if desired usin...

Страница 38: ...0 RFID 53 KB M2 UID2 Ver 4 4 Product ID 40 Magnetic card reader with I Code2 ID reader Keyboard output Use this firmware on the MX53 with an I Code 2 Mifare II 13 56 MHz RFID M2 Module only The three...

Страница 39: ...4 1 Product ID 60 EM ID reader Keyboard output Use this firmware on the MX5C with an EM 125 KHz RFID EM Module only The unique random serial number UID on the EM RFID card is Read automatically and t...

Страница 40: ...on Module only The unique random serial number UID on the RFID card is Read automatically and typed out as if someone manually typed the number This firmware creates a second HID keyboard attached to...

Страница 41: ...unique random serial number UID on the I Code2 RFID card is Read automatically and typed out as if someone manually typed the number This firmware creates a second HID keyboard attached to the system...

Страница 42: ...Read and Write data to the S50 Mifare Memory Card This firmware will create a serial device attached to a Com port Use the MX5 INF install file to automatically install the appropriate Microsoft Drive...

Отзывы: