Porter-Cable PCB420SA Скачать руководство пользователя страница 1

1

Instruction Manual

Manuel d’instructions

Manual de instrucciones

www.portercable.com

CATALOG NUMBER

PCB420SA

INSTRUCTIVO DE OPERACIÓN, CENTROS 

DE SERVICIO Y PÓLIZA DE GARANTÍA.  

      ADVERTENCIA

: LÉASE ESTE 

INSTRUCTIVO ANTES DE USAR EL 

PRODUCTO.

ON

OFF

ON

OFF

4 IN. x 8 IN. (102 MM x 203 MM)

BELT / DISC SANDER

PONCEUSE À BANDE/DISQUE DE 

102 MM x 203 MM (4 PO x 8 PO)

LIJADORA DE CORREA / DISCO DE 

102 MM x 203 MM (4 PULG. x 8 PULG.)

Содержание PCB420SA

Страница 1: ...420SA INSTRUCTIVO DE OPERACI N CENTROS DE SERVICIO Y P LIZA DE GARANT A ADVERTENCIA L ASE ESTE INSTRUCTIVO ANTES DE USAR EL PRODUCTO ON OFF ON OFF 4 IN x 8 IN 102 MM x 203 MM BELT DISC SANDER PONCEUSE...

Страница 2: ...k or re replace power cord immediately if it is worn cut or damaged in any way CALIFORNIA PROPOSITION 65 Some dust created by power sanding sawing grinding drilling and other construction activities c...

Страница 3: ...following precautions when sanding any paint PERSONAL SAFETY No children or pregnant women should enter the work area where the paint sanding is being done until all clean up is completed A dust mask...

Страница 4: ...oggles not glasses that comply with ANSI Safety standard Z87 1 Everyday eyeglasses have only impact resistant lenses They ARE NOT safety glasses WARNING NOTE Glasses or goggles not in compliance with...

Страница 5: ...injury 11 ALWAYS maintain a minimum clearance of 1 16 inch 1 6 mm or less between the table or backstop and the sanding belt or disc 12 DO NOT sand pieces of material that are too small to be safely...

Страница 6: ...e motor to the power line make sure the switch is in the off position and the electric current is rated the same as the current stamped on the motor nameplate Running at a lower voltage will damage th...

Страница 7: ...g or damaged part is correctly replaced TOOLS NEEDED FOR ASSEMBLY Supplied Not Supplied CARTON CONTENTS UNPACKING AND CHECKING CONTENTS Carefully unpack the belt disc sander and all its parts and comp...

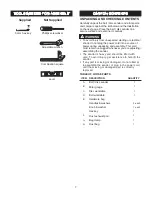
Страница 8: ...8 UNPACKING YOUR BELT DISC SANDER ON OFF A D E B F G H C...

Страница 9: ...lt worktable backstop 8 in diameter sanding disc Disc worktable On Off switch and switch key Dust exhaust Mounting hole 4 in width 36 in length sanding belt Belt worktable Worktable scale Worktable sc...

Страница 10: ...avoid trapping the workpiece or ngers between the worktable 1 and sanding disc 2 the worktable edge should be positioned a maximum of 1 16 in 1 6 mm from sanding disc plate as shown in Fig B Fig B CAU...

Страница 11: ...wo before locking to give a tight t Do not overtighten CAUTION 1 3 4 2 7 5 3 6 MITER GAUGE FIG G A miter gauge 1 is supplied with your sander and can be used with both sanding tables The miter gauge b...

Страница 12: ...crew 5 and secure the scale pointer 6 at 0 Fig J To avoid trapping the workpiece or ngers between the worktable and sanding belt the worktable edge should be positioned a maximum of 1 16 in 1 6 mm fro...

Страница 13: ...ends to slide off its track and to which side front or back of the sander 3 If the sanding belt does not slide to either side it is tracking properly 4 Viewed from the switch end if the sanding belt r...

Страница 14: ...ender the sander inoperable When the operator is ready to use the machine again the black safety portion of the switch may be reinstalled simply by inserting it into the opening in the switch and push...

Страница 15: ...1 Freehand sanding of outside curves should be done on the sanding disc 1 Keep ngers a minimum of 1 in 25 4 mm from the sanding disc Fig Q OPERATING DUST EXHAUST AND DUST BAG FIG R Sanding operations...

Страница 16: ...ct the plug from the power source before removing and installing sanding belt Use only sanding belts that measures 4 in 102 mm in width 36 in 914 mm in length 1 Remove the belt worktable See Fig D on...

Страница 17: ...packed at the factory and require no further lubrication Use a paste wax to ensure smooth operation on all moving table parts Do not use any lubrication on the belt platen as this might end up on the...

Страница 18: ...Blown house fuse 1 3 Replace all broken or defective parts before using sander 4 Contact Porter Cable Service Center or Authorized Service Station for repair Any attempt to repair this motor may crea...

Страница 19: ...accessories should be used with this product A complete line of accessories is available from your Porter Cable Factory Service Center or a Porter Cable Authorized Warranty Service Center Please visit...

Страница 20: ...44S PHILIPS SCREW WHITE M5 8 1 X436 WIRE BOX COVER 1 X4C2 SCALE LABEL 1 X44R EXHAUST COVER 1 X435 PHILIPS SCREW ST4 2 28 1 X4C1 SPRING WASHER D40 1 X44Q DUST EXHAUST 1 X434 RELAY 1 X4C0 STANDARD SPRIN...

Страница 21: ...X436 X433 X45D X432 X427 X430 X42Z X42Y X42X X42W X440 X44B X440 X4BW X44B X4CA X42T X42S X4CA X42T X42M X42L X4BQ X42K X44Y X42J X42H X42G X42F X42E X4BR X42B X42C X421 X429 X428 X45D X42J X44V X437...

Страница 22: ...22 NOTES...

Страница 23: ...23 NOTES...

Страница 24: ...trademarks for one or more Porter Cable and Delta products 2 BY 4 890TM Air America AIRBOSSTM Auto Set B O S S Bammer Biesemeyer Builders Saw Charge Air Charge Air Pro CONTRACTOR SUPERDUTY Contractor...

Отзывы: