background image

Porta

Switch


Prepaid WiFi Services 


© 2000-2011 PortaOne, Inc. All rights Reserved.  www.portaone.com 


22

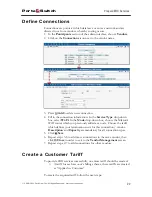
Define Connections 

Connections are points at which data leave or enter a network and are 
directed to or from vendors, whereby costing occurs. 
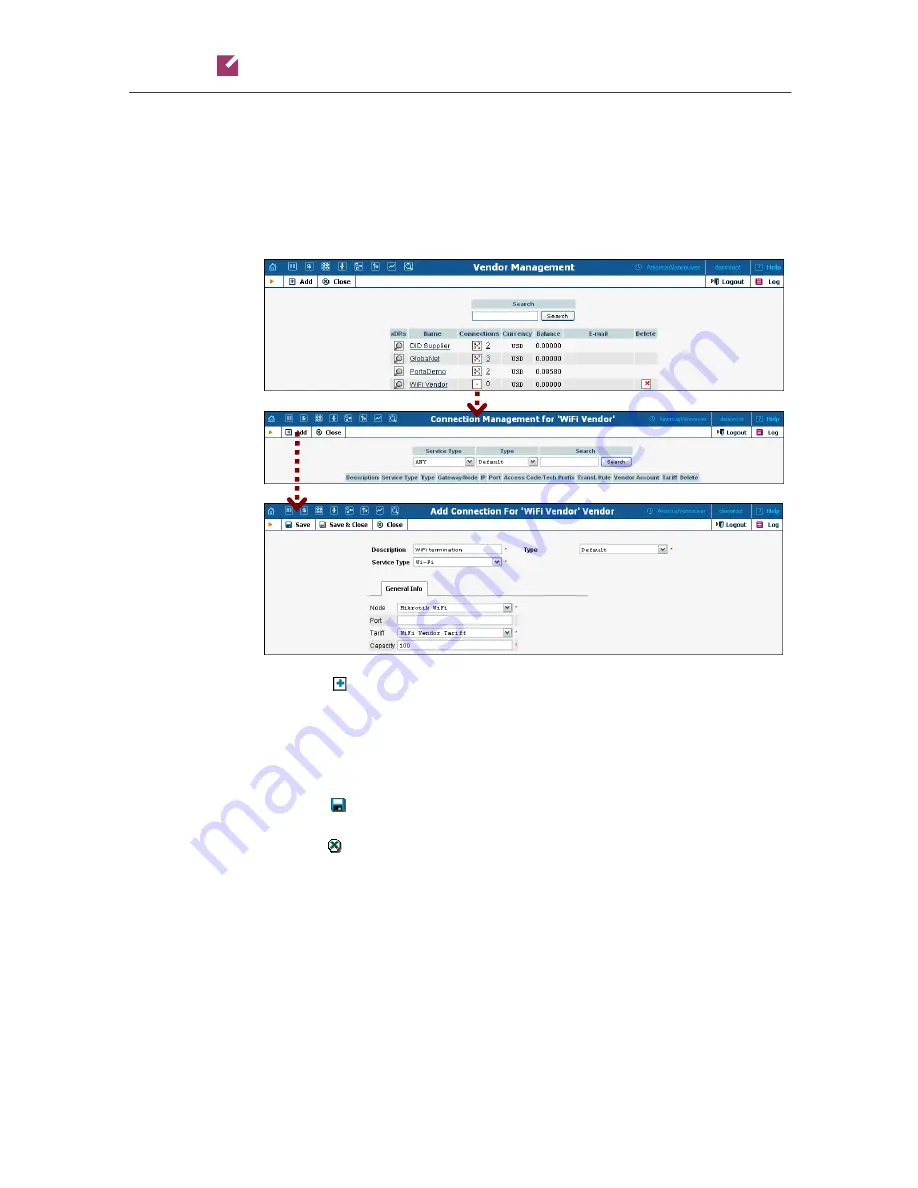
1.


In the 

Participants

 section of the admin interface, choose 

Vendors

2.


Click on the 

Connections

 icon next to the vendor name. 


3.


Press 


Add

 to add a new connection. 

4.


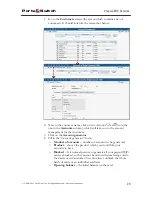
Fill in the connection information. In the 

Service Type

 drop-down 

box, select 

Wi-Fi

. In the 

Node

 drop-down box, choose the Mikrotik 

WiFi router which you previously added as a node. Choose the tariff 
which defines your termination costs for this connection / vendor. 

Description

 and 

Capacity

 are mandatory for all connection types. 

5.


Click   

Save

6.


Repeat steps 3-6 to add more connections to the same vendor, then 
click   

Close

 in order to exit to the 

Vendor Management

 screen. 

7.


Repeat steps 2-7 to add connections for other vendors. 

Create a Customer Tariff 

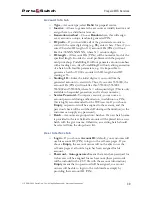
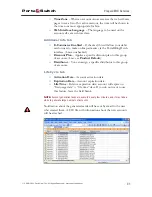
To provide WiFi services successfully, one more tariff should be created: 

o


A tariff for each account’s billing scheme, these tariffs are created 
as “Applied to: Customer”. 

 
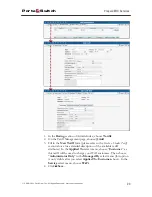
To create the required tariff, follow the next steps:  

Содержание PortaSwitch

Страница 1: ...Handbook Broadband Internet Wifi and IPTV Services Maintenance Release 23 Porta Switch PORTA ONE www portaone com ...

Страница 2: ... accordance with the terms thereof It is against the law to copy the software on any other medium except as specifically provided in the license agreement The licensee may make one copy of the software for backup purposes No part of this publication may be reproduced stored in a retrieval system or transmitted in any form or by any means electronic mechanical photocopied recorded or otherwise with...

Страница 3: ...Internet Event History for Account 32 2 IPTV Services 34 IPTV Service Scenario 35 Checklist 38 Set up the Kasenna LivingRoom Server 38 Configure PortaBilling 38 Create Subscriptions 39 Create Products 40 Create Customer and Account 42 Check Results on LivingRoom Server 44 3 Broadband Internet Access Services 45 Examples of Broadband Packages 46 Checklist 47 Initial Configuration of PortaSwitch 48 ...

Страница 4: ...1 PortaOne Inc All rights Reserved www portaone com 4 Define Discounts within Volume Discount Plan 63 Create a Product 66 Create a Customer 71 Create Accounts 72 Check Current Volume Discount Statistics for Account 75 Verify Broadband Event History for Account 76 ...

Страница 5: ...he latest changes to the product You can access the latest copy of this guide at www portaone com support documentation Conventions This publication uses the following conventions Commands and keywords are given in boldface Terminal sessions console screens or system file names are displayed in fixed width font The exclamation mark draws your attention to important information or actions NOTE Note...

Страница 6: ...udes tourists immigrant communities mobile populations such as military personnel and people with limited credit histories These users can all gain immediate access to WiFi services at key locations such as hotels cafes by using prepaid WiFi cards access codes purchased at supermarkets and other types of retail outlets Prepaid WiFi access is a single purchase transaction so at the moment of the au...

Страница 7: ... work in conjunction with the following Mikrotik RouterBoard 532 with RouterOS 2 9 installed PortaBilling This combination of services enables a carrier to authorize prepaid WiFi access and debit individual user accounts in real time Customer interaction Customer selects the WiFi network Customer clicks Connect Customer opens web browser Customer opens WiFi gateway authorization page Customer ente...

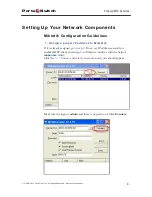
Страница 8: ...tion Guidelines 1 Assign a proper IP address to Mikrotik If it is already assigned go to step 2 If not set IP address manually or enable DHCP client and assign it to Ethernet interface with the help of winbox exe utility Click the button and select your router only one should appear Make sure the login is admin and there is no password Click Connect ...

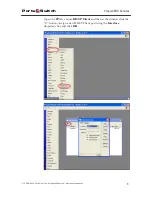
Страница 9: ...Fi Services 2000 2011 PortaOne Inc All rights Reserved www portaone com 9 Open the IP tab choose DHCP Client and then at the window click the button Assign a new DHCP Client port using the Interface dropdown box and click OK ...

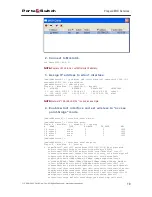
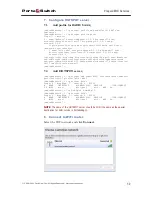
Страница 10: ... 1 R ether2 ether 0 0 1500 2 R ether3 ether 0 0 1500 3 R wlan1 wlan 0 0 1500 admin Mikrotik admin Mikrotik interface wireless print Flags X disabled R running 0 name wlan1 mtu 1500 mac address 00 0C 42 05 7A B6 arp enabled disable running check no interface type Atheros AR5413 radio name 000C42057AB6 mode station ssid MikroTik area frequency mode manual txpower country no_country_set antenna gain ...

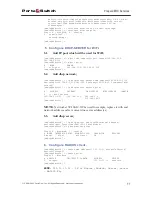
Страница 11: ...ress 192 168 12 0 24 dns server 192 168 0 1 213 186 192 2 gateway 192 168 12 1 comment wifi network admin Mikrotik ip dhcp server network print ADDRESS GATEWAY DNS SERVER WINS SERVER DOMAIN 0 wifi network 192 168 12 0 24 192 168 12 1 192 168 0 1 213 186 192 2 admin Mikrotik NOTE Network 192 168 12 0 24 used for sample replace it with real network address and set correct dns server address es 5 3 A...

Страница 12: ...d split user domain no use radius yes radius accounting yes radius interim update received nas port type wireless 802 11 radius default domain radius location id radius location name admin Mikrotik 7 2 Add HOTSPOT server admin Mikrotik ip hotspot add name WiFi interface wlan1 address pool wifi pool profile wi fi AAA admin Mikrotik ip hotspot print Flags X disabled I invalid S HTTPS NAME INTERFACE ...

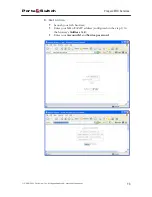
Страница 13: ...es 2000 2011 PortaOne Inc All rights Reserved www portaone com 13 9 Get online Launch your web browser Enter your MikroTik s IP address configured on the step 1 in the browser s Address field Enter your Account Id and Service password ...

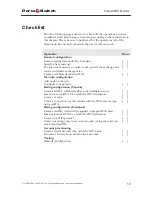
Страница 14: ...ine exchange rates Create a symbolic destination WiFi Network configuration Add node on the web Configure your gateway Rating configuration Vendor Create a tariff A which describes your termination costs Insert rates in tariff A for a symbolic WiFi destination Create a vendor Create a connection for this vendor with the Wi Fi service type using tariff A Rating configuration Customer Create a tarif...

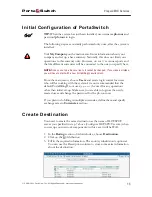
Страница 15: ...lling environment From the main menu choose Users and create login entries for users who will be working with the system It is not recommended that the default PortaBilling root user pb root be used for any operations other than initial set up Make sure you are able to login as the newly created user and change the password for the pb root user If you plan to do billing in multiple currencies defi...

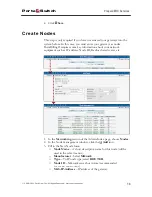
Страница 16: ...nformation about your network equipment such as IP address Node ID Radius shared secret etc 1 In the Networking section of the Admin Index page choose Nodes 2 In the Node management window click the Add icon 3 Fill in the New Node form o Node Name A short descriptive name for this node will be used in the select menus o Manufacturer Select Mikrotik o Type VoIP node type select ROUTER o Node ID Mik...

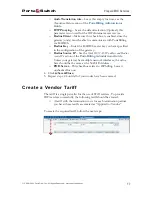
Страница 17: ...ration of the gateway o Radius Source IP See the Node ID NAS IP address and Radius source IP section of the PortaBilling Administrator Guide Unless your gateway has multiple network interfaces the value here should be the same as the NAS IP Address o POD Server This checkbox relates to ISP billing Leave it unchecked for now 4 Click Save Close 5 Repeat steps 2 4 until all of your nodes have been en...

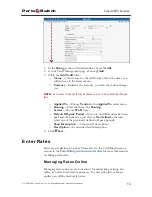
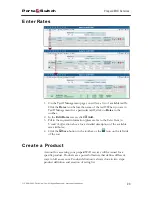
Страница 18: ...enu o Routing Clear the check box Routing o Service Choose Wi Fi here o Default Off peak Period If you do not differentiate between peak and off peak rates just choose Not defined otherwise select one of the previously defined off peak periods o Short Description A short tariff description o Description An extended tariff description 4 Click Save Enter Rates Rates are per destination prices Please...

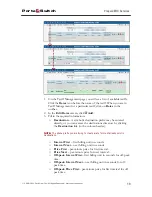
Страница 19: ...may be entered directly or you can access the destinations directory by clicking the Destination link in the column header NOTE The phone prefix you are trying to create a rate for must already exist in Destinations o Interval First first billing unit in seconds o Interval Next next billing unit in seconds o Price First per minute price for first interval o Price Next per minute price for next int...

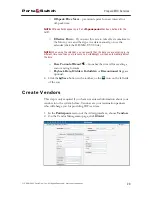
Страница 20: ...t the date you are entering is in a different time zone than your present one PortaBilling will then automatically adjust the time o Rate Formula Wizard launches the wizard for creating a custom rating formula o Payback Rate Hidden Forbidden or Discontinued flags are optional 4 Click the Save button in the toolbar or the icon on the left side of the row Create Vendors This step is only required if...

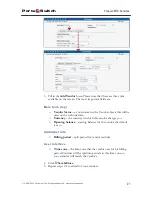
Страница 21: ... this will be used on the web interface o Currency the currency in which this vendor charges you o Opening balance starting balance for the vendor the default is zero Additional Info o Billing period split period for vendor statistics User Interface o Time zone the time zone that the vendor uses for his billing period Statistics will be split into periods in this time zone so your statistics will ...

Страница 22: ...i In the Node drop down box choose the Mikrotik WiFi router which you previously added as a node Choose the tariff which defines your termination costs for this connection vendor Description and Capacity are mandatory for all connection types 5 Click Save 6 Repeat steps 3 6 to add more connections to the same vendor then click Close in order to exit to the Vendor Management screen 7 Repeat steps 2...

Страница 23: ...riff form please refer to the Create a Vendor Tariff section above for a detailed description of the available tariff attributes In the Applied To select menu choose Customer as this tariff will be used to charge your WiFi customers Then choose Administrator Only in the Managed By select menu this option is only visible after you select Applied To Customer above In the Service select menu choose W...

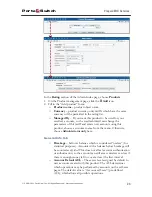
Страница 24: ...Rates screen click Add 3 Fill in the required information please refer to the Enter Rates for Vendor Tariff section above for a detailed description of the available rate attributes 4 Click the Save button in the toolbar or the icon on the left side of the row Create a Product Account for accessing your prepaid WiFi services will be issued for a specific product Products are a powerful feature tha...

Страница 25: ...ate new accounts using this product choose a customer name from the menu Otherwise choose Administrator only here General Info tab o Breakage Leftover balance which is considered useless for statistical purposes Accounts with a balance below breakage will be counted as depleted This does not affect account authentication or authorization so the account can still access wireless services if there i...

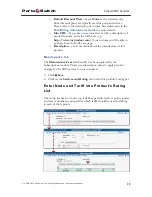
Страница 26: ...myproduct com Your customers will be able to go there from their self care page o Description your comments about the intended use of this product Maintenance tab The Maintenance Fees functionality has been replaced by the Subscriptions module Please use subscription plans to apply periodic charges for the WiFi service to your customers 3 Click Save 4 Click on the Services and Rating tab to edit t...

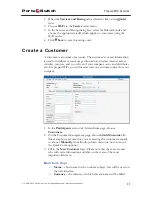
Страница 27: ...rnet access statistics invoices and so on Even if your company owns and distributes all of its prepaid WiFi you will need at least one customer object for your company 1 In the Participants section of Admin Index page choose Customers 2 On the Customer Management page choose Add Customer In this example we assume that you are creating the customer manually so choose Manually from the drop down men...

Страница 28: ...on For more details about different available billing periods see the PortaBilling Administrator Guide o Send Statistics Summary only Distribute an event summary only and do not attach a details file Other options are full statistics attach a complete list of xDRs or do not send no not deliver event statistics to this customer via email at all Payment Info tab o Credit limit If left empty then the...

Страница 29: ...to the account management for that customer 3 Click on the Account generator 4 Fill in the Account generator form o Number of accounts number of accounts to be generated o Product choose the product which you would like your accounts to have o Blocked It is normal practice to generate all your prepaid WiFi cards as blocked so they cannot be misused before being sold to the dealer or end customer Y...

Страница 30: ...nt IDs PINs will look like this 5553000 5553001 5553002 and 555300N where N subsequent digit This is only available in Sequential generation and is always numeric o Service Password To improve security you can use an account password during authentication in addition to a PIN this is highly recommended for the WiFi service If you choose Empty no password will be assigned to the account and the pas...

Страница 31: ...ecked o Discount Plan Applies a specific discount plan to this group of accounts Leave as Product Default o Distributor You can assign a specific distributor to this group of accounts Life Cycle tab o Activation Date Account activation date o Expiration Date Account expiration date o Life Time Relative expiration date account will expire on first usage date life time days If you do not want to use...

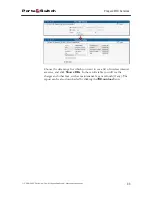
Страница 32: ...nt History for Account To view the xDR of an account go to Customers select the Customer owning the accounts and click on the Accounts icon or alternatively select Account Info in the Help Desk section of the Admin Index page You can also go to the account self care page accessible via the Accounts menu item in the Home popup menu Login with the account s web access login and password After that y...

Страница 33: ...rtaone com 33 Choose the date range for which you want to see a list of wireless internet accesses and click Show xDRs In the results table you will see the charges and other fees such as maintenance fees or refunds if any The report can be also downloaded by clicking the Download icon ...

Страница 34: ...Inc All rights Reserved www portaone com 34 2 IPTV Services This highly customizable IPTV solution enables PortaOne customers to generate additional revenue raise profits and increase customer satisfaction by delivering advanced television services ...

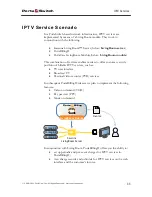
Страница 35: ...carriers to offer customers a wide portfolio of billable IPTV services such as TV user interface Broadcast TV Personal video recorder PVR services In subsequent PortaBilling releases we plan to implement the following features Video on demand VOD Pay per view PPV Music on demand Kasenna LivingRoom Server Porta Billing Invoice Package 1 Package 2 Package 3 LivingRoom Module In conjunction with Livi...

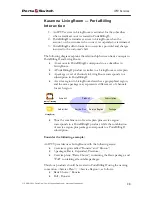
Страница 36: ...annels in LivingRoom corresponds to a subscription in PortaBilling A service region in LivingRoom describes a geographical region and the same package may represent a different set of channels for each region LivingRoom Service Plan Product Account Subscriber Subscription Service Region Package Porta Billing Thus the combination of service plan plus service region corresponds to a PortaBilling pro...

Страница 37: ...there is no need to create a subscription for the Basic package since both service plans already include it 2 Subscriptions for charging accounts in PortaBilling We will use the naming convention Service Plan Service Region so that the LivingRoom module will ignore such subscriptions You may also use your own method of naming as long as it does not use the slash character In our example we need fo...

Страница 38: ...or subscribers Set up the Kasenna LivingRoom Server Please refer to Espial for guidelines on how to set up the LivingRoom server You should complete the steps for all the components except for the Subscribers section Configure PortaBilling The following code must be added to the configuration file located in home porta admin etc porta admin conf on the Slave server LivingRoom Env LivingRoomEnv EMa...

Страница 39: ...n form o Product name The product object name o Currency The product currency o Managed by Choose Administrator only General Info tab o Invoice Line Description The description to appear on the invoice sent to the customer IPTV subscriber Periodic Fees tab o Click the Edit icon and enter the rates for periodic billing PortaBilling will auto fill the form after the rate for monthly billing has been...

Страница 40: ... In the Rating section of the Admin Index page choose Products 1 On the Product Management page click the Add icon 2 Fill in the Add product form o Product name The product object name o Currency The product currency o Managed By Choose Administrator only General Info tab o Breakage Leftover balance which is considered useless for statistical purposes leave as 0 ...

Страница 41: ...ease refer to the description of volume based discounts in the PortaBilling Administrator Guide o Info URL If you have an external server with a description of product features enter the URL here e g http www myproduct com Your customers will be able to go there from their self care page o Description Your description of the intended use of this product Subscriptions tab o Click the Add icon to ad...

Страница 42: ...rtaone com 42 Create Customer and Account Creating a credit account in PortaBilling using a related product will automatically create a corresponding subscriber in LivingRoom where Subscriber ID Account ID and the LivingRoom service plan corresponds to the PortaBilling product ...

Страница 43: ...tomer data as you want it to appear in the subscriber data on the LivingRoom server 4 Save your work by clicking Save 5 Click the or Accounts icon which will take you to the account management for this customer 6 Click the Add icon o Fill in the Add Account form Account Info tab o Type Set the account type to Credit o Batch Select from an existing batch or create a new one If you leave this field ...

Страница 44: ...Porta Switch IPTV Services 2000 2011 PortaOne Inc All rights Reserved www portaone com 44 Check Results on LivingRoom Server ...

Страница 45: ... a fixed monthly fee Fixed bandwidth download and or upload and a limited total data transfer amount for a fixed monthly fee A pay as you go plan where the customer is charged based on the amount of data transferred per kilobyte megabyte or gigabyte In this chapter we will show you how to charge data transfers using tariffs implement packages with a fixed monthly fee using subscriptions assigned t...

Страница 46: ...th 5 GB of data transferred during peak hours and 20 GB of data transferred during night hours 30 00 monthly Data transfer above these thresholds is charged at 20 per gigabyte 3 Premium 256 kbps upload and 1 Mbps download bandwidth data transfer up to 10 GB 40 00 monthly When the data transfer exceeds this threshold the amount of available bandwidth will be severely reduced Please refer to the Por...

Страница 47: ...our termination costs Insert rates in tariff A for the symbolic NETACCESS destination Create a vendor Create a connection for this vendor with the Internet Access service type using tariff A Rating configuration Customer Create a tariff B which will be applied to Internet users Insert rates in tariff B for the symbolic NETACCESS destination Create subscriptions Create a destination group set Creat...

Страница 48: ...PortaBilling environment From the main menu choose Users and create login entries for users who will be working with the system It is not recommended that the default PortaBilling root user pb root be used for any operations other than initial set up Make sure you are able to login as the newly created user and change the password for the pb root user If you plan to do billing in multiple currenci...

Страница 49: ...ights Reserved www portaone com 49 4 Click Save Create Services Services provide a way to define how charges are calculated e g whether customers are charged based on the time they stay online or the amount of data transferred and how these are then presented on their invoices ...

Страница 50: ...re are also three choices of measurement units B kB and MB A measurement unit defines the smallest possible unit charged However it should not be too small as it may then be inconvenient to give price information e g if you charge 0 20 per megabyte the price of one byte will be 0 00000019 o Base Unit Change the field value if necessary o Billing Unit Change the field reading if necessary This will...

Страница 51: ...s check box is enabled since the gateway node must be able to communicate with PortaBilling via RADIUS o Radius Key Enter the RADIUS secret key you have specified in the configuration of the gateway o Radius Source IP See the Node ID NAS IP address and Radius source IP section of the PortaBilling Administrator Guide Unless your gateway has multiple network interfaces the value here should be the s...

Страница 52: ...t this is the name you will then see in the select menus o Currency Indicates the currency in which the vendor charges you NOTE The currency for the tariff may be chosen only once and cannot be changed later o Applied To Choose Vendor in the Applied To select menu o Routing Clear the check box Routing o Service Choose one of the services you created in our example Broadband o Default Off peak Peri...

Страница 53: ...ion o Rate Codes A symbolic destination prefix may be entered directly or you can access the destinations directory by clicking the Rate Codes link in the column header NOTE The NETACCESS rate code you are trying to create a rate for must already exist in Destinations o Minimum Threshold First billing unit in base units in our example megabytes o Rounding Next billing unit in base units in our exa...

Страница 54: ...ou can either type in a date manually or use the calendar click the DD MM YYYY link NOTE When using the calendar you can specify that the date you are entering is in a different time zone than your present one PortaBilling will then automatically adjust the time o Rate Formula Wizard launches the wizard for creating a custom rating formula o Payback Rate Hidden Forbidden or Discontinued flags are ...

Страница 55: ... the Vendor object this will be used on the web interface o Currency the currency in which this vendor charges you o Opening balance starting balance for the vendor the default is zero 4 Click Save Close Define a Connection 1 In the Participants section of the admin interface choose Vendors 2 Click on the Connections icon next to the vendor name 3 Press Add to add a new connection 4 Fill in the co...

Страница 56: ...y The maximum number of sessions the router can handle 5 Click Save Create a Customer Tariff To provide internet access services successfully one more tariff should be created o A tariff for each account s billing scheme these tariffs are created as Applied to Customer To create the required tariff follow the next steps ...

Страница 57: ...re this option is only visible after you select Applied to Customer above o Service Choose one of the services you created o Default Off peak Period If you do not differentiate between peak and off peak rates just choose Not defined otherwise select one of the previously defined off peak periods For our Pro example package we need to set night hours from 9pm until 8am as an off peak period o Short...

Страница 58: ...endor Tariff section above for a detailed description of the available rate attributes 4 Click the Save button in the toolbar or the icon on the left side of the row 5 Repeat steps 1 4 for all your tariffs In our example we need to create a 0 price rate for the Start package Create Subscriptions Subscriptions allow you to charge a certain periodic fee to accounts which belong to a certain product ...

Страница 59: ...e The product object name o Currency The product currency o Managed by Choose Administrator only General Info tab o Invoice Line Description The description to appear on the invoice sent to the customer Periodic Fees tab o Click the Edit icon and enter the rates for periodic billing PortaBilling will auto fill the form after the rate for monthly billing has been entered You can edit rates or add n...

Страница 60: ...nation Group Sets 2 On the Destination Group Sets Management page choose Add 3 Type in the name of the new destination group set 4 Click the Save button in the toolbar or the icon on the left end of the row Define a Destination Group Now you need to create one destination group 1 In the Rating section of the admin interface choose Destination Group Sets 2 On the Destination Group Sets page click o...

Страница 61: ...om 61 4 Type in the destination group name then click the Save button in the toolbar or the icon on the left end of the row Assign Prefix to Destination Group 1 When in edit mode for a destination group set click on the name of the destination group to see its details 2 Click Add to enter add prefixes mode ...

Страница 62: ...count plan contains definitions of all the applicable special discounts offered to users of a certain product 1 In the Rating section of the admin interface choose Volume Discount Plans 2 On the Discount Plan Management page choose Add 3 Fill in the Add Discount Plan form Plan Name A short descriptive name for this discount plan Currency Indicates in which currency pricing information is defined a...

Страница 63: ... the previous steps Counter Reset Select the default option Once in billing period meaning that in every billing period the counters are set to zero and the process starts all over again e g every month the customer is entitled to 500 free MB Destination Group Lookup Type Choose one of the matching models here By default Same Destination As Rate is selected Description An extended discount descrip...

Страница 64: ...wizard There are three tabs where you can define three different discounts for the peak off peak and second off peak periods 1 Define the applicable discount levels for the peak period o Click Add to add a new discount level threshold o In the Threshold column enter the threshold value For our Pro package we need to add a 5 GB threshold o In the Discount column enter the actual value of the discou...

Страница 65: ...veral rating periods will produce multiple xDR records Each xDR record is linked to the applicable discount level rate o Click on the icon at the left end of the row to complete definition of this discount level Repeat the steps above to define more discount levels 2 Click on the Off Peak Period tab and define the applicable discount levels for weekends First you need to uncheck the box reading Us...

Страница 66: ...f the row to save this discount scheme It will be displayed on the Edit Discount Plan page Create a Product An account for accessing your Internet services will be issued for a specific product Products are a powerful feature that defines different ways to bill an account Product definition is always done in two steps product definition and creation of rating list In our case we need to create thr...

Страница 67: ...trator only here General Info tab o Breakage Leftover balance which is considered useless for statistical purposes Accounts with a balance below breakage will be counted as depleted This does not affect account authentication or authorization so the account can still access wireless services if there is enough money left to cover at least the first interval o Account Default ACL The access level a...

Страница 68: ... the intended use of this product Maintenance tab The Maintenance Fees functionality has been replaced by the Subscriptions module Please use subscription plans to apply periodic charges for the broadband service to your customers 4 Click Save 5 Click on the Services and Rating tab to edit this product s rating list Enter Node and Tariff into Product s Rating List The rating list has two functions...

Страница 69: ...he appropriate tariff which applies to your customers when they use Internet service 4 Click Save to save this rating entry Subscriptions tab o Click the Add icon to add a subscription to the selected product o Click the Reapply Subscription button when adding changing a subscription to apply the new settings to all accounts using this product Service Features tab o Limit Bandwidth Check this box ...

Страница 70: ...ement unit in the two smaller boxes This drop down box can also contain other predefined bandwidth limits that are set in porta admin conf see note below These allow you to set different bandwidths for different times of day For the Start package we selected predefined bandwidths Below is an example of the Service Features tab with the custom bandwidth values used for our Pro package For the Premi...

Страница 71: ...dex page choose Customers 2 On the Customer Management page choose Add Customer In this example we assume that you are creating the customer manually so choose Manually from the drop down menu do not use any of the Quick Form options 3 Fill in the New Customer form Please note that there are several tabs with extra information available on the screen The most important fields are Main form top o N...

Страница 72: ... billing periods see the PortaBilling Administrator Guide o Send Statistics Summary only Distribute an event summary only and do not attach a details file Other options are full statistics attach a complete list of xDRs or do not send no not deliver event statistics to this customer via email at all Payment Info tab o Credit limit If left empty then there is no credit limit for this customer User ...

Страница 73: ...one in the Accounts column to go to the account management for that customer 3 Click on Add 4 Fill in the Add Account form o Account ID The ID which will be used to authorize Internet access o Product Choose the previously created Internet access product o Blocked You may create your account as blocked although this is rarely done with Internet service accounts ...

Страница 74: ...a new batch with the given name Alternatively an existing batch could be selected from the drop down list If you leave this field empty the created account will not be tied to any specific batch Life Cycle tab o Activation date Account activation date o Expiration date Account expiration date since we are setting up a postpaid service which should function for a long time leave this field blank o ...

Страница 75: ...e you will see a confirmation screen announcing that a new account has been created 6 Repeat steps 3 5 to create more accounts for the customer For instance a company to which you supply broadband services may have several Internet users Check Current Volume Discount Statistics for Account 1 Go to the Customers screen the one containing a list of customers 2 Next to the customer name click the ico...

Страница 76: ... all applicable discounts levels Click Close Verify Broadband Event History for Account You can view transaction records xDRs for your account subscribers on their respective xDR History pages To check how much time they have spent on the Internet or how much data they have uploaded downloaded go to their Service Usage Details pages Account subscribers can do the same by visiting their self care i...

Страница 77: ...d click Show xDRs In the results table you will see the charges and other fees such as maintenance fees or refunds if any The report can be also downloaded by clicking the Download icon Viewing Service Usage While on the xDR History page click the Services Usage Details button On the next page select the service type and then click on the date for which you want to view the service usage ...

Страница 78: ...Porta Switch Broadband Internet Access Services 2000 2011 PortaOne Inc All rights Reserved www portaone com 78 On the next screen you can view the account s hourly statistics for the chosen service type ...

Отзывы: