Alle Angaben ohne Gewähr. Änderungen vorbehalten. / All data without guarantee. Subject to change. Errors excepted.
Email [email protected]
http://www.polytron.de
Das richtige Signal kommt bei jedem gut an.
POLYTRON-Vertrieb GmbH
Postfach 10 02 33
75313 Bad Wildbad
Bestellannahme
+49 (0)7081 / 17 02-0
Technische Hotline +49 (0)7081 / 17 02-77
Fax
+49 (0)7081 / 17 02-50
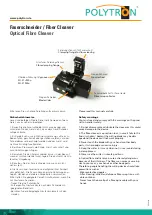
Bestandteile des Werkzeugs:
- Glasfaser Fixierungsflansch
- Fixierungsflansch für Faserschnitt
- Kronen-Zahnrad
- Klingen-Schieber
- V-Kerben-Führung
- Sammelbehälter für Faserreste
Technische Daten:
Geeignete Glasfasern:
Singlemode (SM)
und Multimode (MM)
Glasfaser-Ummantelung: 50 und 900 microns
Glasfaser Durchmesser: 125 µm
Glasfaser Länge
für den Schnitt:
5-20 mm
Maße:
93 (B) x 63 (H) x 48 mm (T)
Maße
Aufbewahrungs-Box:
126 (B) x 103 (H) x 57 mm (T)
Schnittwinkel:
< 0,5°
Schnittklinge:
Innendurchmesser 4 mm,
Außendurchmesser 22 mm
Standzeit der Klinge:
16 Schnittpositionen
1000 Anwendungen pro Position
Ges.gewicht: 280
g
Anwendung des Faserschneiders
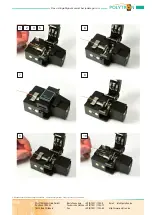
1- Öffnen Sie die Glasfaser Fixierungsflansch.
2- Öffnen Sie den Fixierungsflansch für den Faserschnitt.
3- Bewegen Sie den Schieber mit der Klinge nach hinten.
4- 30 bis 40 mm der Glasfaser abmanteln, die freigelegte
Glasfaser vorsichtig mit einem in Isopropylalkohol getränk-
ten Tuch reinigen.
5- Legen Sie die freigelegte Faser in die V-Kerbung. Die
Länge, die nach dem Schnitt benötigt wird, hängt von den
Vorgaben des Spleißgeräts oder anderen von Ihnen verwen-
deten Werkzeugen ab. Meist werden 16 / 17 mm benötigt,
es kann zw. 10-21 mm eingestellt werden.
6- Schließen Sie den Fixierungsflansch für den Faserschnitt.
7- Schließen Sie die Glasfaser Fixierungsflansch. Die Faser
muss rechtwinklig zur Schneidklinge liegen.
Schieben Sie den Schieber mit der Klinge nach vorne bis
Sie ein „Klack“-Geräusch hören. Die Faser ist nun zuge-
schnitten.
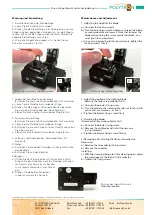
8- Öffnen Sie jetzt den Fixierungsflansch für den Faser-
schnitt. Die abgeschnittene Faser wird nun in den Sammel-
behälter für Faserreste entsorgt.
9- Halten Sie das Glasfaserkabel und öffnen Sie die Glasfa-
ser Fixierungsflansch.
10- Nehmen Sie das Glasfaserkabel vorsichtig heraus.
Entleeren Sie den Sammelbehälter für Faserreste nach
einigen Anwendungen. Öffnen Sie dazu die rechte Abde-
ckung des Behälters und entsorgen Sie den Inhalt in ein
geeignetes Gefäß.
Tool components:
- Fibre clamping flange
- Clamping flange for fibre cleaving
- Crown gear
- Blade slider
- V groove guides
- Fibre scrap collector
Basic specifications:
Applicable fibres:
singlemode (SM)
and multimode (MM)
Coating fibre diameter: 50 and 900 microns
Fibre diameter:
125 µm
Cleave length:
5-20 mm
Cleaver dimensions:
93 (W) x 63 (H) x 48 mm (D)
Carrying case dim.:
126 (W) x 103 (H) x 57 mm (D)
Cleaving angle:
< 0,5°
Cleaver blade specs.: Inside diameter 4 mm,
outside diameter 22 mm
Blade life:
16 cutting spot positions
1000 uses per position
Tool weight:
280 g
Procedure for use:
1- Open the clamping flange for fibre cleaving.
2- Open the fibre clamping flange.
3- Push the blade slider to the back.
4- Strip 30 to 40 mm of the fibre to be cut. Clean the bare
fibre using an isopropyl alcohol wipe.
5- Place the stripped fibre into the V groove. The length of
fibre that should be after the cleaving will depend on
the demands of fusion splicers or other fibre equip-
ment you use. The typical setting is 16 / 17 mm, you
can set 10 to 21 mm.
6- Close the fibre clamping flange.
7- Close the clamping flange for fibre cleaving. Make sure
the fibre is perpendicular to the cleaving blade.
Move upwards the blade slider until its end position (a
“clack” sound will be heard). The fibre should now be
cleaved.
8- Open the clamping flange for fibre cleaving. At this
time the excess fibre is collected automatically in the
fibre scrap collector.
9- Hold the fibre and open the fibre clamping flange.
10- Remove the fibre with care.
After several operations, open the fibre scrap collector
(by removing its right cover) and empty it into a suitable
container.


