22
3
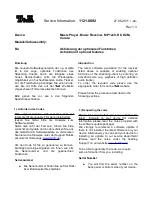
PARTS OF THE UNIT
Front Panel
9
10
11
13
14
15
2
3
4
5
6
7
8
16
1
12
25 26 27
24
23
22
20
21
17
18
19
Description of the Front Panel :
1. Disc Tray
12. “EQ” (equalizer) button
21. “
” PRESET “
”
2. “DVD/M.MEDIA” button
13. “SURR” (surround) button
(previous / next) button
3. “TAPE” button
14. “BAZZ” (bazzoke) button
22. VOLUME control
4. “AM/FM” button
15. “I/ ” (on/standby) button
23. “DOCKING” button
5. “LINE IN/MP3 IN” button
16. VFD screen
24. “ ” (stop) button
6. MIC LEVEL control
17. USB terminal
25. “KARAOKE” button
7. MIC terminal
18. TAPE operational button
26. “
” (play/pause) button
8. Cassette Compartment
19. MP3 IN terminal
27. “ ” (open/close) button
9. Front cover
20. “
” SEARCH “
”
10. PHONES terminal
(fast reverse / fast forward)
11. ECHO LEVEL control
button
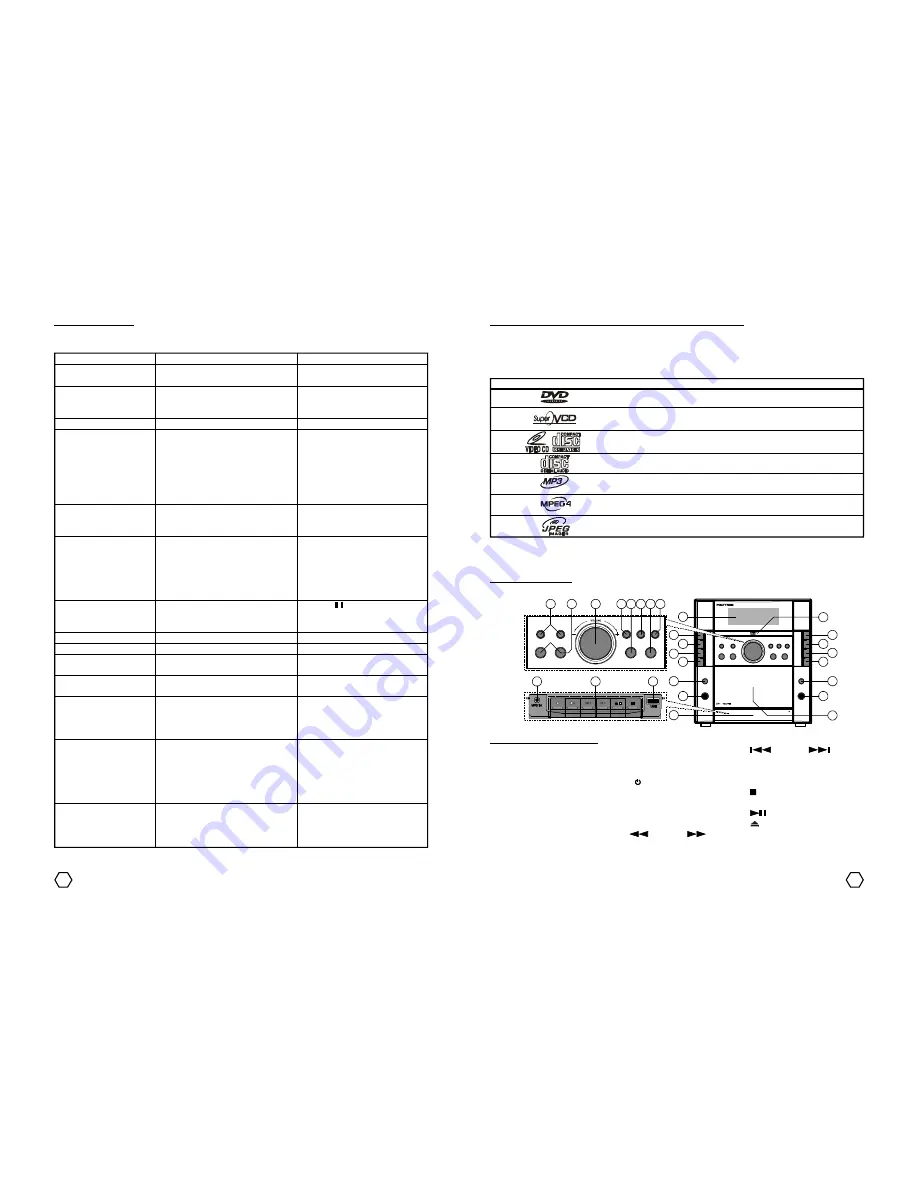
TROUBLESHOOTING
If the unit can not perform normally, follow the instruction below. If can not be finished or the failure there is
no on the
Problem
column, unplug the AC Cord and contact our after sales service near of your place.
Problem
There is no power indication
or no sound.
Output sound is not stereo.
Emitted sound is low.
Disc can not be played.
There is no picture on the
TV screen.
Picture distortion.
The tape does not run.
Unbalanced tape sound.
Bad recording result.
Tape can not be used for
recording.
High frequency of tape is
less.
Bad radio reception or
reception contains noise.
Remote control is does not
work.
MIC does not work.
Causes
- AC Cord plug does not connected
properly to the power source.
- There is active karaoke function.
- Installation cable to other equipment
is not connected properly.
- Volume is in minimum condition.
- Disc is not compatible with the player.
- Disc is placed inversed.
- Disc is not put correctly.
- Disc is dirty.
- Disc is damaged or many scratch.
- Parental Lock function is active.
- AV Input setting is not appropriate
with used TV input terminal.
- Video cable is not firmly connected.
- Disc is dirty.
- Disc damaged or many scratch.
- Bad quality of video cable.
- DVD setup menu is incorrect.
- Tape is in pause condition.
- Check the power source, may be the
AC Cord plug is unplug.
- Head is dirty.
- Record head is dirty.
- Erasure prevention tab on the
cassette has been broken.
- Head is dirty.
- The antenna direction is not correct.
- There is interference from other the
near electric appliances.
- Battery polarity is incorrect or
inversed.
- Remote control is not directed to the
unit sensor on the front panel.
- Battery is exhaust.
- Microphone switch is in OFF position.
- If you use Wireless MIC, may be the
battery has exhaust.
- Maybe Microphone has damaged.
Solution
- Connect the AC Cord plug properly
to the power source.
- Matikan fungsi karaoke.
- Connect the installation cable
properly.
- Increase the Volume level.
- Use the disc/file format according
to the manual instruction.
- Insert the disc with label upside.
- Put the disc correctly.
- Clean up the disc.
- Use the undamaged disc.
- Deactivate the Parental Lock.
- Change the AV Input setting of
the TV.
- Connect the video cable properly.
- Clean up the disc.
- Use the undamaged disc.
- Use the video cable with a good
quality.
- Set the DVD setup menu according
to the manual instruction.
- Press “ ” (pause) button.
- Plug the AC Cord plug to the power
source.
- Clean up the head.
- Clean up the record head.
- Close the erasure prevention tab
with adhesive ribbon.
- Clean up the head.
- Change the direction of the
antenna to get the best reception.
- Move away the unit from other
electric appliances.
- Insert the battery with the right
polarity.
- Point the remote control to the
unit sensor on the front panel.
- Change the battery with the new
ones.
- Switch ON the Microphone switch.
- Replace the battery with the new
one.
- Try other Microphone.
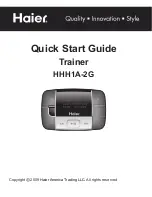
INTRODUCTION OF THE COMPATIBLE DISC AND FILE FORMAT
This unit is designed to be able to play DVD, SVCD, VCD Ver 1.0 - 2.0, CDDA, MP3, MPEG4, MPG and also
can be used to displaying picture in JPEG format.
Note : On the development forward, there will be MPEG4 disc with many extension file kind appears. There is
possibility this player can not support some MPEG4 disc with certain extension file. Not all JPEG files
compatible with this unit.
Kind
Symbol
Content
Size
Max. Duration
Digital Versatile Disc
Super Video Compact Disc
Video Compact Disc (Audio + Video)
Compact Disc Digital Audio (Audio)
Compressed Audio with MPEG Audio Layer 3
format
Audio + Video (Compressed Video MPEG4
format)
Compressed picture / photo with JPEG format
DVD
SVCD
VCD
CD Audio
MP3
MPEG4
JPEG
12 cm / 8 cm
12 cm
12 cm / 8 cm
12 cm / 8 cm
12 cm / 8 cm
12 cm / 8 cm
240 / 180 min.
45 min.
74 / 20 min.
74 / 20 min.
910 / 246 min.
910 / 246 min.
Содержание funtastix
Страница 1: ...Instruction Manual Instruction Manual Stereo Radio Cassette Recorder with Multimedia Player...
Страница 14: ......


