


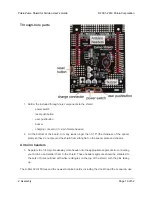


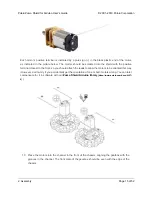


8. Cut two of the included jumper wires in half to form four segments, and trim off the ends
that are covered in adhesive (the adhesive could interfere with making a good electrical
connection to the motor). These wire segments will be used as motor leads.
9. Solder a pair of leads to each motor in the orientation described below. You might find it
helpful to make a small bend at the tip of each lead to hook into the hole in the motor lead tab
to hold it in place for soldering.
Warning:
holding the soldering iron against the motor lead
for more than a few seconds can start to damage the motor brushes, so try to be reasonably
quick/efficient with this soldering; if the first attempt does not go well, remove the soldering
iron and let the motor cool for a few seconds before trying again.
Pololu Zumo Shield for Arduino User’s Guide
© 2001–2019 Pololu Corporation
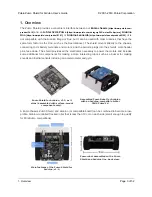
2. Assembly
Page 14 of 52


