


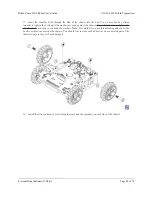


as shrouds; this mounts them less securely, but allows some more flexibility in their positioning (skip to
step
34
).
Note:
Kits shipped before August 2015 do
not
include the LED holder and its mounting screws.
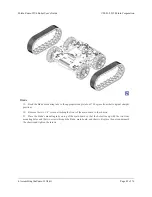
29. Insert the LEDs into the rear of the LED holder, making sure that each LED’s anode (the longer lead
that ends in the smaller post inside the case of the LED) is on the bottom.
30. Bend the LED leads outward so they rest along the channels in the LED holder, then downward around
the sides of the holder. Using a pair of long-nose pliers can help you make more precise bends.
Pololu Zumo 32U4 Robot User’s Guide
© 2001–2015 Pololu Corporation
4. Assembling the Zumo 32U4 kit
Page 51 of 76
Содержание Zumo 32U4
Страница 6: ...Pololu Zumo 32U4 Robot User s Guide 2001 2015 Pololu Corporation 1 Overview Page 6 of 76 ...
Страница 7: ...Pololu Zumo 32U4 Robot User s Guide 2001 2015 Pololu Corporation 1 Overview Page 7 of 76 ...
Страница 42: ...Pololu Zumo 32U4 Robot User s Guide 2001 2015 Pololu Corporation 4 Assembling the Zumo 32U4 kit Page 42 of 76 ...
Страница 58: ...Pololu Zumo 32U4 Robot User s Guide 2001 2015 Pololu Corporation 4 Assembling the Zumo 32U4 kit Page 58 of 76 ...