background image

P a g e 

| 214


EMERGENCY CALL


Users 

could 

configure 

Emergency 

Call 

Numbers 

on 

CD-SMF 

Web 

GUI 

System 

Application

Contacts

General Settings

, in order to still being able to call those numbers even when 

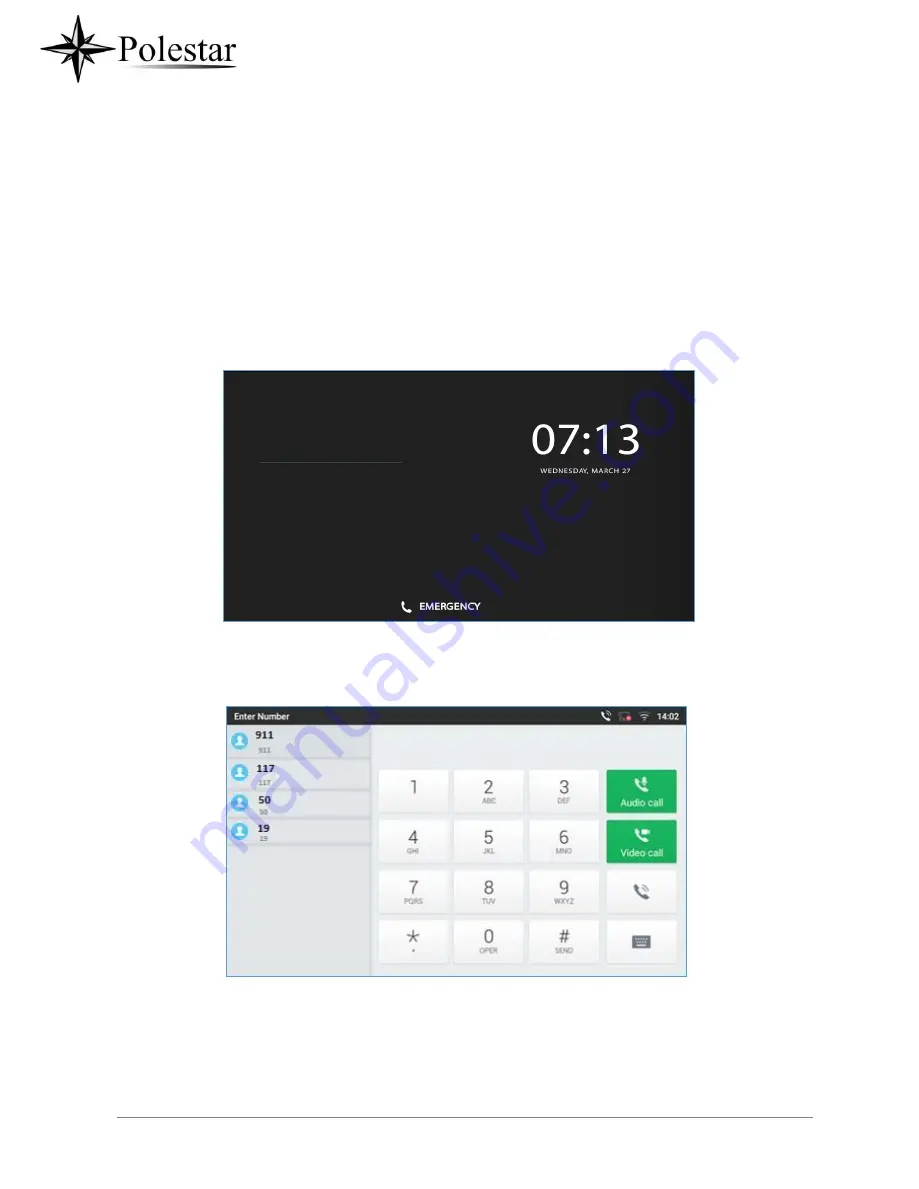
the phone is locked. Emergency call interface can be accessed by tapping on “EMERGENCY” under the 

CD-SMF locked screen. Please, refer to the following figure: 

Figure 172: Emergency Access under CD-SMF Locked Screen 


Once 

“EMERGENCY” is pressed, a dial screen will show and users can choose the numbers allowed to be 

dialed from the list on the left of the dial screen. 


Figure 173: Emergency Dial Screen 


Note

: The CD-SMF is not pre-configured to support or carry emergency calls to any type of hospital, law 

enforcement agency, medical care unit (“Emergency Service(s)”) or any other kind of Emergency Service. 

You must make additional arrangements to access Emergency Services. It is your responsibility to purchase SIP-

compliant Internet telephone service, properly configure the CD-SMF to use that service, and periodically 

Содержание CD-SMF

Страница 1: ...CD SMF IP Multimedia Phone for AndroidTM User Guide ...

Страница 2: ...uipment and receiver Connect the equipment into an outlet on a circuit different from that to which the receiver is connected Consult the dealer or an experienced radio TV technician for help The device complies with FCC radiation exposure limits set forth an uncontrolled environment and it also complies with Part 15 of the FCC RF Rules This equipment must be installed and operated in accordance w...

Страница 3: ...2 channels 802 11ac VHT80 1 Channel UNII Band II 802 11a n HT20 VHT20 4 channels 802 11n ac HT40 VHT40 2 channels 802 11ac VHT80 1 Channel UNII Band III 802 11a n HT20 VHT20 11 channels 802 11n ac HT40 VHT40 5 channels 802 11ac VHT80 2 Channels Carrier Frequency of Each Channel f 2402 k MHz k 0 1 2 78 f 2402 k MHz k 0 2 4 39 Antenna Type Gain Internal PCB Antenna gain 4 0 dBi Internal PCB Antenna ...

Страница 4: ... to Radio Frequency Radiation This equipment complies with EU radiation exposure limits set forth for equipment should be installed and operated with minimum distance of 20 cm between the radiator and your body CE Authentication ...

Страница 5: ...ement WLAN Standard Frequency EIRP Power dBm Wi Fi 2 4G 2 4 2 4835GHZ 18 70 Wi Fi 5G 5 15 5 25GHz 22 06 5 25 5 35GHz 19 21 5 47 5 725GHz 18 24 Bluetooth Bluetooth version EIRP Power dBm EDR 12 14 LE 8 42 The power adapter is a power off device ...

Страница 6: ...rmware contains third party software licensed under the GNU General Public License GPL Polestar uses software under the specific terms of the GPL Please see the GNU General Public License GPL for the exact terms and conditions of the license ...

Страница 7: ...ion 1 0 3 9 19 Firmware Version 1 0 1 19 20 Firmware Version 1 0 1 14 20 WELCOME 21 PRODUCT OVERVIEW 22 Feature Highlights 22 CD SMF Technical Specifications 22 GETTING STARTED 25 Equipment Packaging 25 Description of the CD SMF 26 Front View 26 Back View 27 Side View 28 Connecting and Setting Up the CD SMF 28 Using the Phone Stand 28 Using the Slots for Wall Mounting 29 Connecting the CD SMF 30 C...

Страница 8: ... Up Idle Screen 43 Use the Status Bar 44 Notifications in Status Bar 47 System Settings in Status Bar 49 Use the CD SMF Keys 50 Keypad Shortcut Functions 50 Use the On Screen Keyboard 51 Use the Message Waiting Indicator 53 MAKE PHONE CALLS 54 Register SIP Accounts 54 Account Status 54 Configure SIP Account 55 Dial a Number Directly 56 Redial 57 Dial a Number via Contact 57 Dial a Number via Call ...

Страница 9: ...ence 75 Hold and Resume Conference 76 Auto Conference Mode 76 Multicast paging 76 Multicast Listening switch 76 UCM Conference 77 Participate in UCM Conference Room 77 CCM Conference Call Menu 78 Conference Call Operations 78 CEI Conference Event Indicator 80 Missed Call 82 DND Do Not Disturb 82 Voicemail Message Waiting Indication 83 Call Forward 84 Call Features 86 CONTACTS 88 Local Contacts 88 ...

Страница 10: ...orage Status 95 Diagnostics 97 CD SMF SETTINGS 99 HARASSMENT INTERCEPTION 101 Blocked Contacts 101 Block History 101 Delete Block History 101 Edit Blacklist 102 Intercept Anonymous calls 103 CALL HISTORY 104 Local Call History 104 Dial Out from Call History 105 Call History Options 105 Delete Call History 105 Call History Details 106 SMS 107 View SMS 107 Create New SMS 108 Delete SMS 108 Send SMS ...

Страница 11: ...ile 119 File Categories 120 GS MARKET 121 FTP SERVER 122 CAMERA 124 Take Picture 124 Record Video 124 Angle Adjustment 125 Gallery 125 Screensaver 128 BROWSER 130 ACTION URL 132 CONNECTING CD SMF TO DOOR SYSTEMS 133 CONNECT TO NETWORK AND DEVICES 134 Ethernet 134 WI FI 134 Turn On Off Wi Fi 134 Connect to Wi Fi Networks 134 Wi Fi Settings Shortcut 136 Bluetooth 137 Turn On Off Bluetooth 137 ...

Страница 12: ...pment Packaging 25 Table 4 CD SMF Front View 26 Table 5 CD SMF Back View 27 Table 6 CD SMF Side View 28 Table 7 Programmable Key Indicator 40 Table 8 CD SMF Status Bar Notification Icons 47 Table 9 CD SMF Keys 50 Table 10 CD SMF MWI LED Status 53 Table 11 CD SMF Feature Code 86 Table of Figures Figure 1 CD SMF Package Content 25 Figure 2 CD SMF Front 26 Figure 3 CD SMF Back View 27 Figure 4 CD SMF...

Страница 13: ... 45 Figure 30 CD SMF Top Status Bar Notification 46 Figure 31 CD SMF Top status Bar Get more information 46 Figure 32 CD SMF Top status Bar Wi Fi 47 Figure 33 System Settings in Status Bar 49 Figure 34 CD SMF Keys 50 Figure 35 CD SMF Onscreen Keyboard English Keyboard 51 Figure 36 CD SMF Onscreen Keyboard Lowercase and Uppercase 52 Figure 37 English Keyboard Number and Symbols 52 Figure 38 English...

Страница 14: ...igure 73 Notification of joining the conference 74 Figure 74 Notification of exiting the conference 75 Figure 75 CD SMF Conference Remove Party from Conference 75 Figure 76 Multicast Paging ON 77 Figure 77 Join UCM conference room 77 Figure 78 UCM conference Menu 78 Figure 79 Conference Menu Options 78 Figure 80 Conference s members list 79 Figure 81 Invite a Member 79 Figure 82 Conference Bridge ...

Страница 15: ...14 CD SMF Call History 104 Figure 115 CD SMF Call History Options 105 Figure 116 CD SMF Call History Details 106 Figure 117 CD SMF SMS Message 107 Figure 118 View SMS Dialog 107 Figure 119 Create a New SMS 108 Figure 120 Select contact 109 Figure 121 Click on Message icon 109 Figure 122 Type then send Message 109 Figure 123 SMS Settings 110 Figure 124 Recorder Application 111 Figure 125 Recording ...

Страница 16: ...ndow in Browser 131 Figure 157 CD SMF Web Browser Bookmarks 131 Figure 158 Incoming call from GDS3710 door system 133 Figure 159 CD SMF Connect to Wi Fi 135 Figure 160 CD SMF Connect to Wi Fi Show Advanced Options 135 Figure 161 Wi Fi Add network 136 Figure 162 Wi Fi Settings Shortcut 136 Figure 163 Wi Fi Shortcut Wi Fi List 137 Figure 164 CD SMF Bluetooth Paired Device 139 Figure 165 Bluetooth Se...

Страница 17: ...one s features This guide covers following topics Product Overview Getting started Getting to know CD SMF Make phone calls Contacts CD SMF Settings Harassment Interception Call history SMS Recorder File manager GS Market FTP Server Camera Browser Action URL Connect to network and devices Emergency call Experiencing the CD SMF applications ...

Страница 18: ...story app CALL HISTORY Updated No Noise button in Audio Diagnostics to 2 separate ones Diagnostics Added multicast intercom global switch in LCD widget Multicast Listening switch Updated button in attended transfer from Blind to Transfer now Attended Transfer Supported selecting call mode when calling from history Dial a Number via Call History Updated calling account display to Account Name inste...

Страница 19: ...ame format with timestamp Added BS history in Call History app Improved some UI by position adjustment and adding prompts on LCD and web Improved that device will present in low rate if there is negotiation in video presentation bitrate ...

Страница 20: ... LED Status Updated São Paulo time zone to UTC 3 Updated the attended transfer button to Transfer now during a call Improved device audio quality during a call Updated Chromium integrated browser for integration with their webRTC app Added Presentation app Added Accessibility in Settings The features originate from the Android system Firmware Version 1 0 1 19 Supported sending messages from contac...

Страница 21: ...communications solution The phone features an 8 1280x800 capacitive touch screen IPS LCD Mega pixel camera dual Gigabit ports with PoE PoE HD audio and video integrated Wi Fi Dual band 802 11a b g n ac Bluetooth 4 2 EDR richperipheral interfaces and Android 7 1 1 By combining a state of the art IP video phone an advanced video conferencing solution and the functionality of a tablet businesses thro...

Страница 22: ...ith HD acoustic chamber advanced acoustic echo cancellation and excellent double talk performance Runs the Android Operating System 7 1 1 CD SMF Technical Specifications The following table resumes all the technical specifications including the protocols standards supported voice codecs telephony features languages and upgrade provisioning settings for the phone CD SMF Table 2 CD SMF Technical Spe...

Страница 23: ...l MPK downloadable contacts XML LDAP up to 2000 items call record local and server call log up to 2000 records call waiting auto answer XML customization of screen click to dial flexible dial plan hot desking personalized music ringtones and music on hold server redundancy fail over Sample Applications Local apps Contacts Call History File Manager Programmable Key Settings Browser Voicemail Calcul...

Страница 24: ... 4 USB HDMI in and HDMI out enabled only when power supply or PoE is used Physical Dimension 263mm L x 206mm L x 88 69mm H Unit weight 1 65kg Package weight 2 22kg Temperature and Humidity Operation 0 C to 40 C Storage 10 C to 60 C Humidity 10 to 90 Non condensing Package Content CD SMF phone handset with cord base stand universal power supply network cable screen cleaning cloth quick installation...

Страница 25: ...contents and also information for obtaining the best performance with the CD SMF Equipment Packaging Table 3 Equipment Packaging CD SMF 1x CD SMF Main Case 1x Handset 1x Phone Cord 1x Ethernet Cable 1x 12V Power Adapter 1x Screen Cleaning Cloth 1x Quick Installation Guide 1x GPL License Figure 1 CD SMF Package Content ...

Страница 26: ...P a g e 26 Note Check the package before installation If you find anything missing contact your system administrator ...

Страница 27: ... LCD 8 1280x800 capacitive 5 points IPS LCD touch screen 4 Back Tap to go back to the previous menu 5 Menu Press MENU key to access phone s display settings edit widgets and thread manager Or press and hold on the MENU key for 2 seconds to enter managing application interface directly 6 Home Tap to go back to Home screen or touch and press for about 2 seconds to take a screenshot of phone s screen...

Страница 28: ...hone on the desk 3 Headset Port RJ9 headset connector port supporting EHS with Plantronics headset 4 Handset Port RJ9 handset connector port 5 LAN Port 10 100 1000Mbps RJ 45 port connecting to Ethernet PoE PoE is supported 6 PC Port 10 100 1000Mbps RJ 45 port connecting to PC 7 Power Jack 12V DC Power connector port 8 Side Connectors Cover Open the cover for USB port SD card slot 3 5mm headset por...

Страница 29: ... Headset Port Connect 3 5mm headset 5 HDMI Input Interface Connect presentation device e g a laptop Connecting and Setting Up the CD SMF The CD SMF can be installed on the desktop using the built in stand or attached on the wall using the slots for wall mounting Using the Phone Stand The CD SMF has a built in phone stand To set up the CD SMF as your desk phone follow the steps below 1 Take the pho...

Страница 30: ...P a g e 30 3 Connect the LAN port of the phone to the RJ 45 socket of a hub switch or a router LAN side of the router using the Ethernet cable ...

Страница 31: ... wall mount hole 3 Pull out the tab from the handset cradle see figure below 4 Rotate the tab and plug it back into the slot with the extension up to hold the handset while the phone is mounted on the wall 5 Connect the handset and main phone case with the phone cord 6 Connect the LAN port of the phone to the RJ 45 socket of a hub switch or a router LAN side of the router using the Ethernet cable ...

Страница 32: ...P a g e 32 Figure 6 Tab on The Handset Cradle ...

Страница 33: ...n interface or from the menu of the touch screen you can further configure network connection using static IP DHCP etc Figure 7 CD SMF Back Side View Note USB HDMI in and HDMI out will be disabled when using PoE and enable if using power supply or PoE Cleaning the Phone For daily dust removal and fingerprint removal please use the screen cleaning cloth in the factory package to wipe the phone For ...

Страница 34: ... a g e 34 Keep the power plug clean and dry or may lead to electric shock or other perils DO NOT use disinfectant too frequently DO NOT use high degree or even pure disinfectant It could damage the phone ...

Страница 35: ...users might need register their own account to have the account status displayed The Status Bar shows time network connectivity signal strength notification information etc Date and Time Shortcut Phone Dialer Shortcut Contacts Shortcut Conference Shortcut Call History Account information Widget Up to 8 accounts Programmable keys can be displayed Figure 8 CD SMF Default Home Screen ...

Страница 36: ...P a g e 36 Swipe from right to left to show the application menu of the phone the settings and applications installed will be brought up as shown below Figure 9 CD SMF Onscreen Menu ...

Страница 37: ...d or Options softkey during the call to type letters and symbols using the onscreen keyboard Long Press Touch the screen with fingertip and press for about 2 seconds without lifting your finger from the screen till an action occurs For example long press on a picture to bring up selection option Flick and Slide Touch the screen with fingertip and slide over the screen For example user could slide ...

Страница 38: ...P a g e 38 Press and Drag Touch and press the item then move it by dragging it up down left or right without lifting your finger from the screen ...

Страница 39: ...splay This is usually used when viewing photos or web pages Use the Desktop Desktop Menu When the CD SMF is on idle screen press the MENU key to bring up phone s menu Users can access the following in the desktop menu Desktop page Figure 11 CD SMF Desktop Menu Add delete or edit desktop pages set Home page and change the screen sequence Wallpaper Select wallpaper from Local gallery or from the ava...

Страница 40: ... 40 Add widgets to the desktop by touching and holding the widget from the widget menu Management Manage running applications on the CD SMF For more details please refer to section Manage Running Applications ...

Страница 41: ...to be placed on the desktop Please make sure there is enough space on the desktop Otherwise the widget won t be added Figure 12 Add Widget to the Desktop Manage Desktop Items On the CD SMF desktop users could tap on the desktop items to manage shortcuts and widgets The following operations can be done Tap on the shortcut icon to open the application For example tap on File Manager icon to access f...

Страница 42: ... be resized on the desktop To resize a widget press and hold the widget for about 2 seconds Then lift your finger from the screen This will bring up the white frame as shown in the following figure Touch and drag the border of the frame to adjust the size Figure 14 Resize MPK Widget ...

Страница 43: ...elete Application Widget To move a shortcut widget to a different spot on the desktop or to a different idle screen touch and press the item for about 1 seconds until a recycle bin icon shows up on the top of the screen ...

Страница 44: ...et press on it for about 1 seconds then move it to the recycle bin on the top of the screen Figure 15 Move Clock Widget Group Apps into folders on home screen To group different Apps in a folder hold press on the app and drag it on top of the other app the folder will be created with a dark background showing icons of the Apps added ...

Страница 45: ...P a g e 45 Figure 16 Grouping apps in one folder Tap the folder to display the Apps included you can rename the folder by touching the upper box to ...

Страница 46: ... could select wallpaperfrom different categories Local Open Gallery application and tap on the picture to preview Touch and drag the picture to adjust the frame that will be used as wallpaper Then tap on Set Wallpaper to set the selected area of the picture as wallpaper Wallpapers On the right side of the Wallpaper menu of the CD SMF Select the picture from the default wallpapers available to prev...

Страница 47: ...s the Weather widget to add It to the desktop Figure 18 Accessing available Widgets Figure 19 Minimized display of Weather App Use the Right Left icons to switch between added cities on the minimized weather screen Or when maximized use swiping movement to change between cities ...

Страница 48: ...nd then search for the wanted city Set Programmable Key Widget On the CD SMF desktop touch and press on an empty spot for about 2 seconds or press menu key and select Widgets to display available choices Long press the Programmable key widget to add It to the desktop users can choose from multiple sizes 1xN 2xN or 3xN ...

Страница 49: ...P a g e 49 Figure 21 Programmable Key Widget ...

Страница 50: ...eed dial via active account Dial DTMF Call park Multicast paging Dial prefix and Speed conference Figure 22 Programmable Keys page Programmable Key Indicators The following table shows the indicator status in different scenarios Table 7 Programmable Key Indicator Indicator Status Account Not Registered Account Registered Account Registering Account Call Park Dial Prefix Speed Dial ...

Страница 51: ...P a g e 51 Transfer Dial DTMF ...

Страница 52: ...erence BLF Offline BLF Busy BLF Online Call Park Offline Call Park Busy Call Park Hold Call Park Online SCA Call Park Offline SCA Call Park Busy SCA Call Park Hold SCA Call Park Online SCA account SCA Account Busy SCA Account Hold SCA Account Online ...

Страница 53: ...following Slide the running thread to the left or right to stop the application Tap on icon to delete all running threads Tap on Application softkey to access application menu for advanced management options Idle Screen Switch Idle Screens The CD SMF supports multiple idle screens by sliding the screen horizontally On the CD SMF screen slightly touch an empty area and slide to the left or right us...

Страница 54: ...NU button This will zoom out all the screens as shown in Figure 25 Set up Home Idle Screen 3 The screen with displayed is the HOME screen Others are shown with icon Tap on the icon to select the corresponding screen as the new HOME screen Add Delete idle screen Figure 25 Set up Home Idle Screen As shown in Figure 25 Set up Home Idle Screen this section shows the available desktop screens ...

Страница 55: ...P a g e 55 Users could add or delete idle screen ...

Страница 56: ... screen Delete idle screen Figure 26 Add an Idle Screen Tap on to delet the Idle screen Please make sure the apps shortcuts or widgets on the idle screen are removed first Otherwise the icon won t show for the idle screen Figure 27 Delete an Idle Screen ...

Страница 57: ...he Status Bar The status bar on the top of the CD SMF screen provides visual notifications for the system settings and status as well as quick access for important system settings To access it on the CD SMF idle screen ...

Страница 58: ...or more options on the Status Bar brightness call forward RJ9 headset users can pull down the status bar twice or once with two fingers Figure 29 Status Bar More Options The running process and notifications will show up in the list For example the following figures indicate that there is a notification for an available Wi Fi network ...

Страница 59: ...message to view the details Slide the notification message to the left or the right side to remove it For more information about specific features in the notification bars you can press the bottom right of the feature in question Figure 31 CD SMF Top status Bar Get more information ...

Страница 60: ...he icons used on the status bar for notification purpose Table 8 CD SMF Status Bar Notification Icons Network connected via Ethernet cable Trying to connect to the network via Ethernet cable Network disconnected via Ethernet cable Handset is off hook Speaker is being used x RJ9 headset is connected RJ9 headset is being used for calls 3 5mm earphone is connected ...

Страница 61: ...P a g e 61 3 5mm earphone is being used for calls ...

Страница 62: ... is connected Bluetooth headset is being used for calls Downloading files via Bluetooth Alarm is set up and enabled DND is enabled Silent mode is enabled When it s on the incoming call message won t produce ring tone notification tone from phone s speaker SD Card is inserted SD Card space full USB flash drive is inserted Downloading files via Internet connection Unread voicemail to be retrieved In...

Страница 63: ...P a g e 63 Camera is disabled Contact storage is full ...

Страница 64: ...tings in Status Bar Slide down the top status bar and select System Settings Users will see the following settings Turn on off DND When DND is on all the calls to the registered accounts will be blocked Go to phone Settings Show more options Turn on off Bluetooth Turn on off Wi Fi Turn on off LCD display Turn on off the voice of the phone Figure 33 System Settings in Status Bar ...

Страница 65: ...Shortcut Functions The CD SMF supports keys shortcuts for certain special system functions Screenshot Press and hold the Home button for about 2 seconds to capture screenshot The screenshot can be accessed via File Manager Pictures The screenshot picture size is 1280x800 pixels Firmware upgrade via SD card For users that could not use remote upgrade or could not access the phone s Web GUI to uploa...

Страница 66: ...P a g e 66 3 Power cycle the CD SMF ...

Страница 67: ...that want to factory reset the device manually hard reset is an alternative 1 Power cycle the CD SMF 2 Wait for the LED in the upper right of the phone to light up in Green then about 2 seconds press the both keys the second LCD key from the left Volume Up and the 4th LCD key from the left Menu at the same time it will go into the factory reset process 3 The LCD screen will display Factory reset p...

Страница 68: ...P a g e 68 Figure 35 CD SMF Onscreen Keyboard English Keyboard ...

Страница 69: ... to switch back Figure 37 English Keyboard Number and Symbols Tap on to access more symbols Figure 38 English Keyboard More Symbols Note To configure keyboard and input methods options please refer to the following steps 1 Go to Settings Basic Language Keyboard Virtual Keyboard 2 Click on to add more input method 3 Go to Settings Language Keyboard Current Keyboard and choose from the input methods...

Страница 70: ...P a g e 70 Users could touch and press the key on the keyboard for about 2 seconds to input the alternative character For example touch and press the key for about 2 seconds can get the selection ...

Страница 71: ...low The priority for the LED indicator is from high to low in the following table Table 10 CD SMF MWI LED Status Color LED Status Description Fast Flashing Incoming call Solid Calling Talking Conferencing Screensaver on when the LCD is off Slow Flashing A call is on hold Flashing Missed call s New voicemail s New SIP Message s Solid High memory usage Maximum contact storage Network disconnect Fast...

Страница 72: ...ve separate SIP servers usernames and NAT configurations Account Status On the idle screen the account widget shows the account name and registration status The following figure shows the account is successfully registered account icon is green If the account icon is grey it s still trying to register or unable to register ...

Страница 73: ...P a g e 73 Figure 39 CD SMF Account Widget ...

Страница 74: ... etc Once the correct information is entered and saved the account registration status will show on the main screen Note For web GUI login and configuration information please refer to CD SMF Administration Guide If the account is successfully registered users could use one of the following ways to bring up dial screen to start making calls Take the handset off hook Select an account from the acco...

Страница 75: ...P a g e 75 Note If Enable Video Call option is unchecked the Video Call option on CD SMF dial screen won t be available ...

Страница 76: ...eout Note By default the No Key Entry Timeout is 4 seconds meaning if no key is pressed after entering a number the call will be automatically sent out after the timeout The timeout interval can be configured under web GUI Account Call Settings CD SMF allows users to press key as SEND key This behavior can be disabled via option Use as Dial Key under web GUI Account Call Settings When the user ent...

Страница 77: ...s below to dial a number via Contact 1 Access Contacts by tapping on icon on the left side of the idle screen 2 Navigate in the contacts entries by sliding up down on the screen 3 Tap on the dial icon for the contact Figure 42 CD SMF View Contacts Dial a Number via Call History 1 Access Call History by tapping on icon on the bottom of the idle screen 2 The LCD will display all call history types A...

Страница 78: ...P a g e 78 Note The icon next each call indicates the Call Type with which the call was made icon means this was a Video call And means it was an Audio call ...

Страница 79: ...number on the phone s keypad directly and then select whether to use Audio or Video Call to begin the call Figure 44 Choose Call mode from call history Answer a Call Single Incoming Call When the phone is in idle and there is an incoming audio call the phone will show the call screen as below Tap on Answer softkey to answer the call via speaker or pick up the handset the answer the ...

Страница 80: ...P a g e 80 call ...

Страница 81: ...o Display Mode on phone s Web UI Phone Settings Video Settings Set the video display mode to Original proportion Cut proportionally or Add black margin proportionally If set to Original proportion the phone displays video in its original proportion If the video display proportion is different from the one of the phones the phone will stretch or compress video to display it If set to Cut proportion...

Страница 82: ...P a g e 82 Figure 46 Single Incoming Call Video If the phone set the Preview feature for the incoming call from Web UI the phone will display one ...

Страница 83: ...SIP server Please contact service provider for more information Figure 47 Single Incoming Call Preview 1 Figure 48 Single Incoming Call Preview 2 Transfer Function for Incoming Call If the phone set the Transfer feature for the incoming call from Web UI the phone will display one more key Transfer when there is an incoming call End users will have the possibility to transfer the call without answe...

Страница 84: ...P a g e 84 press MPK to select a destination Reject key to reject it This feature should be supported by the SIP server Please contact service provider for more information ...

Страница 85: ...Single incoming Call Transfer 2 Multiple Calls Call Waiting 1 When there is another incoming call during active call users will hear a call waiting tone with the LCD displaying the caller name and ID for the incoming call In the prompt window it shows new incoming ...

Страница 86: ...P a g e 86 call from Jack with the caller number the account bar in purple is the current active call with 1004 ...

Страница 87: ...call will be placed on hold If the new call is rejected by tapping on Reject softkey the current active call will not be interrupted Call Progress Status During an active call if Home Button is pressed the phone will go back to the home screen and the call in progress status will be shown on the CD SMF status bar once clicking the bar it will go back to call screen Figure 52 Touch to Return to Cal...

Страница 88: ...P a g e 88 Call Hold During the active call press HOLD softkey under More Hold The LCD screen will show as below To ...

Страница 89: ...e 53 Call on Hold Call Recording 1 During the call users could record the conversation to the phone by tapping on Record 2 If need to stop the recording tap on Stop Recording 3 The recording files can be retrieved from the CD SMF Recorder application Figure 54 CD SMF Call Recording ...

Страница 90: ...P a g e 90 MPK Monitoring During the call users could view and monitor the programmable keys configured for the current Account ...

Страница 91: ... MPK button 1 During the Call press the MPK button as shown above 2 The list of MPK configured for the active account will be displayed Figure 56 MPK list 3 User can choose an MPK from the list as they see convenient Mute ...

Страница 92: ...P a g e 92 During an active call press Mute to mute the call The mute icon will be displayed under the Caller Name and ID Press Unmute to unmute the call ...

Страница 93: ...and then turn on video or accept video request during the call if the other party supports video call as well Turn on video during audio call During an active audio call on the call screen tap on More and select Video On a video request will be sent to the other party Figure 58 Turn on Video During Audio Call ...

Страница 94: ...P a g e 94 Accept video request ...

Страница 95: ...udio Channel During Call The CD SMF allows users to switch among handset speaker or headset RJ9 headset 3 5mm earphone Plantronics EHS headset and Bluetooth headset when making calls During a call tap on the first softkey on the bottom to switch audio channel Tap on icon to use handset tap the icon to switch to RJ9 headset tap on icon to switch to speaker tap on to switch to 3 5mm earphone tap on ...

Страница 96: ...d attended transfer Blind Transfer 1 During the active call tap on More softkey 2 Select Transfer to bring up the transfer screen 3 Select transfer mode as Blind by tapping on the highlight area in Figure 61 Blind Transfer The default transfer mode is Blind 4 Enter the digits 5 Tap on Transfer softkey 6 The call will be transferred and CD SMF will hang up the call ...

Страница 97: ...ould like to cancel the transfer press button to go back to the previous talking screen Attended Transfer CD SMF supports attended transfer 1 During the active call tap on More softkey Select Transfer to bring up transfer screen 2 Select transfer mode as Attended by tapping on the mode selection area see figure below ...

Страница 98: ... tap on End to cancel the transfer or tap on Transfer now to complete call transfer Blindly Figure 63 Attended Transfer Transferring 5 After transfer target answers the call the following screen will be shown up If the user taps on Red button the call wil be not be transferred and the original call will be resumed If the user taps on Split soft key to separate the calls the user will talk to the s...

Страница 99: ...P a g e 99 hold If the user presses on Transfer now the call will be then transferred to the transfer destination ...

Страница 100: ...call This will place the current call on hold 2 The second call establishes after the call is answered 3 During the active call tap on More softkey 4 Select Transfer to bring up transfer screen The other call on hold will be displayed such as 5 Select transfer mode as Attended in the transfer mode bar and tap on the call on hold such as to transfer the call 6 The call will be transferred and CD SM...

Страница 101: ...P a g e 101 Figure 65 Attended Transfer ...

Страница 102: ...ress the Transfer softkey then press on MPK Figure 66 Transfer via MPK 2 Choose the destination to transfer calls to from the MPKs list Figure 67 MPK list Note The transfer via programmable keys will follow the Default Transfer Mode whether it s Blind Transfer or Attended Transfer specified in WEB UI under Phone Settings Call Settings Default Transfer Mode ...

Страница 103: ...ods described previously Figure 40 CD SMF Dial Screen 2 Enter the extension number then press on it on the left panel of the screen Figure 68 Add Conference Members from Dial Screen 3 The extension number will be added to dialing field and users can dial another number Note To transfer calls across SIP domains SIP service providers must support transfer across SIP domains If users would like to ca...

Страница 104: ...P a g e 104 Figure 69 Add Conference Members from Dial Screen 2 ...

Страница 105: ...fter the call is established the conference screen is brought up 3 Tap on to add another member to the conference Initiating conference directly using conference soft key 1 On idle screen press conference soft key 2 Tap on to add the members of the conference Figure 70 CD SMF Conference Screen Note When users press on to invite another member to the conference a dial tone will be heard for the use...

Страница 106: ...e conference The following figure shows a 3 way conference established Figure 72 3 Way Conference Call Established Note Every time a conference participant joins or exits the conference when using Full screen a notification will appear in order to make the CD SMF host aware of the participant s actions during the conference ...

Страница 107: ...P a g e 107 Figure 73 Notification of joining the conference ...

Страница 108: ...icon of the user you want to remove The below window will show up giving the possibility to Mute enable video Enlarge or hang up 2 Tap on icon to remove the a party from the conference Figure 75 CD SMF Conference Remove Party from Conference End Conference To end the conference tap on to disconnect all the parties from the conference CD SMF will hang up ...

Страница 109: ...P a g e 109 the call If the remote party hangs up the call itself it will be disconnected from the conference but other parties on CD SMF will stay in the existed conference ...

Страница 110: ...rom sender to listeners but the listeners cannot talk to each other The sender and listeners must be located within the same LAN Sender multicast page configurations are under Web UI Settings Applications Programmable Key BLF Press on Add 1 Set the key Mode to Multicast Paging in dropdown list 2 Enter the multicast paging description in Display Name field 3 Enter multicast paging address and port ...

Страница 111: ... Conference Room Users could dial the UCM conference room extension to join the conference If password is required enter the password to join the conference as a normal user or enter the admin password to join the conference as administrator Figure 77 Join UCM conference room ...

Страница 112: ...p on the UCM conf menu Figure 78 UCM conference Menu Administrators could view invite members bridge conference remove bridge mute unmute and lock the conference Figure 79 Conference Menu Options Conference Call Operations 1 Click on to list all the users currently in the conference ...

Страница 113: ...r users into the conference room Users can send invitations to others to participate in the conference by pressing on the Invite option and then enter the member number an invitation will be sent to that number to join the conference room afterwards Figure 81 Invite a Member ...

Страница 114: ...P a g e 114 Click on to bridge another conference Enter the conference number and password and Bridge ...

Страница 115: ...nference 5 Click on to Unmute 6 Click on to lock this conference room so that other users cannot join it anymore CEI Conference Event Indicator If CEI is enabled Events like members joining Leaving the conference Invitation sent Mute Unmute will be displayed in the call screen as the examples shown below Member joined ...

Страница 116: ...P a g e 116 Member left Figure 83 Member joined conference Event Figure 84 Member Left the conference room Event ...

Страница 117: ...P a g e 117 Member invitation sent Figure 85 Invitation sent Event Notification ...

Страница 118: ...d call screen and return to the idle screen tap on on the upper right of the dialog DND Do Not Disturb When DND is on the incoming calls to the CD SMF will be blocked for all registered accounts with a reminder ring produced To turn on off DND 1 Touch and drag the status bar down on the CD SMF idle screen 2 Tap on the DND icon to turn it on The status bar shows icon indicating DND is on 3 Tap on t...

Страница 119: ...il the Message Waiting Indication MWI LED icon will blink in red on the upper right corner of the CD SMF and will show up in the status bar To retrieve the voicemail 1 Tap on the Message icon from the applications section to bring up voicemail screen All the registered accounts and the number of voicemails are displayed there 2 Tap on the account to dial into the voicemail box Then follow the Inte...

Страница 120: ...hen tapping on the account in Voice Mail screen Call Forward Call forward feature can be set up from CD SMF LCD or web GUI From LCD Go to onscreen Menu Settings Features Call Forward Select account name and tap on Call Forwarding to activate the feature Then the list of options will be available Select the option Call Forward Mode to configure the call forward type Unconditional Time Based Others ...

Страница 121: ...P a g e 121 From Web GUI Figure 89 Unconditional Call Forward Log in CD SMF web GUI and go to Account Account X Call Settings Call Forward By ...

Страница 122: ...ing the setup time the call will be forwarded to the number in In Time Forward To field Other period the call will be forwarded to the number in Out Time Forward To field Figure 91 Call Forward Time Based Call Forward on Busy Call Forward No Answer Call Forward on DND The incoming call will be forwarded when the CD SMF is busy or no answer after certain interval Delayed Call Forward Wait Time s or...

Страница 123: ... phone will try to use this codec during the call Codec code PCMU 7110 PCMA 7111 G726 32 72632 G722 722 iLBC 7201 For example if the user would like to use PCMA as the preferred codec to call phone number 334455 enter 017111334455 02 Force Codec per call Dial 02 followed by the preferred codec code and the phone number The phone will be forced to use this codec during the call Codec code PCMU 7110...

Страница 124: ...P a g e 124 50 Disable Call Waiting Dial 50 ...

Страница 125: ...l call forward Dial 73 74 Paging Call Dial 74 followed by the phone number to send the paging call 83 Force Audio Calling per call Dial 83 followed by the phone number to send the audio call 84 Force Video Calling per call Dial 84 followed by the phone number to send the video call 90 Busy Call Forward To set up busy call forward Dial 90 followed by the phone number to forward the call 91 Cancel B...

Страница 126: ... Contacts The local contacts can save up to 1000 entries Users can manage contacts by adding deleting and modifying single contacts downloading contacts from HTTP TFTP server importing contacts from external storage and exporting contacts to external storage Note A reminder prompt is shown on the CD SMF LCD screen when adding a number of contacts more than the allowed one when importing contacts f...

Страница 127: ...er and other information for the new contacts Please make sure the account number field is selected so the CD SMF will use this account to dial out the new contact The account number field is located on the left of the Phone filed as highlighted below ...

Страница 128: ... Contacts from Dial Pad Import Export Contacts If the users have the CD SMF phonebook file saved in local storage or external storage device that has been plugged into the CD SMF the phonebook file can be directly imported to the Contacts There are two different formats supported for the phonebook file vcard and xml Users could manually create contacts first and export the phonebook file in vcard ...

Страница 129: ...P a g e 129 2 Tap on More on the upper right corner of the Contacts screen 3 Select Import contacts to bring up the dialog below ...

Страница 130: ...MF Contacts Import Contacts To Export Contacts 1 Open Contacts 2 Tap on More on the upper right corner of the Contacts screen 3 Select Export Contacts to bring up dialog below 4 Select the file encoding and file type for the exported phonebook file By default the CD SMF is using UTF 8 as the encoding method 5 Tap on Choose Directory and select the directory where the phonebook file will be exporte...

Страница 131: ...P a g e 131 Figure 97 CD SMF Contacts Export Contacts ...

Страница 132: ...server and the phonebook xml file in correct format is downloadable from the HTTP TFTP HTTPS server 2 Open Contacts 3 Tap on More on the upper right corner of the Contacts screen 4 Select Download Contacts to bring up the dialog below 5 Fill in the necessary options and then tap on in the upper right corner of the screen The CD SMF will send out request to the configured HTTP TFTP HTTPS server Fig...

Страница 133: ...P a g e 133 displayed when entering the key words ...

Страница 134: ...in the list and tap on to call this contact Select Contacts 1 Scroll up down to find the contact in the list 2 Touch and press on the contact for about 2 seconds to show more options such as Delete contact add to blacklist etc 3 To select a batch of contacts at the same time press More on the upper right corner of the contacts screen and select Batch operation Tap on the checkbox for the contacts ...

Страница 135: ... Contacts 2 Then tap on to add the contacts selected to Favorites There are two other methods to add contacts to favorites Directly pressing on the contact and tap on to add the contact to favorite Tapping on Favorites on the Contacts screen to navigate to favorites category and tap on to select the contacts to be added to favorites then tap on ...

Страница 136: ...P a g e 136 Figure 101 Add Contacts to Favorites ...

Страница 137: ...menu then choose the Bluetooth device that you want to share the contact with Sharing a batch of contacts 1 Select the contacts as described in Select Contacts 2 Press on to share the selected contacts via Bluetooth Add Contacts to Blacklist Users can add a single contact or a batch of contacts to the black list Refer to the following steps to do so Add a single contact to black list 1 Long press ...

Страница 138: ...so select a group for the contact when adding or editing the contact Ringtone can be assigned in group as well as single contact If the group has ringtone set to Custom Ringtone this ring tone has the highest priority when there is an incoming call to the contact Contacts Storage Status The CD SMF default maximum contacts storage is up to 2000 To check contact storage status tap on More on the upp...

Страница 139: ...acts storage to more than 2000 contacts on CD SMF Users may access the phone through SSH and change the P value P1688 to another number 10000 to increase the default contacts storage In this case if users increase this default P value the phone resource will be cost and the phone performance will be slower ...

Страница 140: ...device s interfaces connection Network and Accounts status Users can also perform an Audio diagnostic test to check if the built in speaker is working Users can access the Diagnostics app and press on Start to check the phone s status General Status Figure 104 Port Network Status ...

Страница 141: ...P a g e 141 Figure 105 Account Status ...

Страница 142: ...n then Users can indicate whether they could hear the audio recording and whether there was some noise heard Figure 106 Speaker Diagnosis When done with the speaker test Users can Start the Microphone diagnostic which consists of speaking through the microphone after pressing on start and then checking If you can hear your speech back ...

Страница 143: ...P a g e 143 Figure 107 Microphone diagnosis ...

Страница 144: ...ons that require configuration Please refer to the following table to have a clear idea about all the options available under this section Features Call forwarding Harassment Interception Shared Call Appearance SCA Auto Answer Account Ringtones Bluetooth Network Ethernet Settings VPN Proxy Settings Wi Fi General Network Settings Tethering Portable Hotspot ...

Страница 145: ...P a g e 145 Basic Sound Language Keyboard Display Date Time ...

Страница 146: ...s Accounts Power Information Reboot the phone Apps Application Management Default Application Notification Center Advanced Account Settings System Updates Syslog System Security Status Account Status Network Status System Info Storage Status ...

Страница 147: ...ts The blocked Contacts are the contacts that were added to the blacklist the CD SMF will block any calls coming from these contacts To show the blocked contacts tap on Blacklist from the Harassment Interception page Figure 109 List of blocked contacts Block History To show the history of blocked contacts numbers tap on call history from home screen then on Block Figure 110 Block History Delete Bl...

Страница 148: ...P a g e 148 1 In the block history tap on the recycle bin icon 2 Confirm the deletion of the complete blocking record by pressing OK ...

Страница 149: ...t The blacklist can be added manually from contacts or from call history Figure 111 CD SMF Blacklist Add Number to Blacklist 2 The following figure shows manually adding number to blacklist Once Manually add option is selected a window will be prompted for users to enter the phone number in the first field and name note in the second field optional Tap on OK to finish the adding operation ...

Страница 150: ...P a g e 150 Figure 112 Manually Add Number to Blacklist ...

Страница 151: ... menu press on Unblocked to no longer block the calls from coming from this contact 2 From the contacts menu long press on the contact and press Remove from Blacklist Intercept Anonymous calls The CD SMF gives the possibility to intercept anonymous calls for each account registered 1 Enter the harassment Interception Menu 2 Check Intercept Anonymous Calls as shown on the figure below 3 Check the a...

Страница 152: ...y The following figure shows the call history on the CD SMF Figure 114 CD SMF Call History Local Call History There are four different categories in the local call history Users could tap on the icon on the top menu to access the corresponding call logs All Missed Outgoing Incoming Conf History ...

Страница 153: ...P a g e 153 Block if any ...

Страница 154: ...t this number before calling add this number to contacts add this number to balcklist etc Figure 115 CD SMF Call History Options Delete Call History Delete the entire call history Users can delete the complete call history by pressing the directly afeter accessing the call history page Delete a single call history entry Users can delete a single call history entry by pressing the entry for about 2...

Страница 155: ...P a g e 155 o Press on the top right corner of the screen and select the entries to be deleted o Tap on to delete the entries ...

Страница 156: ...od of time when the call was in progress The type of the call Specifying if the call was a Video or an Audio Call Note Call details under conference history include the previous details of the conference and for each one of the participants The following operations could be done Dial out this number directly Bring up dial screen with the call history number Users could edit the number before diali...

Страница 157: ...orage status of SMS Tap on from the phone s desktop to launch SMS application Figure 117 CD SMF SMS Message View SMS On the SMS list screen tap on one of the messages to view the SMS details Figure 118 View SMS Dialog Users can press on in order to make a call to the account s number on that conversation Users can press on in order to delete lock unlock or forward a message or a batch of ...

Страница 158: ...P a g e 158 messages from the conversation Users can press on in order to add the number as a contact in the CD SMF ...

Страница 159: ...field of the screen Tap on Done from the Keyboard once finished 4 Send message Tap on the arrow icon when you are ready to send the message out Delete SMS 1 Users can press and hold one SMS message in a conversation for about 2 seconds until a prompt appears where Delete can be pressed in order to delete the chosen SMS message 2 In order to delete one conversation users can press and hold the conv...

Страница 160: ...P a g e 160 selected in order to delete them by pressing the same icon ...

Страница 161: ...rsion user can send SMS straight from the Contact APP as follow 1 Select one or Multiple contacts Figure 120 Select contact 2 Click on the Message icon Figure 121 Click on Message icon 3 Type the message and then click send button Figure 122 Type then send Message ...

Страница 162: ...fy the current number of messages on the CD SMF and the storage space that still available Enable Quick Reply Enable this feature in order to automatically send a quick reply when an incoming call is rejected Choose a quick reply message Users can add more quick reply messages by clicking on and choose the one that will be used and sent automatically when an incoming call is rejected Figure 123 SM...

Страница 163: ...nch the Recorder application Call Records During an active call users have the option to record the conversation The recorded conversation can be retrieved from the recorder application The account and date are specified in each record s file name Figure 124 Recorder Application Audio Records To use the recorder app to record audio tap on open the recorder 1 Tap on to bring the recording page 2 Ta...

Страница 164: ...conversation a red flag will be displayed besides the record s file name to indicate that it s marked Figure 126 Flag Mark 4 Tap on to cancel the recording or on to end the recording The file will be saved and accessible under Recorder application Users can tap on the recording file to play the recording ...

Страница 165: ...P a g e 165 Figure 127 Recorded Files ...

Страница 166: ...s Enable Change a password for accessing the Recorder application by taping on followed by Settings 1 From the phone s desktop page click on to open the recorder Figure 128 Recorder Menu 2 Click on Menu icon on the top right as shown above 3 Tap on Settings Figure 129 Menu Options ...

Страница 167: ...der Settings 4 Users can enable and choose a password to be set for accessing the Recorder application by taping on Enable Password Figure 131 Set Password 5 Users can change the preconfigured password by taping on Change password ...

Страница 168: ...P a g e 168 Figure 132 Change Password ...

Страница 169: ...mple Lock Unlock Users could lock and unlock the file Send Make sure to enable Bluetooth on the phone in order to send the file to other devices Rename Click on this option in order to rename the file Delete Choose this option to delete a file Users can Export or Delete recordings alternatively by pressing on the Menu key click on Edit and then select the file to operate on choose for file export ...

Страница 170: ...P a g e 170 Figure 134 Export Delete files ...

Страница 171: ...tion Files Operations Copy and Paste Files Follow the steps below to copy and paste a file on the CD SMF 1 Open file manager and navigate to the directory of the file to be copied Touch and press on the file for about 2 seconds until the option s window pops up then press Copy 2 Select the location to which you want to past the file and press on Figure 135 CD SMF File Manager Copy File Or 1 Press ...

Страница 172: ...P a g e 172 3 Select the directory to which you want to past the files then press ...

Страница 173: ... is moved the file will not be kept in the source folder Follow the steps below to move a file on the CD SMF 1 Open file manager and navigate to the directory of the file to be moved Touch and press on the file for about 2 seconds until the options window pops up then press Move 2 Select the location to which you want to past the file and press on ...

Страница 174: ...P a g e 174 Figure 137 CD SMF File Manager Move ...

Страница 175: ...end 2 Select the Bluetooth device to which the file will be transferred Or 1 Open file manager and navigate to the directory of the file to be sent over then press on 2 The check boxes will appear then check the files to be sent over 3 Press on to send the selected files via Bluetooth then choose the Bluetooth devices to send the files to Figure 138 CD SMF File Manager Options Delete Files 1 Open ...

Страница 176: ...P a g e 176 Or 1 Open file manager and navigate to the directory of the file files to be deleted the click on ...

Страница 177: ...ap on OK to confirm Figure 139 Delete File s via File Manager Rename a File 1 Open file manager and navigate to the directory of the file to be renamed Touch and press on the file for about 2 seconds until more options appear 2 Tap on Rename A new dialog window will pop up for users to enter the new name 3 Tap on OK ...

Страница 178: ...P a g e 178 Figure 140 Rename File ...

Страница 179: ...torage devices Pictures contains all the pictures stored on the phone including screenshots camera pictures and external pictures Audio contains all the Audio file on local and external storage Video contains all the videos stored on the phone including recorded videos from camera and videos stored on external devices Downloads in this category the phone will list all the downloaded files such as ...

Страница 180: ...d applications Users could install those applications from the built in GS Market Tap on at the phone onscreen menu to launch the GS Market Users could browse search download and install the apps from there for tools games and other applications Figure 141 GS Market Onscreen Menu ...

Страница 181: ... There are two ways for accessing FTP Server application Users can either access the Built in CD SMF application in the application screen Go to CD SMF application screen File Manager and click on the icon Figure 142 FTP Server Start Tap on Start FTP Server to turn the server on The FTP server address URL will be provided on the screen ...

Страница 182: ... on in the above figure to set up username password port number and directory for remote access By default when the users access the ftp server from a PC a prompt will show asking for user name and password The default user name and password are admin Figure 144 FTP Server Settings ...

Страница 183: ...ke picture 2 The captured picture can be accessed under File Manager Internal Storage DCIM Camera 3 To view the last taken pictures swipe from right to left on camera screen Record Video 1 Swipe from left to right on camera screen or press menu button then tap on then type on to Switch mode This key allows user to choose which camera mode to use Taking Picture or Taking Video Take Picture Video If...

Страница 184: ...P a g e 184 select the video mode 2 Tap on to start recording ...

Страница 185: ...CD SMF has built in Gallery for users to view pictures and play videos from CD SMF internal storage Users could also perform basic editing tasks on pictures under Gallery page To access the recently taken pictures or recorded videos click on the circular key on the right top corner of the camera sceen Figure 146 Recent pictures and videos page On this page users have the ability to perform operati...

Страница 186: ...e 147 Edit Picture Note Videos cannot be edited from the gallery Gallery page To access the Gallery open the camera click on the circular key on the right top corner of the camera sceen Figure 148 Access to the Gallery ...

Страница 187: ...os and select Grid View or Filmstrip View from upper left corner of the screen to set view mode of the pictures Tap on a specific picture to view the picture in full screen Pictures Options When the picture is displayed in full screen press the Menu button A list of options will be available for users to select including Delete Slideshow Edit Rotate left Rotate right Crop or Set Picture as etc ...

Страница 188: ...P a g e 188 Figure 150 CD SMF Gallery Picture Options ...

Страница 189: ...s via a third party application or tap on to delete the selected pictures Screensaver User can set screensaver from the phone s idle screen under Settings Basic Display Screensaver Figure 151 Screensaver settings Users can set Screensaver to Clock or Screensaver Clock When setting the screen saver to Clock the phone will show a clock on the screen when the phone goes to standby mode Press to set t...

Страница 190: ...P a g e 190 images contained on it as screensaver Press to show the screensaver settings ...

Страница 191: ...P a g e 191 Figure 152 Use Network Images Click on Use network images and set the path of the remote screensaver folder Figure 153 Network Image Path ...

Страница 192: ...screen to launch the Browser application Note The default page in the CD SMF s Browser is Google Search Figure 154 CD SMF Web Browser Touch the screen and scroll up down left right to view the web page Use two fingers on the screen to pinch in or spreading out the page Press the MENU button to or press to access more options including refresh New Tab find on page etc ...

Страница 193: ...P a g e 193 Figure 155 CD SMF Browser Menu Options ...

Страница 194: ...P a g e 194 To open a new window tap on icon on the right side of the tab Figure 156 Open New Window in Browser To open Bookmarks History and Saved Pages tap the icon on the upper right of the Browser ...

Страница 195: ...P a g e 195 Figure 157 CD SMF Web Browser Bookmarks ...

Страница 196: ...onURL module users need to know the supported events in this module and also added the dynamic variables of the supported events on phone web GUI The dynamic variables of the supported event will be replaced by actual values of the phone in order to notify the event to SIP server Please refer to CD SMF Administration Guide and ActionURL User Guide for the configuration details https www Polestar c...

Страница 197: ...added Service configuration Once the configuration is done the call from the door system is answered on the CD SMF in full screen with the configured open door button to send the access password to the door system Please refer to the following figure Figure 158 Incoming call from GDS3710 door system The CD SMF can be connected with the door system in two different ways either using peering mode wi...

Страница 198: ...ttings Network Ethernet Settings 2 Touch IPv4 settings 3 Tap on IPV4 Address Type to select DHCP Static IP or PPPoE as the address type For DHCP save the setting and the CD SMF should be able to get IP address from the DHCP server in the network For static IP enter IP Address Subnet Mask Default Gateway DNS Server and Alternative DNS server for the CD SMF to correctly connect to network For PPPoE ...

Страница 199: ...P a g e 199 Connect to Wi Fi Networks 1 Once Wi Fi is turned on CD SMF will automatically start the scanning within the range 2 Go to CD SMF s Settings ...

Страница 200: ...emembered the CD SMF will connect to it again when the SSIDis within the range Figure 159 CD SMF Connect to Wi Fi 8 The previous steps allow the CD SMF to connect the Wi Fi network with DHCP setting by default If it needs to be connected the Wi Fi with static IP settings please scroll down the setting window and tap to check the Show advanced options Then the window will show up the IP settings at...

Страница 201: ...P a g e 201 Figure 160 CD SMF Connect to Wi Fi Show Advanced Options ...

Страница 202: ...o check the Wi Fi parameters and change the setting by checking the Show advanced options at the bottom 10 User can also add Wi Fi Networks manually if the network is hidden or not showing on the list of scanned SSIDs User needs to roll down the Wi Fi settings page and press on Add network and then enter the SSID name Security type and Password Figure 161 Wi Fi Add network Wi Fi Settings Shortcut ...

Страница 203: ...P a g e 203 Figure 162 Wi Fi Settings Shortcut ...

Страница 204: ... transfer files share contact information with other Bluetooth portable devices use Bluetooth headset for making calls switch calls to the CD SMF from mobile devices using Bluetooth hands free profile and listen to media music or other audio output from the CD SMF To connect to a Bluetooth device turn on CD SMF s Bluetooth radio first The first time when using a new Bluetooth device with the CD SM...

Страница 205: ...P a g e 205 Or users could open the top status bar tap on Bluetooth icon to turn it on off ...

Страница 206: ...them first They will stay paired afterwards unless they are unpaired 1 Go to CD SMF s Settings Features Bluetooth 2 Turn on Bluetooth 3 Tap Additional settings and select Visible to nearby Bluetooth devices to make the CD SMF phone visible to all nearby Bluetooth devices 4 The CD SMF scans and displays the IDs of all available Bluetooth devices in range If the device you would like to pair with do...

Страница 207: ...e Unpair a Bluetooth Device 1 In the Bluetooth settings tap on button corresponding to the Bluetooth device 2 Select Unpair Bluetooth Settings Shortcut User can enter the Bluetooth settings by sliding the Status Bar then long Press on the Bluetooth icon ...

Страница 208: ...P a g e 208 Figure 165 Bluetooth Settings Shortcut ...

Страница 209: ... SMF please refer to the link below https www Polestar com sites default files Resources gxv33xx_bluetooth_guide pdf EHS Headset The CD SMF supports normal RJ9 headset and EHS headset To use Plantronics EHS headset 1 Go to the CD SMF Home screen Settings Basic Peripherals enable option Plug RJ9 EHS headset 2 Connect EHS Headset to the CD SMF Insert headset connector into the RJ9 headset port on th...

Страница 210: ...eadsets feature a noise cancellation microphone that minimizes background noise to provide crisp HD audio The headset features multiple call control features such answer end a call volume adjustment and mute unmute Users can plug in the USB port with the headset and simply use the headset as default media input output channel For more details please visit https Polestar com products personal colla...

Страница 211: ...e 211 Once the headset plugged it will be detected automatically and the following icon will be shown on the top right of the status bar this means a USB headset is connected Figure 168 USB Headset Connected ...

Страница 212: ...le USB headset The status bar shows the icon modified indicating that the USB headset is being used for speaking Figure 169 USB Headset Used for Call During the call users can tap on More then Media Channel to toggle between Handset Speaker and USB Headset Figure 170 Switch Between Speaker and USB mode ...

Страница 213: ...File Manager USB Tap on it to access and manage your data Figure 171 USB Storage Device Connected to CD SMF MicroSD Card 1 Insert your MicroSD card into MicroSD Card slot at the back of CD SMF Please make sure the MicroSD Card is inserted with right direction on the CD SMF as indicated on the MicroSD card slot 2 It will take a few seconds for the CD SMF to prepare the connection Then the MicroSD C...

Страница 214: ...Screen Once EMERGENCY is pressed a dial screen will show and users can choose the numbers allowed to be dialed from the list on the left of the dial screen Figure 173 Emergency Dial Screen Note The CD SMF is not pre configured to support or carry emergency calls to any type of hospital law enforcement agency medical care unit Emergency Service s or any other kind of Emergency Service You must make...

Страница 215: ...e 215 test your configuration to confirm that it works as you expect If you do not do so it is your responsibility to purchase traditional wireless or landline telephone services to access Emergency Services ...

Страница 216: ...ons Contact a technical support member or submit a trouble ticket online to receive in depth support Thank you again for purchasing Polestar Enterprise Application phone it will be sure to bring convenience and color to both your business and personal life Android is a trademark of Google LLC Skype and Skype for Business are Registered Trademarks of Microsoft Corporation OpenVPN is a registered tr...

Отзывы: