background image

8

Polaroid a801 Digital Camera User Guide

www.polaroid.com

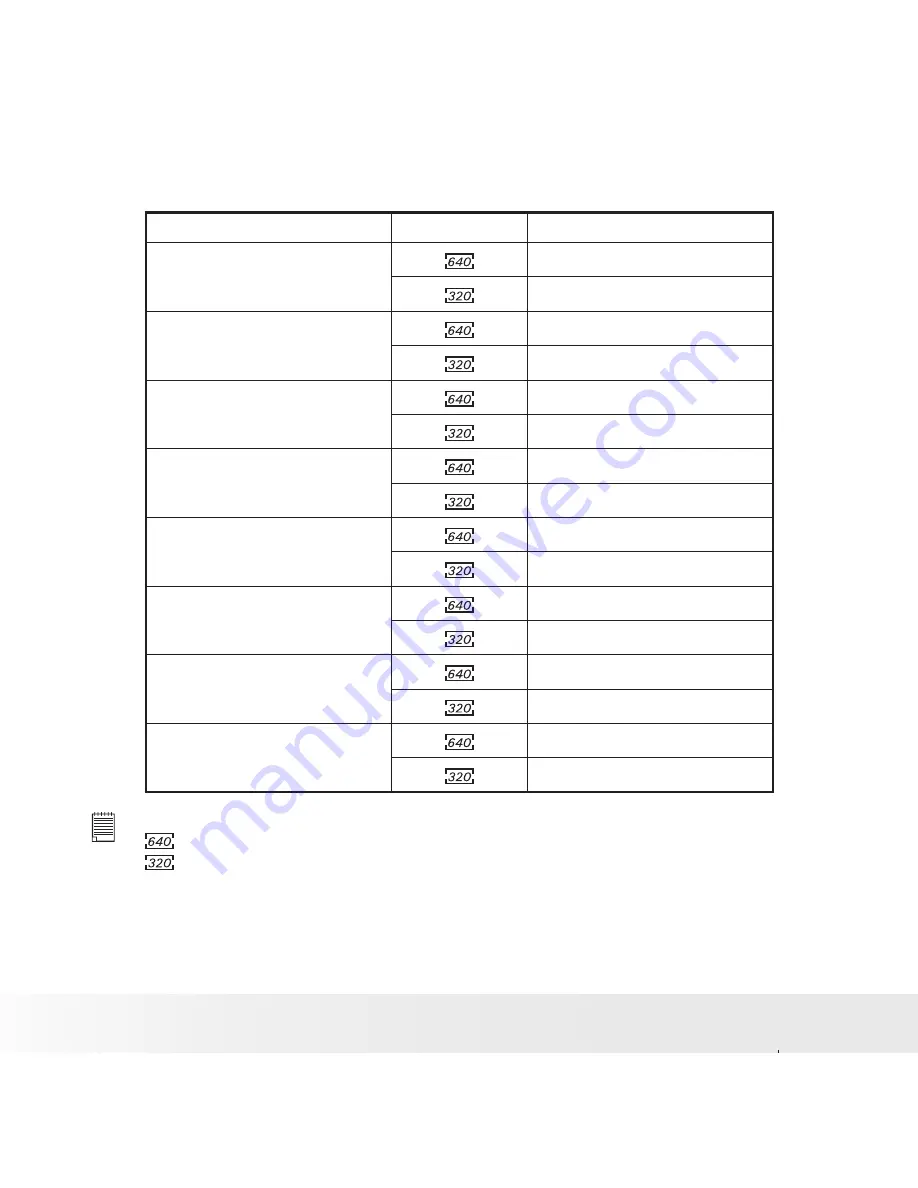
Recordable Video Length

Resolution

Video clips can be taken

11MB Internal Memory

00:00:13
00:00:35

32MB SD

00:00:46

00:2:01

64MB SD

00:1:39
00:4:06

128MB SD

00:3:21
00:8:27

256MB SD

00:6:56

00:16:54

512MB SD

00:13:52
00:33:31

1GB SD

00:27:02
01:07:57

2GB SD

00:54:36
02:12:47

  NOTE:


• 

  640x480


  320x240


• Scene complexity affects a picture’s file size. For example, a picture of trees in 

autumn has a larger file size than a picture of blue sky at the same resolution 

and quality setting. Therefore, the number of pictures and length of video clips 

you can store on a memory card may vary.

Содержание a801

Страница 1: ...1 8 0 Megapixel Digital Camera DIGITAL QUALITY POLAROID SIMPLICITY Questions Need some help This manual should help you understand your new product If you have questions call our toll free number foun...

Страница 2: ...AL CAM E R A 7 8 Zoom in button 9 Zoom out Thumbail button 10 Power LED 11 Flash LED 12 LCD Screen 13 Left button 14 Menu button 15 Wrist strap holder 16 Mode button 17 Flash Up button 18 Self timer R...

Страница 3: ...odes 11 Playback Mode 14 Camera Modes 15 How to Navigate Menus 15 Setup Menu 16 Setting Date and Time 17 Setting Auto Power Off 18 Setting the Beep Sound On Off 19 Adjusting volume control 19 Setting...

Страница 4: ...ips 44 5 Managing Pictures and Video Clips 45 Reviewing Pictures 45 Reviewing Pictures and Video Clip Files in Thumbnail 45 Magnifying Trimming the Displayed Picture 46 Playing a Video Clip on LCD Scr...

Страница 5: ...omputer 71 Transferring Pictures and Video Clips to a Computer 72 10 Troubleshooting Problems 74 11 Getting Help 77 Polaroid Online Services 77 ArcSoft Software Help 77 12 Appendix 78 Technical specif...

Страница 6: ...ions with life like clarity and beautiful color renditions Outstanding features that your a801 digital camera has A high quality glass lens system for well exposed sharp pictures from 1 2m to infinity...

Страница 7: ...1 Burlington Road Bedford MA 01730 1434 Quick Start Guide Warranty Card Skin 4 x AAA Battery USB Cable Wrist Strap The CD ROM Includes a801 Digital Camera Driver PC only ArcSoft PhotoStudio 5 5 PC Arc...

Страница 8: ...pushing it outwards as illustrated 2 Insert the battery as shown 3 Close the battery door by pressing it downwards then slide it back to lock 1 1 2 2 3 1 2 4 To remove the battery slide the battery lo...

Страница 9: ...6 to make your selection Here are some helpful hints to extend battery life considerably by limiting the following activities Reviewing the pictures on the LCD Screen Using the optical viewfinder if y...

Страница 10: ...era 2 Check the battery power level that appears on the LCD screen Battery power is full Battery power is adequate 00001 x1 0 3264x2448 Battery power is low Batter power is exhausted Please replace th...

Страница 11: ...era view the camera s LCD screen to check which camera settings are active Those particular features whose icons are not displayed are not activated Capture Modes Still Image Mode 00001 x1 0 3264x2448...

Страница 12: ...n 3264 X 2448 33 6 Compression 34 7 Sharpness 36 8 Internal Memory SD Card 9 Battery Power Level 10 10 Histogram 11 Digital Zoom Factor X 1 0 X 4 0 37 12 White balance 40 13 Exposure Compensation Valu...

Страница 13: ...roid a801 Digital Camera User Guide www polaroid com Video Mode 640X480 2 1 3 4 5 6 7 No Description Icon Ref Page 1 Video Mode 41 2 Exposure 43 3 White balance 44 4 Record indicator 5 Recorded Time 0...

Страница 14: ...1 2 3264x2448 2007 01 01 00 30 00 00 06 2007 01 01 00 30 No Description Icon Ref Page 1 Playback mode 14 2 Protect 47 3 File Number 100 0012 JPG 22 4 Resolution 3264 X 2448 5 Displayed Date and time 2...

Страница 15: ...ettings like the Date Time and Auto Power Off 1 Press the button to enter Menu Settings Press the button and press the button to enter setup settings 2 Press the and buttons to scroll up and down thro...

Страница 16: ...and press the button to enter setup menu 2 Press the and buttons to scroll up and down through menu bars 3 Press the button to enter Press the button to back to menu bars 4 Press the and buttons to s...

Страница 17: ...TIME 3 Press the button to enter 4 Press the or button to select a field such as year month day hour minute and date format 5 Press or button to adjust the value in the field and select the date form...

Страница 18: ...red setting 5 Press the button to confirm your choice Auto Power Off Off 1 Minute 3 Minutes SETUP Date Time Auto Power Off Beep Sound Volume 1 4 1 MINUTE 3 MINUTES The camera is designed to switch off...

Страница 19: ...ccess the setup menu 2 Press the or button to select Beep Sound 3 Press the button to enter 4 Press the or button to select the desired setting 5 Press the button to confirm your choice Adjusting Volu...

Страница 20: ...refer for the LCD screen 1 Access the setup menu 2 Press the or button to select LANGUAGE 3 Press the button to enter 4 Press the or button to select the desired setting 5 Press the button to confirm...

Страница 21: ...2 Press the or button to select Date Stamp 3 Press the button to enter 4 Press the or button to select the desired setting 5 Press the button to confirm your choice Adjusting the LCD Brightness This...

Страница 22: ...Sequence No 3 Press the button to enter 4 Press the or button to select the desired setting 5 Press the button to confirm your choice ON The file numbers are reassigned to the start each time when an...

Страница 23: ...g To Default Cancel OK SETUP Sequence No Default Setting Opening Storage Media 3 4 2 Press the or to select ICON Default Settings 3 Press the button to enter 4 Press the or button to select the desire...

Страница 24: ...n the camera is turned on You may cancel displaying the startup image according to the following steps 1 Access the setup menu 2 Press the or to select ICON Opening 3 Press the button to enter 4 Press...

Страница 25: ...Setting Opening Storage Media 3 4 2 Press the or to select ICON Storage Media 3 Press the button to enter 4 Press the or button to select the desired setting 5 Press the button to confirm your choice...

Страница 26: ...splays battery level correctly set the type to match the batteries used 1 Access the setup menu Battery Type Alkaline NiMH SETUP Battery Type 4 4 2 Press the or to select ICON Battery Type 3 Press the...

Страница 27: ...www polaroid com Turning the Information Display On Off Press the button each time switches the LCD screen to the next display mode in the following mode LCDScreenOn OffButton Still Image Mode Press P...

Страница 28: ...1 Digital Camera User Guide www polaroid com Video Mode Press Press Press Playback Mode Press 100 0012 JPG Press Press 001 0012 2007 01 01 00 30 2007 01 01 00 30 3264x2448 Press 001 0013 Press Press 0...

Страница 29: ...or a memory card Taking Pictures in Normal Mode You can take pictures at approximately 1 2m to infinity NOTE Most settings are saved by the camera when the power is turned off so that the same settin...

Страница 30: ...hadows The camera has four flash modes default setting is Auto Flash Flash Range Normal 1 2m 3 9 ft to 2 0 m 6 6 ft 1 Press the button to set the camera to Still Image mode 2 Press the button to cycle...

Страница 31: ...e when shooting toward a reflective surface such as a window or mirror If you do not have enough light when using this setting your pictures will be too dark Always On The flash fires for every pictur...

Страница 32: ...e 2 Press the button to select self timer 00001 3264X2448 Display Option Description Off Record a single image 2 SEC Take a picture after a count down of 2 seconds 10 10 SEC Take a picture after a cou...

Страница 33: ...y and occupies more memory space Smaller size and normal quality pictures are easier to email while larger size and fine quality pictures are better for printing Resolution setting 1 Press the button...

Страница 34: ...the or to select ICON Compression 4 Press the button to enter STILL Compression Super Fine Fine Normal Resolution Compression Sharpness Quick Review 5 Press the or button to select the desired setting...

Страница 35: ...0 for further details Compression Resolution Super Fine Fine Normal 3264 X 2448 2 6 7 3072 X 2304 3 7 10 2816 X 2112 4 8 18 2048 X 1536 6 16 23 1600 X 1200 9 27 39 640 X 480 53 119 159 NOTE Scene comp...

Страница 36: ...to select ICON Sharpness 4 Press the button to enter STILL Resolution Compression Sharpness Quick Review Sharpness Strong Normal Soft 5 Press the or button to select the desired setting 6 Press the bu...

Страница 37: ...ss the camera mode to set the camera mode to Still Image or Video mode 3 Press the Zoom In or Zoom Out button to zoom in or zoom out the subject image The zoom status is shown on the LCD screen 4 Now...

Страница 38: ...tton to set the camera to Still Image mode 2 Press the button to enter menu bar 3 Press the or to select ICON Quick Review 4 Press the button to enter Quick Review Off 2 Seconds 5 Seconds STILL Resolu...

Страница 39: ...ill Image mode 2 Press the button 3 Current option is EXPOSURE Exposure 4 Press the or button to select the desired setting 5 Press the button to confirm your choice NOTE A higher EV value is used for...

Страница 40: ...the camera to Still Image mode 2 Press the button 3 Press the or button to select WHITE BALANCE Auto White Balance 4 Press the or button to select the desired setting 5 Press the button to confirm yo...

Страница 41: ...mode NOTE The icon will appear on the LCD screen indicating the Video mode is activated 00 00 53 640X480 2 Frame your subject using the LCD screen 3 Press the Shutter button to start recording 4 Press...

Страница 42: ...on 3 Press the button to select Resolution Resolution 640X480 320X240 VIDEO Resolution 4 Press the button to enter 5 Press the and button to select the desired setting 6 Press the button Here are the...

Страница 43: ...he camera to Video mode 2 Press the button 3 Current option is Exposure Exposure 4 Press the or button to select the desired setting 5 Press the button NOTE A higher EV is best used for light colored...

Страница 44: ...lighting that is available 1 Press the button to set the camera to Video mode 2 Press the button 3 Press the and button to select White Balance Exposure Auto White Balance 4 Press the or button to sel...

Страница 45: ...1 0012 2007 01 01 00 30 Reviewing Pictures and Video Clip Files in Thumbnail You can view up to 9 picture and video clip files at a time on the LCD screen by using the thumbnail function 4 9 1 Press t...

Страница 46: ...the select picture 4 Press the or button to move around the magnified picture 5 Press the button to view the picture in the original size Playing a Video Clip on LCD Screen 1 Press the button to set...

Страница 47: ...ess the or button to select the desired setting 6 Press the button Protect Off On PLAYBACK Protect Slide Show Copy To Card Copy From Card OFF To remove protection from the selected protected file The...

Страница 48: ...o select Slide Show 4 Press the button to enter 2 Seconds 5 Seconds 8 Seconds PLAYBACK Protect Slide Show Copy To Card Copy From Card Slide Show 5 Press the or button to select the desired setting 6 P...

Страница 49: ...button to set the camera to Playback mode 4 Press button 5 Press the or button to select Copy To Card 6 Press the button to enter PLAYBACK Protect Slide Show Copy To Card Copy From Card Copy To Card T...

Страница 50: ...o Playback mode 4 Press button 5 Press the or button to select Copy From Card 6 Press the button to enter PLAYBACK Protect Slide Show Copy To Card Copy From Card This Image All Images CopyFromCard 7 P...

Страница 51: ...select the picture or video clip you want to delete 3 Press the button 4 Press the or button to select the desired setting 5 Press the button 6 Press the or button to select the desired setting 7 Pres...

Страница 52: ...tton to confirm your choice Erase all images videos Cancel OK This Image All This Image Delete a selected unprotected option All Delete all the unprotected files in the current memory NOTE Protected f...

Страница 53: ...Be sure battery level is full before printing Printer Refer to the user guide that comes with your printer and make preparations paper ink cassette cartridge etc as required Turn on the camera and the...

Страница 54: ...press the button after selecting CONTINUE In that case select CANCEL and press the button NOTE Please refer to the printer s user guide for the solutions Printing may resume once the problem is solved...

Страница 55: ...PTY Ink cassette is out of ink INK LOW Ink cassette is almost empty WASTE INK RESERVOIR FULL Waste ink reservoir is full HARDWARE FATAL ERROR A serious error occurs with the printer s hardware PRINTER...

Страница 56: ...ng 3 Press or button to select the PICTBRIDGE option NOTE To print a single image select the image before enabling PictBridge mode Camera Printer Connection 4 Plug Series A of the USB cable into the m...

Страница 57: ...ntil prompt to do so Not following this sequence will result in connection failure Selecting Print Settings 1 Press or button to select the print mode Pictbridge This Image All Images All Index 2 The...

Страница 58: ...or options available 3 Press the button to select the print settings 05 1 Off On No of Copy 1 2 Number of Copies Print Layout File Name On Off Date Stamp On Off Select a setting item using the up or d...

Страница 59: ...the number of printed images on a page N Up Layout 1 2 05 1 Off On 1 2 05 1 Off On No of Copy DEFAULT Print settings differ according to the printer model 1 2 4 6 8 Specify the number of printed imag...

Страница 60: ...Add the date stamp to the printed image OFF Print without the date stamp Selecting Paper Size 1 Press the or button to select SIZE 2 Press the or button to select the paper size The following paper s...

Страница 61: ...r of copies settings recorded on the card With this camera you should always select images by viewing them on the LCD screen Do not specify images by file name without viewing the file contents NOTE P...

Страница 62: ...11 Remove the memory card from the camera and insert it into the printer s card slot as illustrated Location of the card slot may vary from printer to printer model NOTE Make sure you turn off the ca...

Страница 63: ...2 Electrostatic charge electrical noise and other phenomena can cause data corruption or even loss Always make sure that you always back up important data on other media MO disc computer hard drive e...

Страница 64: ...ay conflict with the a801 camera and valuable data in your existing SD card may be distorted or lost when the card is inserted in the a801 camera We strongly recommend the user to use a new or formatt...

Страница 65: ...lts in the risk of damage to the camera and card Should water or any foreign objects ever get into the card slot immediately turn off the camera remove the battery or disconnect the AC adapter and con...

Страница 66: ...ancel OK Format 3 Access the setup menu 4 Press the or button to select FORMAT 5 Press the button to enter 6 Press the or button to select the desired setting 7 Press the button 8 Press the or button...

Страница 67: ...tion please read the ReadMe file in the CD first IMPORTANT For Windows 98SE Windows 98SE needs to install your digital camera Driver for Mass Storage function After the installation please restart the...

Страница 68: ...on screen instructions Open Close NOTE If the setup screen does not appear after loading the CD then you can manually start it by double clicking the My Computer icon on your desktop then double clic...

Страница 69: ...ccess and all at once enhancement to the pictures on your computer for example removing red eye and cloning objects to a different picture Add special effects or place them in cards calendars frames a...

Страница 70: ...I 450 MHz or equivalent processor USB Port 128MB RAM 256MB recommended DirectX 9 0 or higher 500MB free disk space Color monitor with high color 16 bit graphic capability or higher CD ROM drive Standa...

Страница 71: ...ing the Software Onto a Computer Connecting to Your Computer Connect the camera directly to your computer USB Series A plug connects to your computer Plug mini USB cable into the port of your camera 1...

Страница 72: ...on My Computer on your PC desktop and you will see a Removable Disk drive 4 Double click Removable Disk double click DCIM double click any directory folder under DCIM 5 All the pictures video and aud...

Страница 73: ...STORAGE drive System will automatically create a Mass Storage named DIGITALCAM NOTE This Drive name will vary from different version of Mac OS system 4 Double click the folder DIGITALCAM to enter sub...

Страница 74: ...her camera driver or capture device If you have another camera installed on your computer remove it and it s driver completely from your system to avoid conflicting with it My CD Installation wizard d...

Страница 75: ...ries or install new batteries Camera does not turn on Batteries are not oriented correctly Or Batteries may be dead Orient the batteries correctly Or Replace the batteries Camera suddenly powers off A...

Страница 76: ...to a memory card used by another digital camera I cannot erase pictures All the pictures in memory are protected Unprotect the pictures you want to delete There is no response from the camera while pr...

Страница 77: ...Support Center Ireland Hangzhou Tel 353 0 61 702087 Tel 86 571 88210575 Fax 353 0 61 702001 E mail support arcsoft com cn E mail eurosupport arcsoft com Web http www arcsoft com cn new support For Ja...

Страница 78: ...cal Length 7 15 mm Sunny Optics 2511A F No 2 8 5 7 LCD Screen 2 0 LTPS color panel Built in Flash Modes OFF Auto Red Eye Reduction Always On Range Flash Range 1 2m 2m Exposure Control 2 0 EV in 0 3 st...

Страница 79: ...ncluded Self timer 2 sec 10 sec File Format Still Image EXIF 2 2 compatible format JPEG compression DCF compatible Support DPOF Video Clip AVI Power Supply 4 x AAA alkakine battery Tripod Socket Yes C...

Страница 80: ...nal memory and different capacities of SD card Recordable Images Units Images Resolution Quality InternalMemory 32MBSD 64MBSD 128MBSD 3264X2448 2 10 20 40 6 26 53 106 7 39 78 156 3072X2304 3 11 23 46...

Страница 81: ...560 3072X2304 94 188 376 752 247 494 998 1976 357 714 1428 2856 2816X2112 109 218 436 872 294 588 1176 2352 432 864 1728 3456 2048X1536 195 390 780 1560 550 1100 2200 4400 789 1578 3156 6312 1600X1200...

Страница 82: ...0 3 21 00 8 27 256MB SD 00 6 56 00 16 54 512MB SD 00 13 52 00 33 31 1GB SD 00 27 02 01 07 57 2GB SD 00 54 36 02 12 47 NOTE 640x480 320x240 Scene complexity affects a picture s file size For example a...

Страница 83: ...ws 98SE user only because only Windows 98SE needs to install the a801 driver 1 Open Add Remove Program Properties in Control Panel and select Polaroid Digital Camera program then click Add Remove 2 Th...

Страница 84: ...de Description Default Still Image Mode Image Resolution 3264 X 2448 8MB Compression Super Fine Sharpness Normal Quick Review 2 Sec Flash Mode Auto Flash Exposure Compensation 0 White Balance for Pict...

Страница 85: ...Date Stamp Date LCD Brightness Format Internal Memory Sequence No Off Opening On Storage Media Auto Playback Mode Protect Off Slide Show 2 Sec NOTE The default language for the LCD screen may vary wit...

Страница 86: ...aired when the camera is operated beyond these conditions Camera Cautions NEVER immerse any part of the camera or its accessories into any fluid or liquid ALWAYS disconnect the camera from your PC or...

Страница 87: ...to provide reasonable protection against harmful interference in a residential installation This equipment generates uses and can radiate radio frequency energy and if not installed and used in accord...

Страница 88: ...er Guide www polaroid com Shielded cable must be used with this unit to ensure compliance with the Class B FCC limits Under the environment with electrostatic discharge the product may malfunction and...

Страница 89: ...US 0807 Part No OM3549US001...

Отзывы: