Polaris Xr-5DC Скачать руководство пользователя страница 5

LCD Display Description

4

5

6

7

8

10

11

12

13

15

16

17

3

1

2

9

14

5

Application Example of Polaris
Example one

   Navigating through a short distance (about 180 meter) to a destination with a 

difference in latitude and longitude of 0.1minute from the starting point.
  Procedure: 

   1. Take the unit outside in an open area, press "Power" button to  turn on the unit;

   2.Calibrate the  digital compass  (refer to OP8 at page 15), a process which is not necessary if 

done before;

3. Mark down your current location as Home 0 or starting point (refer to OP1 at page 9) when the 

unit obtain the first position fix. (refer to Appendix TTFF);

4.Input the latitude and longitude of the destination (refer to OP5 at page 10): just increase or 

decrease the current value by 0.1minute.

5.Move in pointing direction of the Navigation Pointer.
6.On approaching the destination (10 meter CEP), press "OK" button when the arriving alarm 

sounds.

Example Two

  Navigating through a long distance to a purported destination and on the way 

mark down several location and calculate the distance passed.

  Procedure: 

1.Take the unit outside in an open area, press "Power" button to turn on the unit;
2.Calibrate the digital compass (refer to OP8 at page 15), a process which is not necessary if 

done before;

3.Mark down your current location as Home 0 or starting point(Refer to OP1 at page 9) when 

the unit obtain the first position fix. (refer to Appendix TTFF);

4.Input the latitude and longitude of the destination (refer to OP5 at page 10);
5.Under the guidance of the navigation pointer, move as far as 50 meters from the starting point 

and mark down current location as Home 1(refer to OP2 at page 9);

6.Continue for another 50 meters and mark down Home 2;

7.Show the just passed distance (refer to OP8 at page 15)

Note: latitude and longitude of the destination must differ from that of Home 0 at least 
0.02minute or it may cause the Polaris to trigger the arriving alarm without user's moving 
which result in failure to stop the alarm by pressing "OK" button. If such condition do happen, 
just walk way from the point as far as 15meter and press  "OK" Button.

20

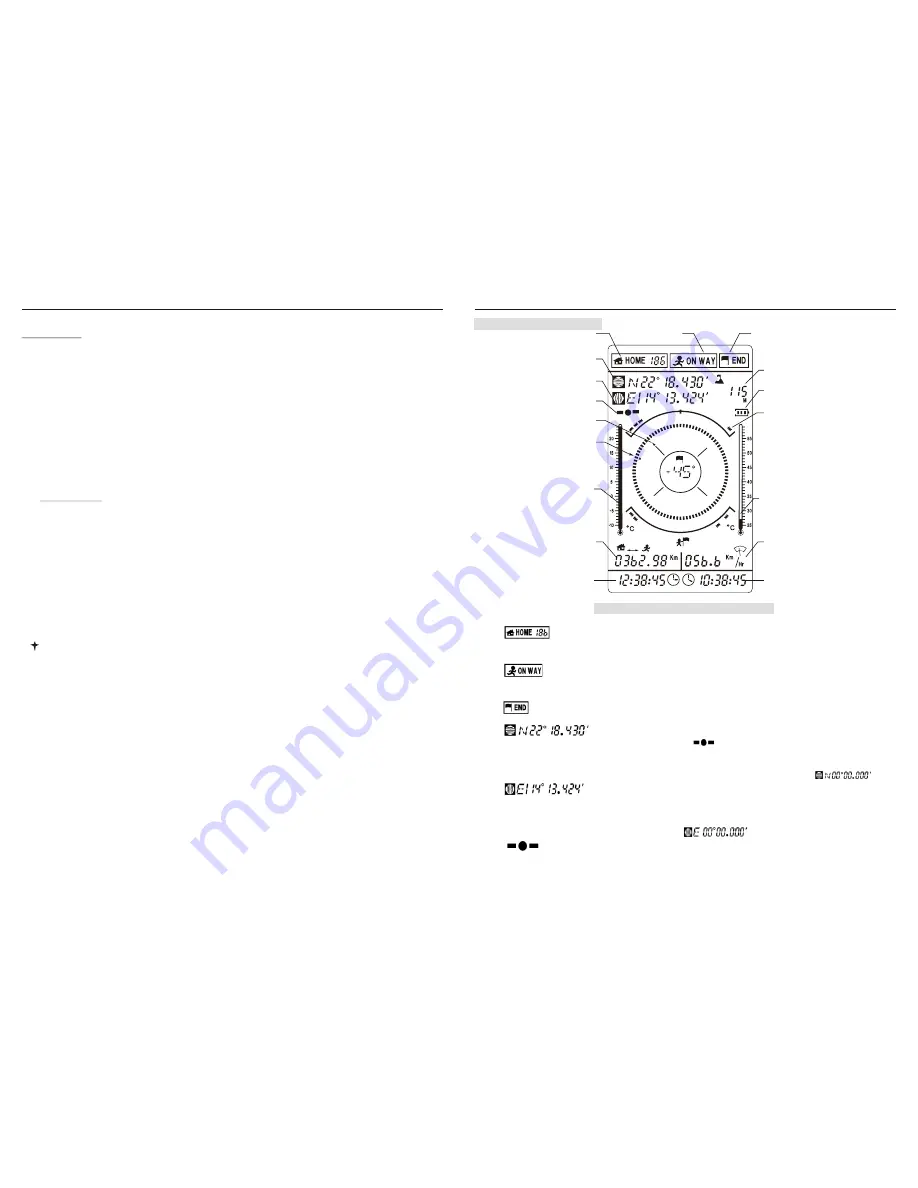
Figure 3: LCD Data Field Description

POLARIS USER MANUAL

POLARIS USER MANUAL

Home Point Icon, acting as a waypoint indicator, showing the total 
number of waypoints. When installing the battery for the first time, it is 
in zero state, indicating no waypoint saved before.

Current Point Icon, functioning as key to mark user's current location 
as a waypoint, a process which will make the Home point icon count by 
1.

Destination Icon, using as a gateway to input a specific destination 
(latitude and longitude).

Latitude Data field, after a successful start (the first position has been 
fixed or GPS signal icon           become stable), always display user's 
current latitude; before that it keep display the latitude of the last 
position fix.When installing batteries for the first time and before the 
first position fix,this field keep showing zero degree.

Longitude Data field, after a successful start (the first position has been  
fixed), always display user's current longitude; before that it keep 
display the longitude of the last position fix. When installing batteries 
for the first  time and before the first position fix, this field keep 
showing zero degree                             .

GPS signal icon,  acting as a position fix indicator. If blinking, means 
that the unit is tracking the GPS signal, yet fails to obtain position fix; 
if stable, means that the unit has pinpoint current location and obtained 
the position fix.

‡@

‡A

‡B

‡C

‡D

‡E

Содержание Xr-5DC

Страница 1: ...F If user hasnot used thisGPS unit forseveral months thealmanac data forthe satellites maybe out of date Theunit is capableof recollecting thisinformation on itsown but theprocess can take several minutes Time to FirstFix TTFF isthe time ittakes a GPSreceiver to findsatellites after the user firstturns it on when the GPSreceiver has lostmemory or hasbeen moved over300 miles from its lastlocation V...

Страница 2: ...ure of the GPS receiver satellite geometry A low DOP value indicates better relative geometry and higher corresponding accuracy The DOP indicators are GDOP geometric DOP PDOP position DOP HDOP horizontal DOP VDOP vertical DOP and TDOP time clock offset Distance The length between two waypoints or from your current position to a destination waypoint This length is measured in great circle over the ...

Страница 3: ... very precise orbit and transmit signal information to the earth GPS receivers take this information and compares the time a signal was transmitted by a satellite with the time it was received The time differenceindicate how far away the satellite is With distance measurements from a few more satellites the receiver can determine the user s position GPS receiver must be locked on to the signal of ...

Страница 4: ... 12 channel Hot start 10sec Warm start 40sec Cold start 120sec Update Rate 1 Hz continuous Accuracy Antenna Physical Size Power Battery Duration Temperature Range Position 10m CEP S A off Velocity 0 1 sec S A off Time 1ms Built in patch 131 4mm H 61 8mm W 28mm D Three 1 5V AAA Batteries 16 hours 0 0 15 C to 70 C 21 POLARIS USER MANUAL POLARIS USER MANUAL Specifications ...

Страница 5: ... 6 Continue for another 50 meters and mark down Home 2 7 Show the just passed distance refer to OP8 at page 15 Note latitude and longitude of the destination must differ from that of Home 0 at least 0 02minute or it may cause the Polaris to trigger the arriving alarm without user s moving which result in failure to stop the alarm by pressing OK button If such condition do happen just walk way from...

Страница 6: ...meand failing to calibrate it remains fixedin NW a charactercentering in the ring of navigationpointer Thermometer Icon performingas atmosphere temperatureindicator with the leftone showing temperaturefrom 10 to24 degree inCelsius or 14 to76 degree inFahrenheit the rightone showing from25 to 60 degree in Celsiusor 77 to140 degree inFahrenheit Distance data field working as anodometer and straightl...

Страница 7: ...9 Use Up or DOWN button to highlight the distance icon refer to S4 in figure4 press and release SET button distance icon will shifted to while the distance will correspond to it ___ cumulative distance between starting point Home 0 to current point Home N During navigation to show suchdistance just actlike OP9 Note Inaccuratedistance will resultif GPS signalis lost duringnavigation Speed With GPS ...

Страница 8: ...der tospeed charge process and notto discharge wastefully 8 4 5 6 8 9 The difference between the two pictures in Figure9 is the left one depicts the an inactive Navigation Pointer with the centered characters denoting user s heading or compass azimuth while the right one depicts an active Navigation Pointer with the centered signed digits calculating the angle betweenuser s heading andthe directio...

Страница 9: ...SER MANUAL To Charge batteries 1 Pull theplastic cover fromthe charging port insert adaptor smini USB terminal then connect the adaptor sanother terminal toAC power mainsocket 1 Take the unit outside in an open area where there is no obstruction from a clear view of sky press POWER button to turn on the unit You will see all the icons pop up on the screen for three seconds After the shown all then...

Страница 10: ...the destination also appears in thedistance data field Now you can use the device to mark down waypoints if you talk a walk from the Home 0 and the unit will measure distance the walk cover symbolized with icon or To mark your current standing locationas a waypoint Press UP button twice to highlight the Current Point icon then press and release SET button Such operation will causes the home point ...

Страница 11: ...ar with Home Point Home 0 toHome 999 Total 2000 waypoints canbe marked here Is starting pointor Home 0 To th st th is waypoint ofthe second to1000 while to is the 1001 to 2000 waypoint you marked down before OP1 Mark Home 0 Highlight the Home point icon refer to S1in Figure4 andthen press and hold SET button for 3seconds the latitude longitude and altitudeof your current position will bestored and...

Страница 12: ...o inputdata Remember thatevery input mustbe confirmed bypressing OK button After the input of latitude and longitude is completed the Navigation Pointer centered in the LCD screen will point to the proposed destination at the direction you should be heading And also the distance betweenstarting point anddestination will bedisplayed in theDistance data field GPS Navigation Pointerand Digital Compas...

Отзывы: