Pocket home PH-BP1-V Скачать руководство пользователя страница 2

The PH-BP1-V transmitter in connection with the 9-channel receiver PH-BP1-P9 is used for wireless 
control of individual rooms (zone control) in a fl oor heating system. There is no need to install any con-
necting cables between the receiver and transmitters (room thermostats)! The entire set can be included 
in the PocketHome

®

 system and all zones controlled from a single point by means of a central unit and/

or through a PC. In that case it is fi rst necessary to activate the PH-BP1-V transmitter in the central unit 
(see Putting in operation in the PocketHome

®

 system)!

In objects which do not necessitate central control the assembly can also work autonomously without a 
central unit. The PH-P1-P9 receiver can be controlled by means of up to 9 PH-BP1-V transmitters.

DESCRIPTION

INSTALLATION

1) The transmitter is easily portable, yet we recommend that it be located in a suitable place where its activity will not 
  be affected by direct fl ow of hot air from a heater, solar radiation or other disturbing effects. Also avoid its 
  installation on an external wall. 
2) Install the transmitter (indoors) as far as possible (at least 0.5 m) from big metal objects and from power lines to 
  avoid interference of signal reception!
3) We recommend that the installation be done by a person adequately qualifi ed in electrical engineering!
4) To prevent interference and affection of systems, every system is protected by its unique factory-saved code!
5) For correct communication of all elements in the PocketHome

®

 system with the PH-CJ37 / Plus central unit, the 

  code must be learned = every element ACTIVATED in the central unit!!!
6) As the entire system works at two-way radio frequency of 433.92 MHz, follow the installation and location 
 instructions!

! Caution:


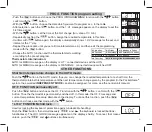
LOCATION AND EXCHANGE OF BATTERIES

- Lift off the back part by pushing the latch at the arrow 
and remove the protective paper from the batteries (at 
fi rst use); thus the transmitter becomes functional.
- Necessity to exchange the batteries is indicated by the 

Ba:tt

” symbol fl ashing on the display (this information 

can also be directly obtained on the central unit or in the 
PC program (see the PH-CJ37/Plus manual).
- Always use alkaline batteries 2 x 1.5 V type AA

Dispose of used batteries in conformity with 
regulations for dealing with hazardous waste!

2

Содержание PH-BP1-V

Страница 1: ...peratures information button when pushed in the AUTO mode it gradually shows information on the required temperature PO t current hour temperature CL O tE P operating hours SU MA and day dE n confirmation button ENTER for selection of functions and temperature setting 1 indication of the preset time and temperature program 2 indication of the selected function AUTO MANU PROG etc 3 indication of ant...

Страница 2: ...on an external wall 2 Install the transmitter indoors as far as possible at least 0 5 m from big metal objects and from power lines to avoid interference of signal reception 3 We recommend that the installation be done by a person adequately qualified in electrical engineering 4 To prevent interference and affection of systems every system is protected by its unique factory saved code 5 For correct...

Страница 3: ...button chose the PA r parameters function with the confirm with i PA r1 appears on the display Confirm with the i and with the choose the option for displayed data in the basic mode t current temperature display C current time display Confirm your choice by pushing the i button again PA r2 economical temperature 17 C by default PA r2 appears on the display Confirm with the i button and set the economi...

Страница 4: ...to the heating system used with the see the table confirm by i button PA r7 Summer mode PA r7 appears on the display push the i button Choose in the summer time without heating Choose the mode with the button then push the i button The LE tr symbol and temperature time value alternate on the display PI r1 Time period of PI control If you choose PI control in PA r5 you must set its parameters Choose...

Страница 5: ...ostat is activated in the PocketHome system see page 7 Push the i button or Fce button to return to function selection PA r9 firmware version number factory setting restoration PA r9 appears on the display This parameter is only informative and shows the firmware version number Push the i button or Fce button to return to function selection To restore factory settings push the P and button all chang...

Страница 6: ...indication AUTO or MANU message on the display is LIT connected device switched ON AUTO or MANU message on the display is FLASHING connected device switched OFF OTHER FUNCTIONS Short term temperature change in the AUTO mode Push the button in the AUTO mode thus you can change the required temperature for a short time the thermostat maintains this temperature until the next temperature change given...

Страница 7: ...pears on the display Push the Test button on the central unit in the ACTIV mode for the given BP1 thermostat see the PH CJ37 manual The Pa rA address will be assigned automatically Push the Test button again and the thermostat is activated in the PockerHome system and primarily controlled from the PH CJ37 Plus central unit the AUTO MANU message and current time temperature appear simultaneously on...

Страница 8: ...r complete control of floor heating Technical parameters Power supply 2 x 1 5 V alkl baterie type AA Communication type two way Frequency 433 92 MHz HF output 10 mW Number of temp changes 6 na každý den Hysteresis 0 1 C to 5 C by steps of 0 1 C Min program time 10 minutes Preset temperature range 3 C to 40 C Temperature setting by 0 5 C Min indication step 0 1 C Measurement accuracy 0 5 C Protectio...

Отзывы: