


4
Chapter I
3. If you have a printer connected to your computer, please
disconnect its cable from the rear of the computer. If you have
more than one printer port connected to you computer, then
locate the printer port that
the Enhanced Parallel Port
(EPP).
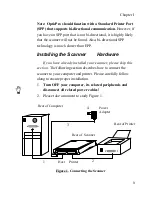
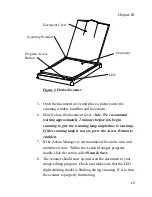
4. Plug the SCANNER CABLE into the scanner (see Figure 1
and number 1).
5. Connect the other end of the SCANNER CABLE in to the PC
printer port (see Figure 1, and number 1).
Attention: If you do not have a printer connected to your
computer and are not sure where the printer port is, see
your computer
information book and locate the
section about the printer port connector
.
6. Next, plug the disconnected printer cable into the rear of the
scanner (see Figure 1 and number 2).
7. After plugging the scanner and printer cables into their
respective locations, plug the power adapter into its power
receptor (see Figure 1 and number 3).
8. Plug the power adapter into a standard AC outlet, see Figure 1
and number 4. Note: When the scanner is not in use, please
leave the power adapter connected to the AC outlet.
Only use the power adapter that is included with your
scanner (24V 550mA). The use of a different power
adapter may damage the unit and void your warranty
!
9. Plug in all power cords and turn on your computer.
Attention
Danger
Содержание OpticPro
Страница 6: ...vi ...
Страница 10: ......
Страница 11: ...Chapter I Chapter I Hardware Installation ...
Страница 15: ...Chapter I 5 10 Install the scanner software see Chapter II Software Setup page 7 ...
Страница 16: ......
Страница 17: ...Chapter II Chapter II Software Setup ...
Страница 20: ......
Страница 21: ...Chapter III Chapter III Usage and Maintenance ...
Страница 26: ......
Страница 27: ...Chapter IV Chapter IV Using TWAIN ...
Страница 39: ...Appendix Appendix A Troubleshooting ...
Страница 42: ......
Страница 43: ...Appendix B Appendix B Customer Service and Warranty ...
Страница 45: ...Appendix C Appendix C Index ...
Страница 47: ......


