background image

E-9

Checking the Supplied Accessories

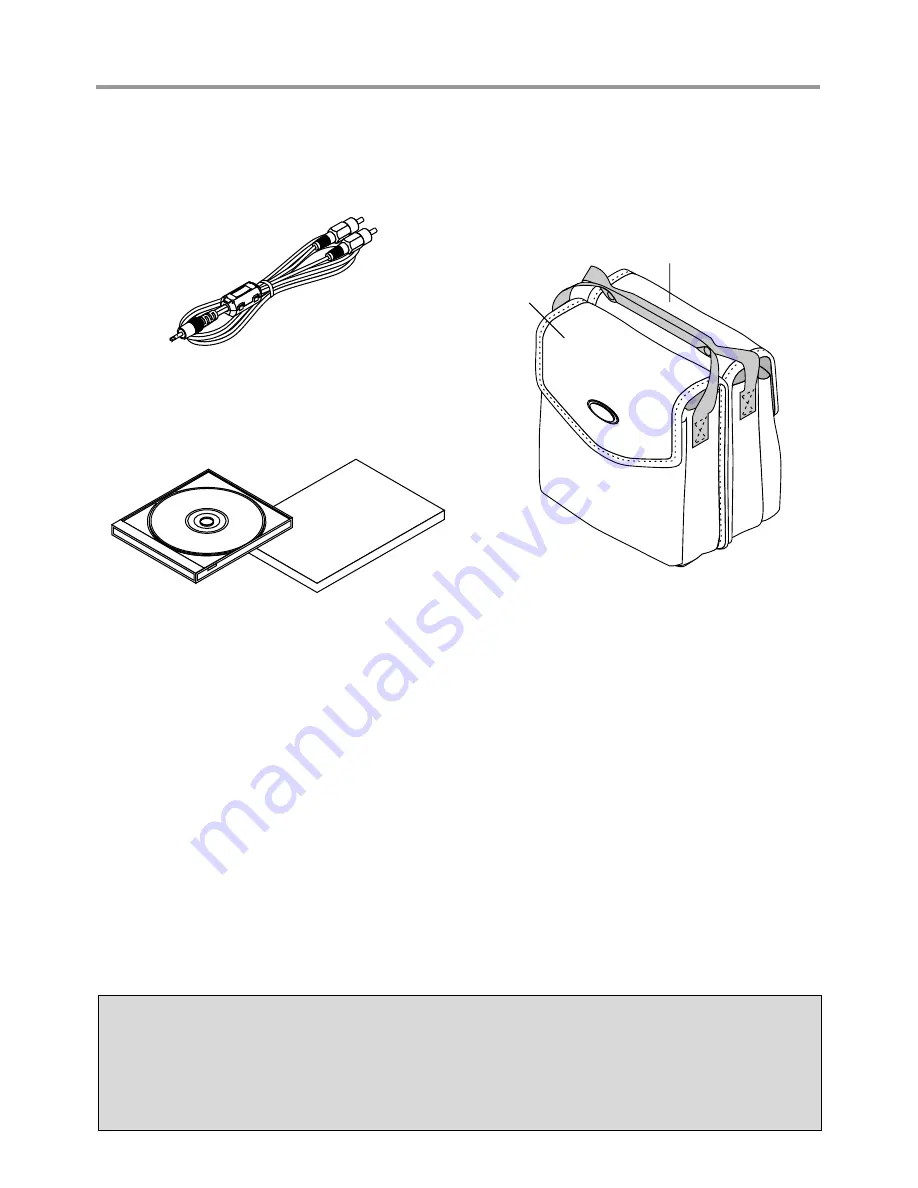
Audio cable (2.5 mm diameter plug / RCA pin
plug, 1.5 m / 4.9 feet) [1]

This cable is used with equipment that has phono type audio
jacks. Connections are described on Page E-23.

No. 772706000

Soft pouch (for projector and accessories) [1]

This pouch is used when storing or moving the projector. The
pouch is made up of two portions that are joined by hook-and-
loop tape to form a single item. The pouch can be separated
into two pieces.

Projector

Accessories

User's Manual (CD-ROM edition) [1]
User's Manual (Simplified Edition) [1]

Precautions

* Leave the power cable plugged in (for 5 to 10 minutes) until the projector returns to room

temperature before placing the projector inside the soft pouch. Placing the projector into the
pouch soon after switching off the power could cause the projector to break down.

* Be sure to attach the lens cap and place the projector into the soft pouch with the lens facing

upward.

Содержание V-1100

Страница 1: ...al Light Processing DLP Digital Micromirror Device and DMD are all trademarks of Texas Instru ments Windows 98 Windows 95 and Windows 3 1 are registered trademarks in the United States and other count...

Страница 2: ...E ARE HIGH VOLTAGE COMPONENTS INSIDE ALL SERVICING MUST BE DONE BY QUALIFIED PLUS SERVICE PERSONNEL WARNING This is a class A product In a domestic environment this product may cause radio inter feren...

Страница 3: ...essive bending A damaged cord can cause electric shock or fire Disconnect the power cable mains lead from the power outlet after using the unit Before disconnecting the power cable make sure that the...

Страница 4: ...l objects such as a wire or screwdriver into the unit If something should fall into the unit immedi ately disconnect the power cable from the unit and have the object removed by a quali fied PLUS serv...

Страница 5: ...l images High quality images such as those from DVD and other sources bring out the display capabilities that are an essential strength of the digital projector Heightened effectiveness with picture i...

Страница 6: ...ections with Video Connectors Video Equipment with VIDEO Connectors E 21 Video Equipment with S VIDEO Connectors E 21 Connections with Component Signals When the Video Connectors are Y Cb and Cr Conne...

Страница 7: ...r Tint Sharpness E 46 Picture Adjustment Fine Picture H Position V Position E 47 Reset E 48 Color Gamma E 49 Color Temp E 49 Color System E 50 Color Space E 50 View Aspect E 51 Filter E 52 Projection...

Страница 8: ...b 15 pin conversion cable 19 cm 0 6 feet 1 This is used when the monitor connector of the personal com puter is a mini D sub 15 pin connector See Page E 19 22 about connections No 772708000 RGB signal...

Страница 9: ...e joined by hook and loop tape to form a single item The pouch can be separated into two pieces Projector Accessories User s Manual CD ROM edition 1 User s Manual Simplified Edition 1 Precautions Leav...

Страница 10: ...he lamp and care must be taken not to come into contact with them STATUS indicator E 61 POWER button E 24 SOURCE button E 28 POWER indicator E 24 MENU button E 38 AUTO button E 28 QUICK MENU button E...

Страница 11: ...N U PC AUDIO VIDEO Front adjusters E 27 Built in Security Slot This security slot supports the MicroSaver Security System manufactured by Kensington Microware Inc AUDIO jack E 23 VIDEO jack E 21 22 P...

Страница 12: ...display screen associated with the PC connector Buttons used for input selec tion E 28 DIGITAL button RGB button YPbPr button VIDEO button S VIDEO button and YCbCr but ton AUTO button E 29 Automatic...

Страница 13: ...pull out to open 2 Remove the old battery and install a new button battery with side facing upward in the battery holder 3 Insert the battery holder into the remote control and push in until the batte...

Страница 14: ...13 1 feet 4 m 1 3 1 f e e t 7m 23 feet 7m 23 feet Remote control sensor Remote control infrared transmitter Side View Remote control sensor Remote control infrared transmitter Top View Note Exposure o...

Страница 15: ...Page E 25 4 Switching on the power of the personal computer and video equipment 5 Properly adjust the projection image to the screen See Projection Screen Position Adjustment on Page E 26 6 Focusing S...

Страница 16: ...certain location or to find out the approximate size of a screen that will be required The projection distance over which focussing is adjustable is 1 2 m 3 9 feet to 6 6 m 21 7 feet The projector sho...

Страница 17: ...1 02 1 28 1 54 1 71 m feet m feet m feet Installation Height of Projection Screen Reference Once the installation location and position have been decided the projection height should be checked In the...

Страница 18: ...on to a displayable resolution at the computer side Check with Table of Supported Frequencies on Page E 70 The setting method of the personal computer will differ depending on the personal computer th...

Страница 19: ...n unit Switch the input selection of the projector to Analog RGB PC VIDEO AUDIO Personal computer Monitor output DVI mini D sub 15 pin conversion cable Supplied item RGB signal cable Supplied item Not...

Страница 20: ...e Fn key plus any one of the F1 to F12 keys See the table below Note When the liquid crystal display of the notebook computer and the projector are displayed at the same time the projected image might...

Страница 21: ...ctor to Video Video Equipment with S VIDEO Connectors Make the connection to the VIDEO connector of the projector using an S video cable Switch the input selection of the projector to S Video PC VIDEO...

Страница 22: ...Connect a DVI mini D sub 15 pin conversion cable to the PC connector of the projector then make a further connection using a component cable which is available as an option Switch the input selection...

Страница 23: ...y convincing audio reproduction please connect the audio output of the video equipment to your audio system PC VIDEO AUDIO R L AUDIO Audio cable Supplied item Video equipment personal computer Note Th...

Страница 24: ...wall outlet Firmly plug in all the way 2 Switch on the projector power Main unit operation Press and hold the POWER button for a while Remote control operation Press the POWER ON button ON OFF POWER S...

Страница 25: ...witch off the power Power Off OK Power Off OK STATUS POWER STATUS POWER STATUS POWER POWER Flashes amber Approximately 90 seconds Lit amber Standby mode The POWER indicator changes to flashing am ber...

Страница 26: ...down with the adjuster See Making Adjust ments with the Adjusters on Page E 27 3 If the image is slanted adjust by turning the right or left front adjuster See Making Adjustments with the Adjusters on...

Страница 27: ...eft and right front adjust ers for fine adjustment Adjust so that there is no shaking of the projector Care must be taken not to come into contact with the ventilation slots which discharge the heat o...

Страница 28: ...s the selection one step in the sequence of Analog RGB YPbPr Digital RGB VIDEO S VIDEO YCbCr Remote control operation Press the desired input se lection button When Auto Source is On When an input sig...

Страница 29: ...operation Remote control operation Press the AUTO button This will not function while the menu or the quick menu is displayed A press of the AUTO button starts the automatic adjustment Note If the di...

Страница 30: ...lecting VIDEO S VIDEO YCbCr or YPbPr Each press of the ASPECT button advances the selection one step in the sequence of Auto Wide Zoom and then repeats Auto While maintaining the aspect ratio projects...

Страница 31: ...YPbPr input screen whereas the sub picture is termed the VIDEO S VIDEO and YCbCr input screen Sub picture Main picture ON OFF FREEZE MUTE PIP DIGITAL RGB YPbPr VIDEO S VIDEO YCbCr QUICK ASPECT AUTO P...

Страница 32: ...the display immediately press the MENU button In the absence of operations for a period of about 10 sec onds the display will close automatically Remote control operation 1 A press of the QUICK MENU b...

Страница 33: ...creen so that they are parallel Picture in Picture The picture from the VIDEO jack is displayed as a sub picture on the input screen from the PC connector This function selects either the size of the...

Страница 34: ...cal keystone adjustment range Likewise overcompensation of the vertical keystone correction value results in a narrowed horizontal adjustment range Note that the adjustment range will differ depending...

Страница 35: ...bsence of operations for a period of about 10 sec onds the display will close automatically 1 2 3 No enlargement Approximately 2 times enlargement Movement The image can also be moved in the following...

Страница 36: ...me adjustment display will appear ENTER ZOOM MENU HKSTN VKSTN VOL CANCEL 3 2 1 Volume 53 2 Adjust the volume The button increases the volume and the button de creases the volume 3 To close the display...

Страница 37: ...Factory Default on Page E 59 Some items will not return to their initial values The adjustment setting items and contents will differ depending on the input selection and the adjust ment setting item...

Страница 38: ...ion of menu names Advances the setting adjustment values of the item contents Names and Functions of Menu Screen Parts Info Setup View Color Image Aspect Filter Projection Auto 3 Keystone V Keystone H...

Страница 39: ...lues will be maintained in storage even when the power has been switched off or the power plug has been disconnected Note that some items are not stored Preparation Switch on the power of the connecte...

Страница 40: ...a return of one step The selected menu name will appear in red Note At the time of menu name selection check that the item name cursor is not being displayed To cancel the display of the cursor press...

Страница 41: ...e cursor button and align the cur sor with the desired item name When the icon is displayed and depend ing on the item contents a press of the cur sor button will result in the setting display a reset...

Страница 42: ...the MENU button to close the sub menu then press again to cancel the cursor This condition allows the menu name to be selected MENU AUTO SOURCE QUICK MENU Info Setup View Color Image Aspect Filter Pro...

Страница 43: ...ect Filter Projection Auto 3 Keystone ENTER CANCEL MENU HKSTN VKSTN ENTER CANCEL MENU HKSTN VKSTN Press the cursor button and select the menu name Selection of the menu name is not pos sible while the...

Страница 44: ...f Input Signal Video Selection Menu Name Item Name Sub Menu Item Name Reference Page Input Signal Tint can be adjusted only at the time of NTSC composite S signal input Image Color View Brightness Con...

Страница 45: ...C r Example of Menu Display Items at the Time of Input Signal Video Selection Menu Name Item Name Sub Menu Item Name Reference Page Input Signal Setup Info Language Auto Source Auto Power Off On Scree...

Страница 46: ...Picture qualities such as brightness and contrast will change depending on the whether the room is bright or dark Please adjust to suit your preference Select the desired item name and then adjust wi...

Страница 47: ...ries of the screen or is smaller than the screen check that the View Aspect set ting is set to Auto See Aspect on Page E 51 Picture Adj Picture Adjustment Adjust this when bright and dark vertical ban...

Страница 48: ...ion resets i e returns to the standard settings the adjustment setting value of the Image menu name A press of the cursor button forces the reset Brightness Contrast Color Tint Sharpness Reset 0 0 0 0...

Страница 49: ...etting contents with the cursor buttons Normal Correction with standard settings Natural Corrects for natural color tones Real Corrects with emphasis on brightness Gamma Normal Normal Auto Color Temp...

Страница 50: ...e is extremely red or extremely green Select the item name Color Space and use the cursor buttons to select a color space setting that provides a normal im age Selection contents at the time ofYCbCr i...

Страница 51: ...es or reduces the image to project a full screen in a ratio of 4 3 Direct Maintains the aspect ratio and projects a picture of the maximum displayable size Real Projects the input signal without pixel...

Страница 52: ...on This function selects the projection orientation to the screen It is set when the projector projects to the front or the rear of the screen 1 Select item name Projection and press the cursor but to...

Страница 53: ...n outline Vertical keystone direction Vertical keystone direction Horizontal keystone direction Horizontal keystone direction Note Overcompensation of the vertical keystone correction value will resul...

Страница 54: ...Note Regardless of whether Keystone Save is set to On or Off when projection is from the standby condition the picture is projected using the previous keystone adjustment values Picture in Picture Thi...

Страница 55: ...ed Select the item name Auto Source and select the setting con tents with the cursor buttons On Switches on the automatic detection function Off Switches off the automatic detection function Auto Sour...

Страница 56: ...s closed and the function is cancelled Auto Power Off Language Auto Source On Off On Black Auto Power Off On Screen Menu Position YPbPr Background Disable Note Some video decks and other equipment out...

Страница 57: ...Enable Function is made valid and input selection is made possible Background This function sets the screen color when the input source is no signal Select item name Background and select the setting...

Страница 58: ...display changes to Adjusting Black and the black level is adjusted Language Auto Source On Off On Black Auto Power Off On Screen Menu Position YPbPr Background White Balance Disable Input Black Signal...

Страница 59: ...input sources to the standard factory default values Select item name Factory Default and press the cursor but ton Status Lamp Timer Reset Factory Default Lamp Timer 12h Press ENTER to Factory Defaul...

Страница 60: ...mp Timer 12h 60Hz 48kHz Lamp Timer This function displays the lamp timer When the lamp timer exceeds 1 000 hours Replace the Lamp Cartridge is displayed on the screen for 10 seconds at one minute inte...

Страница 61: ...tector is activated the power is switched off and even if the power is soon switched back on the power might not actually be supplied to the projector Should this happen wait one minute and then switc...

Страница 62: ...once per second and the POWER indicator will light red The thermal protector is activated and the power of the projector is switched off simultaneously Should this occur proceed with the following act...

Страница 63: ...s the lens properly focussed Are the projection screen and the projector installed at the proper distance Has the projection distance exceeded the focussing range Is there condensation on the lens and...

Страница 64: ...ensor of the main unit Is the remote control out of range for its signal to reach the sensor Is there strong light or a fluorescent lamp in the vicin ity of the sensor Are the batteries weak Try direc...

Страница 65: ...ody with your nails or other hard object since this will cause scratches Dirty Lens Clean using the same method you would use to clean a camera lens Use a commercial blower for camera use or cleaning...

Страница 66: ...dge other than the PLUS replacement lamp cartridge Order this from your PLUS dealer using the unit model number see Note below Note When the lamp usage time reaches 1100 hours it becomes impossible to...

Страница 67: ...ower cable 2 Turn the projector upside down 3 Remove the lamp cover 1 Turn the screw that fastens the lamp cover counterclockwise until it turns freely The screw will not come out 2 Lift the lamp cove...

Страница 68: ...p timer to zero Plug in the power cable and switch on the power before resetting Select Info Lamp Timer Reset and then reset the hours indication NOTE The projector will no longer start when the lamp...

Страница 69: ...00 colors Resolution SXGA Compression XGA True SVGA VGA Expansion True Input Current 1 8 A Power Requirement 100 240 V AC 50 60 Hz Power Consumption 180 watts Mechanical Dimensions Excluding Stand 18...

Страница 70: ...46 9 75 0 1120 750 50 0 60 1 1024 768 56 5 70 1 1024 768 60 0 75 0 1280 1024 64 6 59 9 Apple Macintosh 640 480 35 0 66 7 832 624 49 7 74 5 1024 768 60 2 74 9 1152 870 68 7 75 1 Sun 1152 900 61 8 66 0...

Страница 71: ...E 71 Cabinet Dimensions MENU AUTO SOURCE QUICK MENU STATUS POWER POWER Unit mm inch 45 1 8 180 7 1 141 5 6...

Страница 72: ......

Отзывы: