background image

E-30

General Operation

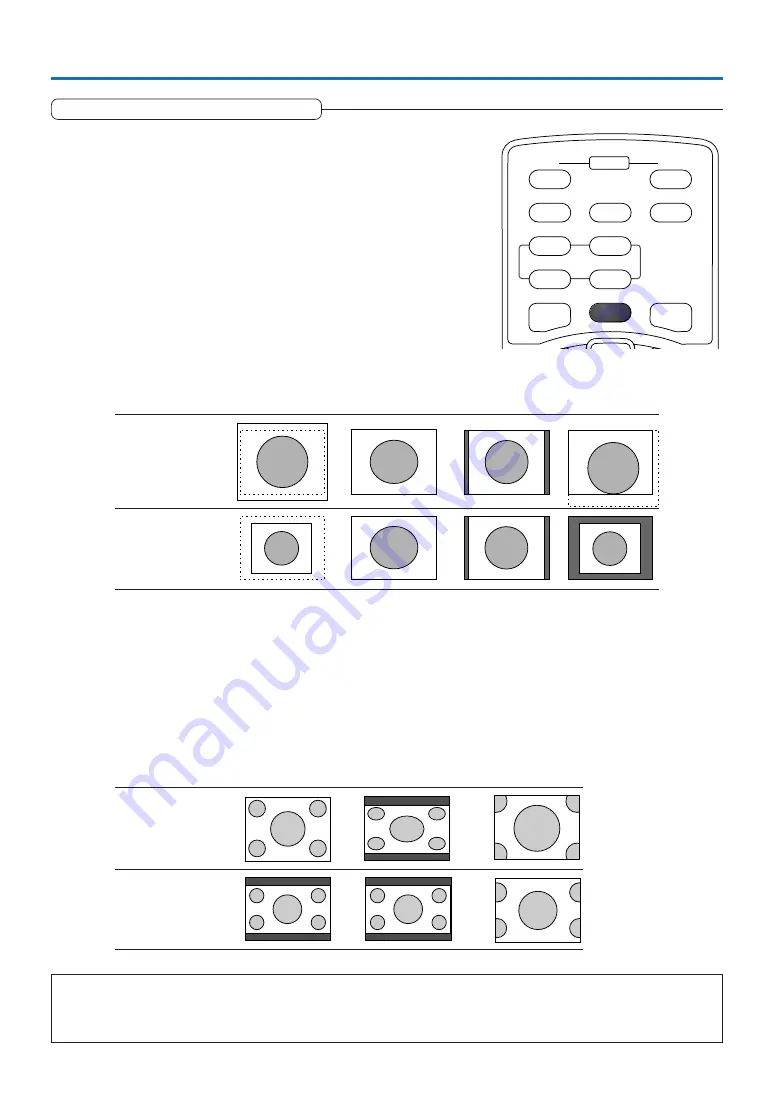
Selection of Aspect Ratio

This function selects horizontal and vertical picture proportions of the input
signal.

Press the ASPECT button while viewing the projected image and select the
aspect ratio.

Personal Computer Signal

Each press of the ASPECT button advances the selection one step in the se-
quence of Auto 

 Direct 

 Real, and then repeats.

Auto ............ Automatically enlarges or reduces the image to project a full screen in a ratio

of 4:3

Direct .......... Maintains the aspect ratio and projects a picture of the maximum displayable

size

Real ............ Projects the input signal without pixel conversion.

Video Signals / Component Signals

Each press of the ASPECT button advances the selection one step in the sequence of Auto 

 Wide 

 Zoom, and then repeats.

Auto ............ While maintaining the aspect ratio, projects a full screen so that no portions extend beyond the boundaries of the screen. The top

and bottom of the 16:9 image becomes black.

Wide ........... Projects to fill the full width with the entire image at 16:9.

(This feature is used to project a squeezed image in a proper aspect ratio.)

Zoom .......... Projects only the 4:3 portion within 16:9 image to fill the screen.

(Portion that extend off screen is cut.)

Input Signal

Auto

Direct

Real

The setting is higher
than the display reso-
lution of the projector.

The setting is lower
than the display reso-
lution of the projector.

Aspect ratio selection

Auto

Wide

Zoom

4:3 screen

16:9 screen

ON

OFF

FREEZE

MUTE

ECO

PC

PC-CARD

VIDEO

S-VIDEO

QUICK

ASPECT

AUTO

STANDBY

Note:

When selection has been made for the “Real” setting of the personal computer signal (i.e., when the input signal and the projector display
resolution are high) and the “Zoom” setting of the video signal, pressing the SELECT 

왖왔왗왘

 buttons on the remote control will permit

movement of the display position. Note that there will not be any movement when the menu or the quick menu is displayed.

Содержание U4-111

Страница 1: ...MD is an ultra precise part developed by Texas Instruments U S A which takes the place of liquid crystal in the projector VGA and XGA are trademarks or registered trademarks of International Business...

Страница 2: ...rotection against harmful interfer ence in a residential installation This equipment generates uses and can radiate radio frequency energy and if not installed and used in accordance with the instruct...

Страница 3: ...the bottom of the product WARNING TO PREVENT FIRE OR SHOCK DO NOT EXPOSE THIS UNIT TO RAIN OR MOISTURE DO NOT USE THIS UNIT S GROUNDED PLUG WITH AN EXTENSION CORD OR IN AN OUTLET UNLESS ALL THREE PRO...

Страница 4: ...periodically using a vacuum cleaner If accumulated dust blocks the ventilation slots the unit will overheat which may cause the unit to malfunction Use a soft brush attachment when using the vacuum c...

Страница 5: ...ital keystone correction function used when making settings that corrects picture distortion to an auto adjustment function that automatically identifies the PC signal A presentation timer that suppor...

Страница 6: ...rs E 21 Video Equipment with S VIDEO Connectors E 21 Connections with Component Signals E 22 When the Video Equipment Has a YCbCr Connector or YPbPr Connector E 22 Connections with the AUDIO Jack E 23...

Страница 7: ...nguage E 56 On Screen E 56 Background E 56 Startup Screen E 57 Info E 58 Status E 58 Factory Default E 58 Lamp Timer Reset E 58 Resolution Frequency E 59 Lamp Timer E 59 Startup Logo Creation E 60 Usi...

Страница 8: ...used in the connection of video equipment that has an S video connector Connections are described on Page E 21 No 771709000 Video cable RCA pin plug 2 m 6 6 feet 1 This cable is used in the connectio...

Страница 9: ...s Manual CD ROM edition 1 User s Manual Simplified Edition 1 HOWTO PUTTHE PROJECTOR INTOTHE CARRYING CASE Close the lens shutter or lens cap before putting the pro jector in its case then fasten the...

Страница 10: ...adjuster E 28 Lamp cover E 74 Opening the lens shutter Slide the lens shutter lever to the left The lens shutter opens When the projector is not in use slide the le ver to the right to close the lens...

Страница 11: ...utton STANDBY button E 24 SOURCE button E 29 MENU button E 36 SELECT buttons QUICK MENU button E 35 Built in Security Slot This security slot supports the MicroSaver Security System manufactured by Ke...

Страница 12: ...doctor Remove the batteries from the remote control when it is not going to be used for a long period Some operations such as menu operations are available only through the use of the remote control...

Страница 13: ...closes with a click sound CR2025 MnO2 LiCELL 3V O L T S J A P A N H C R 2 0 2 5 CR2025 MnO2 LiCELL 3V O L T S J A P A N H C R 2 0 2 5 Purchase a CR2025 type battery for replacement CAUTION Danger of...

Страница 14: ...er is first switched on following purchase See When Menu Language Select Is Displayed Upon Switching On the Power on Page E 25 6 Switching on the power of the personal computer and video equipment 7 P...

Страница 15: ...face of the main unit Screen Size Designation Inches There is a tolerance of 5 due to design values This table uses the lens apex and lens center as references and requires that the projector be in a...

Страница 16: ...feet The projector should be placed within this range There is a tolerance of 5 due to design values This table uses the lens apex and lens center as references and requires that the projector be in...

Страница 17: ...Screen Size Designation Inches There is a tolerance of 5 due to design values This table uses the lens apex and lens center as references and requires that the projector be in a horizontal condition w...

Страница 18: ...1 22 2 03 1 52 2 44 1 83 3 05 2 29 3 66 2 74 4 06 3 05 1 19 1 71 2 56 3 41 4 27 5 12 6 40 7 68 8 54 0 58 0 83 1 25 1 67 2 08 2 50 3 12 3 75 4 17 0 16 0 22 0 34 0 45 0 56 0 67 0 84 1 01 1 12 Screen Si...

Страница 19: ...de Please check with Table of Supported Frequency on Page E 77 The setting method for the personal computer will differ depending on the specific model Please read the personal computer instruction ma...

Страница 20: ...alog RGB using the menu sequence of Setup Input Format PC See Input Format on Page E 50 PC CARD MONITOR OUT Personal computer DVI mini D Sub 15 pin conversion cable Supplied item Note Before making co...

Страница 21: ...from the notebook computer please try the operation described below For an IBM PC AT compatible computer press the Fn key plus any one of the F1 to F12 keys See the table below Manufacturer Model Key...

Страница 22: ...of Setup Input Format Video See Input Format on Page E 50 Video Equipment with S VIDEO Connectors Make the connection to the S VIDEO connector of the projector using the supplied S video cable The in...

Страница 23: ...on Page E 50 This projector automatically distinguishes the YCbCr input signal and the YPbPr input signal and projects it When projecting the YCbCr signal or YPbPr signal if the color of the overall...

Страница 24: ...no type make connection via the supplied audio conversion cable The built in speaker of the projector provides monaural audio To enjoy convincing audio reproduction please connect the audio output of...

Страница 25: ...n after purchase Menu Language Select will be displayed See Page E 25 for information about language selection When the power is switched on the STANDBY indicator changes to flashing green then lights...

Страница 26: ...wise to focus it See Page E 28 Menu Language Select W hlen Sie bitte die Men Sprache aus Deutsch S il vous pla t choisir la langue de menu Fran ais Per favore di scegliere la lingua di menu Italiano E...

Страница 27: ...ANDBY button One more press of the STANDBY STANDBY OFF button will switch off the power Flashing amber Approximately 60 seconds Lit amber Standby mode The STANDBY indicator changes to flash ing amber...

Страница 28: ...ts with the Adjust ers on Page E 28 3 If the image is slanted adjust by turning the right or left front adjuster See Making Adjustments with the Adjusters on Page E 28 4 A projection image such as tha...

Страница 29: ...located at the left and right and 2 raise the projector to align the image with the screen then release your fingers Turn the left and right front adjusters for fine adjustment Adjust so that there i...

Страница 30: ...r an input sig nal is present Note When you do not operate source selection the projector will assume the input selec tion condition that was previously used See Auto Source on Page E 49 for informati...

Страница 31: ...ns extend beyond the boundaries of the screen The top and bottom of the 16 9 image becomes black Wide Projects to fill the full width with the entire image at 16 9 This feature is used to project a sq...

Страница 32: ...k the picture and the sound and the screen will take on the background color that has been set Another press will cause a return to the original conditions ON OFF FREEZE MUTE ECO PC PC CARD VIDEO S VI...

Страница 33: ...button to close the display immediately 2 Press the or the button to set the time The setting contents are Off and from 10 to 60 minutes in 10 minute intervals Settings can also be made with the SELEC...

Страница 34: ...saved See Keystone Save on Page E 48 Screen examples have been drawn in an exaggerated style for the purpose of description General Operation Adjustment of the Volume This function adjusts the volume...

Страница 35: ...of operations for a period of about 10 seconds the display will close automatically 1 2 3 No enlargement Approximately 2 times enlargement Movement The image can also be moved in the following circums...

Страница 36: ...quence The adjustment display can be selected with use of either the SELECT or button 2 Press the cursor or button to make the adjustment Pressing the or button will also switch the adjustment display...

Страница 37: ...tems will not return to their initial values The adjustment setting items and contents will differ depending on the input selection and the adjustment setting items that can be used with the input sig...

Страница 38: ...Card Viewer Menu Operation Method Menu Screen Names and Functions Menu Name This is the title of the menu There is a change to the title screen when the menu is se lected The selected menu name appea...

Страница 39: ...is selected 1 Press the MENU button to display the menu Menu Display The menu name that existed when the menu was closed previously will be displayed Note Please check that the cursor of the item nam...

Страница 40: ...p Info Aspect Auto Off Off On Keystone 0 Items for which the Icon Is Displayed A press of the ENTER button displays the sub menu and the cursor moves to the sub menu Press the SELECT button and align...

Страница 41: ...s displayed Note A press of the QUICK button while the menu is displayed will close the menu and display the quick menu A press of the MENU button while the quick menu is displayed will close the quic...

Страница 42: ...Adj 0 Fine Picture 48 H Position 0 V Position 0 Reset Brightness 0 A n a l o g R G B D i g i t a l R G B Y P b P r Y C b C r V I D E O S V I D E O Menu name Image Color View Brightness E 43 Item Name...

Страница 43: ...Memu Position Lamp Mode E 49 Input Format E 50 PC Video E 50 SVideo E 50 Presentation Timer E 50 Logo Capture Logo Background E 51 E 51 Logo Scaling E 51 Logo Position E 52 Caputure Mode E 52 Invalida...

Страница 44: ...hter More contrast Denser color More green Sharper image Note The adjustment values of the adjustable items are stored according to input source Tint can be adjusted only at the time of NTSC composite...

Страница 45: ...ture is shifted up or down Select the V Position item name and adjust with the SELECT buttons Reset This function resets i e returns to the standard settings the adjust ment setting value of the Image...

Страница 46: ...or Temp The screen color is affected by the color of the illumination and other extraneous light This function adjusts the white which is the reference color for video equipment and improves the quali...

Страница 47: ...lance White Balance This function automatically adjusts the black level and the white level of the analog RGB input signal to suit the personal computer 1 Select the item name White Balance and press...

Страница 48: ...ull width with the entire image at 16 9 This feature is used to project a squeezed image in a proper aspect ra tio Zoom Projects only the 4 3 portion within 16 9 image to fill the screen Portion that...

Страница 49: ...lip Horizontal Flip Keystone 0 3 Keystone Save Aspect Auto Off Off On Pressing the button will cause the projection screen to be corrected toward the screen depicted by the dotted lines Note Menus and...

Страница 50: ...r Off and select the setting contents with the SELECT buttons On The power is switched off when there is no signal Off The power is not switch off even when there is no signal Operation when Function...

Страница 51: ...ntification is not possible with Auto make the setting Select the item name Input Format press the ENTER button and the sub menu will open Select the connector that is to be changed and select the set...

Страница 52: ...buttons Auto Power Off Memu Position Lamp Presentation Timer Option Auto Source On Off Nonal Off Input Format PC Card Viewer Logo Capture Red Green Blue Logo Position Caputure mode In alidata Logo Log...

Страница 53: ...E 60 for information about using logo capture Select item name Logo Capture press the ENTER button and the sub menu will open Select Capture Mode and select the compression ratio with the SELECT butt...

Страница 54: ...CANCEL button There is a change to the menu display Starting Capture Press the ENTER button start the capture Red Green Blue Logo Position Caputure mode Invalidata Logo Logo Background Black Real Hig...

Страница 55: ...l Repeat Progress Bar 5sec Manual Initial Setting Thumbnail On Off 1 2 0 0 0 0 0 0 0 A _ J P G Play Mode This is the slide switching setting at the time of full screen display of the viewer screen See...

Страница 56: ...setting contents with the SELECT buttons Off Stops at the last slide On Repeatedly plays the slides in the folder Play Mode Interval Repeat Progress Bar Manual Initial Setting Thumbnail On Off 5sec P...

Страница 57: ...en and select the setting contents with the SELECT buttons On The message is displayed Off The message is not displayed Note Even when set to off messages that are not in a black frame will be dis pla...

Страница 58: ...the SELECT buttons Logo Displays the logo Blank Does not display the logo Note When Logo is selected at the startup screen the PLUS logo will be displayed if the logo you created and captured is not...

Страница 59: ...f all the in put sources to the standard factory default values Select item name Factory Default and press the ENTER button There is a change to the display Press ENTER to Factory Default Set Press th...

Страница 60: ...approx 2000 hours Lamp life will differ when there has been switching between the modes When Lamp Life Has Been Reached Replace the Lamp Cartridge is displayed on the screen for 10 seconds in a 1 minu...

Страница 61: ...of the created image is white selection of White permits creation of a seamless startup screen 3 Set the Logo Scaling Page E 51 Select Logo Scaling and set the size When a large magnification has bee...

Страница 62: ...ere is a re turn to the menu display This completes the startup logo The next time the projector is started the captured logo will be displayed Note This function is for the logo Full color photograph...

Страница 63: ...be played by this projector are JPEG BMP and PNG of the MS DOS format Progressive JPEG cannot be played Some images in the JPEG format cannot be played Should this be the case please convert the imag...

Страница 64: ...s in the order of 0 to 9 to A to Z File names are within 8 alphanumeric characters and the extensions are 3 characters File names of more than 8 characters will take the form of XXXXXX W YYY including...

Страница 65: ...ng display of the tool bar MENU button Used to display not display the tool bar SOURCE button Switches the projector to PC Card Viewer input CANCEL MENU ON OFF FREEZE MUTE ECO PC PC CARD VIDEO S VIDEO...

Страница 66: ...A press of the MENU button or the CANCEL button while the tool bar is being displayed will close the tool bar Note also that the tool bar will close automatically when there has not been a button ope...

Страница 67: ...y will not work but forcefully pushing it in will cause damage to the projector Please see the instruction manual of the CompactFlash Card if available for information about the insertion orientation...

Страница 68: ...mence from the first slide in the first folder See Page E 54 for infor mation about the settings When PC Card Error is displayed the CompactFlash Card that you are using cannot be properly identified...

Страница 69: ...e ENTER button To move swiftly to the next page press the SELECT button The cursor will move to the very bottom of the screen One more press will move it to the next page To return the cursor use the...

Страница 70: ...bnail display Selection of the Thumbnail icon of the tool bar and press the ENTER button will also cause a return to the thumbnail display A press of the CANCEL button while the tool bar is displayed...

Страница 71: ...projector to a cool place If the projector s internal temperature is high check the cooling fan s ventilation slots and clean them if they are clogged When the temperature protector is activated the...

Страница 72: ...er s resolution If the image is crushed in the horizontal or vertical direction or if it is not displayed over the entire screen select a different aspect ratio When a component signal is being input...

Страница 73: ...er hard object since this will cause scratches Dirty Lens Clean using the same method you would use to clean a camera lens Use a commercial blower for camera use or cleaning paper for eye glasses Be c...

Страница 74: ...hed the power is set to the standby mode and no longer turns on Contact a store that sells the U4 136 U4 131 U4 112 U4 111 for a replacement lamp Indicate you need a U4 150 re placement lamp for the U...

Страница 75: ...ojector upside down 3 Remove the lamp cover 1 Turn the lamp cover s set screw counterclockwise and loosen until the screw turns freely The screw does not come off 2 Open the lamp cover a little then p...

Страница 76: ...Timer Reset on Page E 58 Note After reaching the lamp service life if the lamp is used for more than another 100 hours it will not be possible to switch on the power Should this happen while the proje...

Страница 77: ...U4 136 U4 112 Meets EMC Directive EN55022 EN55024 Meets Low Voltage Directive EN60950 Specifications and design are subject to change without notice Projection lens Image size U4 136 Manual zoom 1 2...

Страница 78: ...solution is 800 600 dots When displaying a signal with resolutions other than 800 600 dots such as 1024 768 sizes of characters or lines may be uneven XGA SVGA XGA SVGA VIDEO NTSC VIDEO PAL SECAM VESA...

Страница 79: ...ICK MENU OPEN STATUS SOURCE STANDBY AUTO MENU QUICK MENU PC CARD Cabinet Dimensions Unit mm inch 190 7 5 53 2 1 239 9 4 12 0 5 Unit mm inch 190 7 5 53 2 1 239 9 4 12 0 5 Applicable Projector U4 131 U4...

Страница 80: ...2003...

Отзывы: