


97
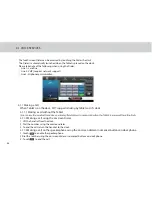
4.1.8 Changing Ringtones
Within the Dialer, touch the Phone Setting tab.
Touch the Ringtones & Volume from the list
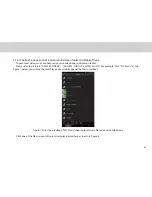
Touch the Menu button at the top corner.
Touch Settings in the menu displayed.
From the options that shows up touch Phone ringtone.
Select the ringtone you would like from the list provided.
4.1.9 CONTACTS
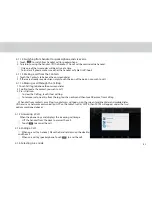
4.1.9.1 Opening Contacts
4.1.9.2 Creating a Contact
1. Open the contacts screen.
2. Touch new contact.
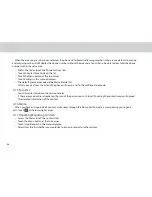
3. Enter the contact’s information:
Enter the contact name, and touch the picture frame to select a picture to display next to the name in the contacts
list and in other applications.
Touch a contact information category, such as phone numbers and e-mail addresses, to enter information about your
contact. Flick up and down to view all categories.
Touch the plus button to the right of a category to add more than one entry for that category. Touch the minus button
to the right of an entry to remove the entry.
Touch the label button to the left of the contact information items such as Phone and E-mail to open a menu with
preset labels for a phone number. You can touch to select a preset label or touch Custom in the menu to create your
own label.
You can open your contacts by touching Contacts on the Home screen or on the Applications screen. In the contact
tab pages, you can touch a contact image to open the contact details screen.
Contacts enables you to save and manage information such as phone numbers, e-mail addresses and chat addresses of
your contacts, and provides quick and easy access to communicate with the people you want.
Содержание TELPAD MT7
Страница 1: ......
Страница 2: ......
Страница 7: ...1 GETTING STARTED...
Страница 9: ...2 TELPAD INTRODUCTION...
Страница 18: ...3 TABLET FUNCTIONS...
Страница 55: ...49 Figure 4 Figure 5...
Страница 56: ...50 Figure 6 Figure 7...
Страница 81: ...75 4 And then press Cast screen same as Figure 2 below Figure 2...
Страница 82: ...76 5 Select Enable wireless display in menu of top right corner Figure 3 Figure 3...
Страница 83: ...77 Figure 4 6 Tablet will search the accessible signal sources in range automatically Figure 4...
Страница 84: ...78 Figure 5 7 Select the corresponding signal source and wireless connection shows successfully Figure 5...
Страница 88: ...82 Figure 5 inish Figure 6 apk iMediaShare interface Please start apk iMediaShare and the interface Figure 6...
Страница 99: ...4 THE CONNECTION BETWEEN DOCK PHONE AND TABLET...
Страница 105: ...5 BASIC TROUBLESHOOTING FOR THE TELPAD...
Страница 107: ...6 FAQs...
Страница 113: ...7 WARNINGS AND PRECAUTIONS...
Страница 118: ...8 PERSONAL INFORMATION AND DATA SECURITY...
Страница 120: ...9 LEGAL NOTICE...
Страница 122: ...10 DISCLAIMER OF WARRANTIES...
Страница 124: ...11 INDEX...
Страница 127: ...Warranty card NAME TEL NO ADDRESS DATE OF PURCHASE VERSION SERIAL NO...
Страница 128: ......
Страница 129: ......


