background image

YMER 3

OPERATORS GUIDE

March 2020

www.plcelectronicsolutions.com

D E S I G N E D   A N D   M A D E   I N   S W E D E N   S I N C E   1 9 6 4

®

D E S I G N E D   A N D   M A D E   I N   S W E D E N   S I N C E   1 9 6 4

®

10

Lens Mapping

This section covers the lens mapping function of Hedén Ymer-3.

Ymer-3 have lens mapping function on the focus channel, the unit have four different storage positions for storing lens data 

internally. The focus mapping function elliminates the need to manually mark separate rings for each lens.

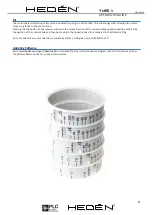
To map a lens to the scale ring, select one of the pre-marked scale rings, the lens mapping function matches the focus 

distance of a lens to a pre-marked lens ring.

The lens mapping is made by selecting a pre-marked scale ring and then by matching up to 20 marks on the lens with the 

corresponding marks on the pre-marked ring. It’s possible to use less than 20 marks, but in general more marks will give a 

better results. The mapping is done by moving the motor to a mark on the lens, then pressing the AUX button and moving 

the scale ring to the corresponding mark, the process is described in more detail below.

After mapping the lens, it will be matched to the pre-marked scale ring used.

-Select Lens

Ymer-3 has four internal positions to store mapped lenses, the lens selected is displayed on the home screen, select or 

change the data storage position to store the lens before mapping a new lens. The stored lens will be overwritten when 

mapping a new lens.


- The currently selected lens id displayed on the home screen


- Long press Enter key to open the Main Menu


- Select “Lens” to go into the lens selection menu, the data for the lens and lens ring


 in the urrently selected lens position will be displayed.


- Press “Select” to select a different lens storage position (1-4)


- “Exit”

- Lens Map On/Off

To activate or de-activate the lens mapping


- Press enter to open Main Menu


- Select “Map On” To turn lens mapping on


- Select “Map Off” to turn lens mapping off


- “Exit to return to home screen

- Map new lens

To map a new lens to a pre-marked scale ring, first select the lens and scale ring, You will start by mapping the infinity mark 

on the lens and then continue with other marks. You can map up to 20 marks on the lens, before you start, make a plan on 

which marks to map.

Before starting to map, select lens position to store the lens, if a lens is already stored in that position it will be overwritten, 

see section “Select Lens”

Mapping the lens:

- Press Enter to open the main menu, then go to “Map Len”

- In the MAP menu choose “MapLens” to start mapping a new lens

- Select lens ring according to the pre-marked ring choosen

- Select the first letter of the lens manufacturers name, note that selecting “None” will not store the lens

- Select the lens manufacturers name from the list

- Add focal length or other identifier, then select “Next”

- To map the lens, use the control knob to move the lens to the infinity mark on the lens

- Press and hold the AUX key on the transmitter and move the knob to the infinity mark on the scale ring, release AUX key

- Use the knob to move to the next marker on the lens

- Press and hold AUS button and move the scale ring to the corresponding position, release AUX key

- Repeat until you have mapped the wjole lens, you can see the marker counter.

- When ready or all marks are mapped, select “Save” wait until the screen say “Complete” and then select “Exit”    

and then“Exit” to get to the main screen.

- The main screen should now be updated with the lens manufacturer and focal length

Содержание HEDEN YMER 3

Страница 1: ...for safe use on any lens with or without end stops and the quickest manual calibration system on the market Features include Lens maping with pre marked scale rings for focus LenSaverTM patent pending manual calibration Automatic calibration 3 channel Receiver Remote trigger Robust radio with a line of sight range of up to 500 m 1640 feet Industry leading wireless control allowing for the fastest ...

Страница 2: ...m Motors 6 Resetting the Receiver to Factory Settings 6 Pairing 6 Calibration 7 On the Receiver 7 On the Transmitter 7 LenSaverTM Manual Calibration 7 Manual Override 8 Focus Limits 8 Macro 8 REC 8 Dir 9 Updating Software 9 Lens mapping 10 Trouble Shooting 11 Q My motor will not calibrate the full span of the lens 11 Q Automatic calibration will not start 11 Q My macro markers are not exactly wher...

Страница 3: ...s sensitive to over voltage and ESD only connect and disconnect the motor when the receiver is not powered up Make sure all cables are original Hedén cables and inspect for damage before use Using faulty cables may cause serious damage to internal electronics We recommend using genuine Sony NP FM500H batteries in the handset for longest run time The included foam insert will fit straight into a Pe...

Страница 4: ...s Power off Camera run stop Short press Illumination of scale ring Short press Down in menus Long press Start pairing cycle Long press Enter menu Short press Enter in menus Limit mode See page XX Long press Toggle between focus iris zoom actions Iris control slider Zoom control Long press Auto calibrate all channels Zoom speed control Limit mode See page XX Battery indicator Radio signal level Sel...

Страница 5: ... D M A D E I N S W E D E N S I N C E 1 9 6 4 5 LED and Button Layout Receiver Motor direction toggle Status display Detachable antenna Run Stop Connector Remote trigger Software update Auxiliary Connector Auxiliary equipment Data communication Power connector Side view left and right side Pair Manual calibration see page Auto calibrate all channels ...

Страница 6: ...if calibrated to a lens to shift on the lens to the corresponding position in the opposite travel direction and then to be moving in the opposite direction compared to the default setting Resetting the Receiver to Factory Settings Resetting the receiver will restore all settings to factory defaults To perform the reset turn the system off Press and hold the AUTO button while powering the system ba...

Страница 7: ...ed to be gentle with the end stops of lenses sometimes the calibration will not reach both end stop due to varition in lens friction If this occours the easiest solution is to use the LenSaver maual calibration described furter down on this page The lens calibration and current position is retained in memory up to 1 day after the system is powered down Removing the motor initiating calibration or ...

Страница 8: ...cond position and the motor moves to its new position within the span defined by the position of the control knob The Macro LED on the transmitter and the LED s by the FOCUS LIMITS button on the receiver turns solid green to indicate that the system is in Macro mode To turn the Macro function off press the Macro button one more time The Macro LED on the transmitter and the LED s by the FOCUS LIMIT...

Страница 9: ...elation to the control knob Pressing the DIR button on the receiver will cause the motor to move to the corresponding opposite position dictated by the position of the control knob and then be moving in the opposite direction compared to the default setting On the receiver the current selection is marked by either a solid green or red DIR button LED Updating Software Go to www heden se support dow...

Страница 10: ...lens and lens ring in the urrently selected lens position will be displayed Press Select to select a different lens storage position 1 4 Exit Lens Map On Off To activate or de activate the lens mapping Press enter to open Main Menu Select Map On To turn lens mapping on Select Map Off to turn lens mapping off Exit to return to home screen Map new lens To map a new lens to a pre marked scale ring fi...

Страница 11: ...ibration can only be done on the receiver Q My macro markers are not exactly where I placed them A Try waiting about one second after each press of the button for the system to calculate the new parameters and correctly place the marker Q I am experiencing connectivity or signal quality issues A1 Make sure the antenna is not damaged A2 Try staying within line of sight Solid structures can interfer...

Страница 12: ...A D E I N S W E D E N S I N C E 1 9 6 4 For sales inquires contact Sales at sales heden se For questions regarding service support and general technical queries techsupport heden se Address Vita Gavelns Väg 6 SE 426 71 VÄSTRA FRÖLUNDA SWEDEN Phone 46 0 31 272110 Visit www heden se for our full range of products downloadable content newsletters and more ...

Отзывы: