background image

81

DE

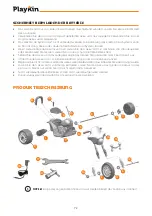
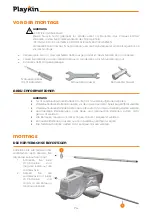
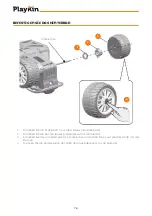
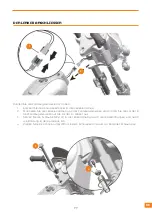
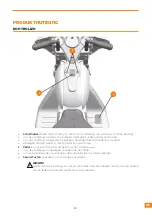
PRODUKTNUTZUNG

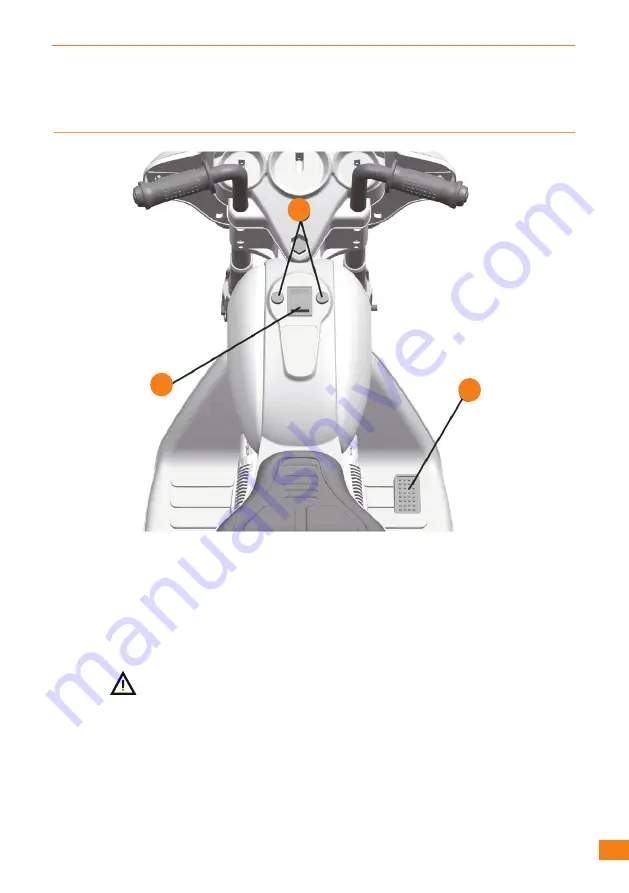
KONTROLLEN


Schalthebel: 

ändert die Richtung, in der sich das Fahrzeug von vorne nach hinten bewegt.


Um das Fahrzeug vorwärts zu bewegen, bewegen Sie den Hebel nach oben.


Um das Fahrzeug rückwärts zu bewegen, bewegen Sie den Hebel nach unten.


Bewegen Sie den Hebel in der Mitte bis zum Anschlag.

1. 

Pedal:

 Es übt Kraft (Geschwindigkeit) auf das Fahrzeug aus.


Um das Fahrzeug zu bewegen, drücken Sie das Pedal.


Um zu bremsen oder zu verlangsamen, drücken Sie das Pedal weniger.


Sound-Tasten: 

drücken, um die Klänge anzuhören.

WICHTIG

Halten Sie das Fahrzeug immer an, wenn Sie Geschwindigkeit oder Richtung ändern, 
um Schäden an Gängen und Motor zu vermeiden.

3

2

1

Содержание POLICE

Страница 1: ...POLICE Manual del usuario Manuel d utilisation Manuale dell utente Instruction manual Betriebsanleitung...

Страница 2: ......

Страница 3: ...m xima Peso m ximo del usuario es de 25 kg No deje nunca el ni o sin vigilancia mientas est en el veh culo Es obligatoria la supervisi n directa del adulto Es necesario usar este juguete con prudencia...

Страница 4: ...les inflamables Realice la carga siempre en lugares bien ventilados No exponga la bater a y el cargador a temperaturas extremas o humedades No abra la bater a La bater a contiene sustancias t xicas y...

Страница 5: ...ueda trasera 6 Eje trasero 7 Chasis 8 Respaldo 9 Asiento 10 Barra del manillar 11 Rueda delantera 12 Tornillo M8x170 Se encuentra en la carrocer a del veh culo 13 Perno M8x100 Se encuentra en el paque...

Страница 6: ...er as no recargables no deben recargarse Las pilas recargables deben retirarse del juguete antes de cargarlas Las bater as recargables s lo deben cargarse bajo la supervisi n de un adulto Los diferent...

Страница 7: ...o 2 Conecte el conector del motor en la carrocer a del veh culo 3 Deslice la rueda motriz sobre el eje trasero y mantenga la rueda motriz correspondiente con la caja de cambios 4 Empuje el tapacubos e...

Страница 8: ...zquierdo 2 Deslice el casquillo extremo del anillo primero en el eje trasero 3 Deslice la rueda trasera sobre el eje trasero y mant ngalo igualado con el casquillo 4 Empuje el tapacubos en el centro d...

Страница 9: ...conjunto del manillar contra la carrocer a del veh culo y alinee los agujeros de la carrocer a del veh culo con los orificios del manillar 3 Inserte el perno M8x100 en el orificio del manillar a trav...

Страница 10: ...el perno M8x170 Contin e empujando el perno hasta que pase a trav s de la otra horquilla del manillar 5 Apriete la contratuerca 8 en el perno con la llave hexagonal SUGERENCIA Utilice la llave ingles...

Страница 11: ...11 ES CONTROL DEL SUMINISTRO DE ALIMENTACI N 1 Enchufe el conector del fusible rojo en el terminal de la bater a Caja de fusibles 1...

Страница 12: ...la parte delantera del asiento en los orificios de la carrocer a del veh culo 2 Apriete un tornillo 4x12 con un destornillador 3 Inserte las leng etas del respaldo en los orificios de la carrocer a d...

Страница 13: ...l veh culo hacia atr s desplace la palanca hacia abajo Desplace la palanca en el centro para la parada 2 Pedal Ejerce la potencia velocidad al veh culo Para mover el veh culo pise el pedal Para frenar...

Страница 14: ...bater a Despu s de cada uso o como m nimo una vez al mes el tiempo de recarga es de 8 a 12 horas menos de 20 horas como m ximo 1 Enchufe el puerto del cargador en la entrada de toma de corriente el en...

Страница 15: ...un cortocircuito que provoque el disparo del fusible REEMPLAZO Y ELIMINACI N DE LA BATER A La bater a eventualmente perder la capacidad de mantener una carga Dependiendo de la cantidad de uso y ciert...

Страница 16: ...eden derretir IDENTIFICACI N Y SOLUCI N DE PROBLEMAS Problema Causa Soluci n El veh culo no funciona Bater a baja de carga Recargue la bater a El fusible t rmico se ha disparado Reajuste el fusible v...

Страница 17: ...en el motor Un punto muerto significa que la corriente el ctrica no pasa correctamente a la conexi n del terminal y el veh culo requiere reparaci n P ngase en contacto con su distribuidor por favor Di...

Страница 18: ...te producto tiene una garant a de 2 a os Esta garant a cubre da os y mal funcionamiento s lo en aquellos casos en los que el producto no ha sido mal utilizado y siempre que todas las instrucciones hay...

Страница 19: ...ctiva 2014 30 UE del Parlamento Europeo y del Consejo de 26 de febrero de 2014 sobre la armonizaci n de las legislaciones de los Estados miembros en materia de compatibilidad electromagn tica refundic...

Страница 20: ...t sur la route pr s des voitures sur les pentes dans les piscines ou autres plans d eau Le pilote doit toujours tre bien assis dans son si ge Le v hicule est quip de ceintures de s curit r glables Veu...

Страница 21: ...atterie proximit de sources de chaleur ou de mat riaux inflammables Chargez toujours dans des endroits bien a r s N exposez pas la batterie et le chargeur des temp ratures ou une humidit extr mes N ou...

Страница 22: ...ign e 11 Roue avant 12 M8x170 boulon Plac sur la carrosserie du v hicule 13 M8x100 boulon Plac dans l emballage du mat riel 14 8 contre crou Plac sur les boulons 15 Vis 4x12 16 Chargeur 17 Spanner Pla...

Страница 23: ...e doivent pas tre recharg es Les piles rechargeables doivent tre retir es du jouet avant d tre charg es Les piles rechargeables ne doivent tre recharg es que sous la surveillance d un adulte Diff rent...

Страница 24: ...t gauche Branchez le connecteur sur le moteur connecteur sur la carrosserie du v hicule 3 Faites glisser la roue motrice sur l essieu arri re Et gardez la roue motrice avec la bo te vitesses 4 Pousser...

Страница 25: ...re c t gauche 2 Faites glisser la bague extr mit de bague en premier sur l essieu arri re 3 Faites glisser la roue arri re sur l essieu arri re et faites le co ncider avec la bague 4 Poussez l enjoliv...

Страница 26: ...on 2 Fixez l ensemble de la poign e par rapport la carrosserie du v hicule Et alignez les trous de la carrosserie du v hicule avec les trous du guidon 3 Ins rez le boulon M8x100 dans le trou du guidon...

Страница 27: ...ser une autre rondelle 10 sur le boulon M8x170 Continuez en poussant le boulon jusqu ce qu il passe par l autre fourche du guidon 5 Fixez le contre crou 8 sur le boulon avec le Hexwrench CONSEIL Utili...

Страница 28: ...28 CONTR LE DE L ALIMENTATION 1 Branchez le connecteur fusible rouge dans la borne de la batterie Bo te fusibles 1...

Страница 29: ...languettes l avant du si ge dans les trous sur la carrosserie du v hicule 2 Serrez une vis 4x12 avec un tournevis 3 Ins rez les languettes du dossier dans les trous de la carrosserie du v hicule et po...

Страница 30: ...r d placer la voiture vers l arri re abaissez le levier D placer le levier au milieu l arr t 1 P dale donne la puissance vitesse au v hicule Pour d placer la voiture appuyez sur la p dale Pour freiner...

Страница 31: ...ement rechargez la batterie Apr s chaque utilisation ou une fois par mois le temps de recharge minimum est de 8 12 heures soit moins de 20 heures au maximum 1 Branchez le port du chargeur dans la pris...

Страница 32: ...t qui provoque le voyage du fusible REMPLACEMENT DE LA BATTERIE La batterie perdra ventuellement la capacit de maintenir une charge En fonction de la quantit d utilisation et de certaines conditions l...

Страница 33: ...s po les et les appareils de chauffage Les pi ces en plastique peuvent fondre IDENTIFICATION ET R SOLUTION DE PROBL MES Probl me Cause Solution Le v hicule ne fonctionne pas Batterie faible Rechargez...

Страница 34: ...ead Spot sur le moteur Un point mort signifie que le courant lectrique ne passe pas correctement la connexion de la borne et que le v hicule doit tre r par Passage difficile d avant en arri re ou vice...

Страница 35: ...ible GARANTIE Ce produit a une garantie de 2 ans Cette garantie couvre les dommages et le mauvais fonctionnement uniquement si le produit n a pas t mal utilis et que toutes les instructions ont t corr...

Страница 36: ...irective 2014 30 UE du Parlement europ en et du Conseil du 26 f vrier 2014 relative l harmonisation des l gislations des tats membres concernant la compatibilit lectromagn tique refonte Le produit liv...

Страница 37: ...causa della sua velocit massima Il peso massimo per l utente di 25 kg Non lasciare mai il bambino incustodito mentre si trova nel veicolo La supervisione diretta da parte di un adulto obbligatoria L u...

Страница 38: ...aricare la batteria vicino a fonti di calore o materiali infiammabili Caricare sempre in aree ben ventilate Non esporre la batteria e il caricabatterie a temperature o umidit estreme Non aprire la bat...

Страница 39: ...12 Vite M8x100 Si trova sulla carrozzeria del veicolo 13 Perno M8x100 Si trova nella confezione degli strumenti 14 Controdado 8 Si trova sui perni 15 Vite 4x12 16 Caricatore 17 Chiave inglese Si trova...

Страница 40: ...essere ricaricate Le pile ricaricabili devono essere rimosse dal giocattolo prima di essere ricaricate La batterie ricaricabili devono essere ricaricate solo sotto la supervisione di un adulto Le dive...

Страница 41: ...l connettore del motore alla carrozzeria del veicolo 2 Inserisca la ruota motrice sull asse posteriore e faccia combaciare la ruota motrice con la cassa del cambio 3 Eserciti pressione sul cerchione s...

Страница 42: ...erisca la boccola estremit del primo anello sull asse posteriore 3 Inserisca la ruota posteriore sull asse posteriore e la faccia combaciare con la boccola 4 Eserciti pressione sul cerchione sulla par...

Страница 43: ...o 2 Monti l insieme del manubrio sulla carrozzeria del veicolo e allinei i fori della carrozzeria del veicolo con i fori del manubrio 3 Inserisca il perno M8x100 nel foro del manubrio attraverso i for...

Страница 44: ...perno M8x170 Continui a spingere il perno fino a che passi attraverso la forcella del manubrio 5 Stringa il controdado 8 sul perno con la chiave esagonale SUGGERIMENTO Utilizzi la chiave inglese per b...

Страница 45: ...IT 45 CONTROLLO DELLA FORNITURA DELL ALIMENTAZIONE 1 Colleghi il connettore del fusibile rosso al terminale della batteria Scatola dei fusibili 1...

Страница 46: ...arte anteriore del sedile nei fori della carrozzeria del veicolo 2 Collochi e stringa una vite 4x12 con un cacciavite 3 Inserisca le linguette dello schienale nei fori della carrozzeria del veicolo e...

Страница 47: ...veicolo all indietro sposti la leva verso il basso Sposti la leva al centro per l arresto 2 Pedale Fornisce la potenza velocit al veicolo Per muovere il veicolo schiacci il pedale Per frenare o rallen...

Страница 48: ...eria Dopo ogni utilizzo o come minimo una volta al mese il tempo di ricarica deve essere tra 8 e 12 ore meno di 20 ore come massimo 1 Colleghi la spina del caricatore nell entrata della presa di corre...

Страница 49: ...nnesca l attivazione del fusibile SOSTITUZIONE E SMALTIMENTO DELLA BATTERIA La batteria prima o poi perder la capacit di poter mantenere una carica Dipendendo dalla quantit dell utilizzo e alcune cond...

Страница 50: ...stica possono fondere IDENTIFICAZIONE E SOLUZIONE DEI PROBLEMI Problema Causa Soluzione Il veicolo non funziona Batteria con poca carica Ricarichi la batteria Il fusibile termico scattato Attivi nuova...

Страница 51: ...punto morto significa che la corrente elettrica non passa correttamente alla connessione del terminale ed necessario riparare il veicolo Si metta in contatto con il suo distributore per favore Un fort...

Страница 52: ...del fusibile GARANZIA Questo prodotto ha una garanzia di 2 anni Questa garanzia copre danni e guasti solo in quei casi in cui il prodotto non stato utilizzato in modo scorretto e sempre che tutte le...

Страница 53: ...ettiva 2014 30 UE del Parlamento europeo e del Consiglio del 26 febbraio 2014 concernente l armonizzazione delle legislazioni degli Stati membri relative alla compatibilit elettromagnetica rifusione I...

Страница 54: ...months due to its maximum speed Maximum user weight is 25 kg Never leave the child unattended while in the vehicle Direct adult supervision is mandatory Careful use of this toy is necessary to avoid...

Страница 55: ...he system Explosive gases are generated during charging Do not charge the battery near sources of heat or flammable materials Always load in well ventilated areas Do not expose the battery and charger...

Страница 56: ...ont wheel 12 M8x170 bolt Placed on the vehicle body 13 M8x100 bolt Placed in the hardware packaging 14 8 locknut Placed onto the bolts 15 4x12 screw 16 Charger 17 Spanner Placed in the hardware packag...

Страница 57: ...be recharged Rechargeable batteries are to be removed from the toy before being charged Rechargeable batteries are only to be charged under adult supervision Different types of batteries or new and u...

Страница 58: ...e Left Side Plug the connector on motor to the connector on the vehicle body 3 Slide the driving wheel onto the rear axle And keep the driving wheel match with the gear box 4 Push the hubcap in the ce...

Страница 59: ...to the rear axle Left Side 2 Slide the Bushing ring end first onto the rear axle 3 Slide the Rear wheel onto the rear axle And keep it match with the Bushing 4 Push the hubcap in the center of the whe...

Страница 60: ...Fit the handle bar assembly against to the vehicle body And lines up the holes of the vehicle body with the holes of the handle bar 3 Insert the M8x100 bolt into the hole of handle bar through the ho...

Страница 61: ...4 Slide another 10 washer onto the M8x170 bolt Contiue pushing the bolt until it pass thrgouth the other fork of handle bar 5 Tigten the 8 locknut to the bolt with the Hexwrench HINT Use the spanner...

Страница 62: ...62 CONTROL POWER SUPPLY 1 Plug the Red fuse connector into the terminal on battery Fuse box 1...

Страница 63: ...T 1 Fit the tabs on front of the seat to the holes on the vehicle body 2 Tighten a 4x12 screw with a screwdriver 3 Insert the tabs on the backrest to the holes in the vehicle body and push until you h...

Страница 64: ...the car backward shift the lever down Shift the lever in the middle the stop 2 Foot pedal Applies power speed to the vehicle To move the car press the pedal down To brake or slow down release pressur...

Страница 65: ...le begins to run slowly recharge the battery After each use or once a month minimum recharge time as 8 to 12 hours less than 20 hours at most 1 Plug the charger port into the input socket the socket i...

Страница 66: ...o trip BATTERY REPLACEMENT AND DISPOSAL The battery will eventually lose the ability to hold a charge Depending on the amount of use and varying conditions the battery should operate for one to three...

Страница 67: ...away from heat sources such as stoves and heaters Plastic parts can melt TROUBLESHOOTING Problem Cause Solution Vehicle does not run Battery low on power Recharge battery Thermal fuse has tripped Res...

Страница 68: ...tor A dead spot means the electric power is not being delivered to the terminal connection and the vehicle needs repair Contact your distributor please Difficult shifting from forward to re verse or v...

Страница 69: ...ry replacement and fuse GUARANTEE This product has a 2 years guarantee This guarantee covers damages and bad function only if the product has not been misused and all the instructions have been correc...

Страница 70: ...the Council of 16 April 2014 on the harmonisation of the laws of the Member States relating to the making available on the market of radio equipment and repealing Directive 1999 5 EC The product deliv...

Страница 71: ...das Spielzeug niemals auf der Stra e in der N he von Autos auf H ngen in Schwimmb dern oder anderen Gew ssern Der Pilot muss immer gut im Sitz sitzen Das Fahrzeug verf gt ber verstellbare Sicherheits...

Страница 72: ...e immer in gut bel fteten Bereichen Setzen Sie den Akku und das Ladeger t keinen extremen Temperaturen oder Feuchtigkeit aus ffnen Sie den Akku nicht Die Batterie enth lt giftige und korrosive Substan...

Страница 73: ...rlegscheibe 10 4 Buchsen 5 Hinterrad 6 Hinterachse 7 Fahrwerk 8 R ckenlehne 9 Sitz 10 Lenkstange 11 Vorderrad 12 Schraube M8x170 Es ist auf der Karosserie des Fahrzeugs 13 Schraube M8x100 Du findest e...

Страница 74: ...en werden Wiederaufladbare Batterien m ssen vor dem Laden aus dem Spielzeug entfernt werden Wiederaufladbare Batterien sollten nur unter Aufsicht von Erwachsenen geladen werden Verschiedene Batteriety...

Страница 75: ...hse linke Seite 2 Den Motorstecker mit der Karosserie verbinden 3 Schieben Sie das Antriebsrad auf die Hinterachse und bewahren Sie das entsprechende Antriebsrad mit dem Getriebe auf 4 Dr cken Sie die...

Страница 76: ...rachse linke Seite 2 Schieben Sie die Buchse erstes Ringende auf die Hinterachse 3 Schieben Sie das Hinterrad ber die Hinterachse und halten Sie es auf gleicher H he mit der Buchse 4 Dr cken Sie die R...

Страница 77: ...e die Lenkeranordnung an der Fahrzeugkarosserie und richten Sie die L cher in der Fahrzeugkarosserie auf die L cher im Lenker aus 3 Setzen Sie die Schraube M8x100 in die Lenker ffnung durch die Lenker...

Страница 78: ...cheibe 10 ber die Schraube M8x170 und dr cken Sie die Schraube weiter bis sie durch die andere Lenkergabel geht 5 Ziehen Sie die Kontermutter 8 an der Schraube mit dem Sechskantschl ssel an TIPP Halte...

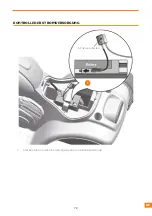
Страница 79: ...79 DE KONTROLLE DER STROMVERSORGUNG 1 Stecken Sie den roten Sicherungsstecker in die Batterieklemme Sicherungskasten 1...

Страница 80: ...en an der Vorderseite des Sitzes in die L cher in der Karosserie 2 Ziehen Sie eine Schraube 4x12 mit einem Schraubendreher an 3 Stecken Sie die Laschen der R ckenlehne in die L cher der Karosserie und...

Страница 81: ...Sie den Hebel nach unten Bewegen Sie den Hebel in der Mitte bis zum Anschlag 1 Pedal Es bt Kraft Geschwindigkeit auf das Fahrzeug aus Um das Fahrzeug zu bewegen dr cken Sie das Pedal Um zu bremsen od...

Страница 82: ...d laden Sie die Batterie auf Nach jedem Gebrauch oder mindestens einmal im Monat betr gt die Ladezeit 8 bis 12 Stunden maximal weniger als 20 Stunden 1 Stecken Sie den Ladestecker in die Steckdose der...

Страница 83: ...ies tun k nnen Sie einen Kurzschluss verursachen wodurch die Sicherung ausgel st wird BATTERIEWECHSEL UND ENTSORGUNG Der Akku verliert irgendwann die F higkeit eine Ladung zu halten Abh ngig von der N...

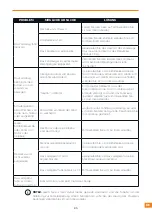
Страница 84: ...Heizungen fern Kunststoffteile k nnen schmelzen IDENTIFIZIERUNG UND L SUNG VON PROBLEMEN PROBLEM M GLICHE URSACHE L SUNG Das Fahrzeug funktioniert nicht Der Akku ist schwach Laden Sie den Akku auf Die...

Страница 85: ...gt wird und das Fahrzeug repariert werden muss Bitte wenden Sie sich an Ihren H ndler Schwierigkeiten beim Wechsel von vorne nach hinten oder umgekehrt Versuchen w hrend der Fahrt zu wechseln Halten S...

Страница 86: ...echsel GARANTIE Auf dieses Produkt wird eine Garantie von 2 Jahren gew hrt Diese Garantie deckt Sch den und Fehlfunktionen nur dann ab wenn das Produkt nicht unsachgem verwendet wurde und alle Anweisu...

Страница 87: ...014 30 EU des Europ ischen Parlaments und des Rates vom 26 Februar 2014 zur Harmonisierung der Rechtsvorschriften der Mitgliedstaaten ber die elektromagnetische Vertr glichkeit Das gelieferte Produkt...

Страница 88: ...Manual revisado en mayo de 2019...

Отзывы: