


5.1 Light
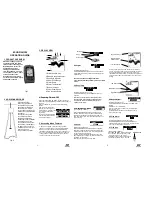
1
2 Battery Strength Indicator
3 Sensitivity Indicator
4 Upper Zoom Range
5 Water Depth
6 Water Temperature
7 Bottom Contour
8 Lower Zoom Range
9 Fish Icon with Depth
5.3 Depth Range Menu
5.4 Zoom
fig.2
fig.1
ECHOFISH 300
OPERATION GUIDE
2 HOW SONAR WORKS
3 DISPLAY VIEW
4 Powering ON and OFF
1 PRODUCT OVERVIEW
5 Accessing Menu Features
5.6 Fish Alarm
5.7 Fish Icon
5.5 Depth Alarm
Water Surface Line
5.2 Sensitivity
1
2
Echofish 300 sonar
technology is based on
sound waves. The system
uses sonar to locate and
define structure, bottom
contour and composition, as
well depth directly below the
transducer.
The transducer sends a
sound wave signal and
determines distance by
measuring the time between
the transmission of the
sound wave and when the
sound wave is reflected off
an object; it then uses the
reflected signal to interpret
location, size, and
composition of an object.
A simple menu system accesses unit's adjustable
features.To activate the menu system,press POWER-
MENU and a menu appears.Press POWER-MENU
repeatedly to access other menus one at a time.When a
menu is on the display,use the right and left arrow keys
to adjust the menu.Menus automatically are removed
from the screen after several seconds.
(Setting Saved in Memory)
Press POWER-MENU until the LIGHT menu appears.
Select either OFF or ON to activate the backlight at the
desired level.
Note: Continuous backlight operation
significantly decreases battery life on portable
units.
(Setting Saved in Memory, 1 to 5)
Press POWER-MENU until the SENSITIVITY menu
appears.
Press POWER-MENU until the Depth Range menu
appears. Select AUTO to have the Unit automatically
select the Depth Range or manually select 4.5m, 9m,
18m, 36m, 55m or 73m. This locks the depth range to a
specific setting.
Note:In manual operation, if the depth is greater
than the depth range setting,the bottom will not
be visible on-screen. Select AUTO to return to
automatic operation.
(Setting Saved in Memory)
Press and release POWER-MENU to power the unit on.
Press and hold POWER-MENU until the unit shuts down to
power off.
When Unit powers on, the Start Up menu temporarily
appears.
From this menu, select either
Start-Up for on-the-water use,
or Simulation for learning to use
the system with simulated
sonar data.
The Start-Up menu disappears
after several seconds and the
Unit begins operation.
(Setting Saved in Memory)
Press POWER-MENU until the ZOOM menu appears.
Select ON to magnify the area around the bottom thus
revealing fish and structure close to the bottom that may
not be visible in typical operation.
In Zoom, the Unit continually changes the upper and
lower Depth Range to keep area just above and below
the bottom on the display.
Select OFF to return to normal operation.
(Setting Saved in Memory)
Press POWER-MENU until the FISH ICON
menu appears. Select either OFF to view
“raw” sonar returns, or ON to take
advantage of Unit’s ability to identify sonar
returns that are determined to be a fish.
Low Sensitivity
Normal Sensitivity
High Sensitivity
Select a higher number to show smaller sonar returns on-
screen, or a lower number to remove clutter from the screen.
Adjusting Sensitivity also affects how sonar returns are
identified as Fish Icon Symbols - more fish will be detected at
a higher setting, fewer at a lower setting. "5" is the Factory
Setting.
(Setting Saved in Memory)
Press POWER-MENU until the DEPTH ALARM menu
appears.
Select OFF for no Depth Alarm;
select a number from 1 to 30m to set the alarm depth
point and turn it on.
An audible alarm sounds when the depth is equal to
or less than the setting.
(Setting Saved in Memory, Defaults to OFF)
Press POWER-MENU until the FISH ALARM menu
appears. Select OFF for no fish alarm, or select the fish
icon to set the fish alarm and turn it on.
Menu Title
Setting
Button Changes
Fish Icon ID
Plastimo is happy to present
you the Echofish 300. With
its innovative technology, the
Echofish 300 is perfect for
people who want to go
fishing on a small boat or
from the seashore. The unit
can be used in oceans, rivers
or lakes. Thanks to the
Echofish 300, you will find
out the location of fish, depth
and bottom contours
Lower
Zoom Range
Upper
Zoom Range
Magnified Bottom
with More Detail
5
2 1
3
9
4
8
7
6