background image

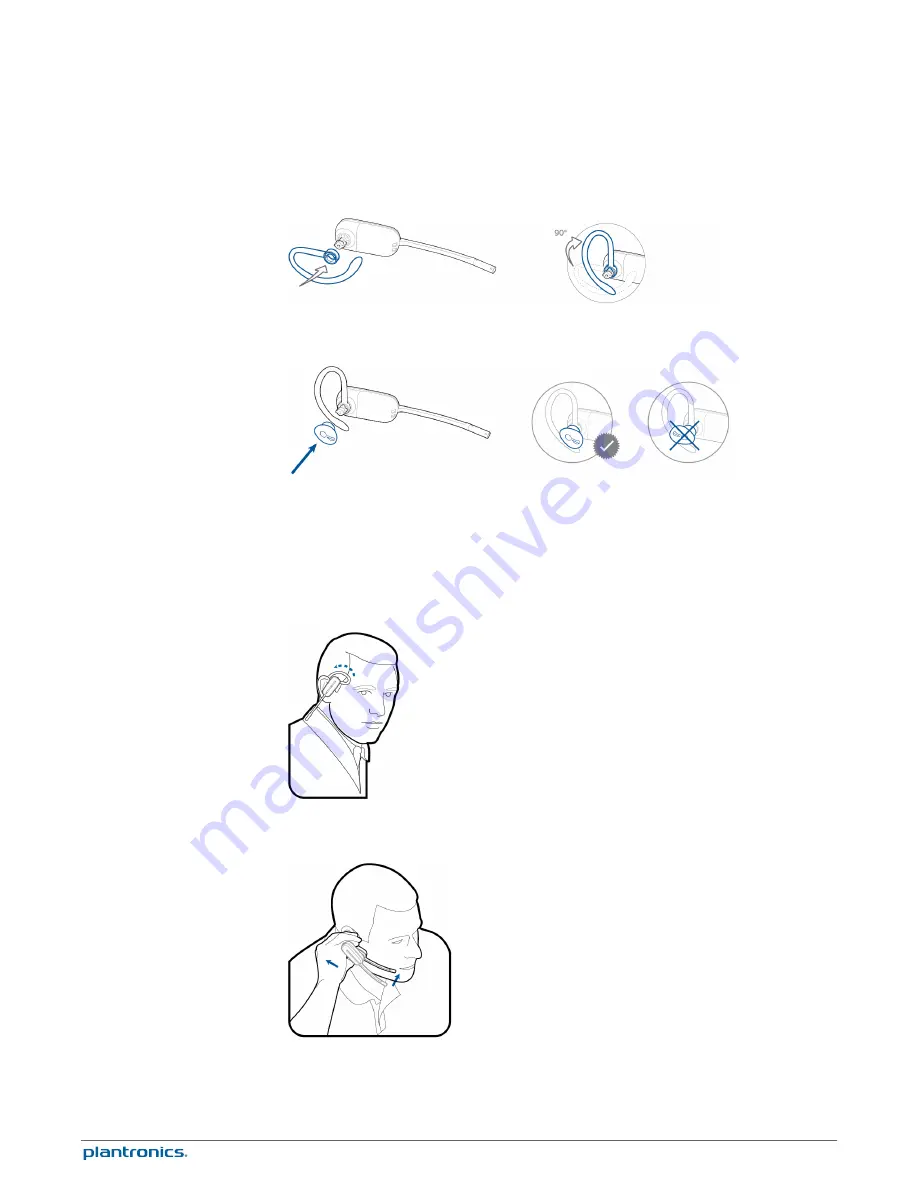
NOTE

Ensure the earloop is flat against the headset before rotating.

2

Choose the size and style of eartip that fits most comfortably. Align the eartip with the notch
facing the microphone as shown. Press on to attach.

NOTE

Ensure the large end of the eartip points to the microphone.

3

To correctly position your headset, see 

Position Your Headset.

When you wear the headset, the microphone should rest as close to your cheek as possible
without touching. The microphone can be adjusted inward by the pivoting earpiece to optimize
the position of the headset.

1

Slide the headset over and behind your ear and fit the eartip into your ear.

2

Holding the base of the headset, push it in and back towards your ear to allow the pivoting
earpiece to bring the microphone close to your mouth. As the base of the headset moves
backwards, you will feel soft clicks until the microphone rests close to your cheek.

Position Your Headset

9

Содержание Savi W740-M

Страница 1: ...Savi W740 M Multi Device Wireless Headset System User Guide...

Страница 2: ...16 Connect Your Computer 16 Place a Softphone Call 16 Position Your Base 16 Headset Features 17 Headset Controls 17 Headset Power 17 Headset Battery Level 18 Mute your Headset During a Call 18 Adjust...

Страница 3: ...ings Base Tab 28 Device Settings Headset Tab 30 Device Settings Security Tab 32 Applications Tab 32 Preferences 32 About Tab 33 Plantronics Update Manager 33 Troubleshooting 35 Headset 35 Desk Phone 3...

Страница 4: ...ting Systems Windows XP Windows Vista Windows 7 Processor 400 MHz Pentium processor or equivalent Minimum 1 GHz Pentium processor or equivalent Recommended RAM 96 MB Minimum 256 MB Recommended Hard Di...

Страница 5: ...and battery Base and charging cradle Over the head headband Behind the head headband Headset fit kit with earloops eartips and foam sleeve USB cable Telephone interface cable Power supply What s in th...

Страница 6: ...one button 4 USB port 11 Bluetooth pairing button LED 5 Desk phone speaking volume 12 Subscription button LED 6 Desk phone configuration switch 13 Charging LED 7 Desk phone listening volume Headset 1...

Страница 7: ...battery while charging your headset via a USB port 4 Electronic hookswitch cable EHS cable Electronically and automatically takes your desk phone handset off hook Enables remote call control with your...

Страница 8: ...p that fits most comfortably Align the earloop as shown and insert it onto the headset Rotate the earloop up 90 NOTE Ensure the earloop is flat against the headset before rotating 2 Choose the size an...

Страница 9: ...the headset the microphone should rest as close to your cheek as possible without touching The microphone can be adjusted inward by the pivoting earpiece to optimize the position of the headset 1 Slid...

Страница 10: ...eadset in so the microphone is close to your mouth 1 Align the headband as shown Ensure the headband sits flat against the headset then rotate it up 90 If you want to wear it on the left switch the st...

Страница 11: ...microphone 3 To position your headset correctly first slide the stem of the headband so the headset fits comfortably 4 With a finger on the headset indicator light push in until the microphone rests a...

Страница 12: ...nd into working power outlet 3 Place the headset in the charge cradle The charging LED will flash green when charging the headset and turn solid green when the headset is fully charged Charge for at l...

Страница 13: ...handset port on the desk phone NOTE If your phone has a built in headset port you should only use the headset port if you will not be using the HL10 lifter In this configuration you must press both th...

Страница 14: ...able EHS manually remove desk phone handset before each call 2 If you do not hear a dial tone open side panel and adjust middle configuration switch A G until you do Default setting A works for majori...

Страница 15: ...base will remain in this mode for 10 minutes If it goes off you will need to press it again 2 Place Bluetooth mobile phone into search mode Select SAVI 7xx from the list of found devices 3 If prompted...

Страница 16: ...sing the headset call control button The minimum recommended separation between your desk phone and the base is 6 inches The minimum recommended separation between the base and computer is 12 inches I...

Страница 17: ...installed and charged the headset is automatically on The headset does not have an on off button If you won t be using the headset for a long period of time and the headset will not be in the chargin...

Страница 18: ...displaying battery status A warning will be issued if your headset s battery is critically low Use the Base When the system is idle short press the base subscription button once to get feedback on th...

Страница 19: ...ab Sound Playback Click OK to confirm changes The headset LED will flash when you are on a call or the headset is in use The LED can be turned off When you are not on a call press the headset volume d...

Страница 20: ...the following methods The subscription button is the silver trim with four dots on the front of the base Automatic secure subscription With your system idle docking a new headset will automatically s...

Страница 21: ...bscription mode Solid green Primary headset subscribed to base Solid yellow Active conference call with guest headsets Solid red No headset subscribed Changing the range can help with desk phone PC au...

Страница 22: ...e Bluetooth button again before the auto connection feature will resume You may customize this feature by using the Plantronics Control Panel by going to Start Programs Plantronics Plantronics Control...

Страница 23: ...s from the PC however only one call is supported at any given time on the mobile phone or desk phone You will need to manage multiple calls on the desk phone or mobile phone on the devices themselves...

Страница 24: ...a call from your mobile phone 3 End the call by pressing the headset call control button Hands free dialing To enable hands free dialing install the Plantronics software Once installed go to Start Pro...

Страница 25: ...e trying to listen to is being routed to your Savi 7xx device 1 Go to Control Panel and open Sounds and Audio Devices 2 In the Audio tab select Savi 7xx under Sound Playback 3 Launch the application t...

Страница 26: ...add headsets to the base an additional headset icon will appear in the Plantronics Control Panel screen with a number from 1 to 3 indicating the number of additional headset subscribed to the base The...

Страница 27: ...ur headset from the pulldown menu then select Device Settings to configure base headset security settings Applications tab Displays the status of Plantronics support for various applications such as s...

Страница 28: ...Audio Limiting 80 dB 85 dB Off Off Hours on phone per day 2 4 6 8 8 Anti Startle Selected Not selected Not Selected G616 Selected Not selected Not Selected The Audio and G616 Limiting features are sup...

Страница 29: ...A separate utility is also available at plantronics com software Auto Connect to Mobile Phone This feature automatically establishes a Bluetooth link to the mobile phone whenever the mobile phone is...

Страница 30: ...tection against sudden loud sounds When Anti startle is SELECTED the system identifies and eliminates sudden loud sounds and rapidly reduces them to a comfortable level When Anti startle is NOT SELECT...

Страница 31: ...sk Phone Desk Phone ringtone Sound 1 Sound 2 Sound 3 Sound 1 Desk Phone volume Standard Low Off Standard PC PC ringtone Sound 1 Sound 2 Sound 3 Sound 2 PC volume Standard Low Off Standard Mobile Mobil...

Страница 32: ...ations such as softphones and media players The status is Enabled for all application modules that have installed support in Plantronics software The status is Running for all supported applications t...

Страница 33: ...io Sensing is a special feature supported by Plantronics wireless devices that can detect an audio signal at the USB port and automatically establish a PC radio link between the Base and wireless head...

Страница 34: ...eck For Updates Now button in Update Manager by clicking on the Start menu Programs Plantronics Plantronics Update Manager Install Checked Updates Following an AUTOMATIC or MANUAL CHECK FOR UPDATES th...

Страница 35: ...etween your base and your telephone If adjusting the distance doesn t help your headset is going out of range move closer to the base See Position Your Base The sound is distorted Lower the desk phone...

Страница 36: ...adset is charged Ensure your headset is subscribed to the base See Subscribing a Headset Ensure that the Plantronics software is installed To download visit plantronics com software Ensure that you ar...

Страница 37: ...Vista and Windows 7 systems Refer to the Sound option in your PC Control Panel Under the Playback tab change the default setting from Speakers Savi Office to your PC speakers Click OK to confirm your...

Страница 38: ...11 Plantronics Inc All rights reserved Plantronics the logo design HL10 Savi Sound Innovation are trademarks or registered trademarks of Plantronics Inc Windows is a registered trademark of Microsoft...

Отзывы: