background image

15


in classes when stopped for less than 4 minutes. After 4 minutes of inactivity, the display will 
automatically turn off. 

When the screen is turned on, it always displays an indicator of the number of steps taken per 

workout and one of the functions - time, the number of kilocalories burned per workout or the 
number of steps taken in 1 minute. To switch between the last 3 functions, press the red button until 
the arrow is in front of the desired symbol. If you want these indicators to be displayed alternately, 
then using the red button set the arrow opposite the "SCAN" icon, and they will start changing in 
automatic mode. 

If you hold the button for 3 seconds, then all values will be reset and the countdown will start 

over.


TRAINING ON THE SIMULATOR  


Before starting a workout 

Important! 

Place the mini stepper on a flat, dry surface. To avoid damage to the floor covering 

during prolonged use of the mini-stepper, it is recommended to place it on a special rubberized or felt 
mat or on a dense non-slip cloth. 

For a more stable and secure position of your feet on the pedals of the simulator, as well as to 

obtain a massage effect due to their embossed surface, you can train barefoot. 


Start training 


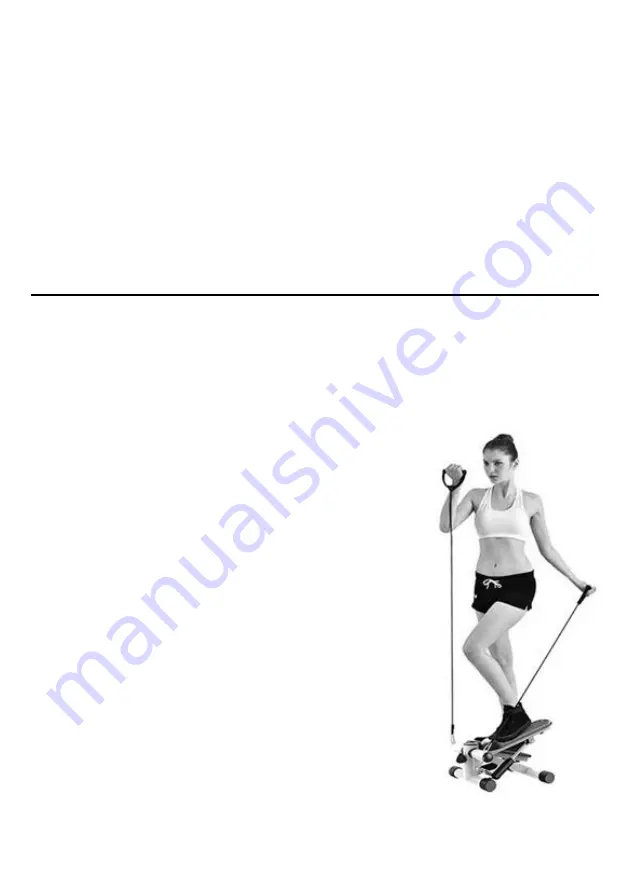
Step 1: Stand on the floor from the rear edge of the machine, 

place  your  left  foot  on  the  left  pedal  and  push  all  the  way  until  it 
reaches the lowest possible position. 

Step 2: Place your right foot on the right pedal. 
Step  3:  Begin  the  exercise  at  a  slow  pace  and  gradually  enter 

your own comfortable stride rhythm. 

Step 4. For a more intense workout, take resistance bands and, 

in time with the movements of your legs, begin to bend your elbows 
forward or to the sides, depending on which muscles you need to use. 
To increase the load even more, you can also raise your arms without 
bending  your  elbows,  either  in  front  of  you  or  moving  behind  you. 
Exercises with resistance bands can be performed both synchronously 
with two hands, and alternately. 

How hydraulic cylinders work: 
1.


When you exercise slowly, the resistance of the pistons inside 
the cylinders is weak. 

2.


When you start to accelerate, the resistance of the pistons 
increases. 

Attention! 

• If during a workout it becomes necessary to adjust the resistance 

of the pedals, first get off the machine and only then adjust the load 
handle: clockwise to increase resistance and counterclockwise to decrease it. 

Содержание FD-STEP-001

Страница 1: ...1 Мини степпер с эспандерами Mini stepper with bands PLANTA FD STEP 001 РУКОВОДСТВО ПО ЭКСПЛУАТАЦИИ USING MANUAL ...

Страница 2: ...и вернёт мышцам тонус Для поддержания здоровья сердечно сосудистой системы достаточно заниматься кардио тренировками всего 10 20 минут в день и изменения общего тонуса и состояния тела не заставят себя долго ждать Регулярное использование мини степпера поможет Вам улучшить качество жизни в целом снизить негативные последствия малоподвижного образа жизни и уровень стресса повысить настроение и прод...

Страница 3: ...Не ставьте тренажер на скользкую влажную поверхность так как это создаёт опасность проскальзывания что в свою очередь может привести к травме Не используйте данное изделие если его корпус треснул сломан видны внутренности конструкции или есть трещины по сварному шву Во время упражнений не прыгайте на тренажере так как велика вероятность падения и получения травмы Лицам с недостаточной физической п...

Страница 4: ... инфекциями и другими заболеваниями Лица с расстройствами восприятия вызванными серьезными заболеваниями периферического кровообращения вызванными диабетом и пр Лица с повреждениями кожи Лица с высокой температурой выше 38 градусов вызванной заболеванием Лица с заболеваниями спины и позвоночника Беременные женщины предположительно беременные женщины а также женщины во время менструации При использ...

Страница 5: ...вкрутите его в отверстие спереди Степень затяжки винта позволяет регулировать уровень нагрузки 2 В соответствии с рисунком 2 закрепите карабины эспандеров в металлические отверстия находящиеся на верхней части опорной рамы 3 Ваш мини степпер собран и можно приступать к тренировке ...

Страница 6: ...лючении экрана на нём всегда отображается показатель количества сделанных шагов за тренировку и одна из функций время количество килокалорий сожжённых за тренировку либо количество шагов сделанных за 1 минуту Для переключения между последними 3 мя функциями нажимайте на красную кнопку пока стрелка не встанет напротив нужного обозначения Если Вы хотите чтобы эти показатели отображались попеременно ...

Страница 7: ...коряться сопротивление поршней возрастает ВНИМАНИЕ Если в течение тренировки возникнет необходимость отрегулировать сопротивление педалей то сначала сойдите с тренажёра и только после этого отрегулируйте ручку нагрузки по часовой стрелке для увеличения сопротивления и против часовой стрелки для его уменьшения Гидравлические цилиндры будут нагреваться после 20 минут интенсивной тренировки Не прикас...

Страница 8: ...еосторожном обращении возможен их отрыв 3 На задней панели аккуратно извлеките батарейку 1 5 V AG4 из гнезда и замените её на новую запасные батарейки в комплект поставки не входят 4 Установите дисплей на место до того момента пока он не встанет вровень с краями металлической рамы и между ними не останется зазоров УХОД И ОБСЛУЖИВАНИЕ 1 Протирайте раму и педали тренажёра влажной тряпкой после каждо...

Страница 9: ...дварительного уведомления изменять комплектующие части изделия не влияяпри этом на основные техническиепараметры изделия Это может повлечь за собой изменениевесаигабаритовизделия нонеболеечемна 5 10 Утилизация В интересах охраны окружающей среды по завершении срока службы прибор нельзя утилизировать вместе с бытовыми отходами Утилизация должна производиться через соответствующие пункты сбора и пер...

Страница 10: ... и комплектующие 5 Гарантия также теряет силу если в гарантийный период ремонт неисправного изделия производился не уполномоченными на то лицами 6 Гарантийный срок 1 год 7 Срок службы 3 года Дата изготовления указана на упаковке Изготовитель Вэнчьжоу МВМ Текнолоджи Ко Лтд Адрес 186 Феюнджиан роад округ Пучжоу район Лунвань Вэньчжоу 325011 Чжэцзян Китай Импортер Уполномоченная организация ООО ПАЛЛА...

Страница 11: ...use the use of the device for commercial purposes as well as in hospitals is prohibited To take full advantage of the appliance read the instruction manual carefully and follow the care and safety guidelines This will extend the life of the device Retain this manual for future reference or when transferring the device to another person For more information visit the website www planta ru com SAFET...

Страница 12: ...ck pain and previous injuries to the legs chest pelvis and neck Persons experiencing numbness in the legs pelvis neck and arms due to hernia intervertebral discs displacement of the vertebrae cervical spondylosis and others diseases Individuals with arthritis rheumatism and gout Persons with osteoporosis Persons with diseases of the cardiovascular system heart disease vascular system hypertension ...

Страница 13: ...play 1 PC 6 Cable 1 PC 3 Load regulator 1 PC 7 Mount for expander 2 pcs 4 Hydraulic cylinder 2 pcs 8 Expander 2 pcs INSTALLATION OF THE SPORTS TRAINER SIMULATIOR 1 As shown in figure 1 take the load regulator and screw it into the hole in the front The tightening of the screw allows you to adjust the load level ...

Страница 14: ...alternates between the following values ШАГОВ МИН the number of steps per minute СКАН switching between indicators К ВО ШАГОВ The maximum is 9999 steps during the current workout ВРЕМЯ time duration of the workout Maximum 99 59 ККАЛ the number of calories burned per workout Maximum 9999 The display is activated by pressing the red button or stepping from one pedal to another The above indicators w...

Страница 15: ... of the simulator as well as to obtain a massage effect due to their embossed surface you can train barefoot Start training Step 1 Stand on the floor from the rear edge of the machine place your left foot on the left pedal and push all the way until it reaches the lowest possible position Step 2 Place your right foot on the right pedal Step 3 Begin the exercise at a slow pace and gradually enter y...

Страница 16: ...e applied effort is not enough then gently pick up one of the edges of the display with a suitable non sharp object for example a flat screwdriver until the display starts to come out of the slot 2 After the display begins to separate freely from the machine frame turn it upside down Warning do not pull the display too far as there are microcircuit wires on the back side and if handled carelessly ...

Страница 17: ...ice to change the component parts of the product without affecting the main technical parameters of the product This may entail a change in the weight and dimensions of the product but not more than 5 10 Disposal In the interest of environmental protection at the end of its useful life the appliance must not be disposed of with household waste Disposal must be carried out at the applicable collect...

Страница 18: ...eriod the defective product was repaired by unauthorized persons 6 The warranty period is 1 year 7 Service life 3 years The date of manufacture is indicated on the packaging Manufacturer WENZHOU MVM TECHNOLOGY CO LTD Address No 168 Feyunjian Road Puzhou District Longwan District Wenzhou 325011 Zhejiang China Importer Authorized Organization LLC PALLADA 111675 Moscow city Rudnevka street building 4...

Отзывы: