Planet NVR-400 Скачать руководство пользователя страница 35


- 34 - 

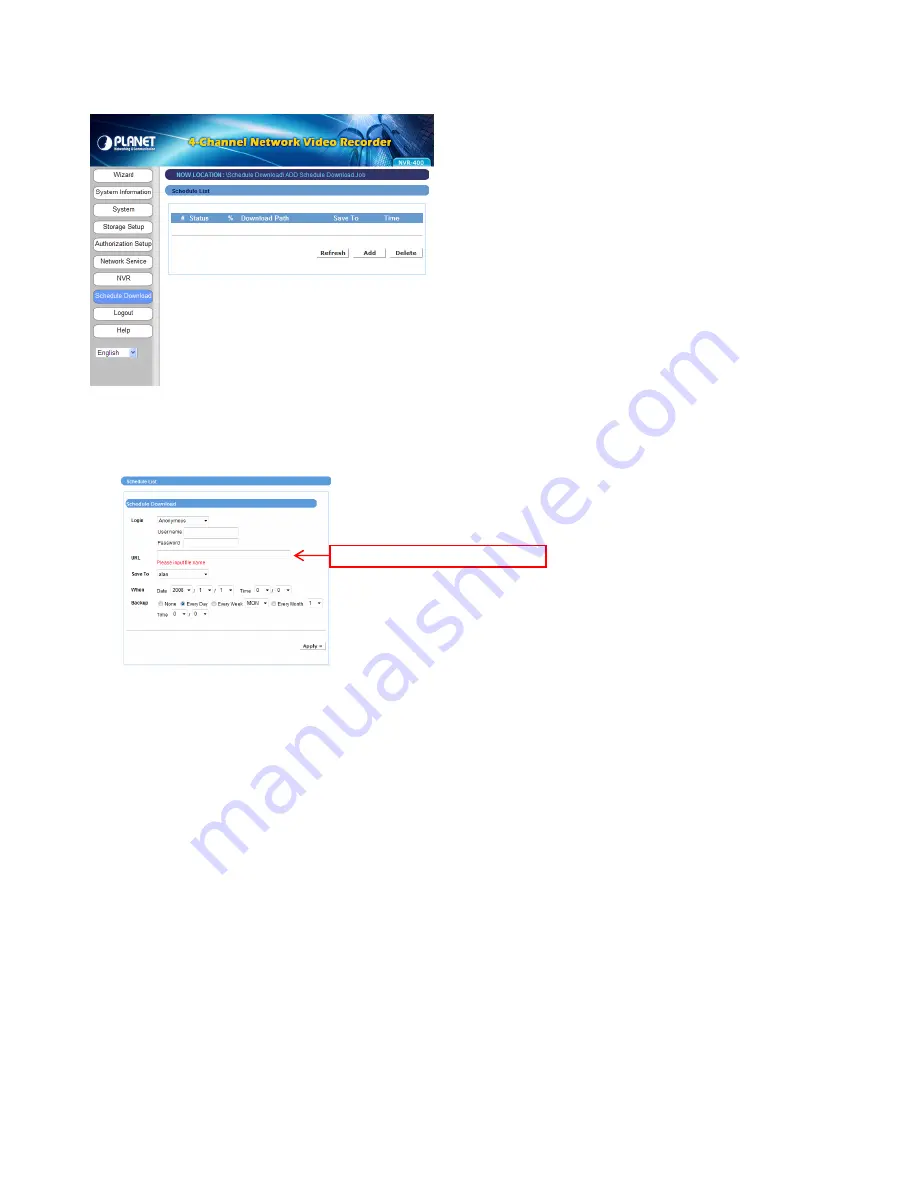
4.2.7 Schedule Download 


The Schedule Download menu allows you to set up download schedule. 

Click 

Add

 and the following setup window will appear: 


Login 

Select 

Anonymous

 or 

Account

 from the list according to the settings of the target 

server. If you have to select 

Account

 to login, you should enter the correct 

User 

name

 and 

Password


URL 

Enter the URL address of target server. 


Save To 

Assign the destination folder from the list to save the downloaded files. 


When 

From the 

Date

 and 

Time

 setting options, set up the start-up time to download files. 


Backup 

Enable the backup function of your device by selecting 

None

Every Day

Every 

Week

, or 

Every Month

, as well as the 

Time


When completed, click 

Apply

 to save this download task to the Schedule List. 

You can delete the download task by selecting it from the Schedule List and then clicking 

Delete

. When you change the settings of selected task, click 

Refresh

 to reload the status 

of these tasks.


Please input the file name. 

Содержание NVR-400

Страница 1: ...4 CH Network Video Recorder NVR 400 User s Manual Version 1 1 Date April 2009...

Страница 2: ...escribed in this User s Manual at any time without notice If you find information in this manual that is incorrect misleading or incomplete we would appreciate your comments and suggestions FCC Warnin...

Страница 3: ...s and illustrations on how to use your Network Video Recorder which includes Chapter 1 Introduction to Your Device describes the components and features of the device Chapter 2 Hardware Installation h...

Страница 4: ...NNECTING THE POWER ADAPTER 9 CHAPTER 3 ACCESSING THE DEVICE 10 3 1 ACCESSING THE DEVICE VIA MY NETWORK PLACES 10 3 2 USING IPFINDER 11 CHAPTER 4 CONFIGURING THE DEVICE 12 4 1 USING THE SETUP WIZARD 13...

Страница 5: ...Quick Installation Guide NOTE Once any item contained is damaged or missing contact the authorized dealer of your locale 1 2 Features and Benefits Simultaneous Record and Live Video Streams 4 IP Camer...

Страница 6: ...Description A steady Green 1000 Mbps or Amber 10 100 Mbps light indicates the device is connected to your LAN When it blinks the device is receiving transmitting data from to the network 1 2 A steady...

Страница 7: ...interface Ethernet Plug the provided Ethernet Cable to connect to your LAN Reset Press to reset the device Press and hold for about five seconds to resume the factory default configuration Fan and Ven...

Страница 8: ...he application of the Network Video Recorder within your network In the illustration below the Network Video Recorder and four Internet cameras are connected to a router switch which minimize the impa...

Страница 9: ...on the tray and then secured the screws on both side NOTE While placing the hard disk drive onto the tray align the screw holes on the bottom of hard disk drive with the studs on the base of tray The...

Страница 10: ...ce s rear panel and then connect it to the network or directly to a computer for configuration Connecting the LAN cable 2 4 Connecting the Power Adapter Plug the AC power adapter to the power connecto...

Страница 11: ...Places 1 On your PC click Start My Network Places 2 Find the device with its device named such as NVR 400 in My Network Place 3 Double click the device icon When the login window appears enter the Use...

Страница 12: ...Click the IPFinder item to launch the utility The control panel will appear as below 3 Once you get the IP address of the device launch the Web browser to access your device Click About to get the Ve...

Страница 13: ...recommended to use IPFinder to search the IP address that is assigned to the device by the DHCP server and then click Link to access the camera via the Web browser Login the Homepage The Web managemen...

Страница 14: ...bar Step 1 LAN Setup Enter the Hostname for the device Select Start UPnP to enable the device s Universal Plug and Play function If your network uses a proxy server select Use proxy and enter the IP...

Страница 15: ...ion of space type refer to the section 4 2 3 Storage Setup in Web Configuration Utility Step 4 Setup Summary Display the configuration of the device When you complete the Setup Wizard click Apply to r...

Страница 16: ...nfigure the advanced settings through the Web Configuration Utility The utility contains the following options in the menu bar System Information System Storage Setup Authorization Setup Network Servi...

Страница 17: ...events log of the device Summary This sub menu displays the hostname and IP address of the device the date and time and the network service that you have set up Status This sub menu displays the firmw...

Страница 18: ...NVR 400 User Guide 17 This sub menu displays the events log recorded by the system...

Страница 19: ...18 4 2 2 System The System menu contains the basic system settings for the device such as the networking settings time and date setup etc Lan...

Страница 20: ...lect this option when your network uses the DHCP server When the device starts up it will be assigned an IP address from the DHCP server automatically Static IP Select this option to assign the IP add...

Страница 21: ...ins the required settings for e mail notification feature When you complete the settings click Send a test mail to test the related configuration is correct or not Once the device connects to the serv...

Страница 22: ...configuration of the device as a file on your PC Restore Config file Click Browse to find the configuration file and then click Apply to restore the customized configuration NOTE Please remember to r...

Страница 23: ...e installed hard disk drives including the USB device NOTE You are not recommended to use the USB device as your major storage device Space Click Add to configure the storage space on the installed ha...

Страница 24: ...ommended Provide mirroring over both disks JBOD maximum data storage space Combine both drives in a linear fashion to create one volume When completed the related information of the disks is displayed...

Страница 25: ...fresh Click format to format the connected USB disk NOTE Please remember to reboot your device when you clicked apply button Share Folder This sub menu allows you to specify the shared folder of the d...

Страница 26: ...will be displayed as the directory under the device name To change the setting select the folder from the Share folder list and then click Edit To remove select it and then click Delete NOTE Please r...

Страница 27: ...to a group from the Group list Enter the password twice for the new user in the Password and Confirm Password boxes and then select the Permission type Admin or User Specify the storage quotas for th...

Страница 28: ...remove users for the group from the Member option When completed click Apply to add the group To organize the users for the group click Edit Member To remove the group select it from the list and then...

Страница 29: ...indows OS Windows Network Setup Workgroup Enter the workgroup name where the device is installed within your network WINS Server WINS Windows Internet Name Service server is used to support NetBIOS ov...

Страница 30: ...d assign the FTP Port the default is port 21 User transmission limitation Specify the maximum upload and download speed KB s by entering the proper values in the related boxes UPnP Media Server The de...

Страница 31: ...program and the files contained in the specified directory will be available to stream over the network Select this option to enable the iTune server and then assign the Path from the list You can al...

Страница 32: ...2 6 NVR The NVR menu allows you to add Internet cameras and view the live video IP Camera Backup Click Auto Add to add the camera automatically or click Add and to add the camera manually through the...

Страница 33: ...file When the recorded file is too large use this option to split it by selecting file size Space Specify the storage space for the camera Motion Enable Enable of disable the motion detection of the c...

Страница 34: ...NVR 400 User Guide 33 Quad View In the Quad View screen you can view the live video from the connected camera You can view up to four cameras simultaneously...

Страница 35: ...To Assign the destination folder from the list to save the downloaded files When From the Date and Time setting options set up the start up time to download files Backup Enable the backup function of...

Страница 36: ...system Logout From this sub menu click Apply to exit the Web Configuration Utility and go back to the Login window Shutdown From this sub menu you can do one of the following Select Shutdown Now and...

Страница 37: ...4 2 9 Help The Help menu displays the information for each setting option of the device Click the topic marked as blue color to link to the corresponding page and view the related information in deta...

Страница 38: ...ystem Type Internal HDD support XFS External USB drive support FAT32 EXT3 User Interface IE browser IPFinder utility Multiple Language Yes USB Compatible List USB Flash Disk Vendor Model Apacer Techno...

Страница 39: ...38 Motion Detection Configuration Example for ICA 530 1 At NVR page please click yes in Motion Enable item 2 At Network Service page Please Enable the FTP Service...

Страница 40: ...NVR 400 User Guide 39 3 Login ICA 530 and set up an object detection area 4 At Event Server page please add NVR as the FTP Server Notice that the FTP Path must be the corresponding camera folder...

Страница 41: ...have to enable the motion detection Second select the item of Sending FTP 6 Go back to NVR page and click start job Notice that if you want to stop motion detection please stop it in ICA 530 first The...

Страница 42: ...NVR 400 User Guide 41 Example to ICA M220 1 The same as ICA 530 2 The same as ICA 530 3 The same as ICA 530 4 Login ICA M220 and set up an object detection area 5 Please add NVR as the FTP Server...

Страница 43: ...42 6 Enable motion detection and select the item of Send snapshot file to FTP 7 Go back to NVR page and click start job...

Отзывы: