background image

password should be provided. 

3.


Press the [

ENTER

] key to confirm the setting. 


A.


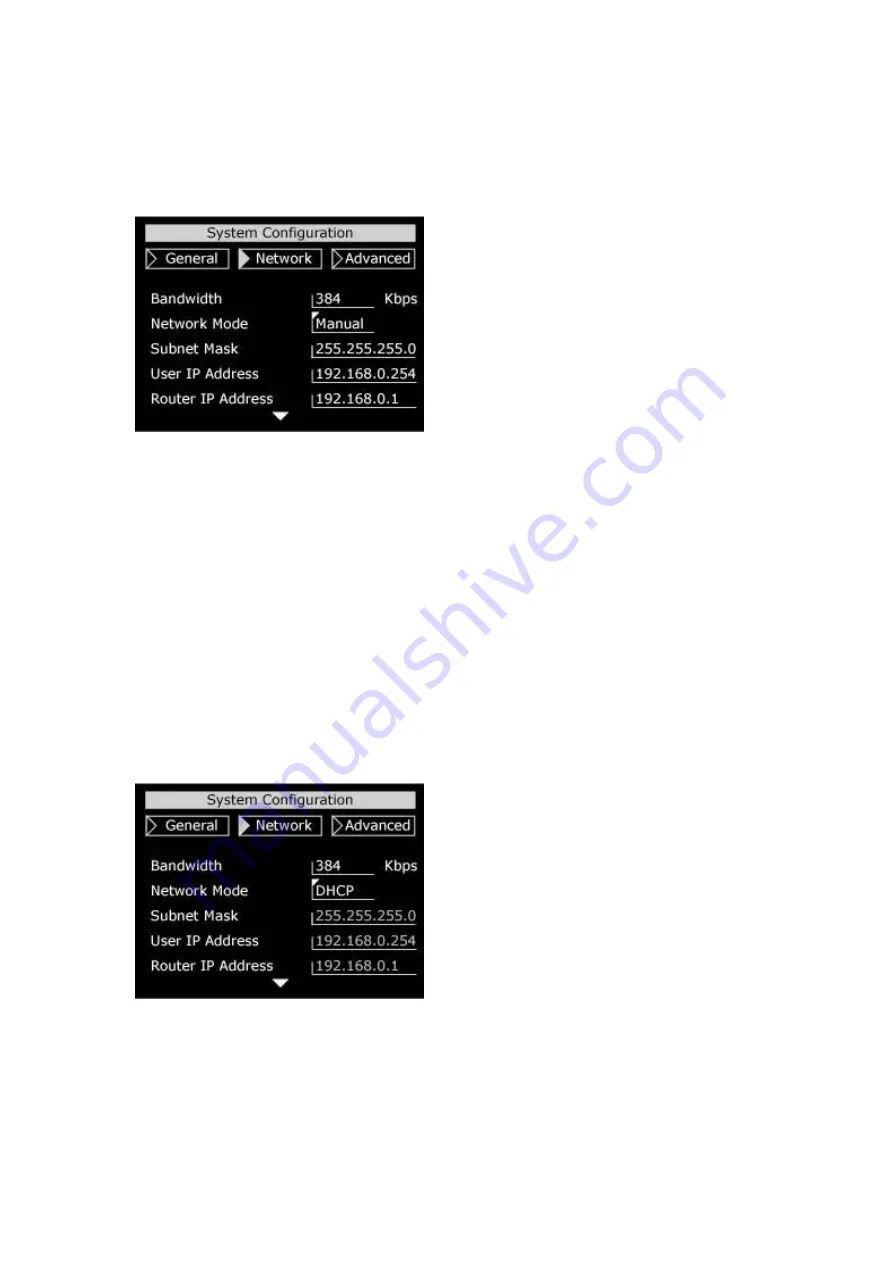
Manual 


If your ISP provides you with one or more static IP addresses, you can setup your 
network manually. However, you have to acquire subnet mask, user IP address, and 
router IP address from your ISP. 
1.


Network 

Æ

 Bandwidth 

Æ

 Press [

] or [

]. 

Select a proper bandwidth in compliance with your Internet transmission speed. 

2.


Network 

Æ

 Network Mode 

Æ

 Press [

] or [

]. Select “Manual” mode. 

3.


Network 

Æ

 Subnet Mask 

Æ

 input your subnet mask. 

4.


Network 

Æ

 User IP Address 

Æ

 input your user IP address. 

5.


Network 

Æ

 Router IP Address 

Æ

 input your router IP address. 

6.


Press [

ESC

] to save your settings. 


B.


DHCP 


1.


Network 

Æ

 Network Mode 

Æ

 Press [

] or [

]. Select “DHCP” mode. 

2.


Press [

ESC

] to save your settings. 


23

Содержание ICF-1501

Страница 1: ...Internet Video Conferencing Phone ICF 1501 ICF 1550 User s Manual ...

Страница 2: ...erson of such revision or changes All brand and product names mentioned in this manual are trademarks and or registered trademarks of their respective holders Federal Communication Commission Interference Statement This equipment has been tested and found to comply with the limits for a Class B digital device pursuant to Part 15 of FCC Rules These limits are designed to provide reasonable protecti...

Страница 3: ...and the mutual recognition of their conformity R TTE The R TTE Directive repeals and replaces in the directive 98 13 EEC Telecommunications Terminal Equipment and Satellite Earth Station Equipment As of April 8 2000 WEEE Regulation To avoid the potential effects on the environment and human health as a result of the presence of hazardous substances in electrical and electronic equipment end users ...

Страница 4: ...Revision User s Manual for Internet Video Conferencing Phone Model ICF 1501 ICF 1550 Rev 1 0 Dec 2005 Part No EM ICF1550v1 4 ...

Страница 5: ...ill function and reduce the chance of being shocked x Do not connect the grounding wire to a gas or water pipe x If possible switch power off and unplug the machine during a thunderstorm y Do not try to disassemble the machine Unplug the machine and call for service in the following situations x The power cord or plug is damaged or frayed x Some liquid is spilled into the machine x The machine app...

Страница 6: ...0 a Language Type 20 a Display Name 21 a Security 21 a Password 21 5 2 Network ICF 1501 22 a Bandwidth 22 a Network Mode 22 a DNS IP Address 24 a DDNS Hostname 25 a DDNS User Name 25 a DDNS Password 25 5 3 Network ICF 1550 26 a Bandwidth 26 a Network Mode 26 5 4 Advanced ICF 1501 28 a Gatekeeper Mode 28 a GK IP Address 29 a GK Phone Number 29 a GK Alias Name 29 a H235 Password 30 a Detect NAT RIP ...

Страница 7: ...date 38 a Update IP Address 38 a Upgrading the System Software 38 a Exit System Configuration 41 5 6 Selecting A V Source 41 a Selecting Video Source 41 a Selecting Audio Source 41 6 Phone Book Setup 42 6 1 Input Characters 42 6 2 Input IP Address 43 6 3 Ten Records Communicating by Phones 43 7 General Operation 44 7 1 Making Video Calls 44 7 2 Making Phone Calls under PSTN 45 7 3 Receiving Video ...

Страница 8: ...r VoIP gateway 50 7 The remote site receives images but no sound from the local site 50 8 Voice is unclear or discontinuous 50 9 How to use the Video Phone if you don t have a static IP address 50 10 How to connect the machine with GATEWAY ICF 1501 51 11 How to check the firmware version of the Video Phone 51 12 How to set dynamic IP under PPPoE mode 51 13 Why the communication quality is poor 51 ...

Страница 9: ...ultiple video inputs which can be used to connect to external cameras for group meetings and or a document camera for showing detailed documents or photographs With up to 30 fps frame rate outstanding picture and sound quality the PLANET Internet Video Conferencing Phone offers you a superior communications experience via the Internet Unless specified by model in the following section turns of Vid...

Страница 10: ...angle adjustable Built in High sensitive microphone Built in high volume speaker pair RCAAudio Video input interfaces for multiple camera connection pair RCAAudio Video output for TV connection Two Ethernet ports for connecting to WAN and PC 1 2 Specification Product Internet Video Conferencing Phone Model ICF 1501 ICF 1550 Hardware Port 2 x 10 100Mbps RJ 45 port 1 x PSTN RJ 11 port Camera Built i...

Страница 11: ...ontrol Unit MCU ICF 1550 Compatible with SIP Proxy server SIP 2 0 Videophone LAN standard IEEE 802 3 Ethernet IEEE 802 3u Fast Ethernet Network and Configuration Connection Type ADSL Cable LAN Access Mode Static IP PPPoE DHCP Bandwidth Usage ICF 1501 128K 256K 384K 512K 768K ICF 1550 128K 256K 384K 512K 768K No Limit Video Resolution CIF 352x288 QCIF 176x144 and SQCIF 128x96 Configuration Interfac...

Страница 12: ...kage and check all equipment carefully 1 Videophone Machine 1 2 Power Adapter 1 AC Power Cord 1 3 Audio Video Cable 2 4 User Manual CD ROM 1 5 Quick Installation Guide 1 If there is any problem please liaise with the sales right away 12 ...

Страница 13: ...o that the light can shine on the user s face Avoid backlight illuminant from user s upper back is improper Avoid light reflection from mirror which is behind the user Step 2 Hardware installation Insert the handset cord into the socket upon the handset and the other end into the socket on the left side of the machine 13 ...

Страница 14: ...e can work as a hub by connecting the Video Phone to a computer with a LAN cable Please plug the LAN cable into the PC port on the back panel 2 You can use the Video Phone as a PSTN telephone as well By connecting the phone line to the Video Phone you may have it work as a PSTN telephone Step 4 Connecting the power cord Please refer to the picture above Plug the power cord into a socket and use th...

Страница 15: ...Step 5 Back panel introduction 15 ...

Страница 16: ...4 Getting to Know the Machine Front View 16 ...

Страница 17: ...Keypad Panel Keypad Panel 17 ...

Страница 18: ...Back View Side View The LCD panel can be tilted up or down to obtain the most comfortable viewing position 18 ...

Страница 19: ...ould take about 30 seconds to make power on self test and system start up In this period the screen will show local images Please do not press any button on this period After the booting process is completed the following page is shown on the LCD monitor Press Menu button a System Configuration page is shown Please use and to move the highlight to the function you need to configure and Enter to en...

Страница 20: ...oes not send image automatically when conversing 3 Press the ENTER key to confirm the setting a System Sleep Sleep mode will be on when system is idle for a pre set period 1 General Æ select System Sleep 2 Press the ENTER key and use number keys to input sleep time Up to 99 minutes To disable System Sleep function please set the time to 0 minute Use the key to delete a character 3 Press the key to...

Страница 21: ... In this case you don t have to worry that the system settings will be changed without notice 1 General Æ select Security 2 Press the or key to select the setting you want Enable enable password protection Users have to input the security password next time when trying to enter system configuration settings Disable Disable password protection 3 Press the ENTER key to save the setting If you select...

Страница 22: ... set your bandwidth consumption in accordance with your Internet bandwidth subscribed from your ISP a Network Mode The Network Mode function is used for network configuration You can get the network setup information from your Internet Service Provider ISP 1 Network Æ select Network Mode 2 Press the or key to select the network mode Manual Fixed IP Mode Acquire the subnet mask address user IP addr...

Страница 23: ... ISP 1 Network Æ Bandwidth Æ Press or Select a proper bandwidth in compliance with your Internet transmission speed 2 Network Æ Network Mode Æ Press or Select Manual mode 3 Network Æ Subnet Mask Æ input your subnet mask 4 Network Æ User IP Address Æ input your user IP address 5 Network Æ Router IP Address Æ input your router IP address 6 Press ESC to save your settings B DHCP 1 Network Æ Network M...

Страница 24: ...rk Æ PPPoE Password Æ input your PPPoE password 4 Press ESC to save your settings a DNS IPAddress 1 Network Æ select DNS IP Address 2 Press ENTER and use keyboard to input your DNS IP address 3 Press to select OK and press ENTER to return to the previous page Note Please register your DDNS on http www dyndns org 1 Please choose Account item 2 After registering the user will get DDNS user name and ...

Страница 25: ...d use the number key to input your DDNS user name Press to delete a word press to input a dot press to switch between upper case and lower case letters and numerals 3 Press to select OK and press ENTER to return to the previous page a DDNS Password Dynamic DNS password setup 1 Network Æ select DDNS Password 2 Press ENTER and use the number key to input your DDNS password You can also use the keypa...

Страница 26: ... the ENTER key to confirm the setting Note Please set your bandwidth consumption in accordance with your Internet bandwidth subscribed from your ISP a Network Mode The Network Mode function is used for network configuration You can get the network setup information from your Internet Service Provider ISP 1 Network Æ select Network Mode 2 Press the or key to select the network mode Manual Fixed IP ...

Страница 27: ...nd router IP address from your ISP 1 Network Æ Bandwidth Æ Press or Select a proper bandwidth in compliance with your Internet transmission speed 2 Network Æ Network Mode Æ Press or Select Manual mode 3 Network Æ Subnet Mask Æ input your subnet mask 4 Network Æ User IP Address Æ input your user IP address 5 Network Æ Router IP Address Æ input your router IP address 6 Press ESC to save your setting...

Страница 28: ...Æ input your PPPoE password 4 Press ESC to save your settings After all settings please press ESC to save your settings 5 4 Advanced ICF 1501 a Gatekeeper Mode When register a gatekeeper you can assign a number to the Video Phone This makes the Video Phone user friendly as users only have to dial a number instead of entering an IP address when making a call 1 Advanced Æ select Gatekeeper Mode 2 Pr...

Страница 29: ...keeper registration 1 Advanced Æ select GK Phone Number 2 Press ENTER and use number keys to input your GK phone number The capacity is 30 digits Press to delete a word Press to input a dot 3 Press to select OK and press ENTER to return to the previous page a GK Alias Name You can register a name or number at the gatekeeper to make the dial of Video Phone more user friendly Please set your gatekee...

Страница 30: ... Network Address Translation and Routing Information Protocol By enabling this function the Video Phone can detect if the other is under NAT mode 1 Advanced Æ select Detect NAT RIP 2 Press or to select Enable or Disable 3 Press ENTER to save the setting a NAT Route If you re a virtual IP user please enable this function and continue setting the NAT route IP 1 Advanced Æ select NAT Route 2 Press or...

Страница 31: ...ct Default 2 Press or to select the setting you want No Action Retain the present setting Configuration Initiate system configurations to default value Phone Book Initiate phone book to default value Call History Initiate call history record to default value 3 Press ENTER to return to the previous page a Picture Quality This function is responsible for the video quality sent to the remote site The...

Страница 32: ...omatically switches Default G 711 64Kbps G 723 6 3Kbps G 729 8Kbps 3 Press ENTER to confirm and save the setting a Remote Update Remote Update provides users to upgrade system software Remote Update function enables users to upgrade Video Phone software online 1 Advanced Æ select Remote Update 2 Press ENTER and select Yes if you want to do remote update 3 Press ENTER to confirm the setting and go ...

Страница 33: ...Use the number keys to input your Router IP address 4 Use the number keys to input your Update IP address 5 Press ESC to save the setting and start upgrading the software It will take about fifteen seconds to start upgrading Please wait patiently DHCP 1 Use the key to go to Update IP Address and input your Update IP address 2 Press ESC to save the setting and start upgrading the software It will t...

Страница 34: ...pgrading the software It will take about fifteen seconds to start upgrading Please wait patiently After updating system will restart automatically Please wait for about fifteen art automatically and return to standby mode Please wait for about ten seconds seconds If there is no upgrade file to update the screen will return to Remote Update page Press Menu and then press ENTER The system will rest ...

Страница 35: ...g you want Disable Not to register a SIP server Proxy To register a SIP server and use it for communication 3 Press ENTER to confirm the setting and return to the previous page If you set this item to Proxy please continue setting the SIP Proxy IP Addr SIP User Name Password Domain Realm and Port items Detailed setup instructions are as follows a SIP Proxy IPAddr SIP Proxy IPAddress Enter the SIP ...

Страница 36: ...r the password assigned by the SIP server 1 Advanced Æ select Password 2 Press ENTER to enter the on screen keyboard to input your password You can also use the keypad to key in numbers and letters The capacity is 30 digits Press to delete a word press to input a dot press to switch between upper case and lower case letters and numerals 3 Press to select OK and press ENTER to return to the previou...

Страница 37: ...configurations to default value Phone Book Initiate phone book to default value Call History Initiate call history record to default value 3 Press ENTER to return to the previous page a Picture Quality This function is responsible for the video quality sent to the remote site There are three kinds of format Auto CIF QCIF provided 1 Advanced Æ select Picture Quality 2 Press or to select the setting...

Страница 38: ...emote Update Remote Update provides users to upgrade system software Remote Update function enables users to upgrade Video Phone software online 1 Advanced Æ select Remote Update 2 Press ENTER and select Yes if you want to do remote update 3 Press ENTER to confirm the setting and go on to the next step a Update IPAddress 1 Advanced Æ select Update IP Address 2 Press ENTER and input the update IP a...

Страница 39: ...ddress 4 Use the number keys to input your Update IP address 5 Press ESC to save the setting and start upgrading the software It will take about fifteen seconds to start upgrading Please wait patiently DHCP 1 Use the key to go to Update IP Address and input your Update IP address 2 Press ESC to save the setting and start upgrading the software It will take about fifteen seconds to start upgrading ...

Страница 40: ...wait patiently After network setting press the Speaker key to save the settings and start updating After updating system will restart automatically Please wait for about fifteen seconds If there is no upgrade file to update the screen will return to Remote Update page Press Menu and then press ENTER The system will restart automatically and return to standby mode Please wait for about ten seconds ...

Страница 41: ...ts one external A V input channel and one A V output channel A V In EXT A V Out Main a Selecting Video Source 1 Press the Channel button 2 Use or to enter Video Channel Selection 3 User or to switch channels a Selecting Audio Source 1 Press the Channel button 2 Use or to enter Audio Channel Selection 3 User or to switch channels 41 ...

Страница 42: ...andby mode Quick search address If you want to search the thirty second phone address you may setup the following steps 1 You can press Phone Book and press 3 in the remote control 2 Then the sign will move to the thirtieth address 3 User can use the key to move to the 32 one 6 1 Input Characters Select one entry from the phone book and press the ENTER button to enter the alphabet number and symbo...

Страница 43: ...rn to the previous page 3 Press ESC to leave phone book sheet and return to standby mode 6 3 Ten Records Communicating by Phones After communicating press Call History to review the call history The most recent ten incoming and outgoing IP records are kept in Call History 1 Press the Call History key to enter the call history sheet Press or to select record of incoming or outgoing calls Press or t...

Страница 44: ... Video Calls Under General State 1 In standby mode pick up the handset or press the Speaker button Then dial the IP address of the remote site 2 Press the ENTER button to confirm and commence the Internet connecting 3 When the connection is set up successfully the video communication will start and the remote site video will be shown on the screen of local site 4 Please hang up the handset or pres...

Страница 45: ... book sheet 2 Press 3 and 2 The Video Phone will connect with the thirty second IP address automatically after a moment 3 When the connection is up successfully the video communication will start and the remote site video will be shown on the screen of local site 4 When finish press the Speaker button to end the connection 7 2 Making Phone Calls under PSTN 1 Press the PSTN button on the panel 2 Pi...

Страница 46: ...ce to take a snapshot of the remote site image 2 Press the Snapshot button again to release the image and return to current video call The Snapshot will disappear once the captured image is released 8 2 Switching the Video and Audio Source The Video Phone allows you to connect with one external video audio source such as a camera When the external device is connected to the Video Phone you can swi...

Страница 47: ... 2 Use or to switch to Audio Channel Selection 3 Use or to switch to the external audio source Main Built in EXT from A V In 4 Press Channel or ESC button to save the setting and exit 8 3 Activating Video Audio Mute a Activate Video Mute If you want to temporarily stop video or audio transmission to the remote site during connection you can use this function to conceal the local video or audio 1 P...

Страница 48: ...swer Mode in the system configuration the A V transmission setting function will be disabled a Switching Images between Remote and Local Site You can switch images between remote and local end by pressing the Window button There are three types of image arrangement remote local remote only and local only 8 4 Operation State This function is to display the status of Network connecting for example c...

Страница 49: ...r Video Phone and make sure the RJ 45 joint on your network wire functions normally b Please check if your system configuration is correct c Please confirm if the IP address of the remote site is correct 3 The Video Phone keeps ringing but doesn t establish the connection This is because you disable the auto answer mode In this case you have to pick up the handset or press the Speaker button to an...

Страница 50: ...t have a static IP address a If you have MIS staff please turn to them for assistance b Please make sure if the router you use supports DMZ Please contact the router manufacturer for setting problems c Please reboot the router after finishing DMZ setting d Please ping your IP address If you fail to locate the IP address there must be some errors in the router setting Please go through the router s...

Страница 51: ...PoE mode Network setup as follows Network Mode PPPoE DDNS User Name DDNS Password Please contact your ISP for password 13 Why the communication quality is poor This is caused by poor Internet connection quality or insufficient bandwidth Please test your Video Phone bandwidth from 128Kbps and up till you get better quality communication Meanwhile you can also try to lower your Video Phone picture q...

Отзывы: