background image


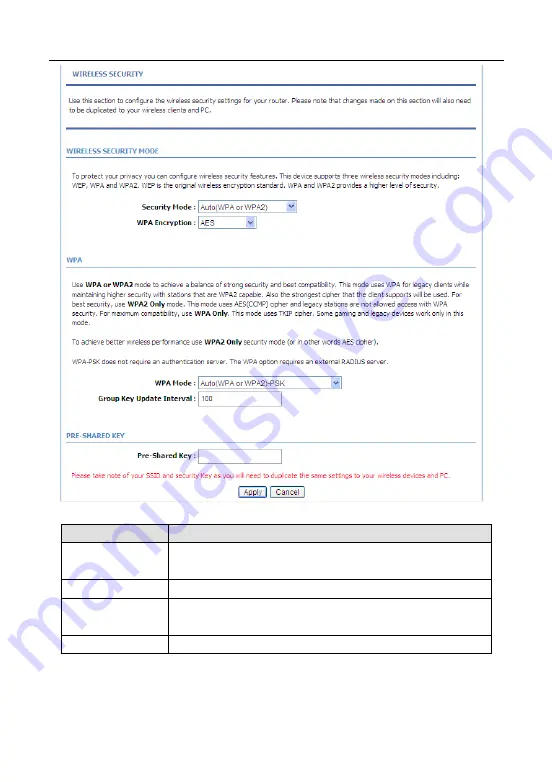
The following table describes the parameters in this page. 

Field 

Description 

WPA Mode 

You can select 

Auto (WPA or WPA2)-PSK

 or 

Auto (WPA 

or WPA2)-Enterprise

 from the drop-down list. 

WPA Encryption 

You can select 

AES 

or 

TKIP+AES


from the drop-down list.

Group Key 

Update Interval 

Set the interval for updating the key. 

Pre-Shared Key 

Set the preshared key to identify the workstation. 


If the 

WPA Mode

 is set to 

Auto (WPA or WPA2)-Enterprise

, the page as shown 

in the following figure appears: 

23 

Содержание ADN-4101

Страница 1: ...802 11n Wireless ADSL 2 2 Router ADN 4101...

Страница 2: ...serves the right to revise this publication and to make changes from time to time in the contents hereof without obligation to notify any person of such revision or changes All brand and product names...

Страница 3: ...l interference and 2 this Device must accept any interference received including interference that may cause undesired operation Federal Communication Commission FCC Radiation Exposure Statement This...

Страница 4: ...ectrical equipment All guidelines of this and of the computer manufacture must therefore be allowed at all times to ensure the safe use of the equipment Energy Saving Note of the Device This power req...

Страница 5: ...p 18 3 2 4 Local Network 26 3 2 5 Time and Date 30 3 2 6 Logout 31 3 3 Advanced Configuration 32 3 3 1 Advanced Wireless 32 3 3 2 Port Forwarding 39 3 3 3 DMZ 41 3 3 4 Parental Control 42 3 3 5 Filter...

Страница 6: ...4 4 Diagnostics 78 3 4 5 Log Configuration 80 3 4 6 Logout 81 3 5 Status 81 3 5 1 Device Information 81 3 5 2 Wireless Clients 83 3 5 3 DHCP Clients 83 3 5 4 Logs 84 3 5 5 Statistics 84 3 5 6 Route i...

Страница 7: ...ention to the power load of the outlet or prolonged lines An overburden power outlet or damaged lines and plugs may cause electric shock or fire accident Check the power cords regularly If you find an...

Страница 8: ...Green On The device is connected to the physical layer of the office On The Internet connection is normal in the routing mode for example PPP dial up is successful and no Internet data is being transm...

Страница 9: ...evice Interface Button Description LINE RJ 11 interface for connecting the interface of the telephone set through the telephone cable LAN1 LAN2 LAN3 LAN4 RJ 45 interface for connecting the Ethernet in...

Страница 10: ...ndows 2000 Windows ME or Windows 98SE Internet Explorer V5 0 or higher Netscape V4 0 or higher or Firefox 1 5 or higher 1 4 Features The device supports the following features IEEE802 11b g n Various...

Страница 11: ...us displaying PPP session PAP CHAP and MS CHAP IP filter IP QoS Remote access control Line connection status test Remote management through telnet or HTTP Backup and restoration of configuration file...

Страница 12: ...ack Modem Connect to the LINE interface of the device Phone Connect to a telephone set Step 2 Connect the LAN interface of the device to the network card of the PC through an Ethernet cable MDI MDIX N...

Страница 13: ...he splitter Note When connection 2 is used the filter must be installed close to the telephone cable See Figure 4 Do not use a splitter to replace the filter Installing a telephone directly before the...

Страница 14: ...plorer IE browser and enter http 192 168 1 1 in the address bar Step 2 The LOGIN page as shown in the following figure appears In this page enter the user name and the password Then click login The us...

Страница 15: ...nfigure Internet connection and other important parameters The following sections describe these various configuration parameters When subscribing to a broadband service be aware of the Internect conn...

Страница 16: ...10 Step 2 Click Setup Wizard The page as shown in the following figure appears There are four steps to configure the device Click Next to continue Step 3 Set the time and date Then click Next...

Страница 17: ...p 4 Configure the Internet connection Select the protocol and the encapsulation mode Set the VPI and the VCI If the Protocol is set to PPPoE or PPPoA the page as shown in the following figure appears...

Страница 18: ...ser name and password for PPPoE or PPPoA dialup If the Protocol is set to Dynamic IP the page as shown in the following figure appears If the Protocol is set to Static IP the page as shown in the foll...

Страница 19: ...ation of the IP address subnet mask and gateway If the Protocol is set to Bridge the page as shown in the following figure appears After setting click Next Step 5 Configure the wireless network Enter...

Страница 20: ...Step 6 View the configuration information of the device To modify the information click Back To effect the configuration click Next 14...

Страница 21: ...tep of the Wizard page you can click Back to review or modify the previous settings or click Cancel to exit the wizard 3 2 2 Internet Setup Choose Setup Internet Setup The page as shown in the followi...

Страница 22: ...d the page as shown in the following figure appears The following table describes the parameters in this page Field Description ATM PVC CONFIGURATION VPI Virtual Path Identifier VPI is the virtual pat...

Страница 23: ...NECTION TYPE Protocol Select PPP over ATM PPPoA PPP over Ethernet PPPoE MAC Encryption Routing MER IP over ATM IPoA or Bridging from the drop down list Encapsulation Mode Select LLC or VCMUX from the...

Страница 24: ...pear to pear network or as complex as a number of computers with wireless LAN cards communicating through access points that bridge network traffic to a wired LAN Choose Setup Wireless The WIRELESS SE...

Страница 25: ...x to enable or disable multiAP isolation If this function is enabled clients of different SSIDs cannot access each other Wireless Network Name SSID Network name It can contain up to 32 characters It c...

Страница 26: ...n Band Width You can set the bandwidth only in the 802 11n mode You can set the bandwidth of the device to 20M or 40M Click Apply to save the settings 3 2 3 2 Wireless Security In the WIRELESS SETTIN...

Страница 27: ...e is set to WEP the page as shown in the following figure appears The following table describes the parameters in this page Field Description WEP Key Length You can select 64 bits or 128 bits from the...

Страница 28: ...y Select the WEP key from the drop down list Its value range is 1 4 WEP Keys 1 4 Set the 64 bits or 128 bits key in the format of Hex or ASCII Authentication Select the authentication mode from the dr...

Страница 29: ...Enterprise from the drop down list WPA Encryption You can select AES or TKIP AES from the drop down list Group Key Update Interval Set the interval for updating the key Pre Shared Key Set the preshare...

Страница 30: ...need to enter the IP address port shared key of the RADIUS server Click Apply to save the settings WPA2 Only If the Security Mode is set to WPA2 only the page as shown in the following figure appears...

Страница 31: ...ters in this page are similar to those in the page for Auto WPA or WPA2 Click Apply to save the settings WPA Only If the Security Mode is set to WPA only the page as shown in the following figure appe...

Страница 32: ...al Network You can configure the LAN IP address according to the actual application The preset IP address is 192 168 1 1 You can use the default settings and DHCP service to manage the IP settings of...

Страница 33: ...f the device DHCP service provides IP settings to workstations configured to automatically obtain IP settings that are connected to the device through the Ethernet port When the device is used for DHC...

Страница 34: ...P Relay IP address And you can also set the perferrde and alternate DNS server Click Apply to save the settings In the DHCP CLIENT CLASS LIST page you can set a IP address range for some specification...

Страница 35: ...Max IP Address The IP Address for maxmun DNS Address Enter the DNS Address with the client class In the LOCAL NETWORK page you can assign LAN IP addresses for specific computers according to their MA...

Страница 36: ...the computer Click Apply to save the settings After the DHCP reservation information is saved the DHCP reservations list displays the information If the DHCP reservations list is not empty you can sel...

Страница 37: ...me to automatically adjust the time when needed Select Automatically synchronize with Internet time servers Select the appropriate time server and the time zone from the corresponding drop down lists...

Страница 38: ...to examine the performance and troubleshoot 3 3 1 Advanced Wireless This function is used to modify the standard 802 11g wireless settings It is recommended not changing the default settings because...

Страница 39: ...3 3 1 1 Advanced Settings In the ADVANCED WIRELESS page click Advanced Settings The page as shown in the following figure appears 33...

Страница 40: ...34...

Страница 41: ...hold Its value range is 256 2346 and the default value is 2345 DTIM Interval Data beacon proportion transmission quantity indication Its value range is 1 255 and the default value is 100 Preamble Type...

Страница 42: ...ireless interface SSID Similar to the primary SSID it identifies a wireless AP These settings are applicable only for more technically advanced users who have sufficient knowledge about wireless LAN D...

Страница 43: ...rity Settings In the ADVANCED WIRELESS page click Security Settings The page as shown in the following figure appears Select the desired SSID from the drop down list Select the encryption type from th...

Страница 44: ...lect Enrollee or Registrar from the drop down list Configuration State Select Configured or unconfigured from the drop down list Input Station PIN If you are using the PIN method you need a Registrar...

Страница 45: ...It allows remote users to access services in your LAN such as FTP for file transfers or SMTP and POP3 for e mail The device receives remote requests for these services at your public IP address It us...

Страница 46: ...er IP Address field to appoint the corresponding PC to receive forwarded packets The port table displays the ports that you want to open on the device The Protocol indicates the type of protocol used...

Страница 47: ...n the following figure appears In this page you can enable a DMZ host In this way access from Internet to the WAN IP address of the device is forwarded to the DMZ host and network server of the intern...

Страница 48: ...cess Block Website allows you to quickly create a list of websites that you wish to prevent users from accessing MAC Filter allows you to control Internet access by clients or PCs connected to the dev...

Страница 49: ...list or select Manual Schedule and set the corresponding time and days Click Apply to add the website to the BLOCK WEBSITE table The page as shown in the following figure appears 3 3 4 2 MAC Filter In...

Страница 50: ...rameters in this page Field Description User Name Enter the name that identifies your configuration For example kids Current PC s MAC Address Enter the MAC address of the computer that connects to the...

Страница 51: ...to manually set the time of MAC filtering Enter the use name and MAC address Select the corresponding time and days Then click Apply to add the MAC address to the BLOCK MAC ADDRESS table The page as s...

Страница 52: ...3 5 1 IP Filtering In the Fitering Options page click IP Filtering The FIREWALL page as shown in the following figure appears Click Add to add an IP filter The page as shown in the following figure ap...

Страница 53: ...drop down list Type Select the In Out or Both from the drop down list Default action Select the Permit or Drop from the drop down list Default Chain Select the Local Forward or Both from the drop down...

Страница 54: ...pecify at least one of the following criteria protocol source destination IP address subnet mask and source destination port Then click Apply to save the settings Note The settings apply only when the...

Страница 55: ...nfigure bridge parameters In this page you can modify the settings or view the information of the bridge and its attached ports Click Add to add a bridge filter The page as shown in the following figu...

Страница 56: ...ame direction to be mapped from the drop down list The device supports frame direction from LAN to WAN and WAN to LAN Time schedule Select the time that you want to apply the rule from the drop down l...

Страница 57: ...isable the Queuing Operation 3 3 6 2 Queue Configuration In the QoS Configuration page click Qos Queue Configuration The page as shown in the following figure appears In this page you can configure th...

Страница 58: ...S Configuration page click QoS Classification Configuration Click Add and the page as shown in the following figure appears The following table describes the parameters in this page Field Description...

Страница 59: ...he Source subnet mask of the packet Destination IPv4 Address Enter the destination IP address of the packet Destination subnet mask Enter the destination subnet mask of the packet Ethernet Type Select...

Страница 60: ...irewall Settings The page as shown in the following figure appears Click Apply to save the settings 3 3 8 DNS Domain name system DNS is an Internet service that translates domain names into IP address...

Страница 61: ...n list Obtain DNS server address automatically If you select this radio button the device automatically obtains IP address of the DNS server from the ISP You need not manually enter the IP address of...

Страница 62: ...P addresses using DHCP so locating a specific host on the LAN using the standard DNS is difficult For example if you are running a public web server on your LAN DDNS ensures that the host can be locat...

Страница 63: ...terface Select the interface that is used for DDNS service from the drop down list The IP address of the interface corresponds to the host name Username Enter the user name of your DDNS account Passwo...

Страница 64: ...ains the following function items Port Mapping IGMP Proxy IGMP Snooping UPnP ADSL SNMP TR 069 Certificates PPTP 3 3 11 Port Mapping In the NETWORK TOOLS page click Port Mapping The page as shown in th...

Страница 65: ...can bind the WAN interface and the LAN interface to the same group Click Add to add port mapping The page as shown in the following figure appears To create a mapping group do as follows Step 1 Enter...

Страница 66: ...y to save the settings 3 3 11 1 IGMP Proxy In the NETWORK TOOLS page click IGMP Proxy The page as shown in the following figure appears IGMP proxy enables the device to issue IGMP host messages on beh...

Страница 67: ...t receive the multicast packets any more In the NETWORK TOOLS page click IGMP Snooping The page as shown in the following figure appears Click Apply to save the settings 3 3 11 3 UPnP In the NETWORK T...

Страница 68: ...In the NETWORK TOOLS page click ADSL The page as shown in the following figure appears In this page you can select the ADSL modulation Normally you are recommended to keep the factory defaults The dev...

Страница 69: ...entity can use it to directly obtain the device information Set Community Universal character to modify the device configuration It is similar to the password The SNMP application entity can use it to...

Страница 70: ...nfiguration You can select Disabled or Enabled to disable or enable TR 069 configuraion Inform You can select Disabled or Enabled to disable or enable notification Disabled indicates that the device d...

Страница 71: ...box to enable authentication of connection request If you enable the function you need to enter the user name and password for authentication Connection Request User Name The user name that the TR069...

Страница 72: ...ystem time with time server Otherwise the certificate fails to be imported Click Input Certificate to import a certificate The page as shown in the following figure appears 3 3 12 Routing Choose Advan...

Страница 73: ...Router and Default Gateway 3 3 12 1 Static Route Choose Advanced Routing and click Static Route The page as shown in the following figure appears This page displays the information of existing static...

Страница 74: ...way IP address of the device Use Interface Select the interface of the static routing used by the device from the drop down list Note You can enter the gateway IP address of the device in the Use Gate...

Страница 75: ...the settings 3 3 12 3 Default Gateway Choose Advanced Routing and click Default Gateway The page as shown in the following figure appears In this page you can select Enable Automatic Assigned Default...

Страница 76: ...ge Field Description Name Set the name of the schedule Day s You can select one more or all of the seven days in a week All Day 24 hrs If you select the check box the rule applies throughout the 24 ho...

Страница 77: ...in the external network you can select Single IP or IP Range with the Internal and External IP type and enter the Internal and External IP address to decide witch Internal IP address transparently th...

Страница 78: ...nt The System page as shown in the following figure appears In this page you can restart the device back up the current settings to a file update the backup file and restore the factory default settin...

Страница 79: ...Settings Click Browse to select the configuration file of device and click Update Settings to update the configuration of the device Restore Default Setting Reset the device to default settings Cauti...

Страница 80: ...t Clear Config Step 3 Click Update Firmware to update the configuration file The device loads the file and reboots automatically Caution Do not turn off your device or press the Reset button when the...

Страница 81: ...for automatic logout You are recommended to change the default password to ensure the security of your network Ensure that you remember the new password or write it down and keep it in a safe locatio...

Страница 82: ...he user New Password Enter the new password Confirm Password Enter the new password again for confirmation WEB IDLE TIME OUT SETTINGS Web Idle Time Out Set the time after which the system automaticall...

Страница 83: ...he settings Caution If you disable the HTTP service you cannot access the configuration page of the device any more 3 4 3 3 IP Address In the ACCESS CONTROLS page click IP Address The page as shown in...

Страница 84: ...ent Diagnosis The page as shown in the following figure appears This page contains WAN Diagonstics and Ping Diagnostics 3 4 4 1 WAN Diagnostics In the Diagnosis page click WAN Diagnostics The page as...

Страница 85: ...79 3 4 4 2 Ping Diagnostics In the Diagnosis page click Ping Diagnostics The page as shown in the following figure appears...

Страница 86: ...Both Local indicates to save the log in the local computer Remote indicates to send the log to the remote log server Both indicates to save the log in the local computer and the remote log server To...

Страница 87: ...gure appears Click Logout to log out of the configuration page 3 5 Status In the Status page you can view the system information and monitor the performance of the device 3 5 1 Device Information Choo...

Страница 88: ...82...

Страница 89: ...Wireless Clients The page as shown in the following page appears The page displays authenticated wireless stations and their statuses 3 5 3 DHCP Clients Choose Status DHCP Clients The page as shown in...

Страница 90: ...page as shown in the following figure appears This page displays the system log Click Refresh to refresh the system log shown in the box 3 5 5 Statistics Choose Status Statistics The page as shown in...

Страница 91: ...lays the statistics information of the network and data transmission The information helps technicians to identify whether the device is functioning properly The information does not affect the functi...

Страница 92: ...page as shown in the following figure appears The table displays destination routes commonly accessed by the network 3 5 7 Logout Choose Staus Logout The page as shown in the following figure appears...

Отзывы: