background image

INSTALLING THE SEAT

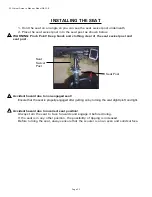
     1. Hold the seat on an angle so you can see the seat swivel post underneath

     2. Place the seat swivel post into the seat post as shown below.

WARNING: Pinch Point! Keep hands and clothing clear of the seat swivel post and 

seat post.


Accident hazard due to non-engaged seat!

     Ensure that the seat is properly engaged after getting on by turning the seat slightly left and right.

Accident hazard due to incorrect seat position!

     Always turn the seat to face forwards and engage it before driving.

     If the seat is in any other position, the possibility of tipping is increased.

     Before turning the seat, always ensure that the scooter is on an even and solid surface.

!

!

!

P3 Cruiser 

Owner’s Manual- Model GB-106

Page 33

Seat 

Swivel

Post

Seat Post

Содержание GB-106 P3 Cruiser

Страница 1: ...15002 Technology Drive Shelby Twp MI 48315 Tel 866 601 7324 Fax 586 247 3435 www worldwideseating com P3 Cruiser Owner s Manual Model GB 106 GB 106 P3 Cruiser ...

Страница 2: ...sts 5 Seat Post Hardware nut bolt pin and washers 6 2 Keys 7 Tiller Mounted Basket 8 P3 Cruiser scooter DISCLAIMER World Wide is not and cannot be held responsible for any damage or injury incurred due to improper or unsafe use of the World Wide P3 Cruiser scooter World Wide specifically disclaims responsibility for any bodily injury or property damage that may occur during any use that does not c...

Страница 3: ...ruiser 16 19 Diagnostics 20 General Care and Maintenance 21 25 Care and Maintenance of your P3 Cruiser 26 Disassembly of your P3 Cruiser 27 29 Assembly of your P3 Cruiser 30 33 Transporting your P3 Cruiser 34 P3 Cruiser Specifications 35 Warranty 36 Warranty Card 37 P3 Cruiser Owner s Manual Model GB 106 Page 2 ...

Страница 4: ...able with your new scooter or do not understand the instructions presented in this owner s manual or if for any reason you do not feel capable of performingthe activities necessary to assemble disassemble operate or maintain your P3 Cruiser please contact the home health care dealer you purchased this scooter from or contact Planet Mobility technical support services at 866 465 4387 Planet Mobilit...

Страница 5: ...on See the disassembly section in this manual Flip up the armrests WARNING WHEN GETTING ON OR OFF YOUR P3 CRUISER DO NOT PUT MOST OR ALL OF YOUR WEIGHT ON THE EDGE OF THE DECK DOING SO MAY CAUSE THE SCOOTER TO TIP GETTING ON YOUR P3 CRUISER Make certain that the key is removed Position the seat for safe and easy mounting See Operation section Carefully place one foot on the approximate center of t...

Страница 6: ... when climbing an incline If you do come to a stop restart and accelerate slowly and carefully Do not try to descend or climb a slope whose gradient is greater than recommended See Specifications section WARNING IF WHILE YOU ARE DRIVING DOWN A SLOPE YOUR SCOOTER STARTS TO MOVE FASTER THAN YOU FEEL IS SAFE RELEASE THE THUMB LEVER AND ALLOW YOUR P3 CRUISER TO COME TO A STOP WHEN YOU FEEL THAT YOU AG...

Страница 7: ...nd allow it to expand the horizons of your daily life But as with all things especially motor operated vehicles observing a few rules and safety considerations will help ensure safe scooter operation So please follow the rules below Do not turn your scooter while on an incline or decline Always keep all your body parts within the confines of the scooter Do not hose down your scooter Always remain ...

Страница 8: ...r curbs that exceed your scooter s capacity Always approach curbs and inclines straight on Be aware of and careful near mechanical pinch points for example when mating the rear carriage to the front frame especially when assembling and disassembling your scooter See Assembly Disassembly section Never sit on your P3 Cruiser when it is being transported Do not operate your vehicle if it is not funct...

Страница 9: ... from EMI RFI measured in volts per meter V M The FDA has also determined that current technology is capable of providing 20 V M of resistance to EMI RFI which would provide useful protection against common sources of interference The resistance level of the Planet Mobility P3 Cruiser is unknown EMI RFI RECOMMENDATIONS Do not turn on or use hand held personal electronic communication devices such ...

Страница 10: ...Scooter Information P3 Cruiser Owner s Manual Model GB 106 Page 9 P3 Cruiser Drive Control Lever Key Tiller Adjustment Knob Circuit Breaker Freewheel Brake Release ...

Страница 11: ...t that you ever need to contact Planet Mobility concerning your scooter Model Serial Number Date of Purchase Body Color Options Your Planet Mobility representative or dealer Name Company Address Please remember to fill in and return your Warranty registration card P3 Cruiser Owner s Manual Model GB 106 Page 10 ...

Страница 12: ...d setting at which you feel comfortable safe and in control of your scooter Key Switch This switch turns the power of your P3 Cruiser on and off Insert the key into the keyhole and push until fully inserted Notice a green LED light illuminate Once illuminated your scooter is powered Note Always make certain that the key is removed from the key switch before getting on or off your scooter P3 Cruise...

Страница 13: ...our scooter forward Increase the pressure applied by your thumb to increase your forward speed To stop your P3 Cruiser release all pressure on the lever The lever will automatically return to the center neutral position and your scooter will come to a gradual stop Note Always bring your P3 Cruiser to a full stop before changing direction from forward to reverse or from reverse to forward To drive ...

Страница 14: ...arging the batteries Note Your scooter will automatically turn itself off if the battery output falls to 18 VDC or lower Tiller Adjustment The tiller on your P3 Cruiser scooter employs an adjustment knob to provide you with infinite tiller angle settings To set the tiller to your liking follow these directions Use one hand to grasp a handgrip Use your other hand to loosen the tiller adjustment kno...

Страница 15: ...EXCEED MAXIMUM ARM WIDTH Seat Height Adjustment To adjust the seat height 1 Remove the seat by holding the Seat Rotation Lever up and lifting the seat straight up 2 Set the seat aside 3 Remove ball detent pin or the bolt nut and washers that hold the seat post in the seat pedestal 4 Position the seat post at the desired height while aligning the holes in the seat post and the seat pedestal 5 Reins...

Страница 16: ... rotate the seat to the desired position 2 Release the handle to lock the seat at any 45 position WARNING DO NOT ATTEMPT TO DRIVE YOUR P3 CRUISER IN ANY SEAT POSITION OTHER THAN FULLY FORWARD Flip Up Armrests Pull up on the end of either armrest to flip it up for easy transfer on and off your scooter Seating The Planet Mobility P3 Cruiser seat is available in black vinyl P3 Cruiser Owner s Manual ...

Страница 17: ...freewheel brake release lever while driving Never switch the scooter to the freewheel mode when somebody is sitting on it For proper operation the freewheel brake release lever should always be securely engaged Do not disengage the motor when on an incline NOTE Reverse movement of the scooter may not occur when the speed control dial is set fully counterclockwise at its slowest setting especially ...

Страница 18: ...ANGER AT ALL TIMES BY STEERING A WIDE ARC AROUND CORNERS AND OBSTACLES ALSO TO AVOID THE RISK OF TIPPING REDUCE SPEED BEFORE NEGOTIATING ANY TURNS Steering in a tight spot If you must steer in a tight spot such as entering a doorway or when turning around 1 Bring your P3 Cruiser to a full stop 2 Turn the speed control dial to the slowest setting Fully counter clockwise 3 Turn the tiller to the dir...

Страница 19: ...e your other hand to steer the scooter and to gently press on the thumb lever that will move your scooter slowly forward 3 Use your arm to push the door gently open 4 Drive through the doorway 5 If it is a self closing door it will close behind you 6 If it is not a self closing door stop your scooter when it is clear of the door and use your hand to push the door closed If the door opens towards y...

Страница 20: ...r while driving up a ramp Starting up again simply requires that you apply gentle and steady forward power pressure to the right hand thumb lever Accelerate gently after stopping on any incline Driving down a ramp Keep your P3 Cruiser speed control dial set fully counterclockwise at the slowest speed setting If you must come to a stop release the thumb control lever slowly and smoothly Max incline...

Страница 21: ...ontroller LED Flashes 5 times pause 5 times pause Brake in freewheel or brake connection problem LED Flashes 6 times pause 6 times pause Paddle or speed potentiometer problem LED Flashes 7 times pause 7 times pause Paddle or speed potentiometer problem LED Flashes 8 times pause 8 times pause Motor disconnected or faulty LED Flashes 9 times pause 9 times pause Controller fault WARNING DO NOT OPERAT...

Страница 22: ...tton is visible through the battery cover If your P3 Cruiser fails to operate your main circuit breaker may have tripped WARNING DO NOT ATTEMPT ELECTRICAL REPAIRS CONSULT PLANET MOBILITY WARNING NEVER SOAK YOUR SCOOTER IN ANY LIQUID THIS MAY CAUSE PERSONAL INJURY AND OR DAMAGE TO YOUR SCOOTER P3 Cruiser Owner s Manual Model GB 106 Page 21 Circuit Breaker ...

Страница 23: ...reaker using the following directions 1 Wait 5 minutes to allow the motor and electronics board to cool or return to normal operating temperature 2 Press in on the main circuit breaker reset button WARNING BE SURE YOU REMOVE THE KEY FROM THE KEY RECEPTACLE BEFORE RESETTING YOUR SCOOTER NOTE If the main circuit breaker continues to trip there is an underlying electrical fault that needs professiona...

Страница 24: ... Make certain that the brake handle is set to the engaged forward position Check the main circuit breaker If necessary reset the circuit breaker Make certain that the speed adjustment dial is at the desired setting Be sure that the key is all the way in the key receptacle and the scooter is ON note the green LED light is illuminated WARNING ONLY START DRIVING IF EVERYTHING IS IN WORKING ORDER HAVE...

Страница 25: ...er for more then three days make certain that you charge the batteries on the night before you are going to use your scooter This will ensure that you start operating your scooter with a full charge on the batteries Note If you use your scooter during the day charge the batteries as soon as you are finished using it The charger is fully automatic Following this procedure will prepare you scooter f...

Страница 26: ... scooter is formed ABS plastic and is painted for style and durability Each P3 Cruiser comes standard with three sets of quick snap color shrouds in Red Blue and Sahara Colors can be changed by gently snapping off the pieces Do not use a sharp object when removing shroud pieces Clean the body of your scooter with a damp cloth Do not hose down your scooter Dry with a clean soft cloth Use cool water...

Страница 27: ...d now illuminate showing the batteries are charging 4 When the charging cycle is complete a green LED light willilluminate indicating a complete charge 5 Unplug and stow the charger and cord into the AC cord pack Troubleshooting Tips If batteries fail to charge within 12 hours Check the battery connections It may be necessary to have the batteries load tested by your dealer It may be necessary to ...

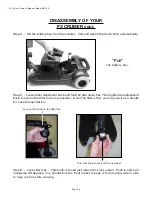
Страница 28: ...YOUR KEY IS OUT OF THE KEYHOLE BEFORE YOU BEGIN DISASSEMBLING YOUR P3 CRUISER Step 2 Optional Remove the arms from the seat This will reduce the weight of the seat making it easier to lift Step 3 While holding the seat rotation lever up grip the seat and remove from the scooter Your seat will pull out of the post Grip the seat on opposite sides and with a firm grip pull the seat straight up toward...

Страница 29: ...er in its new position Once the tiller is flat you may use it as a handle for easy transportation Loosen this knob to lay tiller flat Turn this knob to lock the front wheel Step 6 Lock tiller lock This knob is found just above the front wheel Push in and turn clockwise 90 degrees You should lock the front wheel to keep it from turning side to side to help control while carrying P3 Cruiser Owner s ...

Страница 30: ...HE FRAMES THIS AREA IS A PINCH POINT AND REQUIRES YOUR FULL ATTENTION Step 7 Hold seat post with one hand and push the rear section apart as shown below to disconnect the front and rear frame sections P3 Cruiser Owner s Manual Model GB 106 Page 29 Push the rear down to separate connections and front section from the rear section ...

Страница 31: ...for transport and maintenance work Always carry out any work to be done with great care Always try to get help from a second person especially when stowing parts for transport Pinch Point A pinch point is an area where you MUST consider your fingers to be sure your fingers DO NOT become pinched between two metal areas The greatest chance of pinch points become possible during the assembly of the P...

Страница 32: ...devices are holding correctly BE SURE YOU HAVE ALL THE IMPORTANT PARTS 1 Line up the front and rear components WARNING WATCH FINGER PLACEMENT BE CAREFUL NOT TO PINCH YOUR FINGERS 2 Connect the front and rear frame sections and connect the components WARNING WATCH YOUR FINGERS Notice how the front component connects to the rear component P3 Cruiser Owner s Manual Model GB 106 Page 31 ...

Страница 33: ...NG MAKE SURE YOU TIGHTEN YOUR TILLER TO BE SURE IT IS LOCKED 5 Unlock your front wheel lock knob WARNING IF YOU DON T UNLOCK YOUR TILLER LOCK KNOB YOUR TILLER WILL NOT TURN THIS COULD CAUSE INJURY P3 Cruiser Owner s Manual Model GB 106 Page 32 Unlock front wheel lock knob Engage your brake Set your tiller angle using the tiller lock knob Install your Seat ...

Страница 34: ...non engaged seat Ensure that the seat is properly engaged after getting on by turning the seat slightly left and right Accident hazard due to incorrect seat position Always turn the seat to face forwards and engage it before driving If the seat is in any other position the possibility of tipping is increased Before turning the seat always ensure that the scooter is on an even and solid surface P3 ...

Страница 35: ...Cruiser by its plastic body parts These parts are not designed to be used as handles Also damage to these parts is NOT covered in any warranty Do not use tires or wheels to lift the rear carriage The carriage may rotate and cause injury or damage Use moving blankets or other forms of padding to protect your P3 Cruiser during transportation WARNING IF YOUR SCOOTER AND ITS COMPONENTS ARE NOT PROPERL...

Страница 36: ...ry pack Front Half Rear Half Freewheel Mode Maximum Incline Electronic Speed Control Brakes Charger Rear Wheel Drive Controller Warranty Frame Warranty Electronics warranty excludes batteries Warranty Drive Train GB 106 37 21 25 Foam Filled 8 8 250 lbs 4mph 2 Up to 8 miles 12 VDC 12Ahx2 Standard 31 ANSI RESNA 39 28 21 pounds 24 pounds 21 pounds 32 pounds 24 pounds Yes 6 degrees Yes Electro mechani...

Страница 37: ... repair of the product unless specifically authorized by Planet Mobility This warranty does not include any labor charges incurred in replacement part installation Implied warranties including those of merchantability and fitness for a particular purpose are excluded Liabilities for consequential damage are excluded This warranty gives you specific rights and you may also have other rights which v...

Страница 38: ...scooter Model Serial Number Date of Purchase Body Color Options I have read and fully understand ____ My Planet Mobility P3 Cruiser owner s manual including the sections on operating instructions safety guidelines maintenance and battery instructions ____ Planet Mobility P3 Cruiser Warranty ____ Planet Mobility has instructed me on how to operate my scooter Signature_______________________________...

Страница 39: ...P3 Cruiser Owner s Manual Model GB 106 Page 38 14986 Technology Drive Shelby Twp MI 48315 Tel 866 465 4387 Fax 586 247 3435 www planetmobility com GB 106 P3 Cruiser ...

Отзывы: