background image

6

SPECIAL NOTES ON LCD MONITORS

The following symptoms are normal with LCD monitor and do not indicate a problem.

NOTES AND CLEANING 

 • Due to the nature of the fluorescent light, the screen may flicker during initial use. Turn off 

the Power Switch and then turn it on again to make sure the flicker disappears. 

 • You may find slightly uneven brightness on the screen depending on the desktop pattern 

you use. 

 • The LCD screen has effective pixels of 99.99% or more. It may include blemishes of 0.01% 

or less such as a missing pixel or a pixel lit all of the time. 

 • Due to the nature of the LCD screen, an after image of the previous screen may remain 

after switching the image, when the same image is displayed for hours. In this case, the 
screen is recovered slowly by changing the image or turning off the Power Switch for 
hours. 

 • When the screen becomes black or flashing, or cannot illuminate any more, contact your 

dealer or service center to replace parts. Don’t repair the screen by yourself! 

 • To keep the monitor looking new, periodically clean it with a soft cloth. Stubborn stains 

may be removed with a cloth lightly dampened with a mild detergent solution. Never use 
strong solvents such as thinner, benzene, or abrasive cleaners, since these will damage 
the cabinet. As a safety precaution, always unplug the monitor before cleaning it. 

 • Do not scratch the screen with hard things as it may cause permanent damage. 
 • Do not allow liquids into monitor as it will result in component damage. 

Содержание PXN2410

Страница 1: ...PXN2410 LCD Monitor...

Страница 2: ......

Страница 3: ...ghts are reserved No part of this document may be reproduced translated to another language or stored in a retrieval system or transmitted by any means electronic mechanical photocopying recording or...

Страница 4: ...0 ADJUSTING THE VIEWING ANGLE 11 OPERATING INSTRUCTIONS 12 GENERAL INSTRUCTIONS 12 FRONT PANEL CONTROL 13 HOW TO ADJUST A SETTING 14 ADJUSTING THE PICTURE 15 PLUG AND PLAY 17 TECHNICAL SUPPORT FAQ 18...

Страница 5: ...or relocate the receiving antenna 2 Increase the separation between the equipment and receiver 3 Connect the equipment into an outlet on a circuit different from that to which the receiver is connecte...

Страница 6: ...he manufacturer and follow the kit instructions Slots and openings in the back and bottom of the cabinet are provided for ventilation To ensure reliable operation of the monitor and to protect it from...

Страница 7: ...rly to children can be avoided by taking simple precautions such as ALWAYS use cabinets or stands or installation methods recommended by the manufacturer of the product set ALWAYS use furniture that c...

Страница 8: ...ain after switching the image when the same image is displayed for hours In this case the screen is recovered slowly by changing the image or turning off the Power Switch for hours When the screen bec...

Страница 9: ...isplayport Inputs Ergonomic Design Space Saving Compact Case Design Integrated 2W speakers Use extreme caution when unpacking your monitor as the deskstand is spring loaded Failure to follow the instr...

Страница 10: ...8 PACKAGE LIST The product package should include the following items Power cable User s Guide PXN2410 LCD Monitor Monitor DP cable HDMI cable Stand base Screws for Base...

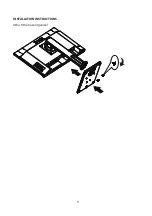
Страница 11: ...9 INSTALLATION INSTRUCTIONS Attach the base organizer...

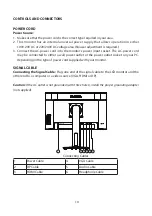
Страница 12: ...t The AC power cord may be connected to either a wall power outlet or the power outlet socket on your PC depending on the type of power cord supplied with your monitor SIGNAL CABLE Connecting the Sign...

Страница 13: ...nge the monitor s angle You are able to adjust the monitor s swivel from 30 to 30 You are able to adjust the monitor s tilt from 5 to 20 You are able to adjust the monitor s pivot from 90 to 90 Swivel...

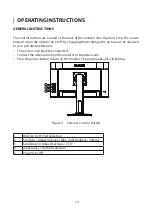
Страница 14: ...adjusted to your personal preferences The power cord should be connected Connect the video cable from the monitor to the video card Press the power button to turn on the monitor The power indicator wi...

Страница 15: ...n when function is activated 2 Input Select Enter When the OSD is OFF pressing 2 button will call out input select Use the up down arrow to select input Press 2 to confirm selection OSD Lock Function...

Страница 16: ...nction selected has a sub menu press or again to navigate through the sub menu functions Once the desired function is highlighted press 2 button to activate it 3 Press or to change the settings of the...

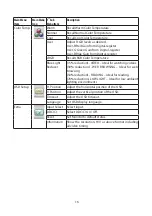
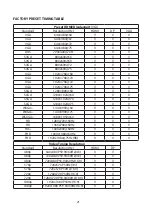
Страница 17: ...s Contrast Grayed Game Brightness 60 Contrast 50 Brightness Contrast Grayed Movie Brightness 80 Contrast 50 Brightness Contrast Grayed Sports Brightness 100 Contrast 50 Brightness Contrast Grayed DCR...

Страница 18: ...lue Light Reducer 15 reduction VIDEO Ideal for watching videos 30 reduction WEB BROWSING Ideal for web browsing 50 reduction READING Ideal for reading 70 reduction LOW LIGHT Ideal for low ambient ligh...

Страница 19: ...ng a time out period will automatically switch to an OFF mode This reduces the monitor s internal power supply consumption After the video input signal is restored full power is restored and the displ...

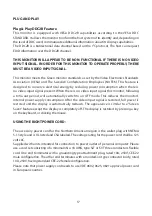
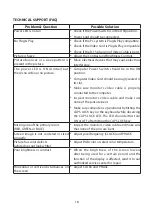
Страница 20: ...ideo cable is properly connected to the computer Inspect monitor s video cable and make sure none of the pins are bent Make sure computer is operational by hitting the CAPS LOCK key on the keyboard wh...

Страница 21: ...ble is properly connected if the connector is loose tighten the connector s screws 2 Check the signal cable s connection pins for damage INPUT NOT SUPPORT Your computer has been set to unsuitable disp...

Страница 22: ...DC2B Power Consumption Power On typ 14 7 W Power Saving 0 5 W Power Off 0 3 W Input Connector 20 pin Displayport 19 pin HDMI 15 pin D SUB Audio In Input Video Signal 1xDisplayPort 1 2 1xHDMI 1 4 1xD S...

Страница 23: ...1280 1024 60 V V V SXGA 1280 1024 70 V V V SXGA 1280 1024 75 V V V WXGA 1440 900 60 V V V WXGA 1440 900 75 V V V WSXGA 1680 1050 60 V V V HD 1280x720 60Hz V V V HD 1366x768 60Hz V V V HD 1600x900 60H...

Страница 24: ..._CH n 8 GND 18 Hot Plug Detect 9 ML_Lane 1 p 19 Return DP_PWR 10 ML_Lane 0 n 20 DP_PWR 19 Pin Color Display Signal Cable PIN NO DESCRIPTION PIN NO DESCRIPTION 1 TMDS Data 2 11 TMDS Clock Shield 2 TMDS...

Страница 25: ...1 15 15 Pin Color Display Signal Cable PIN NO DESCRIPTION PIN NO DESCRIPTION 1 Red 9 5V 2 Green 10 Detect Cable 3 Blue 11 Ground 4 Ground 12 DDC Serial Data 5 Ground 13 H Sync 6 R Ground 14 V Sync 7 G...

Страница 26: ...is turned Off then disconnect the power cord 2 Remove the four screws attaching the base screw dimension M4 x 12mm 3 Attach the mounting bracket from the VESA compatible wall mounting kit 100 mm x 10...

Страница 27: ...manuals touch screen drivers warranty information and access to Planar s Technical Library for online troubleshooting To speak with Planar Customer Support please have you model and serial number avai...

Страница 28: ...Q41G24M193507A Planar Address 1195 NE Compton Drive Hillsboro OR 97006 USA 2021...

Отзывы: