background image

Consignes de sécurité 

Respectez tous les avertissements, les précautions et conseils d’entretien recommandés dans ce 

manuel de l’utilisateur pour maximiser la durée de vie de votre appareil. 
 

A faire : 


Éteindre le produit avant de le nettoyer. 


La surface de l'écran tactile peut être nettoyée avec un chiffon doux et propre imprégné d’un 

nettoyant doux du commerce pour vitres ou d'un mélange à 50/50 d'alcool isopropylique et 

d'eau. 


Utilisez un chiffon doux imprégné d'un détergeant doux pour nettoyer le carter de l'affichage. 


Débranchez la fiche d’alimentation de la prise de courant secteur si le produit ne doit pas être 

utilisé pendant une période prolongée. 


A ne pas faire : 


Ne touchez pas la surface de l’écran LED avec des objets coupants ou durs. 


N'utilisez pas des produits de nettoyage abrasifs, de la cire ou des solvants pour le nettoyage. 


N’utilisez pas le produit dans les conditions suivantes : 

Environnement extrêmement chaud, froid ou humide. 

Endroits poussiéreux ou sales. 

Près d’appareils générant un fort champ magnétique. 

Sous la lumière directe du soleil. 


Si de la fumée, un bruit anormal ou une odeur s'échappait de votre moniteur LCD LED, 

débranchez immédiatement le cordon d'alimentation et appelez votre centre de réparation. 


Ne retirez jamais le couvercle arrière de votre moniteur LCD LED. L’unité d’affichage contient 

des éléments où circule un voltage élevé et présentant un risque d'électrocution. 


N’essayez jamais de réparer vous-même votre moniteur LCD LED. Faites toujours appel à votre 

centre de service ou à un technicien qualifié pour toute réparation. 


Pour des raisons de sécurité, si vous achetez séparément le kit de fixation VESA, 

assurez-vous que celui-ci est certifié UL, et qu’il peut être remplacé uniquement par 

un technicien qualifié. 


 4

Содержание PXL2780MW

Страница 1: ...www planar com USER S GUIDE LED LCD Monitor PXL2780MW ...

Страница 2: ...kage Overview 5 First Setup 6 Front View of the Product 7 Rear View of the Product 8 Quick Installation 9 Basic Operation 10 Advanced Operation OSD Menu 12 Supporting Timing Modes 17 Technical Information 18 Wall Mount Installation Instructions 19 Troubleshooting 20 Planar Support 21 ...

Страница 3: ...r users are encouraged to reduce interference by doing one or more of the following Reorient or relocate the receiving antenna Move the LED LCD Monitor and the receiver further away from each other Connect the LED LCD Monitor into an outlet on a circuit different from that to which the receiver is connected Consult your local dealer or a qualified technician FCC Warning To assure a continued FCC c...

Страница 4: ...eption de signaux radios ou télévisées une possibilité est de réinitialiser le moniteur Les usagers sont aussi encouragés à corriger les interférences en appliquant une ou plusieurs des démarches suivantes Réorientez ou déplacez l antenne de réception Placez le moniteur et le récepteur plus loin l un de l autre Connectez le moniteur à une prise différente de celle à laquelle le récepteur est conne...

Страница 5: ... period of time Don t Do not touch the LED Display screen surface with sharp or hard objects Do not use abrasive cleaners waxes or solvents for your cleaning Do not operate the product under the following conditions o Extremely hot cold or humid environment o Areas susceptible to excessive dust and dirt o Near any appliance generating a strong magnetic field o In direct sunlight If smoke abnormal ...

Страница 6: ...oyage abrasifs de la cire ou des solvants pour le nettoyage N utilisez pas le produit dans les conditions suivantes o Environnement extrêmement chaud froid ou humide o Endroits poussiéreux ou sales o Près d appareils générant un fort champ magnétique o Sous la lumière directe du soleil Si de la fumée un bruit anormal ou une odeur s échappait de votre moniteur LCD LED débranchez immédiatement le co...

Страница 7: ...ions on your purchase of this high performance LED edge lit LCD monitor This LED LCD Monitor comes with the following accessories LED LCD Monitor Base Power Cord DVI Cable Dual Link Audio in Cable Display Port Cable User s Guide 5 ...

Страница 8: ...ening in the base 3 Turn the screw clockwise to attach the base to the monitor 4 Stand the LED LCD Monitor up Disconnecting the stand base 1 Lay the LED LCD Monitor flat on a table with the LED screen face down To prevent the LED LCD Monitor from being scratched put a piece of soft cloth on the table on which the screen will be set 2 2 Turn the screw counterclockwise to remove the screw that holdi...

Страница 9: ...YZ OSD Turn On Off Scroll Down Adjust Decrease Volume menu Scroll UP Adjust Increase Brightness menu Input select Confirm Selection Auto Power On Off LED Indicator Hot keys Instructions please see Using the OSD Menu on page 10 7 ...

Страница 10: ...Rear View of the Product X Y Z Power Input Display Port Input Display Port 20 pin VGA Input D Sub 15 pin DVI Input DVI 24 pin HDMI input HDMI 19 pin Audio Input Headphone Jack 8 ...

Страница 11: ...e earphone output terminal of the monitor Earphone sold separately 4 Connect power cord to a properly grounded AC outlet and then to the monitor 5 Power ON computer and then POWER ON the monitor 6 Set the timing mode on your computer Recommended resolution and refresh rate is 2560 x 1440 60Hz Note VGA and HDMI inputs do not support 2560 x 1440 resolution It is only supported on DVI input using a D...

Страница 12: ...elects between VGA DVI HDMI Display Port mode 2 When in VGA mode press 3 seconds activates Auto Image Adjust Select the desired item when in OSD menu When not in OSD menu directly enters Volume menu Select the desired item when in OSD menu When not in OSD menu directly enters Brightness menu OSD Lock Out Function When LED LCD Monitor is in normal mode the OSD Lock Out function can be enabled Optio...

Страница 13: ... the POWER button are locked Press and hold the 1 button and the button for 3 seconds to lock all 5 buttons The LED LCD Monitor will show a Power Button Locked message for 3 seconds and the message will disappear automatically Repeat this step to unlock 11 ...

Страница 14: ...st the luminance of the video increase brightness decrease brightness Contrast To adjust the foreground white level of screen image increase contrast decrease contrast ECO Allows the user to turn the ECO On or Off Contrast and Brightness adjustment disabled when ECO is active Over Drive Allows the user to change the Over Drive strength Improve the quality of the motion pictures Press or key to adj...

Страница 15: ...io Adjust To adjust the audio functions Volume To adjust the volume of speaker output Mute To turn the Mute ON OFF Audio Adjust When in HDMI input select where the audio source comes from Line in or HDMI When in Display Port input select where the audio source comes from Line in or Display Port 13 ...

Страница 16: ...ture 9300K Most cool color temperature sRGB This is quickly becoming the industry standard for color management Enabling this setting allows the monitor to more accurately display colors the way they were originally intended Enabling the sRGB setting will cause the Contrast and Brightness adjustments to be disabled User Color Individual adjustments for red R green G blue B 1 Press button 2 to sele...

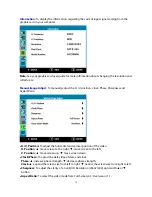
Страница 17: ...ion To adjust the horizontal and vertical position of the video H Position move screen to the right move screen to the left V Position move screen up move screen down Clock Phase To adjust the delay time of data and clock Phase increase phase strength decrease phase strength Clock expand the screen size from left to right narrow the screen size from right to left Sharpness To adjust the clarity of...

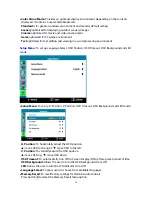
Страница 18: ...ut OSD Background and LED mode Setup Menu To set up H Position V Position OSD Timeout OSD Background and LED mode H Position To horizontally adjust the OSD position move OSD to the right move OSD to the left V Position To vertically adjust the OSD position move OSD up move OSD down OSD Timeout To automatically turn off On Screen Display OSD after a preset period of time OSD Background Allows the u...

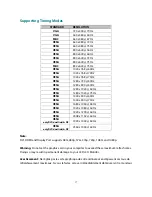
Страница 19: ...1440 x 900 75Hz VESA 1680 x 1050 60Hz VESA 1920 x 1080 60Hz VESA 1920 x 1200 60Hz VESA 2048 x 1152 60Hz VESA only DVI dual link DP 1920 x 1440 60Hz VESA only DVI dual link DP 2560 x 1440 60Hz Note DVI HDMI and Display Port supports 480i 480p 576i 576p 720p 1080i and 1080p Warning Do not set the graphic card in your computer to exceed these maximum refresh rates Doing so may result in permanent dam...

Страница 20: ... DVI D DP support up to 2560 x 1440 non interlaced Compatibility Mac VGA Support up to 2048 x 1152 HDMI Support up to 1920 x 1080 DVI D DP Support up to 2560 x 1440 Note For Mac OSX 10 8 3 DVI D only supports up to 1920 x 1080 Pixel Dimension 0 2331 x 0 2331 mm Display Color 16 7M Tilt 5 20 2 Active Display Area 23 49 x 13 22 596 74 mm x 335 66 mm Temperature Operating 0 C 40 C Storage 20 C 60 C C...

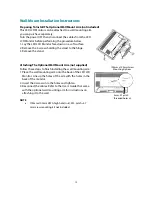
Страница 21: ...ove the stand Attaching The Optional Wall Mount Arm not supplied 4mm 0 7 pitch threaded holes x 4 100mm x 100mm Screw Mounting Options Follow these steps to finish installing the wall mounting arm 1 Place the wall mounting arm onto the back of the LED LCD Monitor Line up the holes of the arm with the holes in the back of the monitor 2 Insert the 4 screws into the holes and tighten 3 Reconnect the ...

Страница 22: ...gnal cables are installed Power on but no screen image Make sure the video cable supplied with the LED LCD Monitor is tightly secured to the video output port on back of the computer If not tightly secure it Adjust brightness Wrong or abnormal colors If any colors red green blue are missing check the video cable to make sure it is securely connected Loose or broken pins in the cable connector coul...

Страница 23: ...t http www planar com support for operations manuals touchscreen drivers warranty information and access to Planar s Technical Library for online trouble shooting To speak with Planar Customer Support please have your model and serial number available and dial Planar Support Tel 1 866 PLANAR1 866 752 6271 or 1 503 748 5799 outside the US Hours 24 hours a day 7 days a week Toll or long distance cha...

Страница 24: ...2014 2001132478T ...

Отзывы: