background image

Adjusting your lcd monitor


12


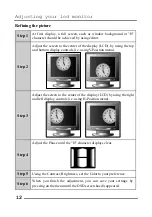
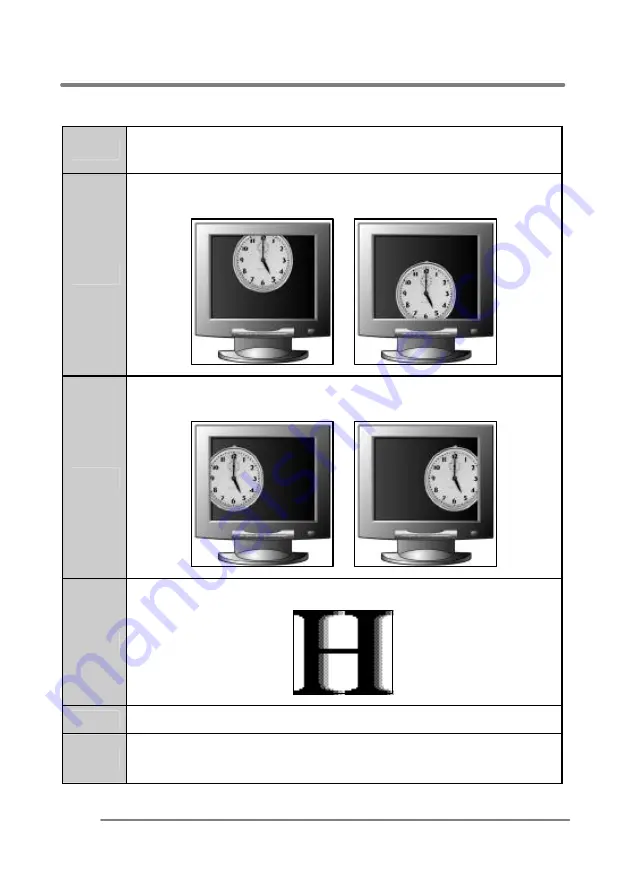
Refining the picture


Step 1 

At first display, a full screen, such as  window background or "H" 
character should be achieved by using editor. 

Step 2 

Adjust the screen to the center of the display (LCD), by using the top 
and bottom display controls (i.e. using V-Position menu). 


Step 3 

Adjust the screen to the center of the display  (LCD) by using the right 
and left display controls (i.e. using H-Position menu). 


Step 4 

Adjust the Phas e until the "H" character displays clear. 


Step 5 

Using the Contrast, Brightness, set the Color to your preference. 

Step 6 

When you finish the adjustment, you can save your settings by 
pressing on the menu until the OSD screen has disappeared. 


Содержание PT1545R

Страница 1: ...ng your monitor 5 Viewing angle 6 How to open the back cover 6 Connecting your monitor 7 User controls 8 OSD On screen display settings 9 Menu adjustments 10 Refining the picture 12 APPENDIX 13 Power...

Страница 2: ...on the monitor or power cord Do not cover the ventilation openings nor touch them with metallic or flammable material High temperature can cause troubles Avoid operating the monitor in extreme heat h...

Страница 3: ...he monitor on a flat surface to prevent it from falling Do not apply any mechanical shocks to the machine Install it in a well ventilated area or secure enough space for ventilation Turn the monitor o...

Страница 4: ...c shock or fire Do not open the monitor There are no user serviceable components inside There is a risk of exposure to high voltage electricity inside even when power is turned off If the display moni...

Страница 5: ...monitor Please make sure the following items are included with your monitor If you find that any of these items are missing or appear damaged contact your dealer immediately The power cord can be diff...

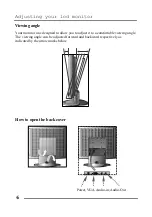
Страница 6: ...our monitor was designed to allow you to adjust it to a comfortable viewing angle The viewing angle can be adjusted forward and backward respectively as indicated by the arrow marks below How to open...

Страница 7: ...Connect the video signal cable 15Pin connector to the system s VGA connector which is located on the back panel of the computer g Connect the power adaptor cord to the mo nitor and then to the power s...

Страница 8: ...OSD menu 3 SELECT Selects the main menu items and sub menu items 4 Moves to the lower menu item or sub menu item Decreases the value of the parameter 5 Moves to the upper menu item or sub menu item I...

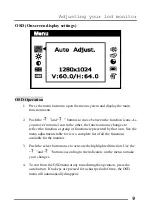
Страница 9: ...ct the function or group of functions represented by that icon See the menu adjustments table to view a complete list of all the functions available for the monitor 3 Push the select button once to ac...

Страница 10: ...hecontrastofthescreenimage H Position Adjusts the horizontal position of the screen image Position V Position Adjusts the vertical position of the screen image Phase Adjusts the noise of the screen im...

Страница 11: ...nguage Fran ais Selects the Fran ais language Espa ol Selects the Espa ol language Language Italiano Selects the Italiano language Horizontal Position Adjusts the OSD Horizontal Position Vertical Posi...

Страница 12: ...and bottom display controls i e using V Position menu Step 3 Adjust the screen to the center of the display LCD by using the right and left display controls i e using H Position menu Step 4 Adjust the...

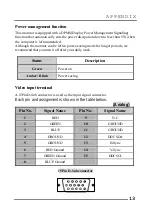
Страница 13: ...longer periods we recommend that you turn it off after your daily work Status Description Green Power on Amber Blink Power saving Video input terminal A 15Pin D Sub connector is used as the input sign...

Страница 14: ...0 x 480 37 9KHz 72Hz VESA Standard VGA 640 x 480 37 5KHz 75Hz VESA Standard 800 x 600 35 2KHz 56Hz VESAGuidelines 800 x 600 37 9KHz 60Hz VESAGuidelines 800 x 600 48 0KHz 72Hz VESA Standard SVGA 800 x...

Страница 15: ...OSD adjust Brightness and Contrast to maximum or reset to their default settings LED OFF Check the power switch Check if the AC power cord is properly connected to the AC adapter No Picture LED Amber...

Страница 16: ...wavy oscillations Check the signal cable connection between computer and monitor Picture appears to be ghosting Check the signal cable connection between computer and monitor Color is not uniform Adj...

Отзывы: