background image

Setting Up the Display

15

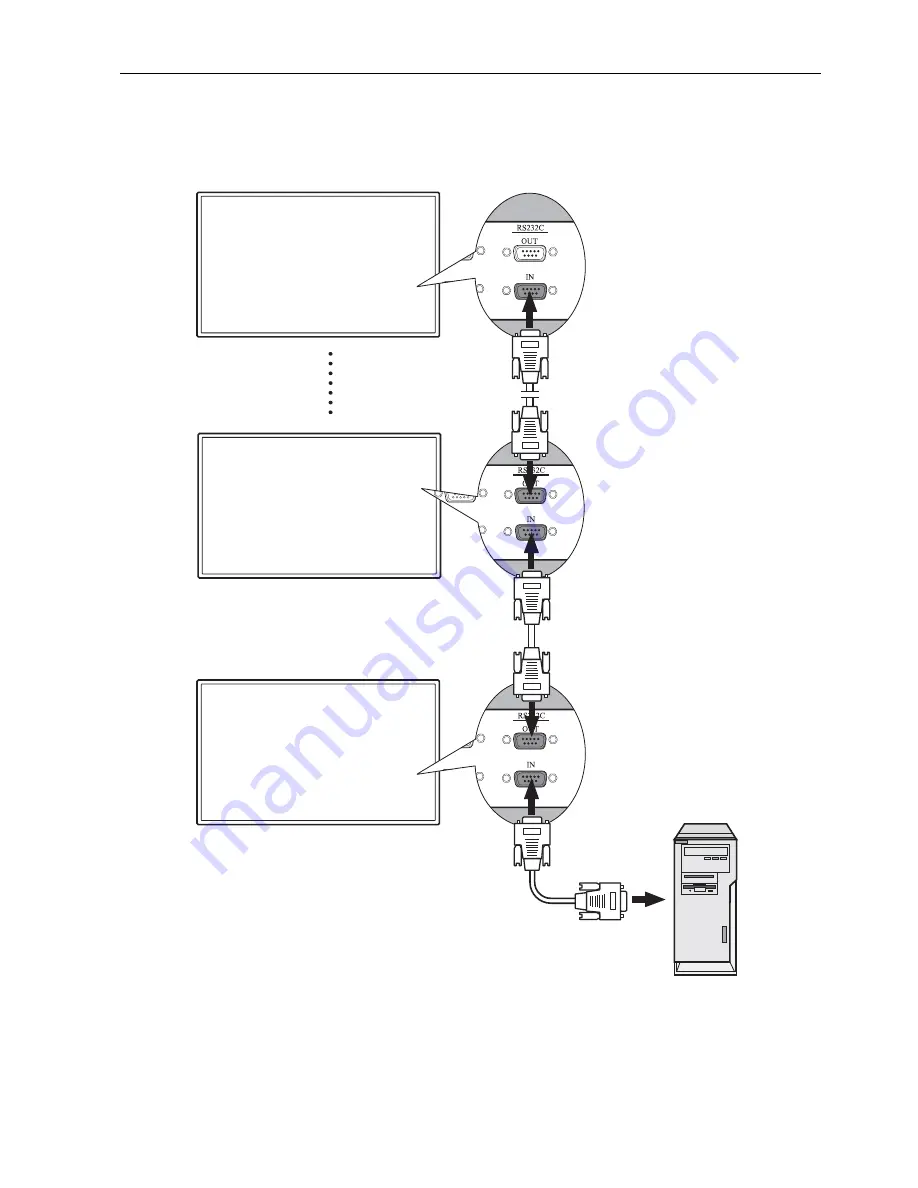
Connecting Multiple Displays

With the RS232C-IN/OUT interfaces, you can connect multiple displays serially (daisy chain) 
to a computer for management. The number of displays you can connect serially depends 
on the resolution of the input signal you use.

Note:

This function requires an RS-232C port equipped computer with the display management 
software installed.

RS-232C cable

RS-232C cable

RS-232C cable

Computer

Содержание PS4200

Страница 1: ...PS Series USER S GUIDE www planar com...

Страница 2: ...y 2011 Document number 020 1128 00 Rev A The information contained in this document is subject to change without notice This document contains proprietary information that is protected by copyright Al...

Страница 3: ...ntrol Usage Tips 8 Battery Safety Notice 8 Setting Up the Display 9 Mounting the Display 9 Installing the Display on a Wall 9 Installing the Optional Desktop Stands 10 Connecting Audio Video Signals 1...

Страница 4: ...he OSD Menu 21 Picture Menu 22 Adjusting the Contrast 22 Adjusting the Brightness 22 Sound Menu 23 Option Menu 24 Setting Menu 25 Product Information 27 Specifications 27 Supported Input Signal Resolu...

Страница 5: ...commended by the manufacturer to mount this display Using wrong or unsuitable accessories may cause the display to fall and result in serious personal injuries Make sure that the surface and fixing po...

Страница 6: ...d or plug is damaged liquid has been spilled or objects have fallen into the apparatus the apparatus has been exposed to rain or moisture does not operate normally or has been dropped Regulatory Compl...

Страница 7: ...hnology and is not a defect LCD screens like plasma PDP and conventional CRT Cathode Ray Tube screens are also susceptible to screen burn in or image retention which can be found on the screen as visi...

Страница 8: ...on your region of purchase Before discarding the package check that you haven t left any accessories inside the box Dispose of packaging materials wisely You can recycle the cardboard carton Consider...

Страница 9: ...when the display is in Standby Standard mode Off when the main power is turned off No Name Description ENTER VIDEO SOURCE Selects a video source Confirms your selection or enters a submenu in the On...

Страница 10: ...signals from the VGA IN input to another display RS232C IN OUT For external control and multi display operation RS232C IN receives control signals from a computer or another display RS232C OUT output...

Страница 11: ...input source DVI Selects the DVI input source Power Turns on the display or puts it in standby mode EXIT Returns to a previous menu or closes the OSD menu ENTER Confirms your selection or save changes...

Страница 12: ...2 Insert the supplied batteries ensuring that the positive and negative marked battery terminals match the and marks in the battery compartment Note The supplied batteries are provided for your conve...

Страница 13: ...ng supplies and an installation manual Follow these instructions carefully Keep in mind the following general installation guidelines Screw length is crucial and will vary depending on the type of mou...

Страница 14: ...ecting the VGA Input 1 Connect the VGA IN jack on the display to the VGA output jack on a computer using a Mini D Sub 15 pin cable 2 Connect the computer s audio output jack to the AUDIO IN jack on th...

Страница 15: ...ck to the VIDEO IN HDMI input jack on the display using an HDMI cable or a DVI D to HDMI conversion cable 2 Connect the computer s audio output jack to the AUDIO IN jack on the display using a suitabl...

Страница 16: ...s a VCR or DVD player using a component video cable 2 Connect the DVD player s audio output jacks to the AUDIO IN AUDIO2 or AUDIO3 jacks on the display using a suitable audio cable 3 To view video ima...

Страница 17: ...cable 3 If a second display is used connect the VIDEO OUT jack on the first display to the VIDEO IN jack on the second display using an AV cable This relays the input signal from the first display to...

Страница 18: ...built in amplifier on the display allows you to output audio signals through external speakers Connect external speakers to the SPEAKERS jacks on the display Note You can use the remote control or the...

Страница 19: ...plays serially daisy chain to a computer for management The number of displays you can connect serially depends on the resolution of the input signal you use Note This function requires an RS 232C por...

Страница 20: ...e for use with 110 240V AC power only The power cord and outlet illustrated may differ from the ones used in your region Only use an appropriate power cord for your region Never use a power cord which...

Страница 21: ...Panel Buttons Press and hold and simultaneously for 5 seconds Once locked the control panel buttons do not function unless unlocked OSD Menu Function Press and hold and simultaneously for 5 seconds On...

Страница 22: ...Picture Picture Mode Contrast Brightness Color Tint Sharpness Backlight DCR Color Temp Input Resolution 20 Sound Volume Mute Audio Source Speaker 21 Option Aspect ratio PIP Video Source Auto Adjustme...

Страница 23: ...TER VIDEO SOURCE to confirm selections 3 Press ENTER to confirm selections 4 Press or to select a feature and press or to adjust settings Press ENTER VIDEO SOURCE to save changes 4 Press and to select...

Страница 24: ...unction is set to HIGH or LOW Color Temp Adjusts the color temperature Input Resolution Sets the VGA input resolution This is only required when the display cannot detect the resolution correctly Adju...

Страница 25: ...io source External Selects the audio output source from SPEAKERS on the rear connector panel Line Out Selects the audio output source from AUDIO OUT on the rear connector panel Internal Select the aud...

Страница 26: ...ode only sounds from the Main Input picture will be available Video Source Sets the video input source Auto Adjustment Automatically optimizes image display for the VGA input Clock Frequency Adjusts t...

Страница 27: ...Sets the horizontal position of the display wall matrix V Position Sets the vertical position of the display wall matrix Frame Comp Adjusts images near the display edges for optimal demonstration acr...

Страница 28: ...ow the current input source and resolution onscreen Select OFF to show the information box onscreen only when you press INFO on the remote control Status Thermal Shows current temperature inside the d...

Страница 29: ...DMI Audio L R RCA jacks Line in 3 5 mm Mini jack Control RS 232C Mini D Sub 9 pin Output Computer VGA Mini D Sub 15 pin Video Composite Video BNC jacks Speaker External speaker jack 12W 12W 8 Ohms Aud...

Страница 30: ...RCA jacks Line in 3 5 mm Mini jack Control RS 232C Mini D Sub 9 pin Output Computer VGA Mini D Sub 15 pin Video Composite Video BNC jacks Speaker External speaker jack 12W 12W 8 Ohms Audio L R RCA jac...

Страница 31: ...cks Line in 3 5 mm Mini jack Control RS 232C Mini D Sub 9 pin Output Computer VGA Mini D Sub 15 pin Video Composite Video BNC jacks Speaker External speaker jack 12W 12W 8 Ohms Audio L R RCA jacks Con...

Страница 32: ...VI 640 x 480 60Hz 640 x 480 72Hz 640 x 480 75Hz 720 x 400 70Hz 800 x 600 60Hz 800 x 600 75Hz 1024 x 768 60Hz 1024 x 768 75Hz 1280 x 768 60Hz 1280 x 960 60Hz 1280 x 1024 60Hz 1360 x 768 60Hz 1366 x 768...

Страница 33: ...Product Information 29 Supported PIP Input Signal Combination Main picture signal source AV S Video VGA YPbPr DVI HDMI Sub picture signal source AV S Video VGA YPbPr DVI HDMI...

Страница 34: ...600 60Hz 800 x 600 75Hz 1024 x 768 60Hz 1024 x 768 75Hz 1280 x 768 60Hz 1280 x 960 60Hz 1280 x 1024 60Hz 1360 x 768 60Hz 1366 x 768 60Hz 1600 x 1200 60Hz 1920 x 1080 60Hz 640 x 480 60Hz 640 x 480 72H...

Страница 35: ...4 x 768 75Hz 1280 x 768 60Hz 1280 x 960 60Hz 1280 x 1024 60Hz 1360 x 768 60Hz 1366 x 768 60Hz 1600 x 1200 60Hz 1920 x 1080 60Hz 640 x 480 60Hz 640 x 480 72Hz 640 x 480 75Hz 720 x 400 70Hz 800 x 600 60...

Страница 36: ...Hz 720 x 400 70Hz 800 x 600 60Hz 800 x 600 75Hz 1024 x 768 60Hz 1024 x 768 75Hz 1280 x 768 60Hz 1280 x 960 60Hz 1280 x 1024 60Hz 1360 x 768 60Hz 1366 x 768 60Hz 1600 x 1200 60Hz 1920 x 1080 60Hz 1080p...

Страница 37: ...24 x 768 75Hz 1280 x 768 60Hz 1280 x 960 60Hz 1280 x 1024 60Hz 1360 x 768 60Hz 1366 x 768 60Hz 1600 x 1200 60Hz 1920 x 1080 60Hz 640 x 480 60Hz 640 x 480 72Hz 640 x 480 75Hz 720 x 400 70Hz 800 x 600 6...

Страница 38: ...60Hz 1280 x 960 60Hz 1280 x 1024 60Hz 1360 x 768 60Hz 1366 x 768 60Hz 1600 x 1200 60Hz 1920 x 1080 60Hz 576i 50Hz 480i 60Hz 480p 60Hz 576p 50Hz 720p 50Hz 640 x 480 60Hz 640 x 480 72Hz 640 x 480 75Hz 7...

Страница 39: ...0Hz 1080i 60Hz 1080p 50Hz 1080p 60Hz 640 x 480 60Hz 640 x 480 72Hz 640 x 480 75Hz 720 x 400 70Hz 800 x 600 60Hz 800 x 600 75Hz 1024 x 768 60Hz 1024 x 768 75Hz 1280 x 768 60Hz 1280 x 960 60Hz 1280 x 10...

Страница 40: ...20p 50Hz 720p 60Hz 1080i 50Hz 1080i 60Hz 1080p 50Hz 1080p 60Hz 640 x 480 60Hz 640 x 480 72Hz 640 x 480 75Hz 720 x 400 70Hz 800 x 600 60Hz 800 x 600 75Hz 1024 x 768 60Hz 1024 x 768 75Hz 1280 x 768 60Hz...

Страница 41: ...5Hz 720 x 400 70Hz 800 x 600 60Hz 800 x 600 75Hz 1024 x 768 60Hz 1024 x 768 75Hz 1280 x 768 60Hz 1280 x 960 60Hz 1280 x 1024 60Hz 1360 x 768 60Hz 1366 x 768 60Hz 1600 x 1200 60Hz 1920 x 1080 60Hz 1080...

Страница 42: ...re HDMI Sub picture YPbPr 576i 50Hz 480i 60Hz 480p 60Hz 576p 50Hz 720p 50Hz 720p 60Hz 1080i 50Hz 1080i 60Hz 1080p 50Hz 1080p 60Hz 1080p 60Hz 1080p 50Hz 1080i 60Hz 1080i 50Hz 720p 60Hz 720p 50Hz 576p 5...

Страница 43: ...t Signal Resolution on page 28 to select a supported resolution and try again Use the Auto Adjustment function See Auto Adjustment on page 22 to let the display automatically optimize the display of c...

Страница 44: ...Troubleshooting 40...

Страница 45: ...7pm Eastern Time M F 6am 4pm Pacific Time Europe and Asia Pacific Support Tel 358 9 420 01 Hours M F 7 00am 4pm CET 2011 Planar Systems Inc 05 08 Planar is a registered trademark of Planar Systems In...

Отзывы: