background image

16 

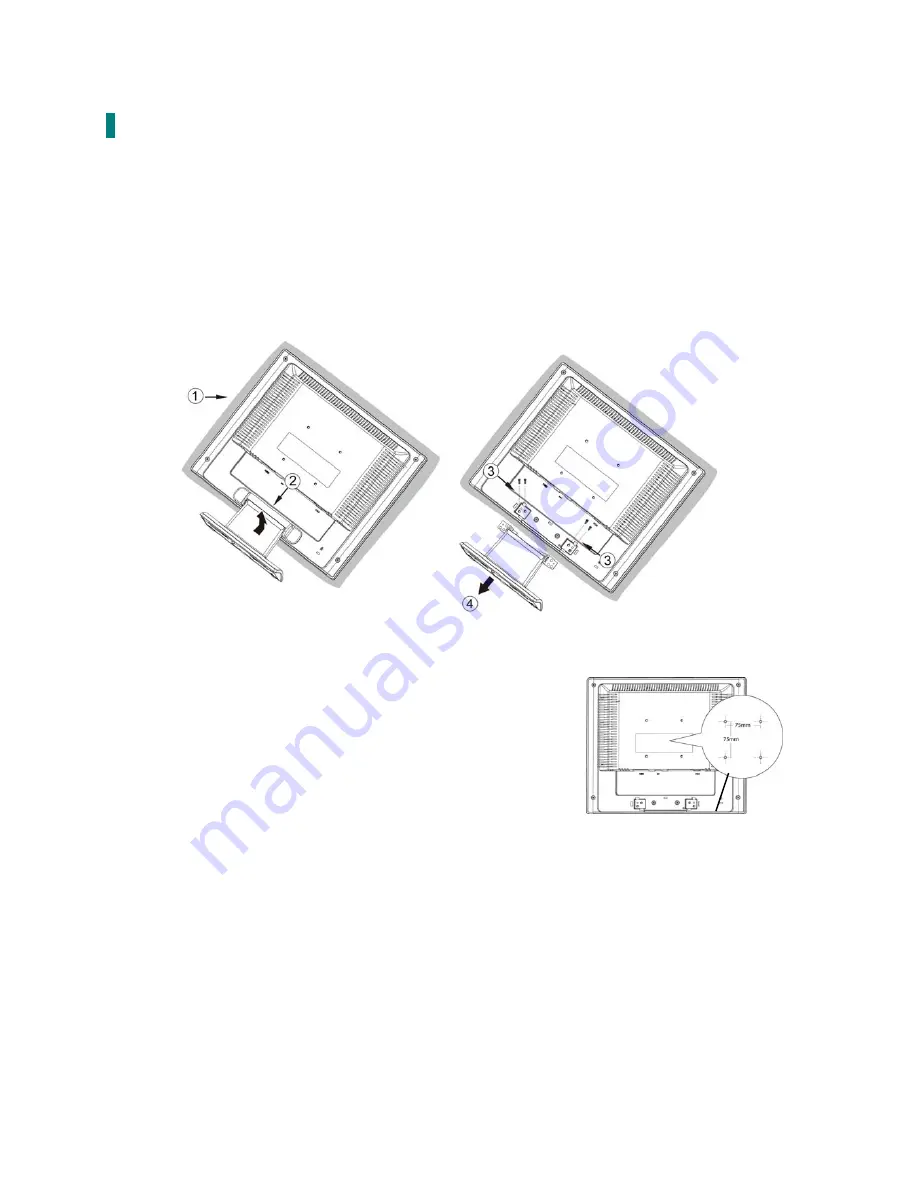
Wall-mount instruction 

Preparing To Install The Optional Wall Mount Arm (not included) 

This LED LCD monitor can be attached to a wall mounting arm you can purchase separately. 
Turn the power OFF then disconnect the cables from the LED LCD monitor before performing 
the procedure below. 
1.


Lay the LED LCD monitor face down on a soft surface. 

2.


Remove hinge cover. (A strong pull, as indicated by arrow, is required to remove.) 

3.


Remove the four screws holding the stand to the hinge. 

4.


Remove the stand. 


Attaching The Optional Wall Mount Arm (not supplied) 

Follow these steps to finish installing the wall mounting arm:   
1.


Place the wall mounting arm onto the back of the TFT LED 

LCD Monitor. Line up the holes of the arm with the holes in 
the back of the monitor.   

2.


Insert the 4 screws into the holes and tighten.   

3.


Reconnect the cables. Refer to the User’s Guide that came 

with the optional wall mounting arm for instructions on 
attaching it to the wall. 


NOTE  


75mmx75mm VESA high hole (n=4), M4, pitch =0.7 mm screw 
mounting kit not included.     

4mm, 0.7 pitch 
threaded holes x 4 

75mm x 75mm Screw 

Mounting Options 

Содержание PLL1500M

Страница 1: ...www planar com USER S GUIDE LED LCD Monitor PLL1500M...

Страница 2: ...5 Front View of the Product 6 Rear View of the Product 7 Quick Installation 8 Basic Operation 9 Advanced Operation OSD Menu 11 Supporting Timing Modes 14 Technical Information 15 Wall mount instructio...

Страница 3: ...not occur in a particular installation If this LED LCD monitor does cause serious interference to radio or television reception resetting the LED LCD monitor may determine it Moreover users are encou...

Страница 4: ...sagers sont aussi encourag s corriger les interf rences en appliquant une ou plusieurs des d marches suivantes R orientez ou d placez l antenne de r ception Placez le moniteur et le r cepteur plus loi...

Страница 5: ...inet There is high voltage parts inside that may cause electric shock to human bodies even when the power cord is disconnected Stop using the LED LCD monitor if the cabinet is damaged Have it checked...

Страница 6: ...dommag Faites le v rifier par un technicien qualifi Placez votre moniteur uniquement dans un environnement propre et sec D branchez imm diatement le moniteur s il tait mouill et faites appel votre r p...

Страница 7: ...tor User s Guide Power Cable Base VGA Cable 15 pin Audio Cable Install the stand base 1 Place the monitor face down on a soft cloth or cushion on a table 2 Install the stand base to the monitor Discon...

Страница 8: ...6 Front View of the Product OSD Turn On Off Volume Adjust Scroll Down Adjust Decrease Preset Mode Scroll UP Adjust Increase Auto adjust Confirm Selection Power On Off LED Indicator...

Страница 9: ...7 Rear View of the Product Power Input Audio Input VGA Input D Sub 15 pin...

Страница 10: ...the audio cable from audio output of computer to the audio input of the monitor 3 Connect the power cord to a properly grounded AC outlet then to the monitor 4 Power ON computer and then POWER ON the...

Страница 11: ...n menu 1 Exits from OSD menu 2 Auto adjust the image when not in OSD menu Select the desired item when in OSD menu When not in OSD menu directly enters Volume adjust Select the desired item when in OS...

Страница 12: ...the POWER button are locked Press and hold the 1 button and the button for 3 seconds to lock all 5 buttons The LED LCD Monitor will show a POWER BUTTON LOCKED message for 5 10 seconds and the message...

Страница 13: ...ock H Size of the screen CONTRAST To adjust the foreground white level of screen image increase contrast decrease contrast BRIGHTNESS To adjust the luminance of the video increase brightness decrease...

Страница 14: ...al position of the video HORIZONTAL POSITION move screen to the right move screen to the left VERTICAL POSITION move screen up move screen down FINE TUNE To adjust the delay time of data and clock Pre...

Страница 15: ...wn OSD TIME OUT To automatically turn off On Screen Display OSD after a preset period of time OSD BACKGROUND Allows the user to turn the OSD background On or Off MEMORY RECALL To recall factory settin...

Страница 16: ...5Hz MAC 832 x 624 75Hz VESA 1024 x 768 60Hz VESA 1024 x 768 70Hz VESA 1024 x 768 75Hz Warning Do not set the graphic card in your computer to exceed these maximum refresh rates Doing so may result in...

Страница 17: ...de 0 5 Watt Off 0 5 Watt Displayable Resolution XGA 1024 x 768 max Vertical Frequency 75 Hz max Pixel Dimension 0 297 x 0 297 mm Display Color 16 2M Tilt 1 20 Active Display Area 304 mm x 228 mm Tempe...

Страница 18: ...holding the stand to the hinge 4 Remove the stand Attaching The Optional Wall Mount Arm not supplied Follow these steps to finish installing the wall mounting arm 1 Place the wall mounting arm onto th...

Страница 19: ...z imm diatement le cordon d alimentation et appelez votre centre de service Never remove the rear cover of your LED LCD monitor cabinet The display unit inside contains high voltage parts and may caus...

Страница 20: ...t http www planar com support for operations manuals touch screen drivers warranty information and access to Planar s Technical Library for online troubleshooting To speak with Planar Customer Support...

Страница 21: ...2014 P N 2001171698T...

Отзывы: