background image

Function Description 

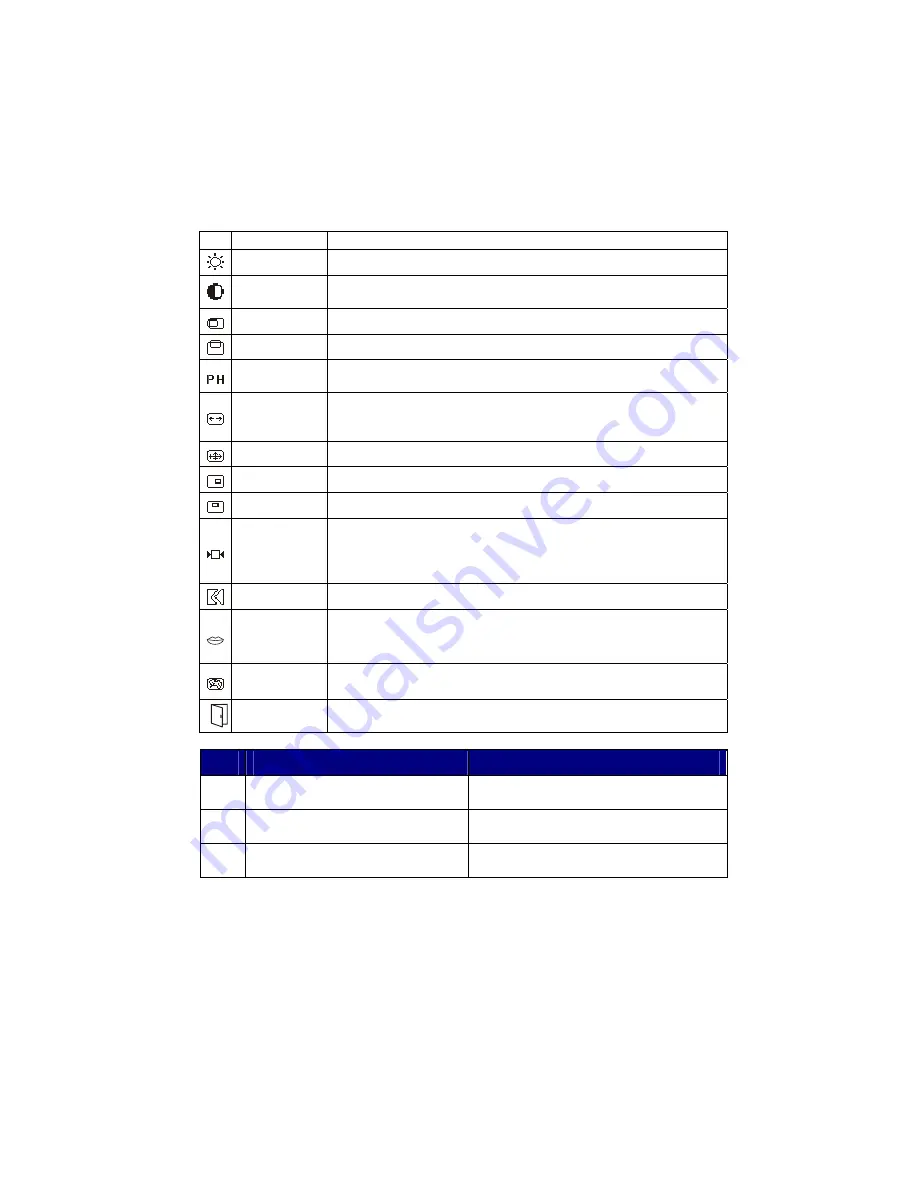
Icon Function 

Function 

Description 


Brightness 

This function increases or decreases the brightness of the image. 


Contrast 

This function increases or decreases the difference between the dark and light 
color. 


H-Position 

This function shifts the entire display image left or right. 


V-Position 

This function shifts the entire display image up or down. 


Phase 

A total of 32 scales (0 to 31) are available to adjust the focus and clarity of the 
display. 


Clock 

This function carries a frequency tracking feature that offers the user to have 
better stability and clarity. Increasing Clock value can be up to +50 scales. The 
number of decreasing Clock (minus) is depend on the input timing. 


Auto Adjustment  This function will adjust the display size automatically to fit full screen. 


OSD H-Position  This function moves the OSD menu window left or right. 


OSD V-Position  This function moves the OSD menu window up or down. 


Graph Text 

This function is to choose a display that allows maximum graphics text 
quality. The resolution selection can either be 640 x 400 or  
720 x 400. Please refer to Chapter 3 “ Standard Timing” Table for of different 
timing modes. 


Recall 

The recall function will return all adjusted parameters to factory preset values. 


Language 

Five OSD language options are available:  
English, German, French, Spanish and Italian.  
Press the left or right Adjustment Control button to select other language. 


Color  

Temperature 

Color Temp.: 

Push the (+ -) button to select a different color temperature. 

Please see the diagram below for function and description. 


Save Exit 

Saves the values of this setting and exits the OSD menu function. 


Icon 

Function 

Description 

9300 

CIE coordinated Color Temperature of 
9300°K 

Sets the CIE coordinate color temperature to 
9300°K 

6500 

CIE coordinated Color Temperature of 
6500°K 

Sets the CIE coordinate color temperature to 
6500°K 

User 

Three colors (Red, Green, Blue) can be 
adjusted from the OSD menu 

Sets the settings to a by user defined CIE 
Temperature. 


7

Содержание PE150

Страница 1: ...PLANAR LCD MONITOR PE150 MANUAL www planar com ...

Страница 2: ......

Страница 3: ... Stand 5 Interface for Arm Applications 5 Connecting the Display to your Computer 5 Connecting the AC Power 5 Setting Up the LCD Monitor 5 Power Management System 6 Chapter 2 Display Controls 6 User Controls 6 Adjusting the Monitor s Display 6 Function Description 7 Chapter 3 Technical Information 8 Specifications 8 Standard Timing Table 9 Troubleshooting 10 1 ...

Страница 4: ...ver there is no guarantee that interference will not occur in a particular installation If this equipment does cause harmful interference to radio or television reception which can be determined by turning the equipment off and on the user is encouraged to try to correct the interference by one or more of the following measures Reorient or relocate the receiving antenna Increase the separation bet...

Страница 5: ...ove the cover or attempt to service this unit by yourself Servicing of any nature should be performed by an authorized technician 5 Store LCD Monitor in a room with a room temperature of 20 60 C or 4 140 F Storing the LCD Monitor outside this range could result in permanent damage 6 If any of the following occurs immediately unplug your monitor and call an authorized technician Monitor to PC signa...

Страница 6: ...Monitor User s Manual on CD 1 5m Monitor to PC signal Cable 1 8m Power Cord Base If you find that any of these items is missing or appears damaged contact your dealer immediately Connecting the LCD Monitor and Base When you open the box to take the base and put on the desk first Then connect the LCD Monitor and base please See fig 1 1 Figure 1 1 Viewing Angle Adjustment The LCD Monitor is designed...

Страница 7: ...g the Display to your Computer 1 Power off your computer 2 Connect the signal cable to the VGA port on your PC 3 Make sure connection are secure Figure 1 5 Attention This device must be connected to an off the shelf video cable in order to comply with FCC regulations A ferrite core interface cable is included in the LCD Monitor package This device will not be in compliance with FCC regulations whe...

Страница 8: ...Select Buttons Press either left or right control button for OSD On Screen Display menu selection 4 Adjustment Control Buttons Press the left button to decrease the OSD setting and press the right button to increase the OSD setting Adjusting the Monitor s Display The monitor has four function control buttons to select among functions shown on OSD menu designed for easy user viewing environments OS...

Страница 9: ... the OSD menu window up or down Graph Text This function is to choose a display that allows maximum graphics text quality The resolution selection can either be 640 x 400 or 720 x 400 Please refer to Chapter 3 Standard Timing Table for of different timing modes Recall The recall function will return all adjusted parameters to factory preset values Language Five OSD language options are available E...

Страница 10: ...dance Polarity Amplitude Multi mode Supported Analog RGB 0 7Vp p 75 Ohm 2 Positive Negative 0 0 7 0 05 Vp Horizontal Frequency 24 61 KHz Vertical Frequency 56 75 Hz Control Power On Off switch with LED indicator Power Management Mode Power AC Input LED Color On 25W maximum 240 VAC Green Standby 5W maximum 240 VAC Yellow Suspend 5W maximum 240 VAC Yellow Off 5W maximum 240 VAC Yellow DC Power Off 5...

Страница 11: ...ble below this LCD monitor will use the most suitable available timing Resolution H Freq KHz V Freq Hz Pixel Freq MHz H V Sync Polarity Mode 640 x 350 31 469 70 087 25 175 VGA 350 640 x 400 24 830 56 420 21 050 NEC PC9801 640 x 400 31 469 70 087 25 175 VGA 400 GRAPH NEC PC9821 640 x 480 31 469 59 940 25 175 VGA 480 640 x 480 37 861 72 809 31 500 VESA 480 72Hz 640 x 480 37 500 75 000 31 500 VESA 48...

Страница 12: ...here is no picture on LCD Monitor If there s no picture on the LCD Monitor please perform the following steps 1 Make sure the power indicator on the LCD Monitor is ON all connections are secured and the system is running on the correct timing Refer to Chapter 3 for information on timing 2 Turn off the LCD Monitor and then turn it back on again If there is still no picture press the Adjustment Cont...

Страница 13: ...271 Hours M F 8am 9pm Eastern Time 2003 Planar Systems Inc 05 03 Planar is a registered trademark of Planar Systems Inc Other brands and names are the property of their respective owners Technical information in this document is subject to change without notice Online Support http planar custhelp com ...

Отзывы: