18
LC17 and LC19 User’s Guide
(020-0599-00B)
To change the minimum brightness limit, one of three basic methods can be used:
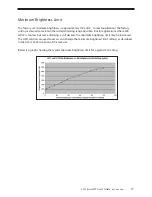
1. If one wishes to set an approximate minimum brightness, the above graph may be used. For
instance, to set the minimum to approximately 500 cd/m
2
, set the minimum brightness limit
to an OSD setting of 30. Note, however, that there may be significant (+/- 50%) luminance
variation for a given OSD setting due to display variation. Also note that decreasing the Mini-
mum Brightness Limit from its factory-set value has no effect; only increasing the limit has an
effect.
2. To set the minimum brightness visually, one may set the dimming to a minimum (by covering the
photo sensor on the front of the monitor if in automatic brightness control mode, or by setting the
DIM_INPUT to 5V if in manual brightness control mode) and then adjust the OSD setting to visually
give the desired result.
3. To quantitatively set the minimum brightness to a desired luminance, one may set the
dimming to a minimum and then adjust the OSD setting to give the desired result as
measured by a photometer (such as the Tektronix J17 with a J1803 luminance head.)
Note that a ten minute monitor warm up period with the monitor set near its minimum
brightness is recommended to allow for an accurate measurement.
As with any OSD setting, a change to the minimum brightness limit will be permanently stored and
will be unaffected by turning off the monitor power.
The minimum brightness limit will affect the minimum brightness of both the automatic brightness
control mode and the manual brightness control mode identically. Below is a graph showing the
impact of various minimum brightness limit settings on the automatic brightness control mode.
Maximum Brightness Mode
If a constant maximum brightness is desired, simply connect both the DIM_INPUT and the /EXT_DIM
inputs of connector J1 to ground. The monitor will then be set to the maximum brightness.
_
q p
g


