background image


LB1500R / LB1500RTC / LB1503R User’s Guide  (020-0463-01A) 

11  

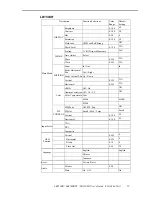
On-Screen Display Menus 

LB1500R/LB1500RTC 


Main 

Menu 

Menu Level 2 

Function Description 

Remark 

Auto-Adjustment 

Choose this function to obtain an optimum image.  


Contrast 

Adjusts the contrast of the display image. The range is 
0~100. 

Default is 50 

Brightness 

Adjusts the brightness of the image. The range is 
0~100. 

Default is 70 

Horizontal Position 

Changes the horizontal position of the image.  


Vertical Position 

Changes the vertical position of the image. 


Clock 

Changes the displays data frequency to match the 
frequency of your graphics card. When you experience 
a vertical flickering bar, use this function to make an 
adjustment. 


Page 1 

Phase 

Synchronizes the signal timing of the display to that of 
the graphics card. When you experience an unstable 
flickering image, use this function to make an 
adjustment. 


Display Mode 

Select this function to show the display resolution, 
vertical refresh, and horizontal scan of the current 
mode.  


OSD Off-Time 

Adjusts how long the OSD menu will be displayed 
after inactivity. The range is 5~60. 

Default is 30 

Language 

Opens the Language sub-menu where you can select 
the desired language of the OSD. Choices include: 
English, German, Spanish, French, Japanese, Italian. 

Default is 
English 

Sharpness 

Adjusts the sharpness of the image. 


Page 2 

Reset 

Resets the display parameters back to its factory 
default settings. 


Volume 

Adjusts the sound volume. The range is 0~32. 

Default is 20 

Page 3 

Mute 

Disables the sound immediately. 


Color Setting 

Adjusts and customizes color. 


Color Adjustment-Red 

Adjusts the red color of the display. The range is 
0~100. 

Default is 100 

Color Adjustment-Red 

Adjusts the green color of the display. The range is 
0~100. 

Default is 100 

Page 4 

Color Adjustment-Red 

Adjusts the blue color of the display. The range is 
0~100. 

Default is 100 

Содержание LB1500R

Страница 1: ...LB1500R LB1500RTC LB1503R Open Frame Monitors USER S GUIDE www planar com...

Страница 2: ...on all its products except where exempted such as medical Should those exemptions be removed in the future Planar will comply with such Directives or amendments A Planar part number will be modified...

Страница 3: ...Revision Control Date Description May 2006 Document number 020 0463 00A March 2007 Document number 020 0463 01A Inserted LB1500RTC information...

Страница 4: ...e Overview 5 Installation Product Overview 6 Signal Input Layout 6 Start Your Installation 7 User Controls Rear Panel Controls 8 How to Use the OSD Menus 10 On Screen Display Menus 11 Appendices Troub...

Страница 5: ...an cloth moistened with mild window glass commercial cleaners or 50 50 mixture of water and isopropyl alcohol Use only high quality safety approved AC DC power adapter that comes with your monitor Dis...

Страница 6: ...r TFT liquid crystal display LCD Features include Direct analog signal input Direct digital DVI signal input LB1503R Direct composite video signal input LB1503R Active matrix TFT LCD technology 1024x7...

Страница 7: ...finger interface Surface Anti glare treatment Interface USB Durability 225 million touches in a single location Hardness Cannot be scratched using any stylus with Mohr s rating of less than 6 5 Transm...

Страница 8: ...0463 01A 5 Package Overview LB1500R LB1500RTC Monitor LB1503R Monitor Quick Start Guide Power Adapter Power Cord VGA Signal Cable DVI D Cable For LB1503R Video BNC Cable For LB1503R USB Cable For LB15...

Страница 9: ...put VGA Input Audio Input Composite Video 12VDC Power Input VGA Input Audio Input Installation Product Overview Front View Front View LB1500R LB1500RTC LB1503R Signal Input Layout Figure 1 LB1503R Con...

Страница 10: ...Connect the VGA signal cable from display VGA input connector to the 15 pin connector of your host computer and tighten the screws 4 For LB1503R connect the DVI signal cable from display DVI input co...

Страница 11: ...LB1500R LB1500RTC LB1503R User s Guide 020 0463 01A 8 Figure 3 The LB1503R Connections...

Страница 12: ...ntrols Rear Panel Controls No Icon Control Function Power Switch Turns on off the power of the LCD display Power LED Green indicates the display is turned on Amber indicates the display is in power sa...

Страница 13: ...lease note the monitor has to be ON with a valid signal present a Press and hold the key b With the key held down press and hold the Menu key for 3 seconds c The wording OSD Locked will appear for 3 s...

Страница 14: ...age use this function to make an adjustment Display Mode Select this function to show the display resolution vertical refresh and horizontal scan of the current mode OSD Off Time Adjusts how long the...

Страница 15: ...255 N A Zoom In Out In Zoom Horizontal Pan Left Right Zoom Vertical Pan Up Down Vertical 0 255 N A POSITION Horizontal 0 255 N A sRGB Off On Off Gamma Correction Off 1 8 2 2 Off Color Temperature User...

Страница 16: ...of your computer is higher than that of the LCD display Reconfigure the resolution of your computer to make it less than or equal to 1024 x 768 Problem Image has vertical flickering line bars Use Cloc...

Страница 17: ...hics card Check all the power switches power cables VGA DVI or Video signal cables Going to Sleep This message means that the LCD display is under the power saving mode In addition the LCD display wil...

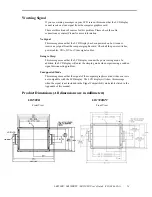
Страница 18: ...LB1500R LB1500RTC LB1503R User s Guide 020 0463 01A 15 LB1500R LB1500RTC Back View LB1500R Side View LB1500RTC Side View...

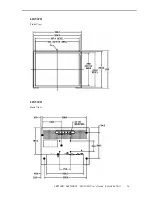
Страница 19: ...LB1500R LB1500RTC LB1503R User s Guide 020 0463 01A 16 LB1503R Front View LB1503R Back View...

Страница 20: ...LB1500R LB1500RTC LB1503R User s Guide 020 0463 01A 17 LB1503R Side View...

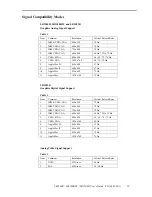
Страница 21: ...Apple Mac II 640 x 480 67 Hz 10 Apple Mac 832 x 642 75 Hz 11 Apple Mac 1024 x 768 75 Hz LB1503R Graphics Digital Signal Support Table 2 Item Comment Resolution Vertical Refresh Rates 1 IBM VESA VGA 6...

Страница 22: ...03 and Linux 1 Be sure that the USB cable is not connected to the PC 2 Open the CD Rom 3 Click I accept when the software license screen appears 4 Click the LA1500RTC LA1710RTC LA1910RTC link for the...

Страница 23: ...registration operations manuals line drawings touch screen drivers warranty information and access to planar s Techinical Library for online troubleshooting To speak with Planar Customer Support plea...

Страница 24: ...verton OR 97006 1992 Tel 1 866 PLANAR1 866 752 6271 or 1 503 748 5799 outside the United States Hours M F 3am 7pm Pacific Time 11 00 03 00 GMT 2007 Planar Systems Inc 03 07 Planar is a registered trad...

Отзывы: