background image


Содержание CM17.4SXAD

Страница 1: ...VitalScreen 17 4 Display VS17 4SXAD CM17 4SXAD OPERATIONS MANUAL www planar com ...

Страница 2: ...rence only Reference to other vendors product does not imply any recommendation or endorsement This document contains proprietary information protected by copyright No part of this manual may be reproduced by any mechanical electronic or other means in any form without prior written permission of the manufacturer Planar and VitalScreen are registered trademarks of Planar Systems Inc DOCUMENT HISTO...

Страница 3: ... measurement function in any way and it is the device and systems manufacturer s responsibility to verify its function in the integrated device or system The display was classified as required by the MDD according to Annex IX of the directive and the medical device MEDDEV guidance available at the time of classification Because the display uses electrical energy and has no direct patient connectio...

Страница 4: ... responsibility of the medical device system manufacturer and Planar supports this requirement by providing a European Commission EC declaration of conformity If Planar supplies a display to an end user rather than a device manufacturer it is the end user s responsibility to ensure continued compliance with the MDD of the system in which the display is integrated For vigilance reporting as require...

Страница 5: ...uipment does cause harmful interference to radio or television reception which can be determined by turning the equipment off and on you are encouraged to try to correct the interference by one or more of the following measures Reorient or relocate the receiving antenna Increase the separation between the equipment and the receiver Connect the equipment into an outlet different from that to which ...

Страница 6: ......

Страница 7: ...r to the Display 7 Connecting the Display to the System 8 Connecting a Video Device 9 Connecting the Optional Touch Screen 9 Mounting the Display 9 Power Management System 10 Landscape to Portrait Mechanical Conversion 10 3 The Display Controls 11 Using the Onscreen Display 11 Onscreen Display Main Menu 11 S Video and Composite Video Settings 15 Onscreen Display Lockout 16 Supported CVBS and S Vid...

Страница 8: ......

Страница 9: ...he contents of the display package and identifies the components of the display Chapter 2 explains how to install the display correctly and use optional components Chapter 3 explains the menus and function controls built into the display Appendix A contains technical information Appendix B focuses on troubleshooting Warranty description and ordering information are provided at the back of this man...

Страница 10: ...t the venting holes on the back of the display Store the display in an environment with a temperature range from 20 to 65 degrees Celsius from 4 to 149 degrees Fahrenheit Storing your display outside that temperature range could result in permanent damage Replace any cord or cable that is frayed or damaged with another of the same type and rating as supplied by Planar See Ordering Information at t...

Страница 11: ...t aqueous ammonia Cidex 2 4 percent glutaraldehyde solution Sodium hypochlorite bleach 10 percent Green soap United States Pharmacopoeia USP 0 5 percent Chlorhexidine in 70 percent isopropyl alcohol Ovation Formula 409 Fantastic WexCide To clean the screen Stand away from the display and spray the cleaning solution onto a clean nonabrasive cloth Without applying excessive pressure clean the screen...

Страница 12: ... journal of the European Communities The product has been tested to specific requirements of medical or ITE device standards If this mark appears with the indicators C and US the product is certified for the Canadian and U S markets meeting the applicable Canadian and U S standards The product has been tested to comply with FCC Class B standards More information available in accompanying documents...

Страница 13: ...tment The setup is Plug and Play Each display has a built in mounting platform that conforms to the Video Electronics Standards Association VESA mounting standard 1 This configuration allows the display to be mounted in a variety of ways such as on a wall bracket or articulated swing arm An alternate configuration with a desk stand is also available for easy use on flat work surfaces Both displays...

Страница 14: ... on the front panel and the display does not meet IPX 1 standards The VitalScreen CR display has been tested and found to comply with the limits for a Class B digital device pursuant to Part 15 of FCC rules The interface buttons on the VitalScreen CR display are not sealed and can be harmed if exposed to liquids Use caution when cleaning near the front panel Distinguishing the Displays Many of the...

Страница 15: ...ou unpack the display make sure you have these items LCD screen AC power supply with 1 5 meter 5 foot cable Power cord for the display which connects from the AC main supply to the AC adapter 3 meter 9 foot S Video Composite Video cable if you purchased the VitalScreen CSR with S Video and Composite Video support 3 meter 9 foot audio cable if you purchased the VitalScreen CSR with S Video and Comp...

Страница 16: ...Screen CR displays provide easy access to all controls and peripheral ports The following illustrations of the screen and the front and back panels identify the display controls and ports 17 4 LCD screen LCD screen A 17 4 inch diagonal AMLCD The screen supports most display standards from 640 x 480 VGA to 1280 x 1024 SXGA ...

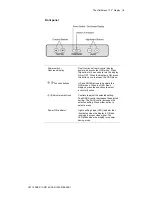
Страница 17: ...ction buttons UP and DOWN arrows to navigate the OSD menus When the OSD menu displays press these buttons to select a control function Adjustment buttons Controls to adjust the selected setting The MINUS control decreases the selected setting The PLUS control increases the selected setting Press either button to select a menu Power ON indicator Light emitting diode LED indicator that illuminates w...

Страница 18: ...ers 4 Touchscreen DB 9 serial port Connect the system touchscreen cable to this port on a resistive touchscreen display Analog VGA video input port 1 Connect the system VGA cable from the computer VGA output to this port for analog mode Digital DVI video input port 2 Connect the system DVI cable from the computer DVI output to this port for digital mode 2 Connect USB upstream port to computer to u...

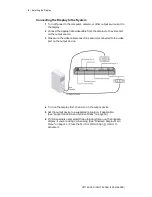
Страница 19: ...isplay Plug the power adapter into a grounded power outlet Use a surge protector between the AC adapter and the electrical wall outlet to prevent sudden current variations from reaching the display Connecting the AC Power to the Display 1 Plug the receptacle end of the AC power cord into the AC power adapter 2 Plug the power connector of the adapter into the power port on the display Locate the lo...

Страница 20: ...ource 3 Make sure the video cable connector is securely connected to the video port on the output device 4 Turn on the display first then turn on the output device 5 Set the output device to a supported resolution if applicable See Supported CVBS and S Video Modes on page 16 6 If VGA analog is used select the Auto Adjust menu on the onscreen display if you are using VGA analog See Onscreen Display...

Страница 21: ...g an alternate video source 6 Press the PLUS or MINUS control to select the desired video mode Connecting the Optional Touch Screen If your VitalScreen CSR or VitalScreen CR display has the optional touch screen connect the display 9 pin D sub serial port to the computer 9 pin RS 232 serial port using the cable supplied with the touchscreen package Next connect the RS 232 cable to the 9 pin serial...

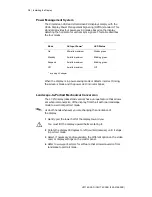
Страница 22: ...mode or detects incorrect timing the screen is blank and the power LED indicator blinks Landscape to Portrait Mechanical Conversion The 17 4 display deskstand version has a unique feature that allows a mechanical conversion of the display from the traditional landscape mode to a vertical portrait mode Use both hands whenever you are changing the orientation of the display 1 Gently pull the lower h...

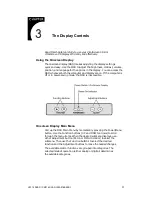
Страница 23: ...display are on If the computer is off or in power saving mode the OSD is inaccessible Onscreen Display Main Menu Call up the OSD Main Menu by momentarily pressing the Power Menu button Use the Function buttons UP and DOWN arrows to scroll through the menu items When the desired submenu displays use either Adjustment button PLUS or MINUS control to select the submenu Then use the Function buttons t...

Страница 24: ... display parameters to optimum values not available for digital mode Color temperature Adjust the color settings Miscellaneous Audio volume OSD H position OSD V position display mode FW firmware version Video Switch to video input port Available with S Video and Composite Video display Language Support six different languages English Dutch German French Spanish Italian Input port Port 1 analog Por...

Страница 25: ...s border color when native size is selected and selected resolution is less than default 1280 x 1024 Analog To main menu Exit Position Menu Analog mode only Clock Adjust the display pixel alignment Phase Adjust the screen display for focus and clarity Default size Appears at display resolution Native size Displays at computer resolution H position Horizontal position adjustment not available for d...

Страница 26: ...e contrast To main menu 1 Three sets of color temperature settings are available two for standard settings and one for user adjustment Miscellaneous Menu Audio volume Audio volume adjustment OSD H position Adjust the OSD position horizontally OSD V position Adjust the OSD position vertically Display mode Shows the display mode F W version Shows the firmware version To main menu Exit Quick adjustme...

Страница 27: ...djust the contrast level of the display Brightness Adjust the brightness of the display s backlight Volume Adjust audio volume Input Switch between S Video and Composite Video modes Video VGA Switch between video and VGA DVI inputs Hue Adjust the hue level of the display Sampling Change Sampling mode settings Overscan Turn Overscan ON or OFF Reset Reset display S Video or Composite Video settings ...

Страница 28: ...cked message only To unlock the OSD press the same three controls in the same manner Supported CVBS and S Video Modes Supported video formats on VitalScreen displays with S Video and Composite Video functionality include the following PAL B G H I D NTSC M Japan This option is available only on the VitalScreen 17 4 CSR display In the table on page 17 A signifies analog mode and D signifies digital ...

Страница 29: ... 16 VESA 800x600 50 00 72 19 48 08 A D 17 VESA 800x600 49 50 75 00 46 88 A D 18 VESA 800x600 56 25 85 06 53 67 A D 19 VGA 720x400 28 32 70 09 31 47 A D 20 VESA 720x400 35 50 85 04 37 93 A D 21 MEDICAL 1024x512 46 76 60 00 34 38 A D 22 XGA 1024x768 65 00 60 00 48 36 A D 23 VESA 1024x768 75 00 70 07 56 48 A D 24 VESA 1024x768 78 75 75 03 60 02 A D 25 1024x768 71 64 66 13 53 96 A D 26 VESA 1024x768 9...

Страница 30: ......

Страница 31: ...touch 200 cd m 2 typical 176 cd m 2 typical Pixel pitch W x H 0 297 mm x 0 297 mm Reliability Monitor Backlight 30 000 hours mean time between failure MTBF 50 000 hours to reach 50 of initial brightness Scanning frequency Analog Digital Horizontal 24 to 81 kHz Vertical 56 to 85 Hz Horizontal 38 6 to 60 kHz Vertical 50 to 75 Hz Power consumption 60 watts maximum 5 watts in standby or off mode Power...

Страница 32: ... the display is illuminated all connections are secure and the system is running on a supported video timing mode 2 If the power LED is not illuminated make sure the AC power connector is securely connected If the AC adapter has an LED verify that the LED is illuminated If it is not contact your dealer for assistance 3 Turn the display off and then turn it back on 4 Connect your system to another ...

Страница 33: ...chnical 19 installing display 7 instructions cleaning xi safety x L landscape to portrait conversion 10 LCD screen 4 lockout onscreen display 16 M main menu onscreen display 11 12 mechanical conversion landscape to portrait 10 menu function 13 main 11 12 O onscreen display function menu 13 lockout 16 main menu 11 12 using 11 optional touch screen connecting 9 ordering information 25 P power manage...

Страница 34: ......

Страница 35: ... RMA If the configuration has been modified in any manner the product must be returned to its original configuration before any warranty service will be performed by Planar No goods are to be returned to Planar without prior authorization Buyer will be responsible for packaging and shipping the defective goods to the appropriate Planar service facility For North America the service facility is loc...

Страница 36: ...description of your technical issues and e mail address to intltech_support planar com Repair service In North America call Planar at 503 748 1100 between 8 A M and 4 P M Pacific time Monday through Friday or fax your request to 503 748 1493 You will need the unit s serial number and a brief description of the problem to receive an RMA number In Europe call Planar Customer Service at 358 9 420 01 ...

Страница 37: ...resistive touch with standard mounting VESA compatible 75 mm and European power cord 996 0498 03 VS17 4SXADV SXGA 17 4 inch video equipped VitalScreen Medically Certified Display with desk stand and U S power cord non touch 996 0533 00 VS17 4SXADV SXGA 17 4 inch video equipped VitalScreen Medically Certified Display with desk stand and European power cord non touch 996 0533 01 VS17 4SXADV SXGA 17 ...

Страница 38: ... 4 SXGA VitalScreen CR resistive touch with standard mounting VESA compatible 75 mm and U S power cord 996 0515 02 CM17 4SXAD TR 17 4 SXGA VitalScreen CR resistive touch with standard mounting VESA compatible 75 mm and European power cord 996 0515 03 Items Included with All Display Products Part Number Cable VGA VGA 2 m white smooth surface analog with audio 903 0293 00 Cable DVI DVI 2 m white smo...

Страница 39: ......

Страница 40: ...1195 NW Compton Drive Beaverton OR 97006 1992 1 503 748 1100 phone 1 503 748 1493 fax sales planar com tech_support planar com Planar Systems Inc Olarinluoma 9 P O Box 46 FIN 02201 Espoo Finland 358 9 420 01 phone 358 9 420 0200 fax intlsales planar com intltech_support planar com ...

Отзывы: