www.pivotcycles.com
1.877.857.4868
3
BIKE SET-UP
Setting Proper Sag
Setting Compression Damping on the Fox Float X
FLOAT X
OPEN COMPRESSION
DAMPING
•
Some Factory Series Float X features a
blue
low speed compression adjustment knob,
which can be used to fine tune the open mode of the compression damping. This knob
offers 10 additional fine tune adjustment settings to the open mode.
•
Turning the knob clockwise will increase low speed compression damping. Turning
the knob counter-clockwise will decrease low speed compression damping. You
can experiment with all of these options to find the setting that provides the best
compression support and plushest feel for your weight and riding style.
•
For a rider close to 100lbs. we recommend having the compression fully open, by
having the knob turned fully counter-clockwise. For riders 200lbs we like to start at 3
clicks in from full closed as a good baseline setting. If the rider's weight is less than
200lbs, open up compression damping 1 click counter-clockwise for every 10lbs. less.
For every 10lbs over 200lbs we recommend increasing compression damping by 1
click clockwise.
2 POSITION LEVER
LOW SPEED COMPRESSION
KNOB
Using the Climb Switch on the Fox Float X
•
Some Float X shocks feature a two position lever allows for on-the-fly adjustment
between fully open and firm for climbing, As with other shocks, the firm setting is best
suited for long fire road climbs and smooth XC courses.
1
2
4
3
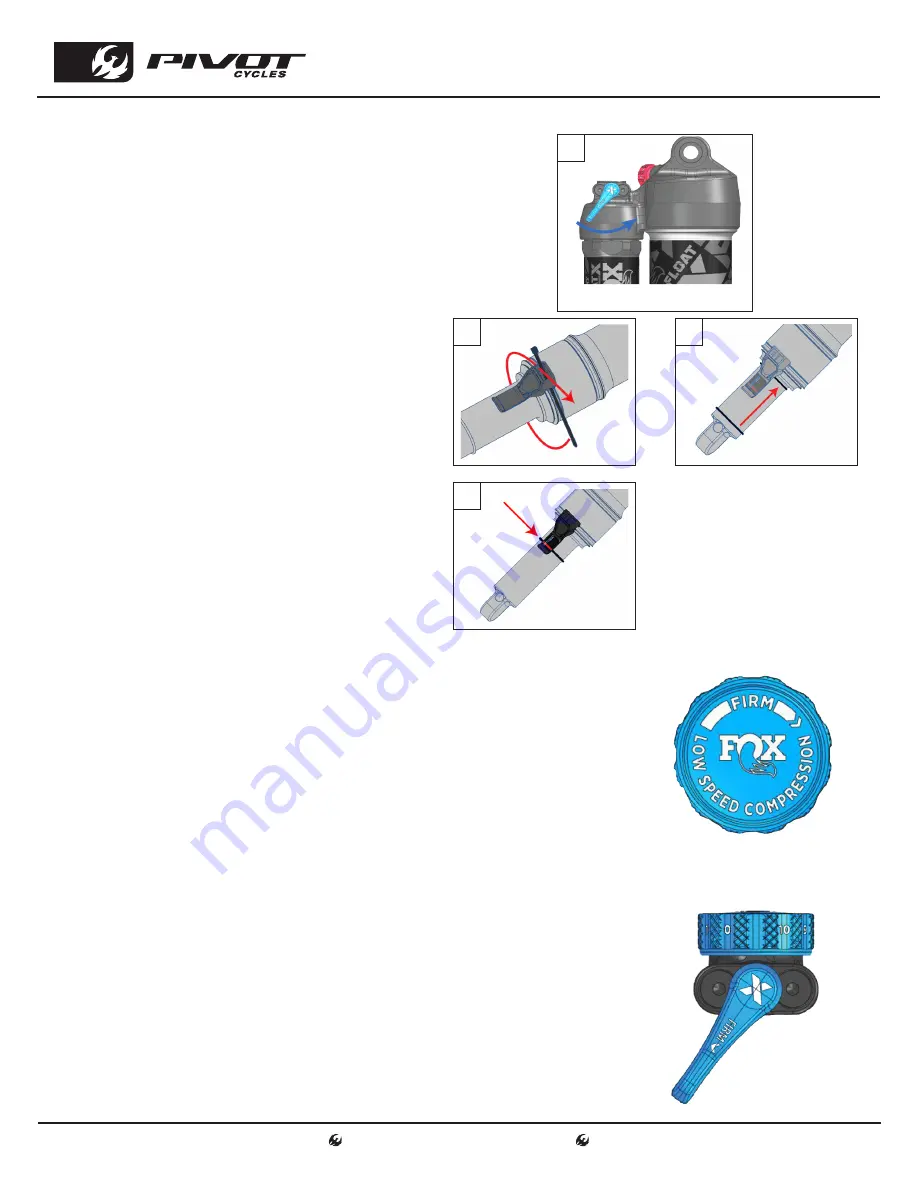
1. Always set sag with the
blue
compression lever to the open
position. (fig. 1)
2. If your shock has additional compression and rebound
adjustments ensure they are adjusted to be fully open, com-
pression to the softest setting, and rebound to its fastest
setting. Do this by rotating them fully counter-clockwise.
3. If it is not installed already, attach the sag indicator to the
bottom of the shock body using the provided zip-tie and
carefully cut the excess.(fig. 2)
4. Find a level surface and something to steady yourself while
mounted on the bike so you can be on the pedals in a seated
position. It may be easier to have a partner hold your bike
steady from the front, by holding the handlebars while you
are in your riding position.
5. While standing on the pedals, sit down hard into the saddle
to cycle the suspension well into the stroke. This will ensure
the bike comes to rest at the natural sag setting with the
rider in the saddle.
6. While in the saddle and not moving, slide the O-ring up into
position against the air can. (fig. 3)
7. Once the O-ring is set in place, slowly step off the bike so as
not to move the O-ring.
8. Make adjustments to the sag by removing or adding air so
that steps 4-7 result in the O-ring lining up with the
red
line
on the sag indicator. (fig. 4) When adjusting air pressure in
the shock, cycle the shock before re-checking sag, so the
large Evol negative air chamber equalizes pressure with the
main chamber each time air is added or removed. You can do
this by pushing down on the saddle several times to compress the shock past the sag point.
WARNING:
Make sure the sag
indicator does not contact the
frame or linkage through the
suspension cycle. Otherwise,
the indicator may break while
riding.
Содержание SHUTTLE LT
Страница 1: ...www pivotcycles com info pivotcycles com 1 877 857 4868 1 Original Operational Instructions SHUTTLE LT...
Страница 22: ...www pivotcycles com info pivotcycles com 1 877 857 4868 19 Notes...
Страница 23: ...www pivotcycles com info pivotcycles com 1 877 857 4868 20 Notes...
Страница 24: ...6720 South Clementine Court Tempe AZ 85283 T 1 480 467 2920 info pivotcycles com www pivotcycles com...


