background image

www.pivotcycles.com

[email protected]

1.877.857.4868

2

FAZUA MOBILE APP

Fazua Rider App Navigation

NOTE: The main page is the map of your current location. To access the Fazua Rider app navigation panel, press on 

the three bar icon in the top left corner. The navigation panel options are listed below.

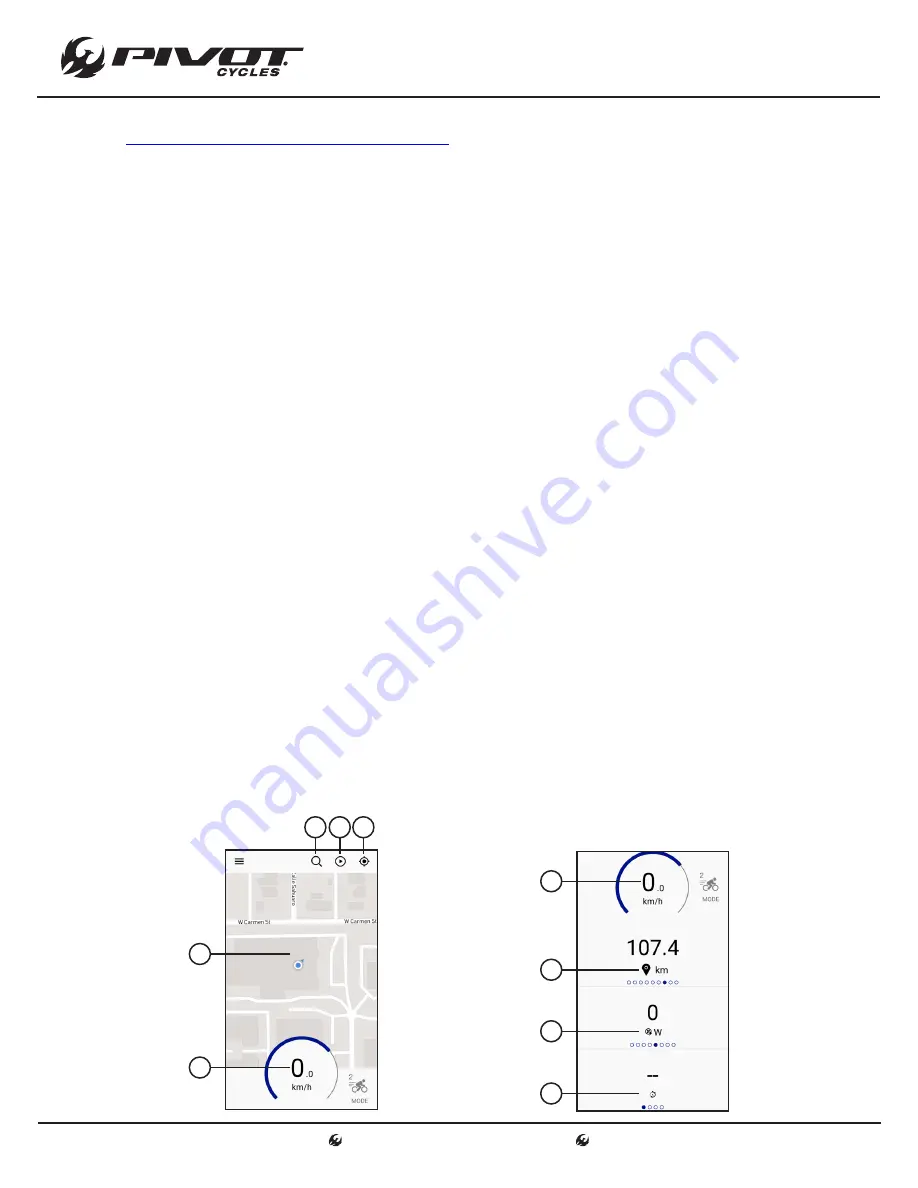
Map

A)  The map displays your current location along with the route, if a destination has been selected.

B)  Use the magnifying glass to search for an address so a route to a selected destination can be provided.

C)  The play button will begin recording your ride so you can track metrics of your ride and review them later.

D)  The compass will center the map to your current location.

E)  The data display shows a selected parameter. By clicking on the data display, you can choose to display 

State of Charge, Speed, or Power Output.

Dashboard

A)  The data display shows a selected parameter. By clicking on the data display, you can choose to display 

State of Charge, Speed, or Power Output. This is the same display that will be shown on the Map page.

B, C, D) These are secondary data displays. Each display can show various metrics, which can be shown by 

swiping left or right on the data display. The data presented in each display can be chosen by tapping on 

the display. Each display can have the following metrics:


State of charge, Cycle count, Remaining capacity, Health, Current, Battery temperature, Voltage, Speed, 

Odometer, Drivetrain temperature, Distance to empty, Power, Rider power, Cadence, User torque, Distance to 

destination, Estimated time of arrival,Trip distance, Trip duration, & Clock.

Map Screenshot

B C D

A

E

Dashboard Screenshot

A

B

C

D

Launching the Fazua Rider App

1.  Turn on Bluetooth in the phone settings.

2.  Turn on the Evation drivesystem fitted to your ebike.

3.  In the Fazua Rider app, either tap on "Tap to Pair Vehicle" in the start screen or go to the menu in the upper 

left corner, tap on "Vehicle" and click on "Tap to Pair Vehicle" there. A connection to you bike only needs to 

be established once using the Fazua Rider app.

Download Mobile App

1.  Go to 

https://fazua.com/en/drive-system/software/

 and click on the "Mobile Apps" link.

2.  On the next page, a link will be provided for both the Google Play Store and the Apple App Store. Follow 

the link corresponding to the operation system of your mobile device (Android or Apple).

3.  Once in the app store on your phone, press "Install".

Содержание E-VAULT

Страница 1: ... you on the trail or road This guide will walk you through the steps necessary to set up all the components and become familiar withtheFazuaE bikeSystem Thisdocumentcontainssomehelpful diagrams and reference material to make sure you have everything necessary to maintain your E Vault and enjoy it to the fullest ...

Страница 2: ...ing the Battery 4 Replacing the Battery in the Drivepack 5 Remote Detail 5 Powering the System ON and OFF 5 Speed Sensor 6 Support Modes 7 Changing Support Modes 7 Rain Mode 7 Support Characteristics 8 Factory Support Settings 8 4 Fazua Software 9 Download Software 9 Connect to the Fazua Toolbox 9 Fazua Toolbox Navigation Panel 9 Customize Assistance Profiles 10 Setting Custom Assistance Profiles ...

Страница 3: ...Troubleshooting 13 Troubleshooting Table 13 7 Schematics 14 Fazua Evation System Schematic 14 Small Parts Schematic 15 Small Parts Table 16 Wiring Diagram 17 5 Warnings 18 Bicycle Safety 18 Imporper Use Hazards 18 Health Hazards 19 Potential Damage Hazards 19 6 Additional Information 20 Fazua Evation Drive System 20 Pivot E Vault 20 Conformity 20 Sources 20 ...

Страница 4: ...omes equipped with the 27 2mm insert The 30 9mm insert can be purchased after market 30 9mm ISO Flex Insert Kit PN BOM SLV FLXPST30 9 V1 The procedure for swapping the ISO Flex inserts can be found on the Pivot website at https store pivotcycles com en file download 65154 isPreview True ISO FLEX Adjusting Saddle Height NOTE The E Vault can accept both a dropper post and rigid post The following in...

Страница 5: ...h display can show various metrics which can be shown by swiping left or right on the data display The data presented in each display can be chosen by tapping on the display Each display can have the following metrics State of charge Cycle count Remaining capacity Health Current Battery temperature Voltage Speed Odometer Drivetrain temperature Distance to empty Power Rider power Cadence User torqu...

Страница 6: ... open a blank email addressed to the Fazua customer service C The arrow will return to the main Map page Settings A Select the app user language English German Italian B Select the speed units miles per hour kilometers per hour C Select the temperature units degrees Fahrenheit degrees Celsius D Update the user profile The rider can add a user photo and link the Fazua Rider app with other activity ...

Страница 7: ...e the battery the drivepack must be removed from the frame see removal instructions above 1 Prepare the charger by plugging the power cable into the power inverter 2 Insert the power plug into the charging socket on the battery 3 Plug the power cable into the mains 4 To ensure a full charge wait until the five LEDs on the battery are lit 1 2 3 4 Installing the Drivepack 1 Place the drivepack into ...

Страница 8: ...in the Drivepack NOTE This procedure will be used to replace the battery in the event that a battery has failed or to replace a discharged battery with a secondary battery to increase the rideable range 1 Press the push button on top of the drivepack all the way down so that it clears the drivepack shell 2 While holding the push button down grasp the battery on the two handles and slide the batter...

Страница 9: ... on the brake side of the wheel and tighten the screw 1 Make sure the magnet is in the proper position and distance from the hub Note the marking on the speed sensor There is an embossed line indicating where the magnet should pass in front of the sensor 2 In order for the speed sensor to function properly the distance between the magnet and speed sensor must be between 4mm and 17mm 1 2 ...

Страница 10: ...er Fazua logo button if conditions require it Activate Rain Mode Press and hold the center Fazua logo button for 2 seconds The five LEDs will illuminate blue cascading from the top to bottom twice to indicate that Rain Mode has been activated While in Rain Mode the touch sensors will be inactive Deactivate Rain Mode Press and hold the center Fazua logo button for 2 seconds The five LEDs will illum...

Страница 11: ...ne along the y axis of Chart 1 and Chart 2 below Support Relation This parameter determines the relationship between rider power and motor support This parameter is defined by setting at what rider power input the maximum motor power output is reached This value can vary between 90 420 W This relationship is illustrated by the slope of the solid Support Relation line in Chart 1 below Ramp Up This ...

Страница 12: ...Fazua website https fazua com en magazine update motor software toolbox 1 Turn on the battery by pressing the power button located on the battery 2 Remove the USB cap with a Torx T10 screwdriver and carefully lift off the USB cap with a soft plastic lever When re installing the USB cap the Torx T10 screws should be torqued to 1 5 Nm 3 Connect the drivepack to the comupter using a mini USB cable 4 ...

Страница 13: ...orpoweroutputislowerintheEcosetting whichsavesbatteryandextendsrange Inthe Performance setting the maximum motor power output is higher which increases battery consumption and reduces range The Moderate setting is a balance between power output and energy consumption Support Relation Low Moderate High In the Low setting the motor provides maximum support even with low rider input power In the High...

Страница 14: ... New give the profile a name and click on Save All the profiles you have saved can be called up in the drop down menu even if the drivepack is not connected to the computer The various profiles are saved to the Fazua Toolbox software and will be available in the drop down menu everytime the program is opened Setting Custom Assistance Profiles To transfer the custom settings to the drivepack click ...

Страница 15: ...armin can be paired to the E Vault to display cadence or power 1 On the Garmin select the three horizontal bars at the lower right of the screen to access the main menu 2 Select Sensors 3 Select either Cadence or Power The Fazua system can provide one or the other but not both simulataneously 4 Select Add Sensor 5 The Garmin will begin searching for the E Vault Turn on the E Vault by pressing the ...

Страница 16: ...es a clicking noise The polygon coupling was loaded on one side Push the polygon coupling back into its original position to mobilize it again The upper LED on the remote lights up flashes red There is a connection error between the drivepack and bottom bracket gear box Clean the interface between the drivepack and bottom bracket gear box The upper LED on the remote lights up flashes yellow There ...

Страница 17: ...ller 5002000302 B Drivepack Battery Driver 5002000101 C Bottom Bracket Gear Box 5002000201 D Drivepack Locker 5002000601 E Speed Sensor Magnet included with Sensor 5002000901 Magnet only AS 5002003401 F Battery Charger US CA 5002000502 Battery Charger EU 5002000501 5002001602 Battery Charger UK 5002000501 5002001601 SCHEMATICS A D C B E F ...

Страница 18: ...com info pivotcycles com 1 877 857 4868 15 Small Parts Schematic SCHEMATICS 4 5 6 7 8 9 10 11 13 14 15 17 19 20 21 22 23 26 32 33 34 35 12 36 102 101 31 30 29 13 11 x1 13 10 x1 16 18 25 24 27 13 10 x1 28 INTERNAL FOAM ...

Страница 19: ...1 FP SCW BTN M4 8 V1 R1 M4x8 Fender Mounting Bolts 22 FP SCW BTN M5 8 M5x8 Button Head Screw 23 FP SCW BTN M5 10 M5x10 Button Head Screw 24 FP GRM 20MM BLK V1 R1 Di2 Battery Anti rattle Grommet 25 FP CLM DI2 SLV BLK V1 Di2 Wire Sleeve for Cable Clamps 26 FP SCW BTN M5 12 M5x12 Button Head Screw 27 FP WSH O RING EVAULT V1 R1 O Ring for Internal Cable Management 28 FP CLM VELCRO 28 12 V1 R1 Velcro f...

Страница 20: ...votcycles com 1 877 857 4868 17 Wiring Diagram SCHEMATICS Controller Wire Speed Sensor Wire Shimano 4 way Junction Box Di2 Battery Wire 300mm Di2 Front Derailleur Wire 300mm Di2 Rear Derailleur Wire 550mm Di2 Shifter Wire 1000mm ...

Страница 21: ...ow all charging instruction and do not charge the battery outside of the temperature range specified in the instructions Charging improperly or at temperatures outside of the specified range may damage the battery and increase the risk of fire Do not modify or attempt to repair the charger or the battery To charge the battery use only original and compatible Evation chargers from Fazua Take care n...

Страница 22: ...rging cable and all plugs for damage If the charger s power cord is damaged it must be replaced by the manufacturer their customer service or a similarly qualified person to avoid hazards Never use a damaged charger Otherwise there is a high risk of electric shock Keep the charger in a clean condition There is an increased risk of electric shock if the charger is dirty or contaminated Do not touch...

Страница 23: ...gned to provide reasonable protection against harmful interference in a residential installation This equipment generates uses and can radiate radio frequency energy and if not installed and used in accordance with the instructions may cause harmful interference to radio communications However there is no guarantee that interference will not occur in a particular installation If this equipment doe...

Отзывы: