D900-05-00
2
I56-0496-018R
To calculate battery requirements, use current values shown on page 1. It
should be noted, however, that there is an in-rush current associated with
strobe power-up. This information may be used in consideration of fuse
selection.
Independent Sounder/Strobe Operation:
There may be applications where it is desirable to drive the
sounder and strobe as independent devices. The System Sensor
sounder/strobe combination model MASS12 or MASS24 is easily
configured for this feature. The terminal connection for this appli-
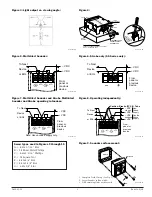
cation is shown in the wiring diagram Figure 8. It must be noted
that for this particular operation the PC TABS must be broken off.
Independent strobe operation in a “coded” system requires a sep-
arate “non-coded” power supply for the strobe.
Installation
A.
General:
Slotted head screws are used to attach each device or combi-
nation of devices to the electrical outlet box. Phillips head
screws are used to attach accessories to the horn. Refer to
Figures 5, 6, 7 and 8 for wiring methods.
Do not loop wires under the terminal screw. Wires connecting the
device to the panel must be broken at the device terminal con-
nection in order to maintain electrical supervision.
The sounder is 1-1/4
″
deep. Back boxes should be 4
″
square by
1-1/2
″
deep minimum; 2-1/8
″
deep is recommended.
B.
Sounder/Strobe combination mounting:
Determine the two holes which will be used to mount the
sounder/strobe combination to the electrical outlet box. Use
the remaining holes to attach the strobe to the sounder with
two phillips head screws.
CAUTION
1. Surface Mount: (See Fig. 11)
2. Semi Flush Mount: (See Fig. 12 and 15)
C.
Sounder mounting:
1. Surface Mount : (See Fig. 9)
2. Semi Flush Mount: (See Fig. 12 and 15)
3. Flush Mount: (See Fig. 14)
Flush mounting requires the use of the deep box BB-D or
equivalent. Determine which of the two holes will be used to
attach the device to the box. Mount the flush plate to the
sounder using the two 1-5/16-inch phillips head screws and
two square nuts through the remaining two holes.
D.
Strobe mounting:
1. Surface Mount: (See Fig. 10)
2. Semi Flush Mount: (See Fig. 13)
Installation procedures must conform to appropriate agency
requirements including but not limited to the following:
NFPA 72, NEC ART. 760 ET.AL., CAN/ULC-S524, CEC PART 1 SEC
32 (ULC models have suffix “A”).
The rated output of the sounder is specified at 10 feet. It should
not be assumed that the output will meet the NFPA requirement
of 15 dB over ambient noise at all locations within a room.
Additional sounders may be needed to ensure sound output level
complies with NFPA requirements.
CAUTION
Limitations Of Sounder/Strobes
WARNING
The sounder and/or strobe will not work without power.
The
sounder/strobe gets its power from the fire/security panel monitoring the
alarm system. If power is cut off for any reason, the sounder/strobe will
not provide the desired audio or visual warning.
The sounder may not be heard.
The loudness of the sounder meets (or
exceeds) current Underwriters Laboratories’ standards. However, the
sounder may not alert a sound sleeper or one who has recently used drugs
or has been drinking alcoholic beverages. The sounder may not be heard
if it is placed on a different floor from the person in hazard or if placed
too far away to be heard over the ambient noise such as traffic, air condi-
tioners, machinery or music appliances that may prevent alert persons
from hearing the alarm. The sounder may not be heard by persons who
are hearing impaired.
The signal strobe may not be seen.
The electronic visual warning signal
uses an extremely reliable xenon flash tube. It flashes at least once every
three seconds and exceeds current Underwriters Laboratories standards
for private mode viewing. The visual warning signal is suitable for direct
viewing and must be installed within an area where it can be seen by
building occupants. The strobe must not be installed in direct sunlight or
areas of high light intensity (over 60 foot candles) where the visual flash
might be disregarded or not seen. The strobe may not be seen by the visu-
ally impaired and is not intended to meet American Disabilities Act (ADA)
requirements.
The signal strobe may cause seizures.
Individuals who have positive
photic response to visual stimuli with seizures, such as persons with
epilepsy, should avoid prolonged exposure to environments in which
strobe signals, including this strobe, are activated.
The signal strobe cannot operate from coded power supplies.
Coded
power supplies produce interrupted power. The strobe must have an unin-
terrupted source of dc power in order to operate correctly. System Sensor
recommends that the sounder and signal strobe always be used in combi-
nation so that the risks from any of the above limitations are minimized.
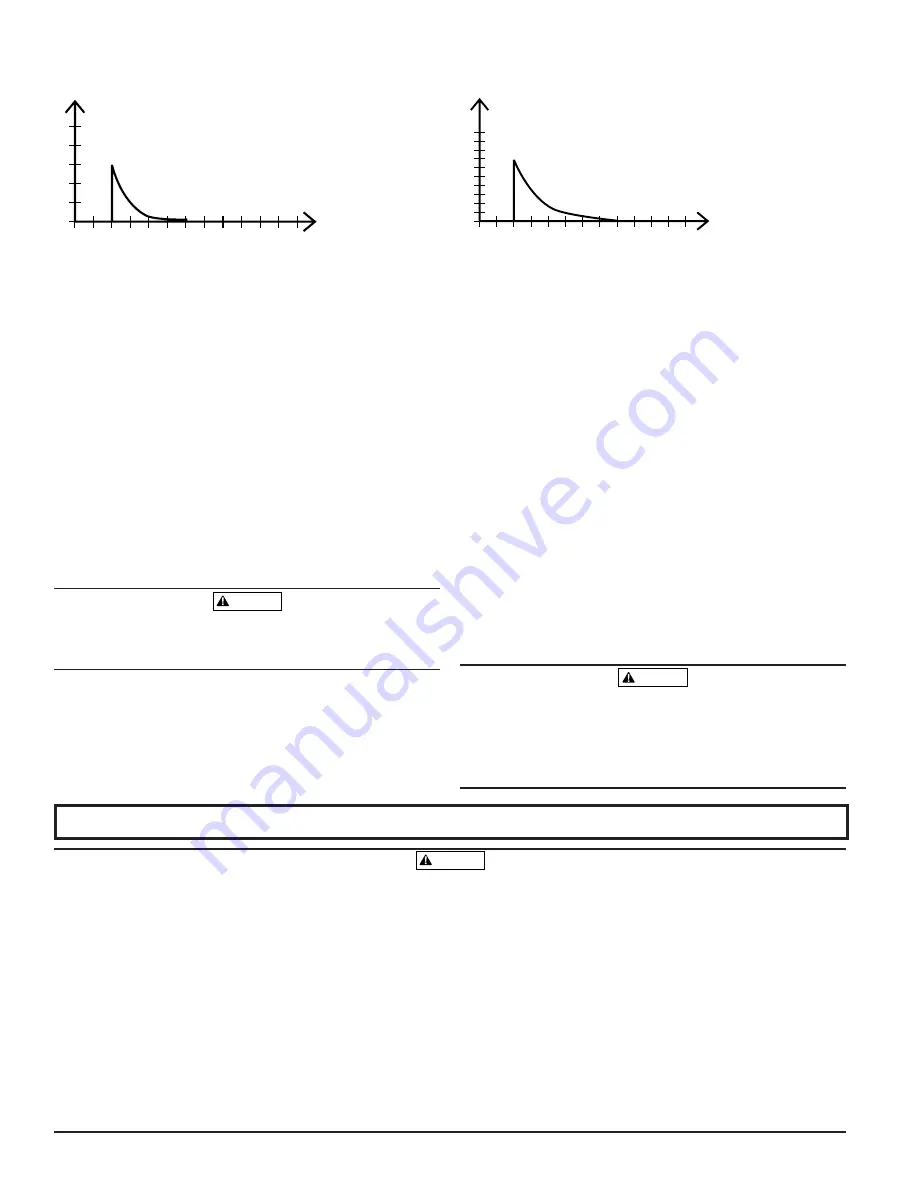
Figure 1. 12V strobe in-rush current:
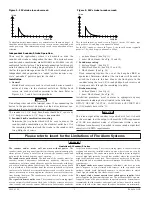
Figure 2. 24V strobe in-rush current:
1A/div
200µS/div
1A/div
200µS/div
This in-rush current, as can be seen in Figure 1 for the 12V strobe, typi-
cally peaks at 3A and drops to nominal in 600
µ
S.
For the 24V strobe, as shown in Figure 2, the in-rush current typically
peaks at 7.0A, then drops to nominal in 800
µ
S.
Please refer to insert for the Limitations of Fire Alarm Systems


