background image

10

En

Controls and Displays

3

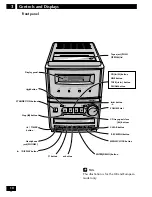
Front panel

CD

Tape eject (PUSH
OPEN


0

) lid

Stop (

7

) button

CD (

3

/

8

) button

LINE button

TAPE (

2 3

) button

FM/AM button

¢

button

3

/ DISPLAY button

VOLUME dial

2

/ TIMER

button

Display panel


4


button

STANDBY/ON button

CD tray open/close

(

0

)


buttons

Headphone

jack(PHONES)

MENU/CLOCK button

ENTER(DEMO) button

5


button


button

REC MENU button

CLEAR button

This illustration is for the UK and European
model only.

+

Содержание X-NM1

Страница 1: ......

Страница 2: ... heat radiation at least 30 cm at top 30 cm at rear and 30 cm at each side WARNING Slots and openings in the cabinet are pro vided for ventilation and to ensure reliable operation of the product and to protect it from overheating to prevent fire hazard the openings should never be blocked and covered with items such as newspapers table cloths cur tains etc Also do not put the apparatus on the thic...

Страница 3: ...ndensation problems 5 Proper ventilation for the unit 5 Discs compatible with this system 5 2 Connecting up Connecting the system 6 Connecting the speakers 7 Connecting the radio antennas 8 Connecting external antennas 9 Connecting other components 9 Connecting the power 9 3 Controls and displays Front panel 10 Remote control 1 1 Display 12 4 Getting started Switching on and setting the clock 13 C...

Страница 4: ...g ª and as shown below 3 Close the battery compartment and your remote is ready for use Make sure not to damage the controller by inserting the battery holder incorrectly check the diagram above Make sure that the plus and minus sides of the battery match the indications on the battery compartment Remove batteries from equipment that isn t going to be used for a month or more When disposing of use...

Страница 5: ...unit s feet or the whole footprint of each speaker Block the cooling vents on the rear and top side of the unit Don t cover the unit with cloth or use on thick carpet etc Put objects above or on top of the system or speakers Avoiding condensation problems Condensation may form inside the unit if it is brought into a warm room from outside or if the temperature of the room rises quickly Although th...

Страница 6: ... FM wire antenna Speaker cord from right R speaker Connect the power cord only after completing all other connections Speaker cord from left L speaker Clear with blue line side Clear side Do not connect any of the supplied speakers to any other amplifier This may result in malfunction or fire These speakers are magnetically shielded however color distortion may occur if the speaker system is insta...

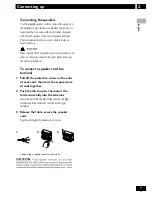
Страница 7: ...lp you match them up Make sure that the bare speaker wires cannot touch each other or come into contact with other metal parts once the unit is switched on To connect a speaker cord to a terminal 1 Pull off the protective covers on the ends of each cord then twist the exposed wire strands together 2 Push the tab to open then insert the twisted wire fully into the terminal Insert the wire with the ...

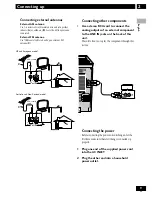
Страница 8: ... See Connecting external antennas on the next page for connection details The signal ground H is designed to reduce noise that occurs when an antenna is connected It is not an electrical safety ground 1 Pull off the protective shields of both AM antenna wires 2 Push open the tabs then insert one wire fully into each terminal 3 Release the tabs to secure the AM antenna wires 4 Fix the AM loop anten...

Страница 9: ...ng on for the first time make sure that everything is connected up properly 1 Plug one end of the supplied power cord into the AC INLET 2 Plug the other end into a household power outlet Connecting other components Use a stereo RCA cord to connect the analog outputs of an external component to the LINE IN jacks on the back of this unit This will allow you to play the component through this system ...

Страница 10: ...on TAPE 2 3 button FM AM button button 3 DISPLAY button VOLUME dial 2 TIMER button Display panel 4 button STANDBY ON button CD tray open close 0 buttons Headphone jack PHONES MENU CLOCK button ENTER DEMO button 5 button button REC MENU button CLEAR button This illustration is for the UK and European model only ...

Страница 11: ...M p 13 15 21 25 8 4 p 14 16 18 21 23 30 32 9 7 p 14 16 18 19 21 22 25 27 30 32 34 10 p 14 16 18 21 23 30 32 1 1 MENU p 15 21 23 29 12 Number buttons p 14 18 22 23 13 CLEAR p 18 21 23 34 14 REC MENU p 27 29 15 PGM p 18 16 REPEAT p 19 17 PLAY MODE p 17 18 5 2 3 ENTER p 13 15 17 21 23 25 27 30 32 34 19 SOUND MODE p 17 20 RANDOM p 19 21 VOLUME p 14 1 2 3 4 5 6 7 8 9 10 1 1 13 17 18 19 20 21 16 14 15 1...

Страница 12: ...oadcast in mono page 15 7 STEREO Lights when you are listening to an FM radio broadcast in stereo 8 PROGRAM Lights when using program play page 18 9 RANDOM Lights during random play page 19 10 REPEAT Blinks during 1 track repeat play lights during all track repeat play page 19 1 1 REC Lights when recording a CD or external source 12 Lights when the record timer is set blinks when in use page 32 33...

Страница 13: ...switch the unit on CD LINE TAPE and FM AM switch the unit on directly in to that function In the case of CD and TAPE if there is a disc tape loaded it will start playing CD 0 on the front panel switches the unit on and opens the disc cover Changing the clock format You can choose either a 12 or 24 hour format for the clock The default is 12 hour display 1 Switch the system into standby 2 Press and...

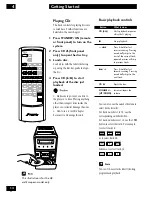
Страница 14: ... CD 2 1 3 5 4 8 7 6 10 9 10 0 VOLUME You can also use the number buttons to select tracks directly For track numbers 1 to 10 use the corresponding number button For track numbers over 10 use the 10 button to select the track For example to select track 18 or to select track 20 Likewise to select track 36 You can t choose tracks directly during programmed playback Basic playback controls Button Wha...

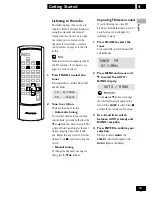
Страница 15: ... start searching for the next station stopping when it has found one Repeat this step to search for other stations Press 7 at anytime to stop the search Manual tuning To change the frequency one step at a time press the 5 buttons 7 FM AM MENU ENTER ENTER Improving FM stereo sound If you re listening to a stereo FM broadcast but find that there is a lot of noise because of a weak signal try switchi...

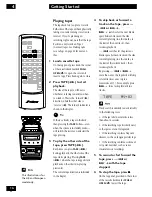
Страница 16: ...e deck marked PUSH OPEN 0 to eject the tape Playing tapes The tape deck lets you play or record both sides of the tape without physically taking it out and turning it over auto reverse If you re planning on recording right away note that the tape deck can only record on Type I normal tapes See Making tape recordings on page 26 for more on this 1 Load a cassette tape On the top panel press down the...

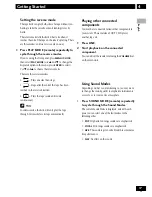
Страница 17: ...round and round continuously In endless mode the deck will only play the tape through 16 times before it stops automatically Playing other connected components You may have connected various other components to your system These include a VCR TV MD player another tape etc 1 Press LINE 2 Start playback on the connected component You can adjust the sound level using the VOLUME dial on the main unit ...

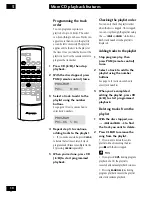
Страница 18: ... re done press CD 6 to start programmed playback Checking the playlist order You can only check the playlist order when the disc is stopped Once stopped you can step through the playlist using the 4 and buttons Each track number in the playlist is displayed Adding tracks to the playlist 1 Stop program play then press PGM remote control twice 2 Select a track to add to the playlist using the number...

Страница 19: ...etting repeat play to the single track option starts PROGRAM REPEAT ONE TRACK playback where just the current track in the playlist repeats Pressing RANDOM twice during REPEAT ONE TRACK playback cancels repeat play and starts random playback Using repeat play You can repeat either a single track over and over or the whole disc Use the remote control to select repeat play 1 If you haven t already s...

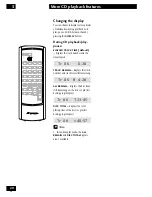
Страница 20: ...E default displays the track number and the time elapsed Tr O6 O 28 TRACK REMAIN displays the track number and track time still remaining Tr O6 R 4 28 ALL REMAIN displays the disc time still remaining on the disc or playlist during program play Tr O6 T23 45 DISC TOTAL displays the total playing time of the disc or playlist during program play Tr O6 t4O 57 In random play mode the ALL REMAIN and DIS...

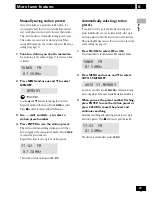
Страница 21: ...he station is saved under preset ST 02 Manually saving station presets If you often listen to a particular radio station it s convenient to have the receiver store the frequency for easy recall whenever you want to listen to that station This saves the effort of manually tuning in each time This system can save up to 24 station presets When saving FM frequencies the receiver also saves the mono se...

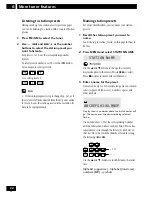
Страница 22: ...et you want to name See Listening to station presets on this page for how to do this 2 Press MENU and select STATION NAME STATION NAME Use the 5 and buttons to change the currently displayed option in the menu Press ENTER to select Press 7 anytime to cancel and exit the menu 3 Enter a name for the preset Names can be up to 12 characters long and can contain letters upper and lower case numbers spa...

Страница 23: ... Editing a station preset name You can edit preset names after they have been set or you can erase them completely 1 Select the preset you want to edit See Listening to station presets on the previous page for how to do this 2 Press MENU and use 5 and to select STATION NAME STATION NAME 3 Press ENTER The name is displayed 4 Edit the name as necessary The input method is exactly the same as for nam...

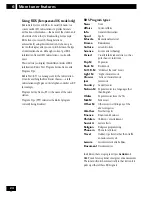
Страница 24: ...taries In addition there are program types ALARM and TEST used for exceptional emergency announcements The tuner will switch automatically to that station if it picks up either of these RDS signals Using RDS European and UK model only Radio Data System or RDS as it s usually known is a system used by FM radio stations to provide listeners with various information the name of the station and what k...

Страница 25: ... reverts to Program Service name Searching for a program type You can search for a station that is broadcasting any program type from the list on the previous page 1 Press FM AM to select FM Press repeatedly to switch between FM and AM bands 2 Press DISPLAY repeatedly until PTY SEARCH appears in the display PTY SEARCH 3 Press ENTER 4 Use 5 and to choose a program type then press ENTER AFFAIRS You ...

Страница 26: ...ike some tape decks there s no need to set recording levels the deck sets the level automatically When recording the volume and sound settings have no effect on the recording This means that you can record something with the volume turned right down if you want Before recording check that the cassette erase protect tabs have not been broken and that the tape is Type I normal position you can t rec...

Страница 27: ...everse mode p 17 Record one side only or Record both sides if recording starts in the 3 forward direction or one side when it starts in the 2 reverse direction 4 Load the disc you want to record Press 7 to make sure the disc is stopped Tr12 t55 57 The CD display showing a disc with 12 tracks and a total playing time of 55 57 5 If you want to record a programmed playlist enter the track order here ...

Страница 28: ...e Programming the track order on page 18 for more on how to do this 6 Pause the disc at that point you want to start recording Since recording starts at any point you pause playback make sure the display shows 0 00 if you plan to start from the beginning of a track on the disc 7 Press REC MENU and select TAPE REC to start recording Use the 5 and buttons to change the currently displayed option in ...

Страница 29: ...ording to finish the session Use the 5 and buttons to change the currently displayed option in the menu Press ENTER to select Press 7 anytime to cancel and exit the menu 5 Playback the source if necessary 6 When you re done press 7 on the front panel to stop recording Reducing the auxiliary input level If the component you connected to the analog inputs causes the sound to distort the input level ...

Страница 30: ...ss ENTER WAKE UP REC TIMER SET UP 4 Use and 5 to select WAKE UP TIMER then press ENTER WAKE UP TIMER Press 7 anytime to cancel and exit the timer menu STANDBY ON SLEEP TIMER 38 7 FM AM CD TAPE ENTER 6 Set the switch off time First set the hour Use 4 and or and 5 to change the flashing hour display then press ENTER OFF AM 8 OO Next set the minute Use 4 and or and 5 to change the flashing minute dis...

Страница 31: ...e sleep timer switch the system into standby or select SLEEP OFF as described above If you are recording a radio broadcast to the tape recorder the SLEEP AUTO option can be selected The SLEEP AUTO option is not available if you re playing a CD in repeat mode When is set for the tape reverse mode playback stops after 2 sides The sleep timer won t work if the clock isn t set confirmation display onl...

Страница 32: ... until you see WAKE UP REC TIMER SET UP then press ENTER WAKE UP REC TIMER SET UP 4 Use and 5 to select REC TIMER then press ENTER REC TIMER STANDBY ON SLEEP TIMER 7 FM AM ENTER Use the 5 and buttons to change the currently displayed option in the menu Press ENTER to select Press 7 anytime to cancel and exit the menu 5 Set the recording start time First set the hour Use 4 and or and 5 to change th...

Страница 33: ...he timer and clock will have to be set again for the timer to work The timer won t work if the clock isn t set Activating deactivating the timers You might choose to cancel the wake up timer but keep the settings for a later time You can also set the record timer and still keep your wake up timer settings 1 Switch the system to standby 2 Press TIMER repeatedly to cycle through the timer options Ch...

Страница 34: ...blackout accidentally unplugging the power cord for over 4 hours the system will default to the demo mode Changing the brightness level Press CLEAR for about three seconds to change the brightness level The display shows either DIMMER ON or DIMMER OFF Changing the frequency step If you find that you can t tune in to stations successfully the frequency step might not be suitable to your country reg...

Страница 35: ...sc become marked with fingerprints dust etc clean using a soft dry cloth wiping the disc lightly from the center to the outside edge as shown on the next page If necessary use a cloth soaked in alcohol or a commercially available CD cleaning kit to clean a disc more thoroughly Never use benzine thinner or other cleaning agents including products designed for cleaning vinyl records Don t wipe the d...

Страница 36: ...important recording against accidental erasure by breaking the erase protect tab s with a small screwdriver Erase protect tab For side A Erase protect tab For side B If you want to re record on an erase protected cassette cover the space left by the broken tab with self adhesive tape Using cassette tapes The tape of a cassette is quite easily damaged and loose tape can jam in the tape deck mechani...

Страница 37: ...de Incorrect system settings Check that the volume is turned up that the speakers are on the input function set correctly etc CD player Auto tuning does not pick up some stations The radio signal is weak Auto tuning will only detect radio stations with a good signal For more sensitive tuning connect an outdoor antenna Sound is mono only Check that the tuner is not in FM mono mode p 15 Noisy radio ...

Страница 38: ...s unit In this case unplug the power cord and then plug back in This will usually reset the unit for proper operation If this does not correct the problem please consult your nearest Pioneer service center It is possible that this unit will cause interference on nearby television sets especially if you re using a TV with an indoor antenna If you experience this problem either use an outdoor televi...

Страница 39: ...hannel stereo Recording playback heads 1 Erase head 1 Power section Power requirements UK Model AC 230 V 50 Hz European Model AC 220 230 V 50 60 Hz Australia and New Zealand Model AC 240V 50 60 Hz Power consumption European and UK Model 75 W Australia and New Zealand Model 140 W Standby power consumption 1 W Miscellaneous section External dimensions 166 W 243 H 315 D mm Weight main unit 6 kg Speak...

Страница 40: ...chaque côté ATTENTION Les évents et les ouvertures dans la struc ture sont prévus pour la ventilation et pour assurer le bon fonctionnement du produit et pour la protéger des risques de surchauffe et des risques d incendie les ouvertures ne doivent jamais etre bloquées ni couvertes par des matériaux tels que journaux nappes rideaux etc De meme ne pas positionner l appareil sur un tapis épais lit c...

Страница 41: ... Raccordement d antennes externes 9 Raccordement d autres composants 9 Raccordement de l alimentation 9 3 Commandes et affichages Panneau avant 10 Télécommande 1 1 Afficheur 12 4 Mise en service Allumage et réglage de l horloge 13 Comment changer le format de l horloge 13 Touches d allumage automatique 13 Lecture des CD 14 Commandes de base pour la lecture 14 Pour écouter la radio 15 Comment améli...

Страница 42: ...ué ci dessous 3 Refermez le compartiment et votre télécommande est prête pour l utiliser Précaution Prenez soin de ne pas endommager le contrôleur en insérant le logement à piles de façon incorrecte vérifiez l illutration ci dessous Vérifiez que les côtés positif et négatif des piles coïncident avec les indications du compartiment à piles Retirez les piles si l appareil ne va pas être utilise pend...

Страница 43: ...pareil ou les empreintes des enceintes Bloquer les orifices de refroidissement à l arrière et au dessus de l unité Ne recouvrez pas l unité avec un linge ou n utilisez pas de tapis épais etc Placer d objets sur ou au dessus de l appareil ou des enceintes Comment éviter les problèmes de condensation De la condensation peut se former à l intérieur du lecteur si celui ci est porté de l extérieur à un...

Страница 44: ...aire FM Cordon de l enceinte droite R Raccordez le cordon d alimentation uniquement après avoir complété tous les autres raccordements Cordon de l enceinte gauche L Transparent avec une ligne bleue face Transparent face Précaution Ne raccordez aucune des enceintes fournies à un amplificateur quelconque Ceci pourrait provoquer un mauvais fonctionnement ou un incendie Bien que les enceintes soient à...

Страница 45: ...faire correspondre Important Vérifiez que les fils dénudés des enceintes n entrent pas en contact les uns avec les autres ou avec d autres parties en métal une fois que l unité est allumée Pour raccorder un cordon d enceinte à une borne 1 Retirez les couvertures protectrices aux extrémités de chaque cordon puis torsadez ensemble les brins de fil dénudés 2 Pressez la languette pour ouvrir la borne ...

Страница 46: ...dement d antennes externes à la page suivante pour les détails de raccordement Remarque Le signe de la mise à la masse H est conçu pour réduire les parasites qui se produisent quand une antenne est raccordée Ce n est pas une prise de terre de sécurité électrique 1 Retirez les protections des deux fils de l antenne AM 2 Pressez les languettes des bornes puis insérez complètement un fil dans chaque ...

Страница 47: ...alimentation Avant de raccorder l alimentation et d allumer pour la première fois vérifiez que tout est correctement raccordé 1 Branchez une extrémité du cordon d alimentation fourni à une prise d entrée AC INLET 2 Branchez l autre extrémité à une prise d alimentation externe Raccordement d autres composants Utilisez un cordon stéréo RCA pour raccorder les sorties analogiques d un composant extern...

Страница 48: ...uche FM AM Touche Touche 3 DISPLAY Cadran VOLUME Touche 2 TIMER Panneau d affichage Touche 4 Touche STANDBY ON Touche 0 d ouverture fermeture du plateau à disques Prise pour écouteurs PHONES Touche MENU CLOCK Touche ENTER DEMO Touche 5 Touche Touche REC MENU Touche CLEAR Remarque Cette illustration correspond au modèle pour le Royaume Uni et pour l Europe ...

Страница 49: ...p 13 15 21 25 8 4 p 14 16 18 21 23 30 32 9 7 p 14 16 18 19 21 22 25 27 30 32 34 10 p 14 16 18 21 23 30 32 1 1 MENU p 15 21 23 29 12 Touches numérotées p 14 18 22 23 13 CLEAR p 18 21 23 34 14 REC MENU p 27 29 15 PGM p 18 16 REPEAT p 19 17 PLAY MODE p 17 18 5 2 3 ENTER p 13 15 17 21 23 25 27 30 32 34 19 SOUND MODE p 17 20 RANDOM p 19 21 VOLUME p 14 1 2 3 4 5 6 7 8 9 10 1 1 13 17 18 19 20 21 16 14 15...

Страница 50: ...llume lorsque vous écoutez une émission de radio FM en stéréo 8 PROGRAM S allume à l utilisation de la lecture programmée page 18 9 RANDOM S allume lors d une lecture aléatoire page 19 10 REPEAT Clignote lors de la lecture répétée d une piste clignote lors de la lecture répétée de toutes les pistes page 19 1 1 REC S allume lors de l enregistrement d un CD ou d une source externe 12 S allume lorsqu...

Страница 51: ... pour voir l horloge En mode d attente la pression de DISPLAY allumera la lumière de fond de l afficheur et indiquera brièvement l heure courante Remarque Si l alimentation secteur est coupée panne de courant débranchement accidentel du cordon d alimentation l appareil retournera à l affichage de 12 00 et il vous faudra le régler de nouveau pour montrer l heure correcte Comment changer le format d...

Страница 52: ...ez également utiliser les touches numérotées pour sélectionner des pistes directement Pour les numéros de pistes de 1 à 10 utilisez le touche numérotée correspondante Pour les numéros de pistes supérieurs à 10 utilisez la touche 10 pour sélectionner la piste Par exemple pour sélectionner la piste 18 ou pour sélectionner la piste 20 De même que pour sélectionner la piste 36 Remarque Vous ne pouvez ...

Страница 53: ...rechercher la station suivante en s arrêtant quand il en a trouvée une Répétez cette opération pour rechercher d autres stations Appuyez sur 7 à tout moment pour arrêter la recherche Accord manuel Pour changer de fréquence un pas à la fois appuyez sur les touches ou 5 Comment améliorer le son FM stéréo Si vous écoutez une émission FM stéréo mais vous trouvez qu il y a trop de parasites à cause du ...

Страница 54: ... marque PUSH OPEN 0 pour éjecter la cassette Lecture des cassettes La platine cassette vous permet de lire ou d enregistrer les deux faces de la cassette sans la retirer et la retourner inversion automatique Si vous pensez enregistrer en une seule fois remarquez que la platine cassette enregistre uniquement sur des cassettes Type I normales Consultez Comment effecteur des enregistrements sub casse...

Страница 55: ...a la cassette uniquement 16 fois avant de s arrêter automatiquement Lecture d autres composants raccordés Il se peut que vous ayez raccordés d autres composants à votre appareil Ceci inclut un magnétoscope un téléviseur un lecteur MD une autre platine cassette etc 1 Appuyez sur LINE 2 Démarrez la lecture sur le composant raccordé Vous pouvez ajuster le niveau sonore en utilisant le sélecteur VOLUM...

Страница 56: ...uyez sur CD 6 pour démarrer la lecture programmée Comment vérifier l ordre du répertoire Vouspouvezvérifierl ordredurépertoire uniquementsiledisqueestàl arrêt Une fois arrêté vous pouvez avancer sur le répertoire en utilisant les touches 4 et Chaquenuméro de piste du répertoire est affiché Comment ajouter des pistes au répertoire 1 Arrêtez la lecture du programme puis appuyez deux fois sur PGM tél...

Страница 57: ...ormale reprend La pression de 7 lors de la lecture aléatoire arrête la lecture et annule la lecture aléatoire Astuce En appuyant deux fois sur REPEAT lors de la lecture aléatoire vous pouvez utiliser la lecture RANDOM REPEAT ALL TRACK Toutes les pistes du disque seront lues de manière aléatoire en continu Utilisation de la lecture répétée Vous pouvez répéter une seule piste encore et encore ou la ...

Страница 58: ... par défaut affiche le numéro de piste et la durée écoulée Tr O6 O 28 TRACK REMAIN affiche le numéro de piste et la durée restante de la piste Tr O6 R 4 28 ALL REMAIN affiche la durée restante du disque sur celui ci ou du répertoire lors de la lecture programmée Tr O6 T23 45 DISC TOTAL affiche la durée totale de lecture du disque ou du répertoire lors de la lecture programmée Tr O6 t4O 57 Remarque...

Страница 59: ...e sous le préréglage ST 02 Mémorisation manuelle des stations préréglées Si vous écoutez souvent une station de radio en particulier il est commode de mémoriser la fréquence pour la rappeler plus facilement à chaque fois que vous souhaitez écouter cette station Ceci vous évite d accor der manuellement à chaque fois Cet appareil peut mémoriser jusqu à 24 stations préréglées En mémorisant des fréque...

Страница 60: ...us souhaitez donner un nom Consultez Pour écouter des stations préréglées sur cette page pour la manière de faire 2 Appuyez sur MENU et sélectionnez STATION NAME STATION NAME Rappel Utilisez les touches 5 et pour changer l option du menu actuellement affichée Appuyez sur ENTER pour sélectionner Appuyez sur 7 à tout moment pour annuler et quitter le menu 3 Saisissez un nom pour le préréglage Les no...

Страница 61: ... préréglée Vous pouvez monter des noms de préréglages après les avoir réglés ou bien vous pouvez les effacer complètement 1 Sélectionnez le préréglage que vous souhaitez monter Consultez Pour écouter des stations préréglées à la page précédente pour la manière de faire 2 Appuyez sur MENU et utilisez 5 et pour sélectionner STATION NAME STATION NAME 3 Appuyez sur ENTER Le nom est affiché 4 Montez le...

Страница 62: ...s Le tuner passera automatiquement à cette station s il ramasse l un ou l autre signal RDS Utilisation du RDS uniquement le modèle pour l Europe et le Royaume Uni Le système de données de radio Radio Data System ou plus habituellement connu par RDS est un système utilisé par les stations de radio FM pour offrir aux auditeurs différentes informations le nom de la station et quel type de programme q...

Страница 63: ... de programme Recherche d un type de programme Vous pouvez rechercher une station qui émette n importe quel type de programme de la liste de la page précédente 1 Appuyez sur FM AM pour sélectionner FM Appuyez plusieurs fois pour passer parmi les bandes FM et AM 2 Appuyez plusieurs fois sur DISPLAY jusqu à ce que PTY SEARCH apparaisse sur l affichage PTY SEARCH 3 Appuyez sur ENTER 4 Utilisez 5 et p...

Страница 64: ...tte il n est pas nécessaire de régler les niveaux d enregistrement la platine règle automatiquement le niveau A l enregistre ment les réglages du volume et du son sont sans effet sur l enregistrement Ceci signifie que vous pouvez enregistrer avec le volume complètement baissé si vous le souhaitez Avant d enregistrer vérifiez que les languettes de protection contre l effacement de la cassette n ont...

Страница 65: ... Pour enregistrer uniquement sur une face ou Pour enregistrer sur les deux faces si l enregistrement démarre dans le sens 3 avance ou sur une face quand il démarre dans le sens 2 inverse 4 Chargez le disque que vous souhaitez enregistrer Appuyez sur 7 pour être sûr que le disque est arrêté Tr12 t55 57 L affichage du CD montrant un disque ayant 12 pistes et une durée totale de lecture de 55 57 5 Si...

Страница 66: ... pistes Consultez Programmation de l ordre des pistes á la page 18 pour savoir comment faire 6 Mettez le disque en pause au point où vous souhaitez démarrer l enregistrement Puisque l enregistrement démarre à un point quelconque de la lecture en pause vérifiez que l affichage montre 0 00 si vous pensez démarrer depuis le début d une piste du disque 7 Appuyez sur REC MENU et sélectionnez TAPE REC p...

Страница 67: ...ion Rappel Utilisez les touches 5 et pour changer l option du menu actuellement affichée Appuyez sur ENTER pour sélectionner Appuyez sur 7 à tout moment pour annuler et quitter le menu 5 Lisez la source le cas échéant 6 Après quoi appuyez sur 7 sur le panneau avant pour arrêter l enregistrement Comment réduire le niveau de l entrée auxiliaire Si le composant que vous avez raccordé aux entrées anal...

Страница 68: ...z sur ENTER WAKE UP REC TIMER SET UP 4 Utilisez et 5 pour sélectionner WAKE UP TIMER puis appuyez sur ENTER WAKE UP TIMER Appuyez sur 7 à tout moment pour annuler et quitter le menu de la minuterie STANDBY ON SLEEP TIMER 38 7 FM AM CD TAPE ENTER 6 Réglez l heure de désactivation Réglez d abord les heures Utilisez 4 et ou et 5 pour changer l affichage clignotant de l heure puis appuyez sur ENTER OF...

Страница 69: ...z l appareil en mode d attente ou sélectionnez SLEEP OFF comme décrit ci dessus Remarque Si vous enregistrez une émission de radio à l enregistreur cassette l option SLEEP AUTO peut être sélectionnée L option SLEEP AUTO n est pas valable si vous êtes en mode de lecture répétée d un CD Quand vous réglez pour le mode d inversion de cassette la lecture s arrête après les deux faces La minuterie de so...

Страница 70: ...ET UP puis appuyez sur ENTER WAKE UP REC TIMER SET UP 4 Utilisez et 5 pour sélectionner REC TIMER puis appuyez sur ENTER REC TIMER STANDBY ON SLEEP TIMER 7 FM AM ENTER Rappel Utilisez les touches 5 et pour changer l option du menu actuellement affichée Appuyez sur ENTER pour sélectionner Appuyez sur 7 à tout moment pour annuler et quitter le menu 5 Réglez l heure de démarrage de l enregistrement R...

Страница 71: ...uterie ne fonctionnera pas si l horloge n est pas réglée Activation désactivation des minuteries Vous pouvez choisir d annuler la minuterie de réveil mais gardez tout de même les réglages pour une prochaine fois 1 Mettez l appareil en mode d attente 2 Appuyez plusieurs fois sur TIMER pour passer sur les options de la minuterie Choisissez TIMER OFF pour désactiver tous les réglages des minuteries P...

Страница 72: ...tel du cordon d alimentation pendant plus de 4 heures l appareil retournera par défaut au mode de démonstration Comment changer le niveau de luminosité Appuyez sur CLEAR pendant environ trois secondes pour changer le niveau de luminosité L afficheur montre soit DIMMER ON ou DIMMER OFF Comment changer le pas de fréquence Si vous rencontrez des difficultés à accorder des stations il se peut que le p...

Страница 73: ... doigts de la poussière etc nettoyez le en utilisant un chiffon doux et humecté en essuyant le disque du centre vers la périphérie comme indiqué sur la page suivante Si nécessaire utilisez un chiffon imbibé d alcool ou un kit de nettoyage de CD disponible dans le commerce pour que le nettoyage du disque soit plus complet N utilisez jamais de benzine de diluant ou autres agents nettoyants y compris...

Страница 74: ...nt de s emmêler dans le mécanisme de la platine cassette et d entraîner d autres problèmes tel qu un embobinement irrégulier Evitez d utiliser des cassettes plus longues que 90 minutes Protection contre les enregistrements Vous pouvez protéger un enregistrement important contre tout effacement accidentel en brisant la ou les languettes de protection avec un petit tourne vis Languette de protection...

Страница 75: ...pareil sont incorrects Vérifiez que le volume est monté que les enceintes sont activées que la fonction d entrée est réglée correctement etc Lecteur CD L accord automatique ne capte pas certaines stations Si le signal radio est faible L accord automatique ne détecte que des stations de radio ayant un bon signal Pour obtenir un accord plus sensible raccordez une antenne extérieure Le son est unique...

Страница 76: ...utres influences externes peuvent provoquer un mauvais fonctionnement de cette unité Dans ce cas débranchez le cordon d alimentation et rebranchez le Ceci réinitialisera l unité pour qu elle fonctionne convenablement Si cela ne corrige pas le problème veuillez consulter votre service Pioneer le plus proche Il est possible que cette unité provoque des interférences sur des téléviseurs qui se trouve...

Страница 77: ...A 50 Hz Modèle pour l Europe 220 230 V 50 60 Hz Modèle pour l Australie et la Nouvelle Zélande 240V CA 50 60 Hz Consommation Modèle pour l Europe et le Royaume Uni 75 W Modèle pour l Australie et la Nouvelle Zélande 140 W Consommation en mode d attente 1W Section divers Dimensions externes 166 L x 243 H x 315 P mm Poids unité principale 6 kg Enceintes Type Enceinte étagère basse réflexe Elements d...

Страница 78: ...40 Fr Additional Information 9 ...

Страница 79: ...41 Fr 9 Additional Information ...

Страница 80: ...ONEER EUROPE NV Haven 1087 Keetberglaan 1 B 9120 Melsele Belgium TEL 03 570 05 11 PIONEER ELECTRONICS AUSTRALIA PTY LTD 178 184 Boundary Road Braeside Victoria 3195 Australia TEL 03 9586 6300 PIONEER ELECTRONICS DE MEXICO S A DE C V San Lorenzo 1009 3er Piso Desp 302 Col Del Valle Mexico D F C P 03100 TEL 5 688 52 90 Printed in China Imprimé en Chine Published by Pioneer Corporation Copyright 2001...

Отзывы: