background image

Using the tuner

07

37

En

Chapter 7:

Using the tuner

Listening to the radio

The following steps show you how to tune in to 
FM and AM radio broadcasts using the 
automatic (search) and manual (step) tuning 
functions. Once you are tuned to a station you 
can memorize the frequency for recall later—
see 

Saving station presets

 below for more on 

how to do this.

1

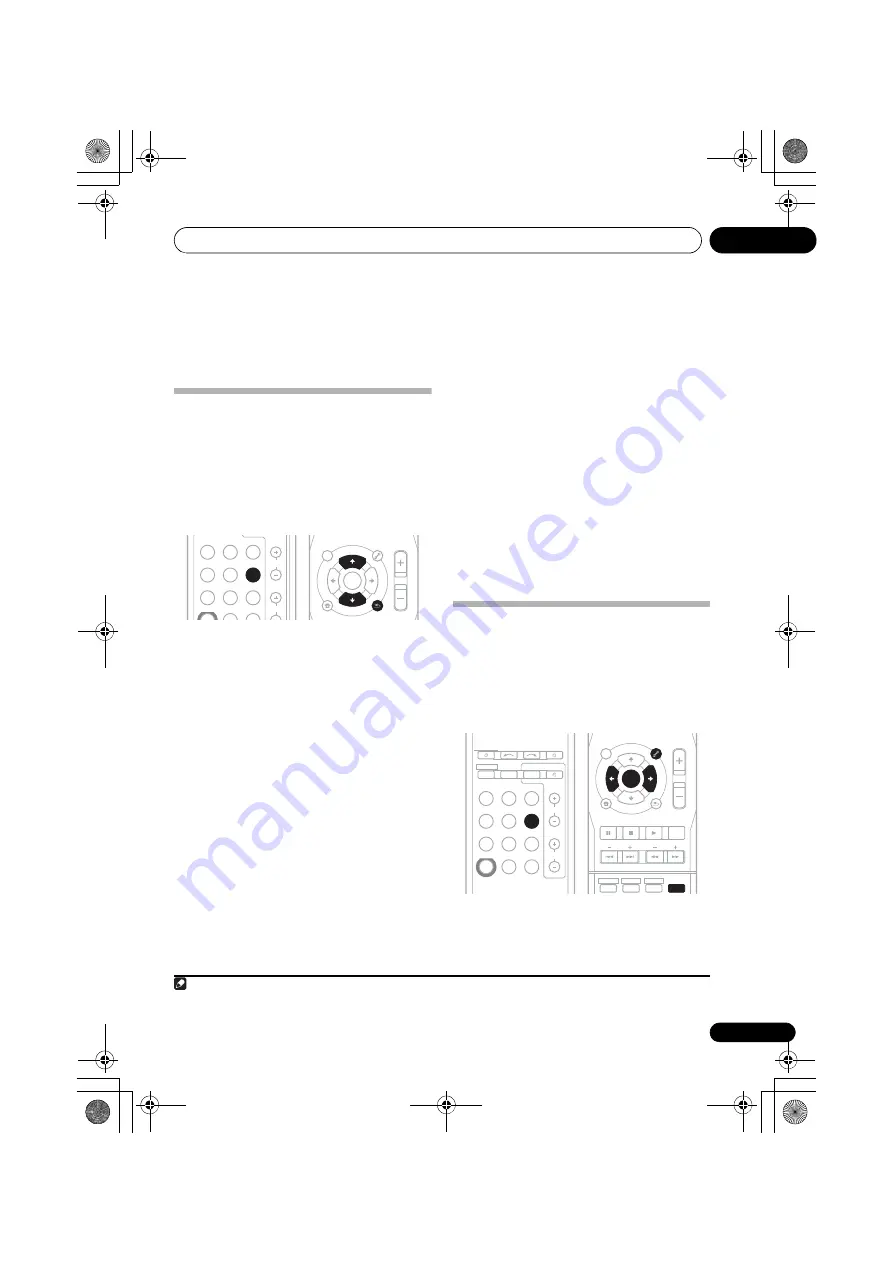
Press TUNER to select the tuner.

2

Use BAND to change the BAND (FM or 

AM), if necessary.

Each press switches the band between FM 
(stereo or mono) and AM.

3

Tune to a station.

There are three ways to do this:

Automatic tuning

To search for stations in the currently 
selected band, press and hold 

TUNE

 /


for about a second. The receiver will start 
searching for the next station, stopping 
when it has found one. Repeat to search for 
other stations.

Manual tuning

To change the frequency one step at a 
time, press 

TUNE

 /

.

High speed tuning

Press and hold 

TUNE

 /

 for high speed 

tuning. Release the button at the frequency 
you want.

Improving FM sound

If the 

TUNE

 or 

ST

 indicators don’t light when 

tuning to an FM station because the signal is 
weak, press the 

BAND

 button to select 

FM 

MONO

 and set the receiver to the mono 

reception mode. This should improve the 
sound quality and allow you to enjoy the 
broadcast.

Saving station presets

If you often listen to a particular radio station, 
it’s convenient to have the receiver store the 
frequency for easy recall whenever you want to 
listen to that station. This saves the effort of 
manually tuning in each time. This unit can 
memorize up to 30 stations.

1

1

Tune to a station you want to memorize.

See 

Listening to the radio

 above for more on 

this.

BD DVD

TV

DVR

CH

CD

CD-R

TUNER

PORTABLE

MULTI IN SIGNAL SEL

PHASE S.RETRIEVER

VOL

TODOROKI

ENTER

RETURN

SETUP

AUDIO

PARAMETER

TUNER EDIT  

TOOLS

MASTER
VOLUME

MENU

HOME
MENU

TOP

MENU

TUNE

TUNE

P

R

E

S

E

T

P

R

E

S

E

T

TUNER

TUNE

TUNE

BAND

Note

1 If the receiver is left disconnected from the AC power outlet for over a month, the station memories will be lost and will have 

to be reprogrammed.

1

HDD

ENTER

2

DISPLAY

DVD

3

VCR

MUTE

RETURN

SETUP

AUDIO

PARAMETER

TUNER EDIT  

TOOLS

MASTER
VOLUME

BAND

MENU

HOME
MENU

TRE

BASS

TOP

MENU

TUNE

TUNE

P

R

E

S

E

T

P

R

E

S

E

T

DTV/ TV

PTY SEARCH

BD DVD

TV

INPUT SELECT

SOURCE

DVR

INPUT

CH

TV  CONTROL

RECEIVER

ZONE 2
ON/OFF

CD

CD-R

TUNER

PORTABLE

MULTI IN SIGNAL SEL

PHASE S.RETRIEVER

STANDARD ADV SURR

STEREO/

A L C

AUTO/

DIRECT

VOL

RECEIVER

TODOROKI

P

R

E

S

E

T

P

R

E

S

E

T

TUNER EDIT  

DISPLAY

TUNER

VSX-RS320_DWXCN.book  37 ページ  2010年4月2日 金曜日 午後5時46分

Содержание VSX-RS320-k

Страница 1: ...VSX RS320 K VSX RS320_DWXCN book 1 ページ 2010年4月2日 金曜日 午後5時46分 ...

Страница 2: ...ng splashing rain or moisture D3 4 2 1 3_A1_En WARNING Before plugging in for the first time read the following section carefully The voltage of the available power supply differs according to country or region Be sure that the power supply voltage of the area where this unit will be used meets the required voltage e g 230 V or 120 V written on the rear panel D3 4 2 1 4 _A1_En WARNING To prevent a...

Страница 3: ...d to unplug it from the AC outlet to shut down all power Therefore make sure the unit has been installed so that the power cord can be easily unplugged from the AC outlet in case of an accident To avoid fire hazard the power cord should also be unplugged from the AC outlet when left unused for a long period of time for example when on vacation D3 4 2 2 2a _A1_En This product is for general househo...

Страница 4: ...ents 21 Connecting to the front panel audio mini jack 21 Connecting antennas 22 Using external antennas 22 Connecting an IR receiver 23 Plugging in the receiver 23 04 Listening to your system Basic playback 24 Selecting the audio input signal 25 Auto playback 25 Listening in surround sound 25 Using the Advanced surround effects 26 Listening in stereo 26 Using Front Stage Surround Advance 26 Using ...

Страница 5: ...nt to hook up using a digital connection from the BD DVD player to the receiver About video outputs connection page 16 Connecting a TV and playback components page 17 Connecting antennas page 22 Plugging in the receiver page 23 Front Left L Surround Left SL Surround Right SR Center C Subwoofer SW Listening position Front Right R 4 Power On Make sure you ve set the video input on your TV to this re...

Страница 6: ...life or performance of batteries Installing the receiver When installing this unit make sure to put it on a level and stable surface Don t install it on the following places on a color TV the screen may distort near a cassette deck or close to a device that gives off a magnetic field This may interfere with the sound in direct sunlight in damp or wet areas in extremely hot or cold areas in places ...

Страница 7: ...jack Use to connect headphones page 31 8 Listening mode buttons AUTO SURROUND STREAM DIRECT Switches between Auto surround mode Auto playback on page 25 and Stream Direct playback Stream Direct playback bypasses the tone controls for the most accurate reproduction of a source page 27 STEREO A L C Switches between stereo playback Auto level control stereo mode page 26 and Front Stage Surround Advan...

Страница 8: ...age 21 Operating range of remote control unit The remote control may not work properly if There are obstacles between the remote control and the receiver s remote sensor Direct sunlight or fluorescent light is shining onto the remote sensor The receiver is located near a device that is emitting infrared rays The receiver is operated simultaneously with another infrared remote control unit Display ...

Страница 9: ...with DTS encoded audio signals is detected 96 24 Lights when a source with DTS 96 24 encoded audio signals is detected 11 Character display Displays various system information 12 Dolby Digital indicators 2 D Lights when a Dolby Digital encoded signal is detected 2PLll Lights to indicate Pro Logic II decoding see Listening in surround sound on page 25 for more on this 13 ADV S Lights when one of th...

Страница 10: ...25 TODOROKI Press to switch on off the TODOROKI mode page 27 PHASE Press to switch on off Phase Control page 28 S RETRIEVER Press to restore CD quality sound to compressed audio sources page 28 7 Listening mode buttons AUTO DIRECT Switches between Auto surround mode Auto playback on page 25 and Stream Direct playback Stream Direct playback bypasses the tone controls for the most accurate reproduct...

Страница 11: ...d FM MONO radio bands page 37 9 TUNE PRESET ENTER Use the arrow buttons when setting up your surround sound system page 32 Also used to control BD DVD menus options Use the TUNE buttons can be used to find radio frequencies page 37 and the PRESET buttons can be used to select preset radio stations page 38 10 Component control buttons The main buttons etc are used to control a component after you h...

Страница 12: ...any time by pressing SLEEP once DIMMER Dims or brightens the display The brightness can be controlled in four steps 12 SOURCE Turns on or off the power of the Pioneer DVD or DVR units when BD DVD or DVR is selected using the input function buttons 13 TV CONTROL buttons These buttons can control only be used with Pioneer TVs Use to turn on off the power of the TV INPUT Use to select the TV input si...

Страница 13: ... you re using a center speaker place the front speakers at a wider angle If not place them at a narrower angle Place the center speaker above or below the TV so that the sound of the center channel is localized at the TV screen Also make sure the center speaker does not cross the line formed by the leading edge of the front left and right speakers It is best to angle the speakers towards the liste...

Страница 14: ...ke sure that all the bare speaker wire is twisted together and inserted fully into the speaker terminal If any of the bare speaker wire touches the back panel it may cause the power to cut off as a safety measure Be sure to complete all connections before connecting this unit to the AC power source Bare wire connections Front speaker terminals 1 Twist exposed wire strands together 2 Loosen termina...

Страница 15: ...nel surround sound audio HDMI features include uncompressed digital video a bandwidth of up to 2 2 gigabytes per second with HDTV signals one connector instead of several cables and connectors and communication between the AV source and AV devices such as DTVs Even if you connect the playback components with an HDMI cable no sound will come out of the speaker connected to this receiver An audio ca...

Страница 16: ... This receiver is not loaded with a video converter When you use component video cables or HDMI cables for connecting to the input device the same cables should be used for connecting to the TV The signals input from the analog composite and component video inputs of this unit will not be output from the HDMI OUT Note 1 When connecting optical cables be careful when inserting the plug not to damag...

Страница 17: ... L R CENTER SURROUND COAXIAL CD IN 1 BD DVD IN 1 1 2 TV SAT IN 2 BD DVD IN 1 TV SAT IN 2 OPTICAL ASSIGNABLE IR ASSIGNABLE 1 2 ASSIGNABLE OUT OUT MONITO Y PB PR IN ZONE2 OUT MONITOR OUT BD DVD IN TV SAT IN SUBWOOFER PRE OUT L R DVR VCR TV SAT OUT IN DVR VCR VIDEO L R OUT BD DVD IN TV SAT IN OUT IN IN IN CD R TAPE CD SUBWOOFER IN L R TV SAT IN BD DVD IN L R MONITOR OUT BD DVD IN OUT BD DVD IN 1 HDMI...

Страница 18: ...e 25 AUDIO AUDIO DIGITAL COMPONENT VIDEO BD DVD MULTI CH IN BD DVD IN HDMI ANTENNA FM UNBAL 75 Ω AM LOOP FRONT L R L R CENTER SURROUND COAXIAL CD IN 1 BD DVD IN 1 1 2 TV SAT IN 2 BD DVD IN 1 TV SAT IN 2 OPTICAL ASSIGNABLE IR ASSIGNABLE 1 2 ASSIGNABLE OUT OUT MONITO Y PB PR IN ZONE2 OUT MONITOR OUT BD DVD IN TV SAT IN SUBWOOFER PRE OUT L R DVR VCR TV SAT OUT IN DVR VCR VIDEO L R OUT BD DVD IN TV SA...

Страница 19: ...oo See Connecting using HDMI on page 17 or Connecting your component with no HDMI terminal on page 18 for more on this For details about an audio or a video recording see page 39 PLAY R L DIGITAL AUDIO OUT ANALOG AUDIO OUT R L ANALOG AUDIO IN OPTICAL VIDEO OUT VIDEO IN REC AUDIO AUDIO DIGITAL COMPONENT VIDEO BD DVD MULTI CH IN BD DVD IN HDMI ANTENNA AM LOOP FRONT L R L R CENTER SURROUND COAXIAL CD...

Страница 20: ...ONENT VIDEO BD DVD MULTI CH IN BD DVD IN ANTENNA FM UNBAL 75 Ω AM LOOP FRONT L R L R CENTER SURROUND COAXIAL CD IN 1 1 2 BD DVD IN 1 TV SAT IN 2 OPTICAL ASSIGNABLE IR ASSIGNABLE 1 2 ASSIGNABLE OUT OUT MONITOR Y PB PR IN ZONE2 OUT MONITOR OUT BD DVD IN TV SAT IN SUBWOOFER PRE OUT L R DVR VCR TV SAT OUT IN DVR VCR VIDEO L R OUT IN IN IN CD R TAPE CD SUBWOOFER IN BD DVD IN 1 TV SAT IN 2 L R TV SAT IN...

Страница 21: ...ing to the front panel audio mini jack Front audio connections are accessed via the front panel using the INPUT SELECTOR or PORTABLE button on the remote control Use a stereo mini jack cable to connect a digital audio player etc AUDIO DIGITAL C BD DVD MULTI CH IN BD DVD IN HDMI ANTENNA AM LOOP FRONT L R L R CENTER SURROUND COAXIAL CD IN 1 1 2 OPTICAL ASSIGNABLE IR ASSIGNABLE OUT IN MO DVR VCR TV S...

Страница 22: ...n a flat surface and in a direction giving the best reception 4 Connect the FM wire antenna into the FM antenna socket For best results extend the FM antenna fully and fix to a wall or door frame Don t drape loosely or leave coiled up Using external antennas To improve FM reception Connect an external FM antenna as shown below To improve AM reception Connect a 5 m to 6 m length of vinyl coated wir...

Страница 23: ... power cord or pinch the cord in any other way Never make a knot in the cord or tie it with other cables The power cords should be routed so that they are not likely to be stepped on A damaged power cord can cause a fire or give you an electric shock Check the power cord once in a while If you find it damaged ask your nearest Pioneer authorized independent service company for a replacement Do not ...

Страница 24: ...e front panel display whether or not surround sound playback is being performed properly see Display on page 8 If the display does not correspond to the input signal and listening mode check the connections and settings 4 Use the volume control to adjust the volume level Turn down the volume of your TV so that all sound is coming from the speakers connected to this receiver Note 1 Make sure that t...

Страница 25: ...receiver you can listen to any source in surround sound However the options available will depend on your speaker setup and the type of source you re listening to While listening to a source press STANDARD If the source is Dolby Digital DTS or Dolby Surround encoded the proper decoding format will automatically be selected and shows in the display With two channel sources press STANDARD repeatedly...

Страница 26: ...r subwoofer depending on your speaker settings Dolby Digital or DTS multichannel sources are downmixed to stereo In the Auto level control stereo mode A L C this unit equalizes playback sound levels if each sound level varies with the music source recorded in a portable audio player While listening to a source press STEREO A L C for stereo playback Press repeatedly to switch between STEREO The aud...

Страница 27: ...ss emphasized There are two TODOROKI modes 1 and 2 While listening to a source press TODOROKI TODOROKI MODE to select the TODOROKI mode 3 The TODOROKI indicator on the front panel lights Press repeatedly to switch between TODOROKI 1 A heavy bass mode with the bass emphasized to achieve a powerful sound TODOROKI 2 A heavy bass mode with the bass emphasized less than in the TODOROKI 1 mode TODOROKI ...

Страница 28: ...osition The default setting is on and we recommend leaving Phase Control switched on for all sound sources Press PHASE to switch on phase correction Note 1 The Sound Retriever is only applicable to 2 channel sources PHASE S RETRIEVER VOL TODOROKI S RETRIEVER 2 Phase matching is a very important factor in achieving proper sound reproduction If two waveforms are in phase they crest and trough togeth...

Страница 29: ...ECEIVER ZONE 2 ON OFF CD CD R TUNER ENTER RETURN SETUP AUDIO PARAMETER TUNER EDIT TOOLS MASTER VOLUME BAND MENU HOME MENU TOP MENU TUNE TUNE P R E S E T P R E S E T RETURN AUDIO PARAMETER RECEIVER RECEIVER Setting What it does Option s S DELAY Sound Delay Some monitors have a slight delay when showing video so the soundtrack will be slightly out of sync with the picture By adding a bit of delay yo...

Страница 30: ...by Digital and DTS audio sources include ultra low bass tones Set the LFE attenuator as necessary to prevent the ultra low bass tones from distorting the sound from the speakers The LFE is not limited when set to 0 dB which is the recommended value When set to 10 dB the LFE is limited by the respective degree When OFF is selected no sound is output from the LFE channel LFEATT 0 0 dB LFEATT 10 10 d...

Страница 31: ... PHONE jack 2 Press then press the SPEAKERS button to select SP OFF The sound is heard from the headphone and no sound is heard from the speakers connected to this receiver The listening mode when the sound is heard from the headphone can be selected only from STEREO or A L C Note 1 During playback from the multichannel inputs you can t use any of the sound features modes and only the volume and c...

Страница 32: ...on page 33 CH LEVEL Adjust overall balance of your speaker system see Channel level on page 33 SP DISTN Specify the distance of your speakers from the listening position see Speaker Distance on page 34 3 Press RETURN after making the adjustments necessary for each setting Speaker setting Use this setting to specify your speaker configuration size number of speakers 1 Select SP SET from the SP SETU...

Страница 33: ...VEL from the SP SETUP menu 2 Use to select a setup option T TONE M Move the test tone manually from speaker to speaker and adjust individual channel levels T TONE A Adjust channel levels as the test tone moves from speaker to speaker automatically 3 Confirm your selected setup option The test tones will start after you press ENTER 3 4 Adjust the level of each channel using If you selected T TONE M...

Страница 34: ...re on this see Connecting your component with no HDMI terminal on page 18 1 Select IN ASSIG from the System Setup menu 2 Select COMP IN from the IN ASSIG menu 3 Use to select the number of the component video input to which you ve connected your video component The numbers match the numbers beside the inputs on the rear of the receiver 4 Select the component that corresponds with the one you conne...

Страница 35: ...r your sub zone MULTI ZONE listening options The following table shows what you can listen to in the sub zone Basic MULTI ZONE setup ZONE 2 Connect a separate amplifier to the ZONE 2 AUDIO OUT jacks on the rear of this receiver You should have a pair of speakers attached to the sub zone amplifier as shown in the following illustration Note 1 You can t use sound controls such as the bass treble con...

Страница 36: ...lowing table shows the possible MULTI ZONE remote controls a Without pressing the SHIFT button you can switch power on off in the sub zone b In ZONE 2 you cannot select MULTI IN inputs Note 1 If the receiver is in standby the display is dimmed and ZONE2 ON continues to show in the display BAND PHONES INPUT SELECTOR STANDBY ON PHASE CONTROL AUTO SURROUND STREAM DIRECT STEREO A L C ADVANCED SURROUND...

Страница 37: ...eception mode This should improve the sound quality and allow you to enjoy the broadcast Saving station presets If you often listen to a particular radio station it s convenient to have the receiver store the frequency for easy recall whenever you want to listen to that station This saves the effort of manually tuning in each time This unit can memorize up to 30 stations 1 1 Tune to a station you ...

Страница 38: ...rst character position is blinking on the display 3 Input the name you want Choose a name up to eight characters long Use the PRESET buttons to select character position Use the TUNE buttons to select characters The name is stored when ENTER is pressed Tip To erase a station name follow steps 1 and 2 and press ENTER while the display is blank Press TUNER EDIT while the display is blank to keep the...

Страница 39: ...s on the remote control or the front panel INPUT SELECTOR dial 2 Select the input signal if necessary Press SIGNAL SEL to select the analog input signalcorrespondingtothe source component see page 25 for more on this 3 Prepare the source you want to record Tune to the radio station load the CD video DVD etc 4 Prepare the recorder Insert a blank tape MD video etc into the recording device and set t...

Страница 40: ...f ZONE2 ON is displayed Press the ZONE 2 ON OFF button to switch the sub zone off No sound is output when a function is selected Check the audio output settings of the source component Make sure the component is connected correctly refer to Connecting your equipment on page 13 Press MUTE on the remote control to turn muting off Press SIGNAL SEL to select the proper input signal see Selecting the a...

Страница 41: ...ing in Speaker setting on page 32 to YES or PLUS Switch the LFEATT LFE Attenuate on page 30 to LFEATT 0 or LFEATT 10 The PHASE CONTROL feature doesn t seem to have an audible effect If applicable check that the lowpass filter switch on your subwoofer is off or the lowpass cutoff is set to the highest frequency setting If there is a PHASE setting on your subwoofer set it to 0º or depending on the s...

Страница 42: ...ntrol does not support operation of a Blu ray Disc player The display is dark or off Press DIMMER on the remote repeatedly to return to the default Symptom Remedy No picture If the problem still persists when connecting your HDMI component directly to your monitor please consult the component or monitor manual or contact the manufacturer for support Depending in the output settings of the source c...

Страница 43: ...al 19 pin Not DVI HDMI output type 5 V 100 mA Integrated control section Control IR terminal 3 5 Mini jack MONO IR signal High Active High Level 2 0 V Miscellaneous Power Requirements AC 220 V to 240 V 50 Hz 60 Hz Power Consumption 270 W In standby 0 5 W Dimensions 420 mm W x 158 mm H x 347 7 mm D Weight without package 8 9 kg Furnished Parts Remote control 1 Dry cell batteries AAA size IEC R03 2 ...

Страница 44: ...ay Markham Ontario L3R 0P2 Canada TEL 1 877 283 5901 905 479 4411 PIONEER EUROPE NV Haven 1087 Keetberglaan 1 B 9120 Melsele Belgium TEL 03 570 05 11 PIONEER ELECTRONICS ASIACENTRE PTE LTD 253 Alexandra Road 04 01 Singapore 159936 TEL 65 6472 7555 PIONEER ELECTRONICS AUSTRALIA PTY LTD 178 184 Boundary Road Braeside Victoria 3195 Australia TEL 03 9586 6300 PIONEER ELECTRONICS DE MEXICO S A DE C V B...

Отзывы: