background image

23

<ARB7192>

OPERA

TION

STANDBY/ON

STANDBY

PHONES

AUDIO/VIDEO MULTI-CHANNEL RECEIVER

VSX-D498

STATION

TUNING 
SELECT

SIGNAL

SELECT

MIDNIGHT

DOWN

UP

BASS

TREBLE

VCR

DVD/LD

TV/SAT

VIDEO

CD

FM/AM

MD/TAPE 1

B

LOUDNESS

TAPE 2

MONITOR

DIRECT

VIDEO

VIDEO
INPUT

L

MASTER
VOLUME

CLASS

MEMORY

MPX

MODE

+

+

+

+

FREQUENCY

DSP

MODE

AUDIO

R

A

SPEAKERS

DVD 5.1CH

1

%

^

(

)

*

2

3 4 5 6 7

8

9

0

- = ~ ! @ #

$

&

Names of Parts and Basic Operations

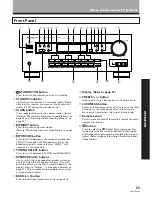
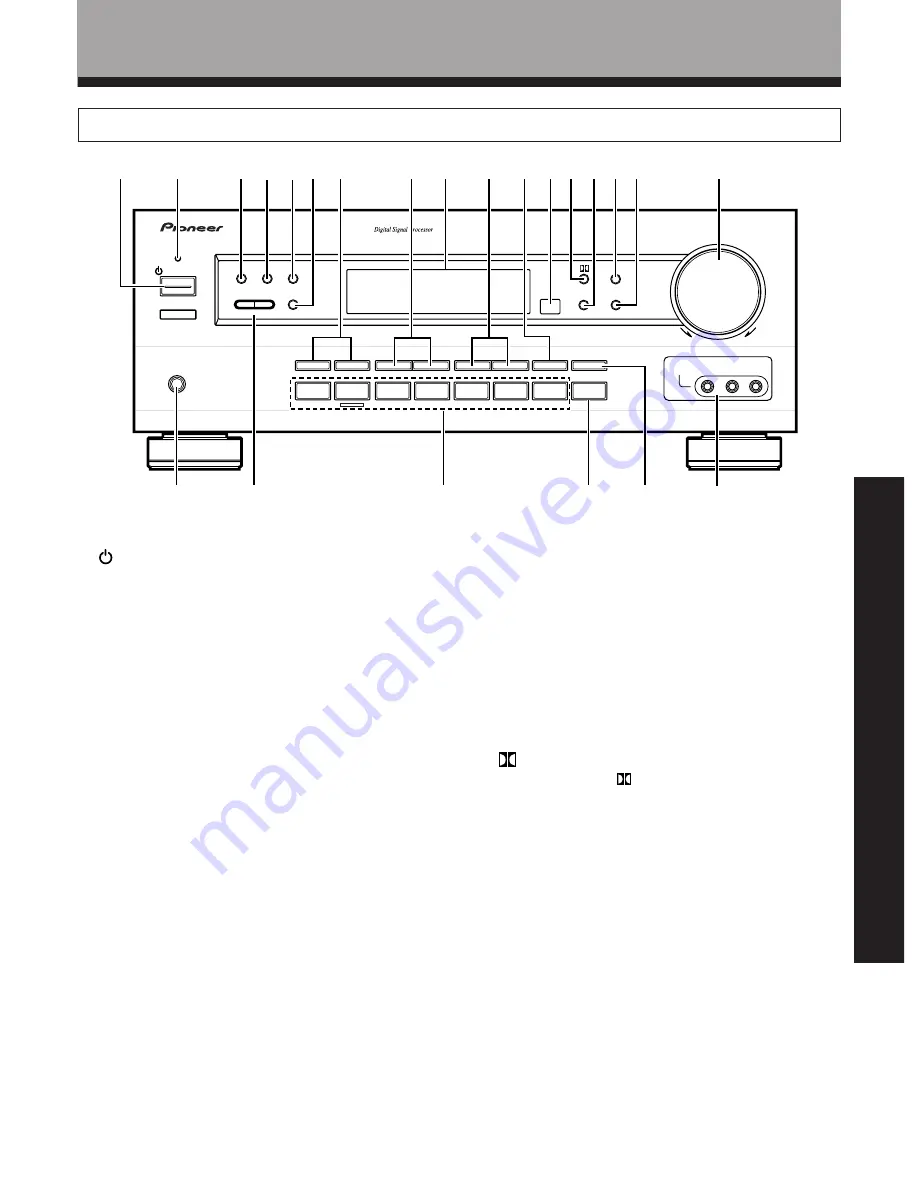
Front Panel

1

 STANDBY/ON button

Press to switch the receiver on or put in standby.

2

STANDBY indicator

Lights when the receiver is in standby mode. (Please
note that this receiver consumes a small amount of
power (2.5 W) during the standby mode.)

3

CLASS button

Press repeatedly to switch the preset station classes.
(Refer to “Memorizing Frequency Tuned Stations” on
page 34 and “Recalling the Memorizing Stations” on
page 35)

4

MEMORY button

Press to memorize a preset station.
(Refer to “Memorizing Frequency Tuned Stations” on page
34)

5

MPX MODE button

Press to switch between auto stereo and monaural
(“MONO”) reception of FM broadcasts. When the
broadcast signal is weak, selecting “MONO” will
improve the sound quality.

6

TUNING SELECT button

Press to switch between STATION and FREQUENCY.

7

SPEAKERS (A/B) buttons

Use to switch the corresponding speaker system on
or off. To listen to both speaker systems (A and B),
press the buttons so that both A and B appear in the
display (refer to “Display”, 

=

, Speaker indicators on

page 21). Only A speakers are available when using
surround sound modes.

8

BASS (+/–) button

Press to adjust low frequencies in the range of ±6.

9

Display (Refer to page 21)

0

TREBLE (+/–) button

Used to adjust high frequencies in the range of ±6.

-

LOUDNESS button

Switches the loudness on or off. Use to raise the level
of the bass and treble frequencies so they can be
more easily heard when listening at low volumes.

=

Remote sensor

Point the remote control toward the remote sensor to
operate the receiver.

~

 button

Press to select the 

 (Dolby) Surround mode. This

mode automatically switches between Dolby Digital
and Dolby Pro Logic decoding according to the input
signal. (Refer to page 28 for more information about
Dolby Digital.)

Содержание VSX-D498

Страница 1: ...AUDIO VIDEO MULTI CHANNEL RECEIVER VSX D498 Operating Instructions ...

Страница 2: ...cular installation If this equipment does cause harmful interference to radio or television reception which can be determined by turning the equipment off and on the user is encouraged to try to correct the interference by one or more of the following measures Reorient or relocate the receiving antenna Increase the separation between the equipment and receiver Connect the equipment into an outlet ...

Страница 3: ...cinityofoverheadpowerlines or other electric light or power circuits or where it can fall into such power lines or circuits When installing an outside antenna system extreme care should be taken to keep from touching such power lines or circuits as contact with them might be fatal OVERLOADING Do not overload wall outlets extensioncords orintegralconveniencereceptacles as this can result in a risk ...

Страница 4: ...rs or other factors require that the volume be kept low the surround effects may tend to become less than satisfactory When the midnight listening mode is on you can enjoy the effects of quality surround sound even at low volumes 5 1 Channel Input By connecting components equipped with 5 1 channel output to the DVD 5 1 channel input on this unit you can enjoy 5 1 channel surround sound Connections...

Страница 5: ...Operations 21 Display 21 Remote Control 22 Front Panel 23 Sound Modes 25 Switching ANALOG DIGITAL Signal Input 26 Playback 27 Playing Sources with Dolby Digital Sound 28 Selecting a Sound Mode 29 DVD 5 1ch input playback 30 Listening in MIDNIGHT Listening Mode 30 Ajusting Bass and Treble Frequencies Tone Control 31 Tuner Operations 32 Automatic and Manual Tuning 32 Direct Tuning 33 Memorizing Freq...

Страница 6: ...Control This manual is divided into two main sections SET UP This section explains how to make the necessary connections from the receiver to your other audio and video components Receiver operations described later in this section under the heading Preparations enable you to set up and customize your home entertainment center OPERATION This section provides complete information about operation of...

Страница 7: ...this unit the magnetic field produced by the transformers in this unit may cause a humming noise to come from the speakers Remote Control Receiver To CONTROL IN terminal of another PIONEER component bearing the Î mark PIONEER component bearing the Î mark Connecting an optional control cord allows you to operate other PIONEER components simply by pointing the receiver s remote control at the remote...

Страница 8: ...ully extend for best reception attach horizontally along a window frame etc AM loop antenna FM wire antenna See below H GND FM UNBAL 75Ω LOOP ANTENNA AM H GND FM UNBAL 75Ω LOOP ANTENNA AM VIDEO OUT FM UNBAL 75Ω OUT IN CONTROL LOOP ANTENNA AM ANTENNA OPT 1 OPT 2 COAX PLAY REC MD TAPE 1 IN IN OUT PLAY REC IN IN IN IN IN IN OUT IN OUT OUT CD TAPE 2 MONITOR TO MONITOR TV R L TV SAT DVD LD DVD 5 1 CH I...

Страница 9: ...E D EMPLON REC PLAY L R L R REC PLAY L R L R L OUTPUT R Audio Components Connections Connections Be sure to switch power to standby and remove the power cord from the wall outlet when you make or change connections Connect your audio components as shown below Refer to Digital Connections on page 11 when making digital connections from your DVD or LD player 7 Audio cords Use audio cords not supplie...

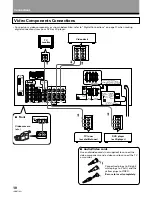
Страница 10: ...R B A FRONT SPEAKERS L R SPEAKER IMPEDANCE 6Ω OR 8Ω 16Ω SPEAKER ATTENTION IMPEDANCE DE HAUT PARLEURS 6Ω OU 8Ω 16Ω HAUT PARLEUR ATTENTION SE REPOTER AU MODE D EMPLON V OUTPUT L R V OUTPUT L R V INPUT OUTPUT V L R L R INPUT VIDEO L R Connections Video Components Connections 7 Audio Video cords Use audio video cords not supplied to connect the video components and a video cord to connect the TV or mo...

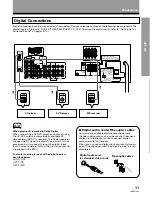
Страница 11: ...o the digital inputs on this unit DVD LD TV SAT MD TAPE1 CD VCR To assign the digital inputs refer to Setting Up for Surround Sound on page 15 19 When playing LD recorded in Dolby Digital When connecting a DVD LD player or LD player using the AC 3 RF output a commercially available RF demodulator RFD 1 is required The RF demodulator changes the RF signal to a digital signal which is then processed...

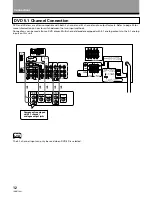
Страница 12: ...ITAL IN L R B A FRONT SPEAKERS L R SPEAKER IMPEDANCE 6Ω OR 8Ω 16Ω SPEAKER ATTENTION IMPEDANCE DE HAUT PARLEURS 6Ω OU 8Ω 16Ω HAUT PARLEUR ATTENTION SE REPOTER AU MODE D EMPLON L R SURROUND OUTPUT L R FRONT OUTPUT CENTER VIDEO OUT SUB WOOFER Connections DVD 5 1 Channel Connection DVD and LD discs are often compatible with both 2 channel and 5 1 channel audio output formats Refer to page 30 for more ...

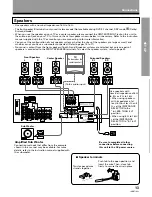
Страница 13: ...o the instruction manual supplied with the TV or monitor you are connecting to for more information You can set the configuration of your speaker system whether the sizes of the speakers are large or small and whether or not you have a sub woofer connected Refer to pages 15 to 17 No sound is output from the front speakers if both A and B speaker systems are selected but only one pair of speakers i...

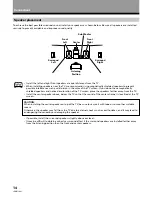
Страница 14: ...f the TV be sure to secure it with tape or some other suitable means Otherwise the speaker may fall from the TV due to external shocks such as earthquakes and it may lead to endangering those nearby or damaging the speaker If possible install the surround speakers slightly above ear level It may be difficult to obtain a cohesive surround effect if the surround speakers are installed farther away f...

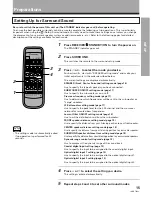
Страница 15: ...our surround speakers Dynamic range control setting mode page 19 Use to compress the dynamic range of the sound track Coaxial digital input setting page 19 Use to specify the input to be assigned to the coaxial digital input Optical digital input 1 setting page 19 Use to specify the input to be assigned to the optical digital input 1 Optical digital input 2 setting page 19 Use to specify the input...

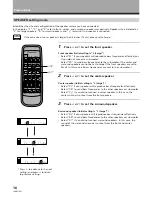
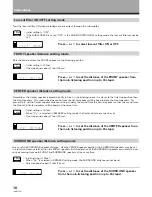
Страница 16: ...quencies effectively Select SS to send bass frequencies to the other speakers or sub woofer Select S if you did not connect surround speakers In this case the sound of the surround channels is output from the front and center speakers SPEAKER setting mode Establishes the size and configuration of the speaker system you have connected In the display F C and S refer to front center and surround spea...

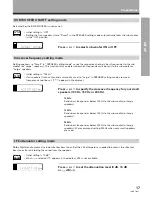
Страница 17: ...er frequency cannot be set appears in the display Press or fi to specify the crossover frequency for your small speakers 100 Hz 150 Hz or 200 Hz 100 Hz Sends bass frequencies below 100 Hz to the sub woofer or Large speakers 150 Hz Sends bass frequencies below 150 Hz to the sub woofer or Large speakers 200 Hz Sends bass frequencies below 200 Hz to the sub woofer or Large speakers We recommend settin...

Страница 18: ... about 1 foot 30 cm Press or fi to set the distance of the CENTER speaker from the main listening position up to 30 steps memo SURROUND speaker distance setting mode Use to set the SURROUND speaker distance Like the CENTER speaker position the SURROUND speakers may be set in a location closer or farther than the FRONT speakers Set the distance of the SURROUND speakers accurately to hear sounds comi...

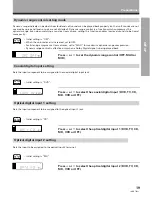
Страница 19: ... a Dolby Digital signal is being played back Press or fi to set the dynamic range control OFF MAX or MID memo dB SP SIGNAL SELECT ANALOG A Coaxial digital input setting Sets the input component to be assigned to the coaxial digital input jack Initial setting is DVD memo Press or fi to select the coaxial digital input DVD TV CD MD VCR or OFF dB SP SIGNAL SELECT ANALOG A Optical digital input 1 settin...

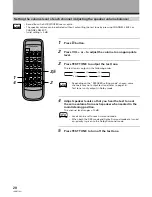
Страница 20: ...DSP mode and Dolby Surroud mode are turned on priority is given to the Dolby Surround mode 5 Press TEST TONE to turn off the test tone Sound from the SUB WOOFER seems quite The speaker volume can be adjusted without outputting the test tone by pressing CHANNEL LEVEL or CHANNEL SELECT Initial setting is 0 dB FL CT FR SR SL SW memo Setting the volume level of each channel Adjusting the speaker volum...

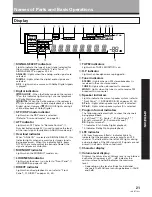
Страница 21: ...dB and 0dB 1 SIGNAL SELECT indicators Light to indicate the type of input signal selected for the current component refer to Front Panel SIGNAL SELECT on pages 23 24 ANALOG Lights when the analog audio signals are selected DIGITAL Lights when the digital audio signals are selected AC 3 Lights when a source with Dolby Digital signals is played 2 Digital indicators PRO LOGIC When the Dolby mode on t...

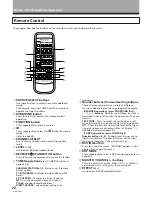
Страница 22: ...UNER MPX STANDBY ON CLASS DIRECT ACCESS TAPE TV FUNC BAND CD SOURCE SELECT TEST TONE EFFECT SURROUND DSP MODE TV VOL FREQ 0 7 8 9 4 5 6 1 2 3 MUTING MASTER VOLUME Î CD DISC CHANNEL STATION TV CONTROL LEVEL FUNCTION CHANNEL SELECT ATT 1 2 3 4 5 6 7 8 9 0 frepuency 9 Number buttons Surround setting buttons These buttons can perform a variety of different functions depending on the remote operation m...

Страница 23: ... to switch between auto stereo and monaural MONO reception of FM broadcasts When the broadcast signal is weak selecting MONO will improve the sound quality 6 TUNING SELECT button Press to switch between STATION and FREQUENCY 7 SPEAKERS A B buttons Use to switch the corresponding speaker system on or off To listen to both speaker systems A and B press the buttons so that both A and B appear in the ...

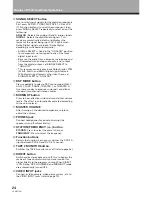
Страница 24: ...L SELECT to ANALOG DSP MODE button Press repeatedly to select a DSP sound mode HALL 1 HALL 2 JAZZ DANCE THEATER 1 or THEATER 2 Use these modes to produce surround sound from standard two channel stereo sources MIDNIGHT button Press to hear effective surround sound at low volume levels The effect is automatically adjusted according to the volume level MASTER VOLUME After turning on the desired comp...

Страница 25: ...nvironment of a large concert hall of wooden construction Complex delay of reflected sounds coupled with reverberation effects create a dynamic and beautiful sound characteristic of an orchestra performing in a concert hall making it suitable for classical music HALL 2 Simulates the acoustic environment of a large concert hall with stone walls The rich reverberations and natural fullness of the so...

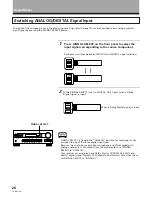
Страница 26: ...A SP SIGNAL SELECT DIGITAL SIGNAL SELECT DIGITAL A While SIGNAL SELECT is set to DIGITAL AC 3 lights when a Dolby Digital signal is input When a Dolgy Digital signal is input SP SIGNAL SELECT DIGITAL AC 3 SIGNAL SELECT DIGITAL AC 3 A SIGNAL SELECT is fixed in the ANALOG position for components not assigned to one of the three digital input jacks Because the audio from a karaoke microphone and LD r...

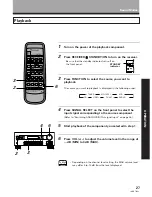
Страница 27: ...signal input on page 26 5 Start playback of the component you selected in step 1 6 Press VOL to adjust the volume level in the range of dB MIN to 0 dB MAX 2 3 6 3 2 6 STANDBY indicator Depending on the channel level setting the MAX volume level may differ 0 to 10 dB from the level displayed memo TUNER MD TAPE 1 VCR TV SAT DVD LD VIDEO CD 4 AV MULTI CHANNEL RECEIVER REMOTE CONTROL UNIT RECEIVER STA...

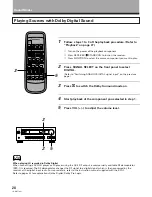
Страница 28: ... level 3 5 2 3 5 When playing LD recorded in Dolby Digital When connecting a DVD LD player or LD player using the AC 3 RF output a commercially available RF demodulator RFD 1 is required The RF demodulator changes the RF signal to a digital signal which is then processed by the receiver at the digital input jacks For more details refer to the instruction manual supplied with the RFD 1 Refer to pag...

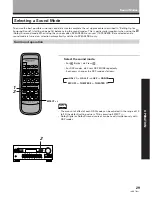
Страница 29: ...d mode is turned on selection automatically switches to SPEAKERS A only Surrround operation Sound Modes HALL 1 HALL 2 JAZZ DANCE SFC OFF THEATER 2 THEATER 1 memo The amount of effect of each DSP mode can be adjusted in the range of 10 to 90 the default setting value is 70 by pressing EFFECT Dolby Digital or Dolby Srround sources can be used simultaneously with DSP modes 1 2 EFFECT 2 AV MULTI CHANN...

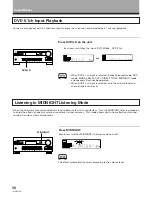
Страница 30: ... LS LEF MIDNIGHT memo The effect automatically adjusts according to the volume level MIDNIGHT DVD 5 1ch Input Playback Connect a component with 5 1 channel output to enjoy the surround sound created by 5 1 channel playback Press DVD LD on the unit Each press switches the input DVD LD j DVD 5 1ch dB SP SIGNAL SELECT ANALOG A dB SP SIGNAL SELECT ANALOG DIGITAL AC 3 A DIGITAL L C R RS LS LEF j memo W...

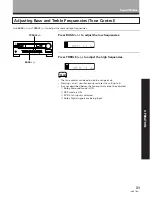
Страница 31: ...just the high frequencies dB SP SIGNAL SELECT ANALOG A dB SP SIGNAL SELECT ANALOG A TREBLE BASS memo The tone control can be adjusted in a range of 6 Pressing and simultaneously restores the setting to 0 In cases described below the tone control cannot be adjusted 1 Dolby Surround mode is ON 2 DSP mode is ON 3 DVD 5 1ch input is selected 4 Dolby Digital signals are being input Sound Modes ...

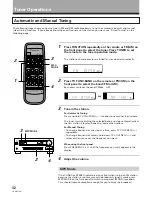
Страница 32: ...to locate other stations For Manual Tuning To change frequencies one step at a time press TV VOL FREQ repeatedly To change frequencies quickly hold down TV VOL FREQ and release when you reach the frequency you want When using the front panel Press FREQUENCY until the frequency you want appears in the display 4 Adjust the volume MPX Mode If the TUNED or STEREO indicators do not light when tuning an...

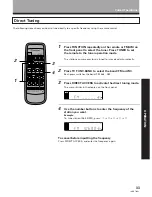
Страница 33: ...ESS to activate the direct tuning mode The cursor blinks in the display on the front panel 4 Use the number buttons to enter the frequency of the station you want Example To tune station 106 00 FM press 1 6 To cancel before inputting the frequency Press DIRECT ACCESS and enter the frequency again 2 1 3 4 dB SP SIGNAL SELECT ANALOG A dB SP SIGNAL SELECT ANALOG A AV MULTI CHANNEL RECEIVER REMOTE CON...

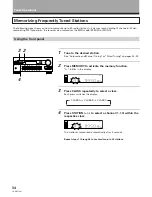
Страница 34: ...e desired station See Automatic and Manual Tuning or Direct Tuning on pages 32 33 2 Press MEMORY to activate the memory function A blinks in the display 3 Press CLASS repeatedly to select a class Each press switches the display 4 Press STATION to select a channel 1 10 within the respective class The station is memorized automatically after 5 seconds Repeat steps 1 through 4 to memorize up to 30 st...

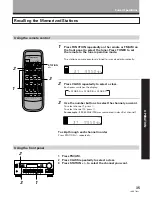
Страница 35: ...ple If 99 50 MHz FM was memorized in class B at channel 7 To skip through each channel in order Press STATION repeatedly Using the remote control Using the front panel 1 Press FM AM 2 Press CLASS repeatedly to select a class 3 Press STATION to select the channel you want CLASS A CLASS B CLASS C 2 1 3 dB SP SIGNAL SELECT ANALOG A dB SP SIGNAL SELECT ANALOG A 2 1 3 AV MULTI CHANNEL RECEIVER REMOTE C...

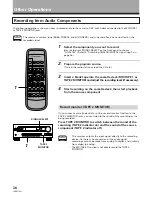
Страница 36: ...n listen to the sound of the recording as it is being recorded Press TAPE 2 MONITOR to switch between the sound of the recording TAPE 2 indicator on and the sound of the source component TAPE 2 indicator off 1 TAPE 2 MONITOR SIGNAL SELECT The receiver s volume tone BASS TREBLE and LOUDNESS and surround effects have no effect on the recorded signal memo This receiver outputs the input signal direct...

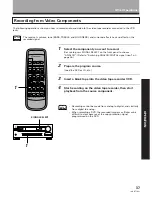
Страница 37: ...en start playback from the source component memo The receiver s volume tone BASS TREBLE and LOUDNESS and surround effects have no effect on the recorded signal memo Recording cannot be made from analog to digital and similarly from digital to analog When recording a DVD the recorded image may flicker or be difficult to view because of the copy protection signal programmed on the DVD SIGNAL SELECT ...

Страница 38: ...UNCTION CHANNEL SELECT ATT 0 9 3 6 2 4 8 1 5 7 1 2 3 4 5 6 DVD 1 Press to switch the DVD player on or off 2 7 Press to stop playback With certain models pressing this button when the unit is stopped may open the disc tray 3 8 Press to pause playback With certain models this button may freeze the frame 4 4 4 Press to return to the beginning of the current chapter track Press repeatedly to return to...

Страница 39: ...perations memo 1 Press to switch the LD player on or off 2 7 Press to stop playback With certain models pressing this button when the unit is stopped may open the disc tray 3 8 Press to pause playback With certain models this button may set still pictures 4 4 4 Press to return to the beginning of the current chapter track Press repeatedly to return to the beginning of previous chapters tracks Pres...

Страница 40: ...eration is possible regardless of the current remote operation mode 3 CHANNEL Use to select a TV channel 4 TV VOL Use to adjust the volume of the TV AV MULTI CHANNEL RECEIVER REMOTE CONTROL UNIT RECEIVER STANDBY ON LD DVD TUNER MPX STANDBY ON CLASS DIRECT ACCESS TAPE TV FUNC BAND CD SOURCE SELECT TEST TONE EFFECT SURROUND DSP MODE TV VOL FREQ MUTING MASTER VOLUME Î CD DISC CHANNEL STATION TV CONTR...

Страница 41: ...ward playback 6 3 Press to start playback 7 CD DISC For multi disc CD changers use to select the disc numbers not possible with all models CD player operations Before to performing these operations press the CD SOURCE SELECT button to switch the remote to the CD operation mode memo AV MULTI CHANNEL RECEIVER REMOTE CONTROL UNIT RECEIVER STANDBY ON LD DVD TUNER MPX STANDBY ON CLASS DIRECT ACCESS TAP...

Страница 42: ...e Hold down during playback for fast reverse playback not possible with all models 9 button Press to fast forward the tape Hold down during playback for fast forward playback 0 button 8 Press to fast forward the tape Hold down during playback for fast forward playback CD DISC 3 Press to start playback CD DISC 7 Press to stop playback or recording Cassette deck operations Before to performing these...

Страница 43: ...required for the multi channel system with this method AC 3 is used to compress the data In reproducing audio signals the smaller the bit number used the lower the sound quality With AC 3 drop in auditory sound quality is prevented by using masking technology and digital filtering technology based on the human auditory characteristics Laser disc format Laser discs are now available on the market i...

Страница 44: ...ause by other equipment fluorescent lamp motor etc Symptom The power does not turn ON The unit does not respond when the buttons are pressed No sound is output when a function is selected No image is output when a function is selected Considerable noise in radio broadcasts Remedy Connect the power plug to the wall outlet Disconnect the power plug from the outlet and insert again Disconnect the pow...

Страница 45: ... This is not a malfunction Remedy Connect an outdoor antenna refer to page 8 Refer to SPEAKER setting mode on page 16 to check the speaker settings Refer to Adjusting the speaker volume on page 20 to check the speaker levels Connect the speakers refer to page 13 Set SIGNAL SELECT to DIGITAL or ANAROG according to the type of connections made refer to page 26 Set the digital input setting correctly...

Страница 46: ... p 75 Ω Output Level Impedance VCR MONITOR 1 Vp p 75 Ω Frequency Response VCR MONITOR 5 Hz to 7 MHz dB Signal to Noise Ratio 55 dB Cross Talk 55 dB FM Tuner Section Frequency Range 87 5 MHz to 108 MHz Usable Sensitivity Mono 13 2 dBf IHF 1 3 µV 75 Ω 50 dB Quieting Sensitivity Mono 20 2 dBf Stereo 38 6 dBf Signal to Noise Ratio Mono 73 dB at 85 dBf Stereo 70 dB at 85 dBf Specifications Specificatio...

Страница 47: ...ited Warranty sheet included with your product PIONEER ELECTRONICS SERVICE INC CUSTOMER SERVICE DEPARTMENT P O BOX 1760 LONG BEACH CA 90801 1760 U S A Should this product require service in the U S A and you wish to locate the nearest Pioneer Authorized Independent Service Company or if you wish to purchase replacement parts operating instructions service manuals or accessories please call the num...

Страница 48: ...20 Rock band concert in front of speakers thunderclap 140 Gunshot blast jet plane 180 Rocket launching pad Information courtesy of the Deafness Research Foundation We Want You LISTENING For A Lifetime For Assistance With Basic Set up Operation or Trouble Shooting You May Contact Our Customer Service Hotline at 1 800 421 1404 USA ONLY Power cord CAUTION Handle the power cord by the plug Do not pull...

Отзывы: