background image

8

 Initial Setup

Before you start

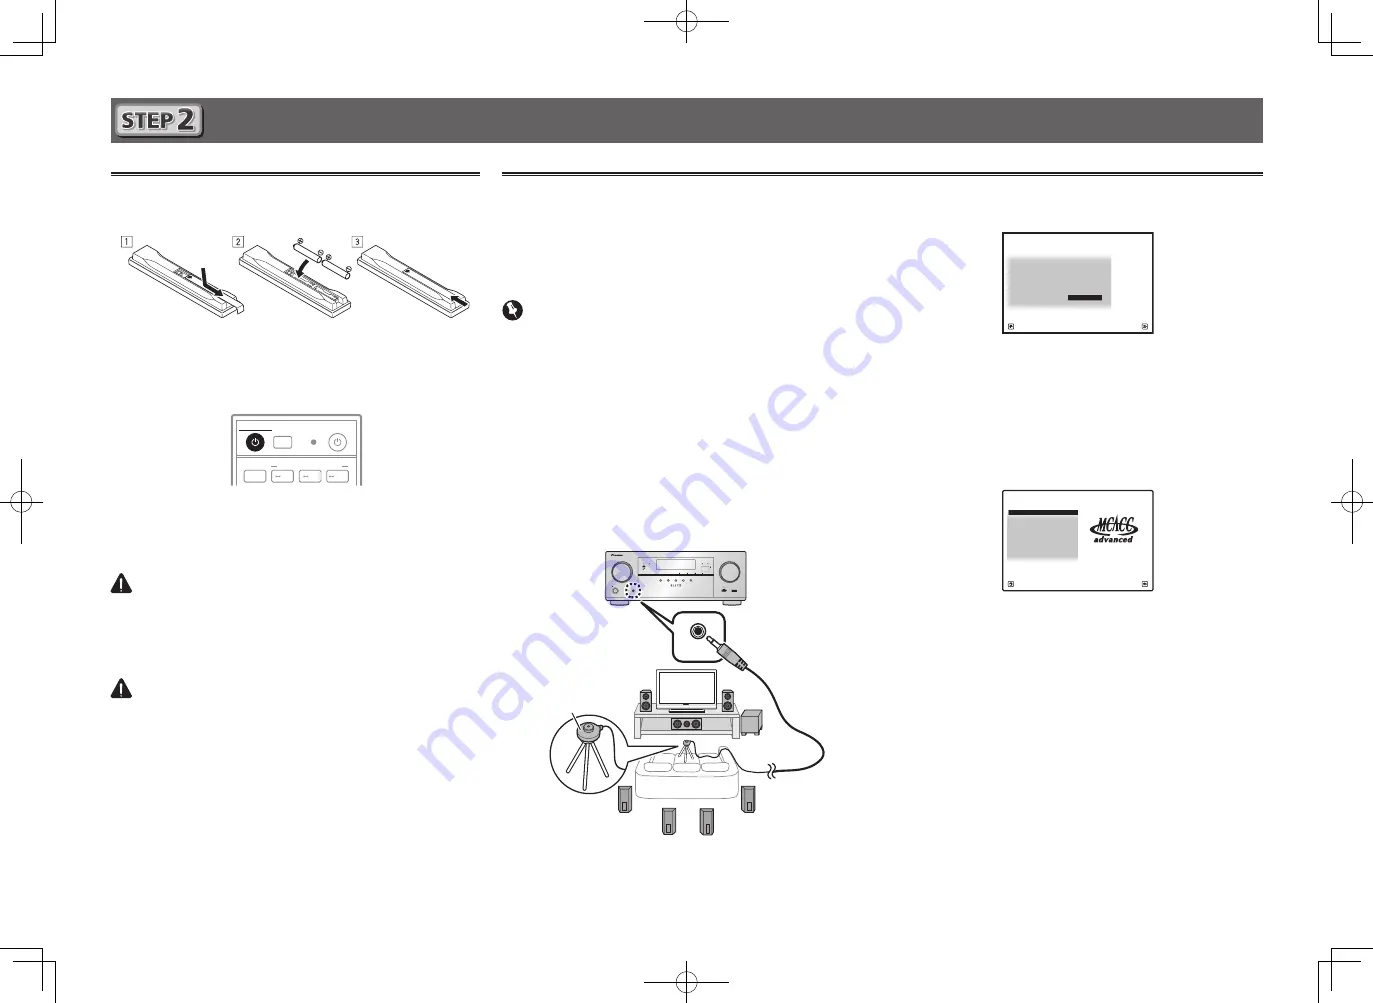
Put the batteries in the remote control.

The batteries included with the unit are to check initial 
operations; they may not last over a long period. We 
recommend using alkaline batteries that have a longer life.

Switch on the receiver and your TV.

ALL ZONE STBY

SOURCE

STANDBY/ON

MAIN

SUB ZONE CONTROL

Z2

Z3

HDZ

RECEIVER

Switch the TV input so that it connects to the 
receiver.

Turn the subwoofer on and turn up the volume.

 WARNING


• Do not use or store batteries in direct sunlight or other 

excessively hot place, such as inside a car or near a heater. 
This can cause batteries to leak, overheat, explode or catch 
fire. It can also reduce the life or performance of batteries.

 CAUTION


• When inserting the batteries, make sure not to damage 

the springs on the battery’s (–) terminals. This can cause 
batteries to leak or overheat.


• When disposing of used batteries, please comply with 

governmental regulations or environmental public 
institution’s rules that apply in your country/area.

Automatically setting up for surround sound (MCACC)

The Auto Multi-Channel ACoustic Calibration (MCACC) setup 
uses the supplied setup microphone to measure and analyze 
the test tone that is outputted by the speakers. This setup 
enables automatic high precision measuring and settings; 
utilizing it will create an optimum user listening environment.

 Important


• Measure in a quiet environment.


• If you have a tripod, use it to place the microphone so 

that it’s about ear level at your normal listening position. 
Otherwise, place the microphone at ear level using a table 
or a chair.


• Accurate measurements may not be possible if there are 

obstacles between the speakers and the listening position 
(microphone).


• When measuring, step away from the listening position, 

and operate using the remote control from the external 
side of all the speakers.

Connect the supplied setup microphone.

MASTER

VOLUME

STANDBY/ON

INPUT

SELECTOR

iPod  iPhone

DIRECT  CONTROL

STATUS

ADVANCED

SURROUND

STANDARD

SURROUND

AUTO SURR/ALC/

STREAM DIRECT

PHONES

SPEAKERS

CONTROL – MULTI-ZONE – ON / OFF

BAND

TUNER EDIT

TUNE

PRESET

ENTER

iPod  iPhone

HDMI

ADVANCED

MCACC

FL OFF

MCACC

SETUP MIC

5V 

1 A

HDMI 5 INPUT

MCACC

SETUP MIC

The 

Full Auto MCACC

 screen appears on your TV.

Speaker System 

: Normal(SB/FH)

1a.Full Auto MCACC

A/V RECEIVER

Exit

Return


START

EQ Type 

---

MCACC 

: M1.MEMORY 1

Measurement Type  : 

Basic

Press MAIN RECEIVER on the remote control, 
then press the ENTER button.


• Automatic measuring will start.


• Measuring will take about 3 to 12 minutes.

Follow the instructions on-screen.


• Automatic setting is complete when the Home Menu 

screen appears.

1. Advanced MCACC

2. MCACC Data Check
3. Data Management
4. System Setup
5. Network Information
6. Operation Mode Setup

Exit

Return

HOME MENU

A/V RECEIVER


• If 

Reverse Phase

 is displayed, the speaker’s wiring (+ and –) 

may be inverted. Check the speaker connections. 
Even if the connections are correct, 

Reverse Phase

 may be 

displayed, depending on the speakers and the surrounding 
environment. This does not affect measurements, however, 
so select 

Go Next

.


• If 

ERR

 is displayed, check that speaker is properly connected. 

E.g.) Check whether the surround speaker has been 
mistakenly connected to the surround back terminal.


• If the power cuts out, the core of the speaker cable may be 

in contact with the rear panel, or the (+) and (–) cores may 
be touching, causing the protection circuits to activate. 
Re-twist the core of the speaker cable, and connect it so 
that it does not protrude from the speaker terminal. Also 
check the speaker side connections.

Make sure the setup microphone is 
disconnected.

Tripod

Microphone

Содержание VSX-80 Elite

Страница 1: ...tériel seront conservés pour référence en cas de sinistre tel que la perte ou le vol Recevez des conseils des informations d entretien et de mise à jour sur votre nouveau matériel Contribuez au développement de nos produits Votre participation nous aide à concevoir des produits qui répondent à vos besoins Recevez gratuitement le bulletin d informations de Pioneer Les clients enregistrés peuvent s ...

Страница 2: ...avigator allows you to learn basic operations effectively It is unnecessary to read this guide for explanations will be explained in the Wiring Navi Move on to Using Built in AVNavigator in this guide You can use the Interactive Operation Guide in The contents are linked interactively with the product allowing you to remember them while reading and actually use the product while becoming used to i...

Страница 3: ...hands are wet as this could cause a short circuit or electric shock Do not place the unit a piece of furniture or other object on the power cord or pinch the cord in any other way Never make a knot in the cord or tie it with other cables The power cords should be routed so that they are not likely to be stepped on A damaged power cord can cause a fire or give you an electric shock Check the power ...

Страница 4: ...loads Depending on the computer network setting or security setting AVNavigator may not operate Using Windows PC Launch Internet Explorer and enter the IP address of this unit in the address field of Internet Explorer Access the IP address http the receiver s IP address from a web browser You can display the IP address of the unit on the unit s front panel display by pressing the STATUS button on ...

Страница 5: ...n Using Android device Download a free application iControlAV5 from the Google Play Store After launching iControlAV5 follow the instructions on the screen After that on the Home screen press the icon Using Built in AVNavigator continued About using Wiring Navi Wiring Navi starts when Wiring Navi is pressed on the AVNavigator screen When connection navigation is finished proceed to ...

Страница 6: ... exposed wire strands together 2 Loosen terminal and insert exposed wire 3 Tighten terminal 1 2 3 10 mm 3 8 in CAUTION Before making or changing connections switch off the power and disconnect the power cord from the AC outlet These speaker terminals carry HAZARDOUS LIVE voltage To prevent the risk of electric shock when connecting or disconnecting the speaker cables disconnect the power cord befo...

Страница 7: ... other device connections Plugging in the receiver Only plug in after you have connected all your components to this receiver including the speakers CAUTION Handle the power cord by the plug part Do not pull out the plug by tugging the cord and never touch the power cord when your hands are wet as this could cause a short circuit or electric shock Do not place the unit a piece of furniture or othe...

Страница 8: ...microphone When measuring step away from the listening position and operate using the remote control from the external side of all the speakers 1 Connect the supplied setup microphone MASTER VOLUME STANDBY ON INPUT SELECTOR iPod iPhone DIRECT CONTROL STATUS ADVANCED SURROUND STANDARD SURROUND AUTO SURR ALC STREAM DIRECT PHONES SPEAKERS CONTROL MULTI ZONE ON OFF BAND TUNER EDIT TUNE PRESET ENTER iP...

Страница 9: ...hen the low frequency playback capability of the front speaker is high we recommend the setting not be changed Method 2 Change the subwoofer setting to PLUS The low frequency component is output from the front speaker and subwoofer For that reason low sounds are sometimes output too much In such a case we recommend not to change or to change to Method 1 For details see Speaker Setting of the opera...

Страница 10: ...o play music from the iPod 3 Use to select a category then press ENTER to browse that category To return to the previous level any time press RETURN 4 Use to browse the selected category e g albums Use to move to previous next levels 5 Continue browsing until you arrive at what you want to play then press to start playback Listening to Internet radio stations About one minute is required between t...

Страница 11: ......

Страница 12: ...gator vous permet en outre d apprendre effi cacement les opérations de base Il est inutile de lire ce guide pour obtenir des explications seront expliqués dans le Wiring Navi Poursuivez à la rubrique Utilisation de l AVNavigator intégré dans ce guide Vous pouvez utiliser le Interactive Operation Guide dans Les contenus sont liés de manière interactive avec le produit ce qui vous permet de les mémo...

Страница 13: ... mains mouillées car cela pourrait causer un court circuit ou une électrocution Ne placez pas l appareil un meuble ou tout autre objet sur le cordon d alimentation et ne coincez pas le cordon Ne faites jamais de nœud sur le cordon et ne le nouez pas avec d autres câbles Les cordons d alimentation doivent être placés de telle sorte que l on ne risque pas de marcher dessus Un cordon d alimentation e...

Страница 14: ...risque de ne pas fonctionner avec certains paramétrages du réseau informatique ou de la sécurité Utilisation d un PC sous Windows Lancez Internet Explorer et saisissez l adresse IP de cet appareil dans le champ d adresse d Internet Explorer Accédez à l adresse IP http l adresse IP du récepteur depuis un navigateur web Vous pouvez afficher l adresse IP de l appareil sur l afficheur de ce dernier en...

Страница 15: ...l Android Téléchargez une application gratuite iControlAV5 depuis le Google Play Store Après avoir lancé iControlAV5 suivez les instructions à l écran Effleurez ensuite l icône sur l écran d accueil Utilisation de l AVNavigator intégré suite À propos de l utilisation de Wiring Navi Wiring Navi démarre lorsque vous appuyez sur Wiring Navi sur l écran d AVNavigator Lorsque la navigation de connexion...

Страница 16: ...ntes 1 Torsadez les fils ensemble 2 Dévissez la borne et insérez la partie dénudée des fils 3 Serrez la borne 1 2 3 10 mm ATTENTION Avant de réaliser ou de modifier des liaisons éteignez les appareils et débranchez le cordon d alimentation de la prise électrique Ces bornes d enceintes sont soumises à une tension DANGEREUSE Pour éviter tout risque de décharge électrique lors du branchement ou débra...

Страница 17: ...aisons Branchement du récepteur N effectuez le branchement qu après avoir raccordé tous les composants au récepteur y compris les enceintes ATTENTION Saisissez le cordon d alimentation par la prise Ne débranchez jamais la fiche en tirant sur le cordon et ne touchez jamais le cordon d alimentation lorsque vous avez les mains mouillées car cela pourrait causer un court circuit ou une électrocution N...

Страница 18: ...il y a des obstacles entre les enceintes et la position d écoute microphone Pendant les mesures éloignez vous de la position d écoute et actionnez la télécommande loin de toutes les enceintes 1 Raccordez le microphone de configuration fourni MASTER VOLUME STANDBY ON INPUT SELECTOR iPod iPhone DIRECT CONTROL STATUS ADVANCED SURROUND STANDARD SURROUND AUTO SURR ALC STREAM DIRECT PHONES SPEAKERS CONT...

Страница 19: ...mmandons de ne pas modifier ce réglage Méthode 2 Modifiez le réglage du caisson de grave en PLUS La composante basses fréquences est émise par les enceintes avant et le caisson de grave De ce fait les sons graves sont parfois trop puissants Dans ce cas nous recommandons de ne pas modifier le réglage ou d appliquer la méthode 1 Reportez vous à la rubrique Réglage des enceintes du mode d emploi pour...

Страница 20: ...r sélectionner une catégorie puis appuyez sur ENTER pour naviguer dans cette catégorie Pour revenir à tout moment au niveau précédent appuyez sur RETURN 4 Utilisez pour naviguer dans la catégorie sélectionnée par exemple albums Utilisez pour passer au niveau précédent suivant 5 Poursuivez votre navigation jusqu à atteindre les éléments que vous souhaitez lire puis appuyez sur pour lancer la lectur...

Страница 21: ......

Страница 22: ......

Страница 23: ......

Страница 24: ... 0S PIONEER HOME ELECTRONICS CORPORATION 1 1 Shin ogura Saiwai ku Kawasaki shi Kanagawa 212 0031 Japan PIONEER ELECTRONICS USA INC P O BOX 1540 Long Beach California 90801 1540 U S A TEL 800 421 1404 PIONEER ELECTRONICS OF CANADA INC 340 Ferrier Street Unit 2 Markham Ontario L3R 2Z5 Canada TEL 1 877 283 5901 905 479 4411 PIONEER EUROPE NV Haven 1087 Keetberglaan 1 B 9120 Melsele Belgium TEL 03 570...

Отзывы: