background image

En

11

03

Connecting your equipment

Connecting your equipment

Connecting your equipment

This receiver provides you with many connection possibilities, but it doesn’t have to be difficult. This 
chapter explains the kinds of components you can connect to make up your home theater system.

 CAUTION

!

  Before making or changing the connections, switch off the power and disconnect the power cord 

from the power outlet. Plugging in should be the final step.

!

  When making connections, also keep the power cords of the devices being connected unplugged 

from the power outlets.

!

  Depending on the device being connected (amplifier, receiver, etc.), the methods of connection 

and terminal names may differ from the explanations in this manual. Also refer to the operating 
instructions of the respective devices.

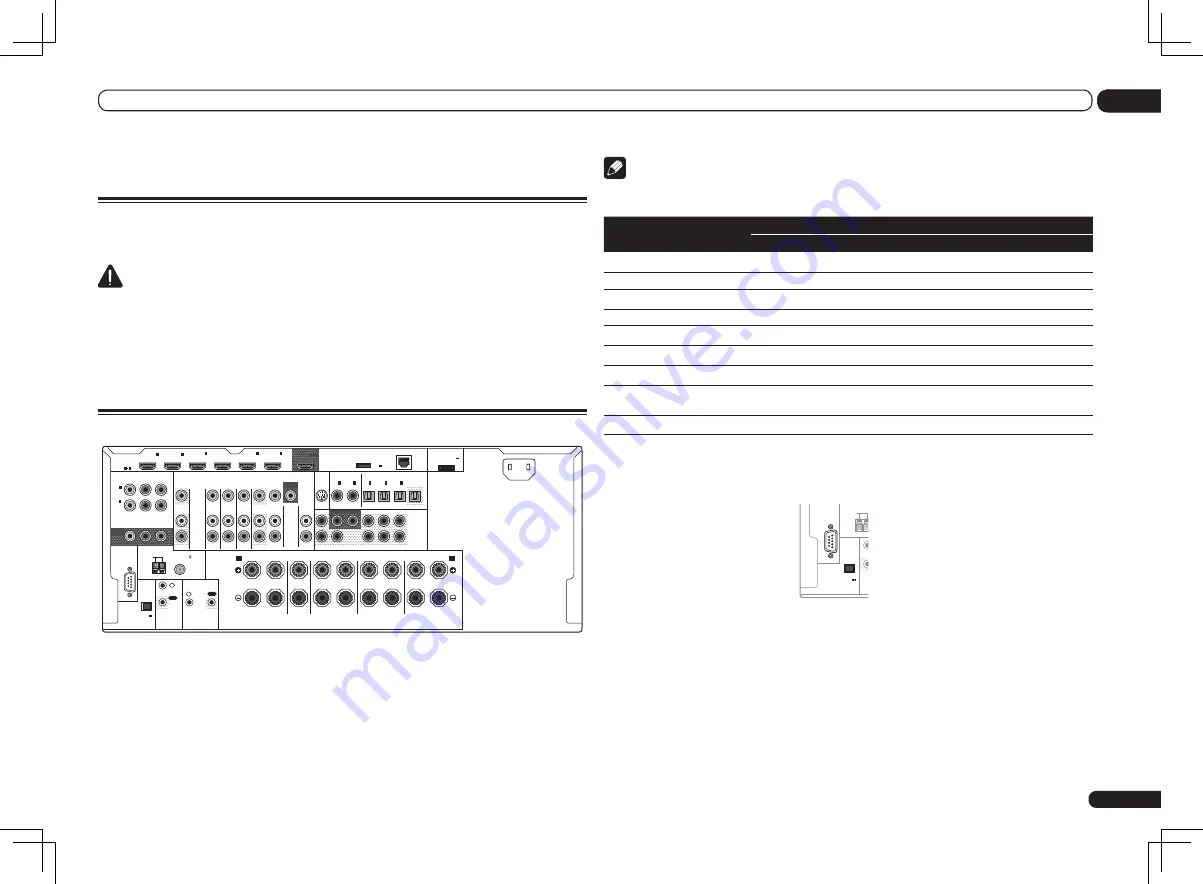
Rear panel

RS-232C

ZONE 2

L

R

IN

IN

IN

IN

DVR/BDR

OUT

OUT

TV/SAT VIDEO

IN

CD

DVD

IN

SIRIUS

OUT

PRE OUT

SUBWOOFER

1

2

COMPONENT  VIDEO

Y

P

B

P

R

ASSIGNABLE

MONITOR

OUT

(DVD)

IN

1

(DVR/

BDR)

IN

2

FRONT

CENTER

SURROUND SURR  BACK FH / FW

(

CD

)

(

DVD

)

COAXIAL

ASSIGNABLE

IN

1

IN

2

(

DVR/BDR

)

(

TV/SAT

)

OPTICAL

ASSIGNABLE

IN

1

IN

2

IN

3

OUT

(

VIDEO

)

(OUTPUT 5 V

   0.1 A MAX)

ADAPTER PORT

EXTENSION

DC OUTPUT

for WIRELESS LAN

(10/100)

LAN

(OUTPUT

5 V

0.6 A MAX)

FRONT

CENTER

SURROUND

SURROUND BACK

R

L

R

L

R

L

R

L

(Single)

(Single)

SPEAKERS

FRONT HEIGHT / FRONT WIDE /

B

A

AC IN

FM UNBAL 75

AM LOOP

ANTENNA

(OUTPUT 5 V

   150 mA MAX)

CONTROL

IR

OUT

IN

OUT

IN

VIDEO

AUDIO

MONITOR

OUT

HDMI

BD IN

(VIDEO)

IN

1

IN

2

IN

4

(DVD)

IN

5

(DVR/BDR)

IN

6

ASSIGNABLE

1 6

 Note

!

  The input functions below are assigned by default to the receiver’s different input terminals. Refer to 

The Input Setup menu

 on page 27 to change the assignments if other connections are used.

Input function

Input Terminals

HDMI

Digital

Component

BD

(

BD

)

DVD

IN 5

COAX-1

IN 1

TV/SAT

OPT-1

DVR/BDR

IN 6

OPT-2

IN 2

VIDEO

IN 4

OPT-3

HDMI 1

IN 1

HDMI 2

IN 2

HDMI 3

(front panel)

IN 3

CD

COAX-2

!

  The CU-RF100 omni-directional remote control (separately sold) can be connected to the 

RS-232C


and 

EXTENSION

 terminals. Using the CU-RF100 lets you display the receiver’s display information 

on the remote control display in your hands and operate it without worrying about obstacles or the 
direction in which the remote control is pointing.

RS-232C

EXTENSION

AM LOOP

ANTENN

(OUTPUT 5 V

   150 mA MAX)

CO

Содержание VSX-1121-K

Страница 1: ...laim such as loss or theft Improve product development Your input helps us continue to design products that meet your needs Receive a free Pioneer newsletter Registered customers can opt in to receive a monthly newsletter Receive free tips updates and service bulletins on your new product Register your product on http www pioneerelectronics com US http www pioneerelectronics ca Canada ...

Страница 2: ...left unused for a long period of time for example when on vacation D3 4 2 2 2a _A1_En WARNING Handling the cord on this product or cords associated with accessories sold with the product may expose you to chemicals listed on proposition 65 known to the State of California and other governmental entities to cause cancer and birth defect or other reproductive harm D36 P5_B1_En Caution To prevent fir...

Страница 3: ...hout annoying blaring or distortion and most importantly without affecting your sensitive hearing Sound can be deceiving Over time your hearing comfort level adapts to higher volumes of sound so what sounds normal can actually be loud and harmful to your hearing Guard against this by setting your equipment at a safe level BEFORE your hearing adapts ESTABLISH A SAFE LEVEL Set your volume control at...

Страница 4: ... 86 About FLAC 86 Auto Surround ALC and Stream Direct with different input signal formats 87 Glossary 88 Features index 90 Specifications 92 Preset code list 93 Thank you for buying this Pioneer product Please read through these operating instructions so you will know how to operate your model properly After you have finished read ing the instructions put them away in a safe place for future refer...

Страница 5: ...on page 14 Bi amping your speakers on page 15 j 4 Connecting the components About the audio connection on page 16 About the video converter on page 16 Connecting your TV and playback components on page 17 Connecting AM FM antennas on page 21 Plugging in the receiver on page 24 j 5 Switching the speaker impedance page 25 Only if the impedance of the connected speakers is 6 W to 8 W j 6 Power On j 7...

Страница 6: ...tteries together En 6 01 Before you start Before you start Our philosophy Pioneer is dedicated to making your home theater listening experience as close as pos sible to the vision of the moviemakers and mas tering engineer when they created the original soundtrack We do this by focusing on three important steps 1 Designing with carefully selected components so as to transmit the original soundtrac...

Страница 7: ... below before using this CD ROM Do not use if you are unwilling to consent to the terms of its use Also agree to the License Agreement displayed when installing AVNavigator Terms of Use Copyright to data provided on this CD ROM belongs to PIONEER CORPORATION Unauthorized transfer duplication broadcast public transmission translation sales lending or other such matters that go beyond the scope of p...

Страница 8: ...d or restores the sound if it has been muted adjusting the volume also restores the sound 16 LIGHT Press to turn on off the illumination for the buttons The way the buttons light can be selected from four modes page 56 En 8 02 Controls and displays Controls and displays Remote control This section explains how to operate the remote control for the receiver LIGHT RECEIVER D ACCESS CH LEVEL A ATT DI...

Страница 9: ... tone controls features is selected page 48 6 Listening mode indicators AUTO SURROUND Lights when the Auto Surround feature is switched on page 36 ALC Lights when the ALC Auto level control mode is selected page 36 STREAM DIRECT Lights when Direct Pure Direct is selected page 37 ADV SURROUND Lights when one of the Advanced Surround modes has been selected page 37 STANDARD Lights when one of the St...

Страница 10: ...witches between AM and FM radio bands page 32 TUNER EDIT Use with TUNE i j PRESET k l and ENTER to memorize and name stations for recall page 32 18 PHONES jack Use to connect headphones When the head phones are connected there is no sound output from the speakers 19 MCACC SETUP MIC jack Use to connect the supplied microphone page 25 20 iPod iPhone iPad USB terminals Use to connect your Apple iPod ...

Страница 11: ...GNABLE IN 1 IN 2 DVR BDR TV SAT OPTICAL ASSIGNABLE IN1 IN2 IN3 OUT VIDEO OUTPUT 5 V 0 1 A MAX ADAPTER PORT EXTENSION DC OUTPUT forWIRELESS LAN 10 100 LAN OUTPUT 5V 0 6 A MAX FRONT CENTER SURROUND SURROUNDBACK R L R L R L R L Single Single SPEAKERS FRONTHEIGHT FRONTWIDE B A AC IN FMUNBAL75 AMLOOP ANTENNA OUTPUT 5V 150 mA MAX CONTROL IR OUT IN OUT IN VIDEO AUDIO MONITOR OUT HDMI BD IN VIDEO IN 1 IN ...

Страница 12: ...ts you to build various surround systems in accordance with the number of speakers you have Be sure to connect speakers to the front left and right channels L and R It is also possible to only connect one of the surround back speakers SB or neither If you have two subwoofers the second subwoofer can be connected to the SUBWOOFER 2 terminal Connecting two subwoofers increases the bass sound to achi...

Страница 13: ... place the front speakers 2 m to 3 m 6 ft to 9 ft apart at equal distance from the TV If you re going to place speakers around your CRT TV use shielded speakers or place the speakers at a sufficient distance from your CRT TV If you re using a center speaker place the front speakers at a wider angle If not place them at a narrower angle Place the center speaker above or below the TV so that the sou...

Страница 14: ... be used for the front wide and Speaker B speakers Front height setting Front height right Front height left Front wide setting Front wide right Front wide left Speaker B setting Speaker B right Speaker B left Front right Center Subwoofer 2 Subwoofer 1 Front left The surround back terminals can also be used for ZONE 2 Surround left 5 2 ch surround setting Not connected Not connected 6 2 ch surroun...

Страница 15: ...n If your speakers have a removable crossover network make sure you do not remove it for bi amping Doing so may damage your speakers Bi wiring your speakers Your speakers can also be bi wired if they sup port bi amping With these connections the Speaker System setting makes no difference CAUTION Don t connect different speakers from the same terminal in this way When bi wiring as well heed the cau...

Страница 16: ...Resolution Audio DVD Audio CD SACD DSD signal Video CD Super VCD Synchronized operation with components using the Control with HDMI function see Control with HDMI function on page 45 Note An HDMI connection can only be made with DVI equipped components compatible with both DVI and High Bandwidth Digital Content Protection HDCP If you choose to connect to a DVI connector you will need a separate ad...

Страница 17: ...r DVI with HDCP equipped component Blu ray Disc player BD etc you can connect it to this receiver using a commercially available HDMI cable If the TV and playback components support the Control with HDMI feature the convenient Control with HDMI functions can be used see Control with HDMI function on page 45 RS 232C ZONE 2 L R IN IN IN IN DVR BDR OUT OUT TV SAT VIDEO IN CD DVD IN SIRIUS PRE OUT SUB...

Страница 18: ... receiver connect the receiver and TV with audio cables page 17 If you use an optical digital audio cable you ll need to tell the receiver which digital input you connected the player to see The Input Setup menu on page 27 En 18 03 Connecting your equipment Connecting your DVD player with no HDMI output This diagram shows connections of a TV with HDMI input and DVD player or other playback com pon...

Страница 19: ...e 52 If your HDD DVD recorder BD recorder etc is equipped with an HDMI output terminal we recommend connecting it to the receiver s HDMI DVR BDR IN terminal When doing so also connect the receiver and TV by HDMI see Connecting using HDMI on page 17 Connecting a satellite cable receiver or other set top box Satellite and cable receivers and terrestrial digital TV tuners are all examples of so calle...

Страница 20: ...e connected to the SUBWOOFER 2 terminal Connecting two subwoofers increases the bass sound to achieve more powerful sound reproduction In this case the same sound is output from the two subwoofers To hear sound only from the pre outs switch the speaker system to OFF or simply disconnect any speakers that are connected directly to the receiver En 20 03 Connecting your equipment Connecting other aud...

Страница 21: ...er MULTI ZONE connections Different sources can be playing in two zones at the same time or depending on your needs the same source can also be used The main and sub zone have independent power the main zone power can be off while sub zone is on and the sub zone can be controlled by the remote or front panel controls Making MULTI ZONE connections It is possible to make these connections if you hav...

Страница 22: ...MENU iPod iPod cable supplied En 22 03 Connecting your equipment 2 Connect a TV monitor to the VIDEO ZONE 2 OUT jack on this receiver L R OUT 2 PRE O UBWOOFER 2 TER SURROUND SURR BACK FH FW CD D AXIAL SIGNABLE 1 IN 2 DVR BDR TV SAT OPTICAL ASSIGNABLE IN1 IN2 IN3 OUT VIDEO DC OUTPUT forWIRELESS LAN 10 10 LAN OUTPUT 5V 0 6 A MAX UND SURROUNDBACK L R R L Single Single FRONTHE RS 232C ZONE 2 OUT ZONE ...

Страница 23: ...net L R 2 PRE OUT OOFER 2 SURROUND SURR BACK FH FW CD L BLE IN 2 DVR BDR TV SAT OPTICAL ASSIGNABLE IN1 IN2 IN3 OUT VIDEO OUTPUT 5 V 0 1 A MAX ADAPTER PORT DC OUTPUT forWIRELESS LAN 10 100 LAN OUTPUT 5V 0 6 A MAX SURROUNDBACK L R L R L Single Single FRONTHEIGHT FRONTWIDE B Internet Modem Wireless LAN converter AS WL300 Router Connecting an IR receiver If you keep your stereo components in a closed ...

Страница 24: ...ble to control this unit using the remote sensor Important Note that if you use this feature make sure that you also have at least one set of analog audio video or HDMI jacks connected to another component for grounding purposes 1 Decide which component you want to use the remote sensor of When you want to control any component in the chain this is the remote sensor at which you ll point the corre...

Страница 25: ...are not moved during the Full Auto MCACC Setup Using the Full Auto MCACC Setup will overwrite any existing settings for the MCACC preset you select Before using the Full Auto MCACC Setup the headphones should be disconnected CAUTION The test tones used in the Full Auto MCACC Setup are output at high volume THX THX is a trademark of THX Ltd which is registered in some jurisdictions All rights reser...

Страница 26: ...tem setting on page 66 and make sure to connect your speakers as necessary before continuing to step 4 EQ Type This determines how the frequency balance is adjusted MCACC The six MCACC presets are used for storing surround sound settings for different listening positions Simply choose an unused preset for now you can rename it later in Data Management on page 65 THX Speaker Select YES when using T...

Страница 27: ...ng INPUT SELECT DVD and other inputs can be still be selected directly with the input function buttons 7 When you re finished press RETURN You will return to the System Setup menu Input function default and possible settings The terminals on the receiver generally cor respond to the name of one of the input func tions If you have connected components to this receiver differently from or in additio...

Страница 28: ... round Back Creates a virtual surround back channel sound for playback 48 V HEIGHT Virtual Height Creates a virtual height channel sound for play back 48 V DEPTH Virtual Depth Plays with a sound field suited for 3D images 48 Other functions INPUT SELECT INPUT SELECTOR Switches the input 29 MASTER VOLUME MUTE Use to set the listening volume 29 LISTENING MODE Only Pioneer recommended modes can be se...

Страница 29: ...units have resolutions that may not be converted In this case use an analog video connection Playing an iPod This receiver has the iPod iPhone iPad USB terminal that will allow you to control playback of audio content from your iPod using the con trols of this receiver This receiver is compatible with the audio and video of the iPod nano audio only for the iPod nano 1G 2G iPod fifth generation aud...

Страница 30: ...ious photo content En 30 05 Basic playback 2 Use i j to select a category then press ENTER to browse that category To return to the previous level any time press RETURN 3 Use i j to browse the selected category e g albums Use k l to move to previous next levels 4 Continue browsing until you arrive at what you want to play then press d to start playback Note You can play all of the songs in a parti...

Страница 31: ... file formats Note that some file formats are not available for playback although they are listed as playable file formats Music files Category Extension Stream MP3 a mp3 MPEG 1 2 2 5 Audio Layer 3 Sampling frequency 8 kHz to 48 kHz Quantization bitrate 16 bit Channel 2 ch Bitrate 8 kbps to 320 kbps VBR CBR Supported Supported WAV wav LPCM Sampling frequency 32 kHz 44 1 kHz 48 kHz Quantization bit...

Страница 32: ...a Canada SIRIUS XM and all related marks and logos are trademarks of Sirius XM Radio Inc and its subsidiaries All rights reserved Service not available in Alaska and Hawaii En 32 05 Basic playback Listening to the radio The following steps show you how to tune in to FM and AM radio broadcasts using the auto matic search and manual step tuning func tions If you already know the frequency of the sta...

Страница 33: ...can select channels directly by pressing D ACCESS then the three digit channel number You can press DISP to change SIRIUS Radio information in the front panel display The currently selected channel is automatically chosen without pressing ENTER after 10 seconds Saving channel presets This receiver can memorize up to 63 channels stored in seven banks or classes A to G of 9 channels each 1 Select th...

Страница 34: ... be displayed correctly When the Bluetooth wireless technology device is not connected Go back to the passcode setting in step 5 In this case perform the connection operation from the Bluetooth wireless technology device 9 From the Bluetooth wireless technology device list select Bluetooth ADAPTER and enter the Passcode selected in step 5 The passcode may in some cases be referred to as PASSKEY or...

Страница 35: ...uttons can be used for basic playback of files stored on Bluetooth wireless technology devices Bluetooth wireless technology device should be compatible with AVRCP profile Depending on the Bluetooth wireless technology device you use operation may differ from what is shown in the remote control buttons TV DTV MPX PQLS PHASE CTRL STATUS AUDIO HDD DVD 1 3 2 2 2 THX HDMI OUT 4 While listening to a so...

Страница 36: ... adjust C WIDTH DIMENSION and PANORAMA See Setting the Audio options on page 48 to adjust them When listening to 2 channel sources in Neo 6 Cinema or Neo 6 Music mode you can also adjust the center image effect see Setting the Audio options on page 48 Listening to your system Enjoying various types of playback using the listening modes Using this receiver you can listen to any source in surround s...

Страница 37: ...MA Designed for movies with lots of dialog SCI FI Designed for science fiction with lots of special effects MONO FILM Creates surround sound from mono soundtracks ENT SHOW Suitable for musical sources EXPANDED Creates an extra wide stereo field TV SURROUND Provides surround sound for both mono and stereo TV sources ADVANCED GAME Suitable for video games SPORTS Suitable for sports programs CLASSICA...

Страница 38: ...ects an optical or coaxial digital signal HDMI Selects an HDMI signal When the HDMI audio output parameter is set to THROUGH the sound will be heard through your TV not from this receiver When set to DIGITAL HDMI or AUTO only selected DIGITAL or HDMI the indicators light according to the signal being decoded see Display on page 9 Better sound using Phase Control This receiver s Phase Control featu...

Страница 39: ...s controlled by this DMC to play files are called DMRs Digital Media Renderers This receiver supports this DMR function When in the DMR mode such operations as playing and stopping files can be performed from the external controller Volume adjustment and the muting control are also possible The DMR mode is canceled if the remote control unit is operated while in the DMR mode aside from certain but...

Страница 40: ...tation selected from the list of Internet radio stations Registering broadcast stations not on the vTuner list from the special Pioneer site With the receiver broadcast stations not included on the list of station distributed by vTuner can be registered and played Check the access code required for registration on the receiver use this access code to access the If not please authorize this receive...

Страница 41: ...sic you ll love mixed in with music you already know For details check the website http www pandora com You must have a registered account in order to listen to songs using Pandora Internet Radio Select Pandora then follow the instructions on the screen to make the account settings Also see Checking about the Accounts on page 41 As of April 2011 the Pandora service is only offered in the United St...

Страница 42: ...VE REMEDY FAILS OF ITS ESSENTIAL PURPOSE IF ANY APPLICABLE AUTHORITY HOLDS ANY PORTION OF THIS SECTION TO BE UNENFORCEABLE THEN LIABILITY WILL BE LIMITED TO THE MAXIMUM EXTENT PERMITTED BY APPLICABLE LAW 4 Select Rhapsody Sirius or Pandora and press ENTER The contents below can be checked when Rhapsody is selected Set Account Account Info The contents below can be checked when Sirius is selected S...

Страница 43: ...ademarks of Microsoft Corporation in the United States and or other countries About playable file formats The Home Media Gallery feature of this receiver supports the following file formats Note that some file formats are not available for playback although they are listed as playable file formats Also the compatibility of file formats varies depending on the type of server Check with your server ...

Страница 44: ...ntization bitrate 8 bit 16 bit 24 bit Channel 2 ch Bitrate VBR CBR a MPEG Layer 3 audio decoding technology licensed from Fraunhofer IIS and Thomson multimedia b Only streaming data from servers is concerned so there is no extension En 44 07 Playback with HOME MEDIA GALLERY inputs ...

Страница 45: ...et the most out of this function we recommend that you connect your HDMI component not to a TV but rather directly to the HDMI terminal on this receiver HDMI Setup You must adjust the settings of this receiver as well as the connected Control with HDMI compatible components in order to make use of the Control with HDMI function For more information see the operating instructions for each component...

Страница 46: ...nction for PQLS compatible players PQLS OFF PQLS is disabled En 46 08 Control with HDMI function Normal The TV s sound is input from the Audio input terminals other than HDMI inputs via HDMI The TV s sound is input via the HDMI terminal This can only be selected when Control is set to ON 9 When you re finished press HOME MENU Before using synchronization Once you have finished all connections and ...

Страница 47: ...her amps or an AV converter such as an HDMI switch can cause operational errors When Control is set to ON HDMI Input in The Input Setup menu on page 27 is automatically set to OFF When the receiver s Control is turned ON even if the receiver s power is in the standby mode it is possible to output the audio and video signals from a player via HDMI to the TV without producing sound from the receiver...

Страница 48: ...ed for Dolby Digital DTS Dolby Digital Plus Dolby TrueHD DTS HD and DTS HD Master Audio you may need to use this feature when listening to surround sound at low volumes AUTO MAX MID OFF Using other functions Setting the Audio options There are a number of additional sound settings you can make using the AUDIO PARAMETER menu The defaults if not stated are listed in bold Important Note that if a set...

Страница 49: ...s you to hear a virtual front height chan nel through your front speakers OFF ON V DEPTH Virtual Depth l When this mode is selected the sound field expands virtually to behind the display resulting in a sound field with the same depth as the 3D picture to achieve a better sense of presence OFF MIN MID MAX a The adjustment can be made only when TONE is set to ON b With the iPod USB HOME MEDIA GALLE...

Страница 50: ...t protection signals In this case change the setting When AUTO is selected the resolution is selected automatically according to the capacity of the TV monitor connected by HDMI When PURE is selected the signals are output with the same resolution as when input see About the video converter on page 16 If this is set to something other than AUTO PURE and 480i 576i analog signals are input 480p 576p...

Страница 51: ...nnels maximum 5 channels and a maximum of 7 channels are output SP FW ON Front wide channels are added to the front center and surround channels maximum 5 channels and a maximum of 7 channels are output SP OFF No sound is output from the speakers When you select Speaker B you can select from SP A ON Sound is output from the A speaker terminals up to 7 channels including surround back channels depe...

Страница 52: ...et to ZONE 2 use the MASTER VOLUME dial to adjust the volume for the sub zone 5 When you re finished press MULTI ZONE CONTROL again to return to the main zone controls You can also press MULTI ZONE ON OFF on the front panel to switch off all output to the sub zone s You won t be able to switch the main zone off completely unless you ve switched off the MULTI ZONE control first If you don t plan to...

Страница 53: ...2 SW YES Surround Position IN REAR Crossover 80 Hz X Curve OFF DIMMER Brightest Inputs See Input function default and possible settings on page 27 HDMI HDMI Audio Amp Control ON Control Mode PQLS Display Power Off NO Audio playback Power On Level LAST Volume Limit OFF Mute Level FULL Phase Control ON Auto Sound Retriever iPod USB HOME MEDIA GALLERY ADAPTER PORT input function ON Other input functi...

Страница 54: ...e is set by pressing the number button while pressing RCU SETUP The different items on the Remote Setup menu are described below For their setting procedures refer to the explanations for the respective items Setting What it does Preset recall Preset codes can be set for the various input functions The remote control codes of a number of other devices including products of other brands are preset ...

Страница 55: ...component you want to control The LED blinks once and flashes continuously 3 Point the two remote controls towards each other then press the button that will be doing the learning on this receiver s remote control The LED flashes once then stops flashing remaining lit The remote controls should be 3 cm 1 inch apart 3 cm 1 inch This receiver s remote control Other remote control 4 Press the corresp...

Страница 56: ...u want to start the sequence by switching on your DVD player press DVD With Multi operation the HDMI and TV CTRL settings cannot be made For other settable input functions see Setting the remote to control other components on page 54 For System off press the u SOURCE button The LED blinks twice and flashes continuously En 56 10 Controlling the rest of your system Direct function Default setting On...

Страница 57: ...rammed will run then all Pioneer components will switch off followed by this receiver switch of all the zones becomes off In order to avoid accidently switching off a DVD recorder that is currently recording no DVD recorder power off codes are sent Erasing the settings for the multi operation This erases all the settings programmed in the remote control for the multi operation 1 Press and hold RCU...

Страница 58: ...LAY INFO CH CH CH OUTPUT RESOLUTION a CH CH CH a Controls for BD En 58 10 Controlling the rest of your system Controlling components This remote control can control components after entering the proper codes see Setting the remote to control other components on page 54 for more on this Use the input function buttons to select the component The TV CONTROL buttons on the remote control are dedicated...

Страница 59: ... j k l e g m n ENTER ENTER SACD SETUP b RETURN d d d d d e e e e e g g g g g m m m m m n n n n n o o o o o p p p p p AUDIO AUDIO PURE AUDIO b DISP DISPLAY INFO TIME b a Controls for MD b Controls for SACD TV Projector Button s TV Projector u SOURCE POWER ON 1 MOVIE 2 STANDARD 3 DYNAMIC 4 USER1 5 USER2 6 USER3 7 COLOR 8 SHARP 9 GAMMA 0 COLOR CLR SHARP ENTER CLASS COLOR TEMP EXIT INFO i j k l i j k ...

Страница 60: ...lyzed for standing waves This is useful if you want to get a balanced flat calibration for several seating positions in your listening area Place the microphone at the reference point indicated on screen and note that the last microphone placement will be at your main listening position En 60 11 The Advanced MCACC menu The Advanced MCACC menu Making receiver settings from the Advanced MCACC menu T...

Страница 61: ... continue If the speaker is not pointed to the microphone listening position or when using speakers that affect the phase dipole speakers reflective speakers etc Reverse Phase may be displayed even if the speakers are properly connected If Reverse Phase is displayed the speaker s wiring and may be inverted Check the speaker connections If the connections were wrong turn off the power disconnect th...

Страница 62: ...ves from your speaker system resonate mutually with sound En 62 11 The Advanced MCACC menu Manual MCACC setup You can use the settings in the Manual MCACC setup menu to make detailed adjustments when you re more familiar with the system Before making these settings you should have already completed Automatically conducting optimum sound tuning Full Auto MCACC on page 25 You only need to make these...

Страница 63: ...oo drastically will affect the overall balance If the speaker balance seems uneven you can raise or lower channel levels using test tones with the TRIM feature Use k l to select TRIM then use i j to raise or lower the channel level for the current speaker Acoustic Calibration EQ Professional This setup minimizes the unwanted effects of room reverberation by allowing you to calibrate your system ba...

Страница 64: ...d MCACC menu EQ OFF You will see the reverb characteristics of your listening area without the equalization performed by this receiver before calibration EQ ON You will see the reverb characteristics of your listening area with the equalization performed by this receiver after calibration Note that the EQ response may not appear entirely flat due to adjustments necessary for your listening area Th...

Страница 65: ...ttings from one MCACC preset to another see Copying MCACC preset data on page 65 MCACC Memory Clear Clear any MCACC presets that you don t want see Clearing MCACC presets on page 65 Renaming MCACC presets If you have several different MCACC presets that you re using you may want to rename them for easier identification 1 Select Memory Rename from the Data Management setup menu 2 Select the MCACC p...

Страница 66: ...he surround speaker is positioned obliquely behind you 4 When Setting Change is displayed select Yes If No is selected the setting is not changed You will return to the Manual SP Setup menu Speaker Setting Use this setting to specify your speaker configu ration size number of speakers and crossover frequency It is a good idea to make sure that the settings made in Automatically conduct ing optimum...

Страница 67: ...ed to the subwoofer If you did not connect a subwoofer choose NO the bass frequencies are output from other speakers If you have a subwoofer and like lots of bass it may seem logical to select LARGE for your front speakers and PLUS for the subwoofer This may not however yield the best bass results Depending on the speaker placement of your room you may actually experience a decrease in the amount ...

Страница 68: ... xDSL modem or a terminal adapter is directly connected to this receiver enter the subnet mask provided by your ISP on paper In most cases enter 255 255 255 0 Default Gateway In case a gateway router is connected to this receiver enter the corresponding IP address 2 Adjust the distance of each speaker using k l You can adjust the distance of each speaker in 1 2 inch Increments 3 When you re finish...

Страница 69: ...2 Select Edit Name then select Rename If after changing the name you want to restore the name to the default select Default 3 Input the name you want Use i j to select a character k l to set the position and ENTER to confirm your selection Parental Lock Set restrictions for using Internet services Also set the password accompanying the usage restrictions Upon shipment from the factory the password...

Страница 70: ... the access point to which you want to connect from this list Connection settings are made by inputting the 8 digit PIN code displayed on the receiver s screen to the access point to which you want to connect Search for Access Point Display a list of the SSIDs of connectable access points and select the access point to which you want to connect from this list Connection settings with the access po...

Страница 71: ... Select Remote Control Mode Setup from the Other Setup menu 2 Select the Remote Control Mode setting you want 3 Select OK to change the remote control mode 4 Follow the instructions on the screen to change the remote control s setting See Operating multiple receivers on page 54 5 When you re finished press RETURN You will return to the Other Setup menu Flicker Reduction Setup Default setting OFF T...

Страница 72: ...us messages Descriptions NO UPDATE FILE No update file was found on the USB memory device Store the file in the USB memory device s root directory FILE ERROR Try disconnecting then reconnecting the USB device or storing the update file again If the error still occurs try using a different USB memory device UPDATE ERROR 1 to UPDATE ERROR 7 Turn the receiver s power off then turn it back on and try ...

Страница 73: ...elect D SAFETY cOFFd and then use PRESET k l to select 1 or 2 select D SAFETY cOFFd to deactivate this feature If the power switches off even with 2 switched on turn down the volume With 1 or 2 on some features may be unavailable The unit does not respond when the buttons are pressed Try switching the receiver off then back on again Try disconnecting the power cord then connect again Symptom Remed...

Страница 74: ... you re recording isn t copy protected Subwoofer output is very low To route more signal to the subwoofer set it to PLUS or set the front speakers to SMALL see Speaker Setting on page 66 Symptom Remedy No sound from surround back speakers Check that the surround back speakers are set to LARGE or SMALL and the surround speakers are not set to NO see Speaker Setting on page 66 Check the speaker conn...

Страница 75: ...eck that no object that emits electromagnetic waves in the 2 4 GHz band microwave oven wireless LAN device or Bluetooth wireless technology appa ratus is near the unit If such an object is near the unit set the unit far from it Or stop using the object emitting the electromagnetic waves Check that the Bluetooth wireless technology device is not too far from the unit and that obstructions are not s...

Страница 76: ...cteristics graph after EQ calibra tion However these adjustments are taken into account by the filters dedi cated to overall system calibration Symptom Remedy Noisy intermittent or dis torted picture Sometimes a video deck may output a noisy video signal during scanning for example or the video quality may just be poor with some video game units for example The picture quality may also depend on t...

Страница 77: ...put signal on page 38 If a two channel soundtrack is currently playing including Dolby Surround encoded then this is not a malfunction Check the disc packaging for details about the audio tracks available During playback of DVD Audio the display shows PCM This will occur when playing DVD Audio material over the HDMI connection This is not a malfunction The power turns off auto matically and some i...

Страница 78: ...HDMI component directly to your monitor please consult the component or monitor manual or contact the manufacturer for support If video images do not appear on your TV try adjusting the resolution Deep Color or other setting for your component While analog video signals are being output over HDMI use a separate con nection for audio output To output signals in Deep Color use an HDMI cable High Spe...

Страница 79: ...because of the browser s security function This is not a problem Perform the operation to authorize the blocked contents Symptom Causes Remedy AVNavigator cannot be installed An error message may appear if there are not enough system resources available Re start the PC then start the installer AVNV_XXX_ xxx exe with no other applications active Installation of AVNavigator may fail because of incom...

Страница 80: ...cted and displayed but the audio files stored on the USB memory device cannot be played back Some formats of USB memory devices including FAT 12 NTFS and HFS cannot be played back on this receiver Check whether the format of your USB memory device is either FAT 16 or FAT 32 Note that the FAT 12 NTFS and HFS formats cannot be played back on this receiver page 30 The file format cannot be properly p...

Страница 81: ...ows 7 installed Instead of logging onto the domain log onto the local machine page 40 Symptoms Causes Remedies Cannot listen to Inter net radio stations The firewall settings for compo nents on the network are cur rently in operation Check the firewall settings for components on the network You are currently disconnected from the Internet Check the connection settings for components on the network...

Страница 82: ...nverter may not match In the receiver s IP settings set DHCP to ON After the setting is completed turn the receiver s power off Next turn the receiver s power back on and check whether the wireless LAN converter s settings can be displayed with the receiver En 82 13 Additional information If the settings can be displayed change the IP address settings of the receiver and wireless LAN converter as ...

Страница 83: ...of 0 5 inch using the Full Auto MCACC Setup function page 25 Step 1 Speaker layout and distance adjustment Use speaker stands or the like to make sure the speakers are steady and leave at least 10 cm 4 inches from the surrounding walls Position the speakers attentively so that the speakers on the left and right are at equal angles from the listening position center of the adjustments We recommend ...

Страница 84: ...p of the monitor place it facing slightly downwards towards the listening position En 84 13 Additional information Important information regarding the HDMI connection There are cases where you may not be able to route HDMI signals through this receiver this depends on the HDMI equipped component you are connecting check with the manufac turer for HDMI compatibility information If you aren t receiv...

Страница 85: ...alance for watching a movie soundtrack in a small home environment Timbre Matching The human ear changes our perception of a sound depending on the direction from which the sound is coming In a movie theatre there is an array of surround speakers so that the sur round information is all around you In a home theatre you use only two speakers located to the side of your head The Timbre Matching feat...

Страница 86: ...product may also engage the THX Surround EX mode during the playback of 5 1 channel material that is not Dolby Digital Surround EX encoded In such case the infor mation delivered to the Surround Back channel will be program dependent and may or may not be very pleasing depending on the particular soundtrack and the tastes of the individual listener Boundary Gain CompensationTM Depending on the lis...

Страница 87: ...k Stereo playback Analog sources As above ANALOG DIRECT stereo PCM sources As above PCM DIRECT DVD A sources As above As above SACD sources As above Stereo playback En 87 13 Additional information Multichannel signal formats Input signal format Auto Surround ALC PURE DIRECT DIRECT Surround Back speaker s Connected Dolby Digital EX 6 1 channel flagged Dolby TrueHD EX 6 1 channel flagged Dolby Digit...

Страница 88: ...ty due to compression when send ing Bluetooth signals En 88 13 Additional information Glossary Audio formats Decoding Dolby The Dolby technologies are explained below See http www dolby com for more detailed information Dolby Digital Dolby Digital is a multichannel digital audio coding system widely used in cinemas and in the home for DVD and digital broadcast soundtracks Dolby TrueHD Dolby TrueHD...

Страница 89: ... NEMS and BridgeCo or an authorized subsidiary En 89 13 Additional information aacPlus AAC decoder uses aacPlus developed by Coding Technologies www codingtechnologies com FLAC FLAC Free Lossless Audio Codec is an audio format allows lossless codec Audio is com pressed in FLAC without any loss in quality For more details about FLAC visit the following website http flac sourceforge net Windows Medi...

Страница 90: ...s on page 48 Height Gain Dolby Pro Logic llz Height option See Setting the Audio options on page 48 Virtual Height See Setting the Audio options on page 48 En 90 13 Additional information LAN devices and encryption to be made with simple operations There are a number of meth ods including push button configuration and PIN code configuration This AV receiver sup ports both push button configuration...

Страница 91: ...igital Video Converter See Setting the Video options on page 50 Pure Cinema See Setting the Video options on page 50 Progressive Motion See Setting the Video options on page 50 Advanced Video Adjust See Setting the Video options on page 50 Auto Power Down See The Other Setup menu on page 70 En 91 13 Additional information ...

Страница 92: ...ection Input Sensitivity Impedance LINE 350 mV 47 kW Output Level Impedance REC 335 mV 2 2 kW Signal to Noise Ratio IHF short circuited A network LINE 103 dB Frequency Response 5 Hz to 100 000 Hz dB Pure Direct Mode Tuner Section Frequency Range FM 87 5 MHz to 108 MHz Antenna Input FM 75 W unbalanced Frequency Range AM 531 kHz to 1602 kHz Antenna AM Loop antenna balanced Video Section Signal level...

Страница 93: ...Initial 0091 Insignia 0085 0086 Inteq 0099 Janeil 0012 JBL 0101 JC Penney 0000 0004 0005 0006 0010 JCB 0002 Jensen 0004 0006 JVC 0007 0010 0044 5064 Kawasho 0002 0004 0006 KEC 0104 Kenwood 0004 0006 0100 KLH 0106 Kloss Novabeam 0008 0012 KTV 0008 0100 0104 0110 LG 0005 0052 0078 0097 Logik 0001 Luxman 0004 0006 LXI 0000 0006 0101 0102 Magnavox 0004 0006 0019 0020 0037 0042 0100 0101 Majestic 0001 ...

Страница 94: ...DVR BDR HDR If operations are not possible using the preset codes below you may be able to conduct operations with the preset codes for the DVD BD Pioneer 2103 2150 2151 2152 2153 2154 2155 2156 2157 Panasonic 2100 2106 Sharp 2104 2112 Sony 2105 2108 2109 2110 2113 Toshiba 2111 VCR Pioneer 1035 ABS 1017 Adventura 1005 Aiwa 1005 Alienware 1017 American High 1004 Asha 1002 Audio Dynamics 1000 Audiov...

Страница 95: ...7 6036 SKY 6042 6059 6030 6031 SM Electronic 6011 Smart 6051 Sonicview 6055 6107 Sony 6062 6063 6030 6143 Star Choice 6032 Star Trak 6032 TechniSat 6033 Thomson 6110 6111 6014 Tivo 6113 6114 6115 6116 Toshiba 6038 6054 6039 6130 TPS 6041 Triasat 6033 Ultrasat 6021 US Digital 6020 USDTV 6020 ViewSat 6048 Voom 6032 Zehnder 6101 Zenith 6042 6069 6037 6125 6127 6129 Satellite Set Top Box SAT PVR Combi...

Страница 96: ...5049 Marantz 5033 Onkyo 5017 5018 5030 5050 Panasonic 5036 Philips 5022 5032 5044 RCA 5013 5029 Roadstar 5052 Sharp 5051 Sony 5012 5023 5026 5027 5028 5039 TEAC 5015 5016 5034 5035 5037 Technics 5041 Victor 5014 Yamaha 5024 5025 5038 5046 5047 CD R Pioneer 5067 Philips 5054 Yamaha 5055 Cassete Deck Pioneer 5058 5059 5070 Digital Tape Pioneer 5069 MD Pioneer 5068 ...

Страница 97: ...97 En 97 13 Additional information ...

Страница 98: ...98 En 98 13 Additional information ...

Страница 99: ...WARRANTIES OF MERCHANTABILITY AND FITNESS FOR A PARTICULAR PURPOSE TO A PERIOD NOT TO EXCEED THE WARRANTY PERIOD NO WARRANTIES SHALL APPLY AFTER THE WARRANTY PERIOD SOME STATES DO NOT ALLOW LIMITATIONS ON HOW LONG AN IMPLIED WARRANTY LASTS AND SOME STATES DO NOT ALLOW THE EXCLUSIONS OR LIMITATIONS OF INCIDENTAL OR CONSEQUENTIAL DAMAGES SO THE ABOVE LIMITATIONS OR EXCLUSIONS MAY NOT APPLY TO YOU TH...

Страница 100: ...Kawasaki shi Kanagawa 212 0031 Japan PIONEER ELECTRONICS USA INC P O BOX 1540 Long Beach California 90801 1540 U S A TEL 800 421 1404 PIONEER ELECTRONICS OF CANADA INC 340 Ferrier Street Unit 2 Markham Ontario L3R 2Z5 Canada TEL 1 877 283 5901 905 479 4411 PIONEER EUROPE NV Haven 1087 Keetberglaan 1 B 9120 Melsele Belgium TEL 03 570 05 11 PIONEER ELECTRONICS ASIACENTRE PTE LTD 253 Alexandra Road 0...

Отзывы: