67
VSX-1022-K
5
6
7
8
5
6
7
8
A
B
C
D
E
F
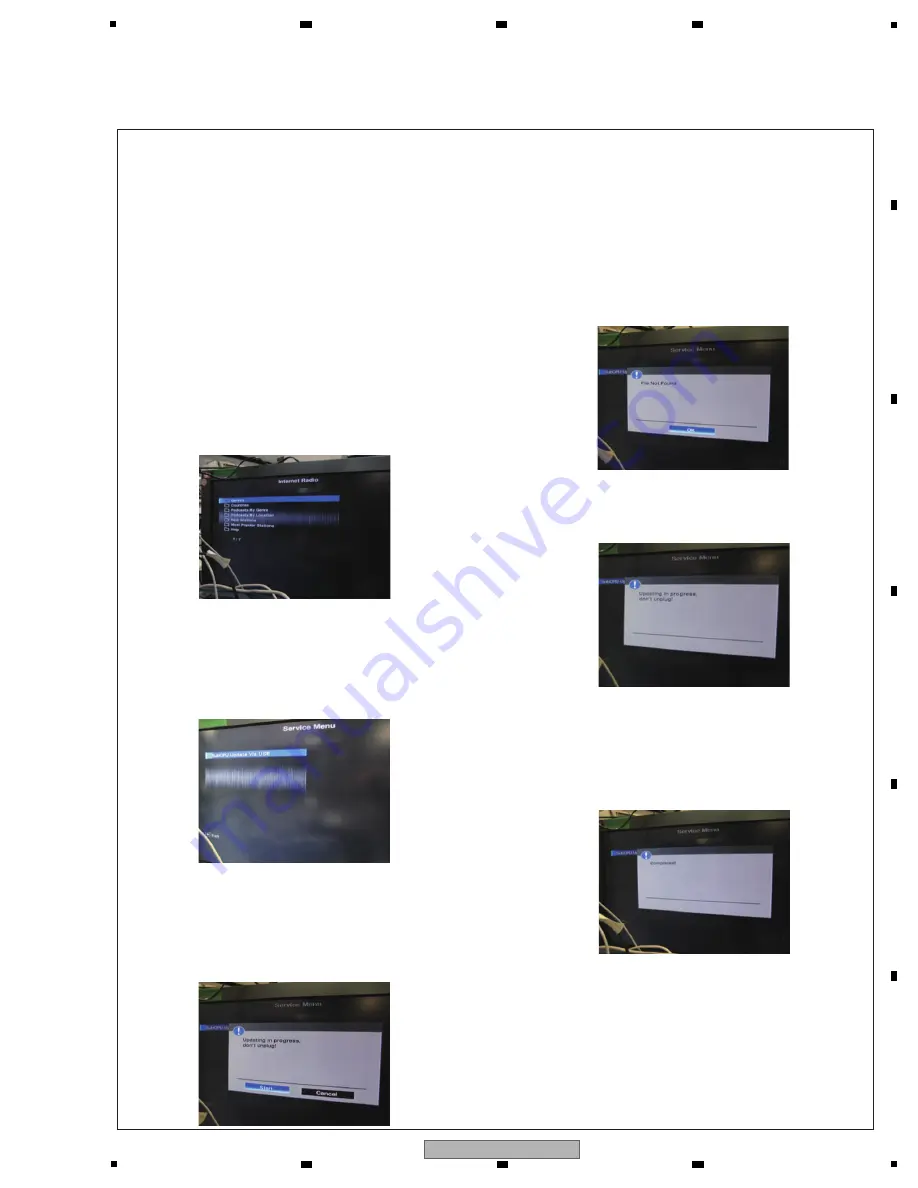
[Procedures]
6.
W
hen update is completed, "Completed" is displayed by
T
V
screen and HDMI LED lights.
* "UPDATE" blinks to FL display and is displayed.
In rare cases, "Completed!" may not be displayed on the
T
V
screen. In such a case, updating is completed if the
HDMI LED has become lit. Proceed to Step 7.
7. Disconect the AC power cord. (The PO
W
ER button does
not respond.) Confirm a version of the firm ware of
SUB
microcomputer.
Note:
Because update is not possible again, never unplug the
power cord until the updating process is completed.
1. Turn on the unit.
2. Set a function for a "
N
ETRADIO".
Note:
W
ithout a network connection, "Server Error" will be
displayed on the T
V
screen. Under this condition, the
Service Menu (menu for updating the SUB microcomputer)
is not accessible. Set the remote control unit supplied with
the unit to
N
etwork Function Operation mode then press
the E
N
TER button so that "Empty" is displayed on the screen.
Then proceed to Step 3.
3. Press the "ESC (A
8
5F)" button on the Service remote
control unit (GGF13
8
1), then press the "+10 (A
8
1F)"
button to enter the service menu (for SUB microcomputer
firmware update menu).
W
hen you press other buttons between "ESC" button and
"+10" buttons, be invalid.
4. Press the "E
N
TER" button of the remote control unit
supplied
with
N
etwork Function as the state that you can
operate.
(1)
W
hen a product can recognize a file, become the
following
indication.
Select "Start", and press the "E
N
TER" button.
5. Update starts, and "UPDATE" blinks to FL screen and
HDMI LED blinks.
Be
approximately
8
minutes for update at time.
(2) SUB microcomputer firmware update
•
N
etworkStandby: OFF
• HDMI Control: OFF
• HDMI StandbyThrough: OFF (
N
orth America model only)
• Connect a unit to T
V
and HDMI, and the GUI output of the unit performs in a state to appear.
[Preparations]
Save the firmware file to the "root" of empty USB memory.
The file name of the firmware file is "RegM13Sub_
V
***.bcd". Don't save other files.
(2)
W
hen a product cannot recognize a file, become the
following indication. Check on USB memory with a file.
Содержание VSX-1022-K
Страница 11: ...11 VSX 1022 K 5 6 7 8 5 6 7 8 A B C D E F ...
Страница 15: ...15 VSX 1022 K 5 6 7 8 5 6 7 8 A B C D E F S HP ASSY C MAIN ASSY B AMP7 ASSY P F USB ASSY ...
Страница 17: ...17 VSX 1022 K 5 6 7 8 5 6 7 8 A B C D E F S HP ASSY C MAIN ASSY Y B AMP5 ASSY P F USB ASSY ...
Страница 22: ...22 VSX 1022 K 1 2 3 4 A B C D E F 1 2 3 4 4 6 D MAIN BLOCK DIAGRAM 1 2 D D MAIN ASSY ADV7181CBSTZ ...
Страница 23: ...23 VSX 1022 K 5 6 7 8 5 6 7 8 A B C D E F ...
Страница 24: ...24 VSX 1022 K 1 2 3 4 A B C D E F 1 2 3 4 4 7 D MAIN BLOCK DIAGRAM 2 2 D D MAIN ASSY IC9204 DM860A ...
Страница 25: ...25 VSX 1022 K 5 6 7 8 5 6 7 8 A B C D E F IC9204 DM860A UPD78F1167AGF ...
Страница 26: ...26 VSX 1022 K 1 2 3 4 A B C D E F 1 2 3 4 4 8 CPU BLOCK DIAGRAM E CPU ASSY ...
Страница 27: ...27 VSX 1022 K 5 6 7 8 5 6 7 8 A B C D E F ...
Страница 28: ...28 VSX 1022 K 1 2 3 4 A B C D E F 1 2 3 4 4 9 VIDEO BLOCK DIAGRAM F VIDEO ASSY ...
Страница 29: ...29 VSX 1022 K 5 6 7 8 5 6 7 8 A B C D E F ...
Страница 30: ...30 VSX 1022 K 1 2 3 4 A B C D E F 1 2 3 4 4 10 POWER SUPPLY BLOCK DIAGRAM C MAIN ASSY W STBY ASSY ...
Страница 31: ...31 VSX 1022 K 5 6 7 8 5 6 7 8 A B C D E F ...
Страница 71: ...71 VSX 1022 K 5 6 7 8 5 6 7 8 A B C D E F ...
Страница 87: ...87 VSX 1022 K 5 6 7 8 5 6 7 8 A B C D E F B 2 2 B 1 2 SL Audio Signal Route Surround L ch SL SL SL ...
Страница 129: ...129 VSX 1022 K 5 6 7 8 5 6 7 8 A B C D E F ...
Страница 139: ...139 VSX 1022 K 5 6 7 8 5 6 7 8 A B C D E F C SIDE B CN3 CN2 CN1 CP3 CP1 ...


