background image

− 

13

 −

English

 Before Installing the Product

 WARNING

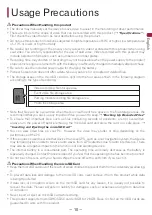
• When installing the product on vehicles installed with an air bag, never install on the cover of the air 

bag and at locations that might obstruct the deployment of the air bag. Doing so might prevent the air 

bag from being deployed normally, cause the product to fly out due to air bag deployment, and cause 

accident and injury.

 CAUTION

• First check with the vehicle manufacturer for precautions related to the installation work when installing 

the product in a vehicle equipped with airbags. Otherwise there is a risk of airbag malfunction.

• Always use the included parts as specified. There is a risk of product failure if other parts are used.
• Install this product in a location where it will not hinder vehicle equipment and the ability to drive the 

vehicle.

Installation Precautions

• Main unit and 2nd camera are for installation to the inside of the front and rear windows only. Do not 

install it anywhere else inside or outside of the vehicle.

• When installing main unit to the inside of the front windscreen, be sure to install them to the specified 

positions of the front windscreen and within the specified dimensions.

• When installing the 2nd camera to the inside of the rear window, pay attention to the following points.


— Avoid installing the 2nd camera on heating wires on windscreens.


— If the vehicle is provided with a rear wiper, install so that it is within the wiping range of the wiper.


— Install the 2nd camera as far as possible from the high mount stop lamp.

• Depending on the vehicle, installation at the specified location and within the specified dimensions 

may not be possible. For details, consult with your dealer.

• Do not cover this product and 2nd camera or get the lens dirty.
• Do not place reflective objects near the lens.
• Take care when handling this product and 2nd camera so that they do not drop and you do not touch 

the lens.

• Recording quality may be affected if the front windscreen of the vehicle is coated or has been specially 

treated.

• This product may not be able to receive GPS signals if the front windscreen of the vehicle has been 

specially treated. Check the GPS reception status indicator displayed on the screen of this product. 

If a GPS signal cannot be received, this product cannot be installed in this vehicle. 


“Using this 

product” - “Status Display”

• Choose a working location free from dust and debris in the air.
• When the temperature is low or there is condensation on the glass, turn on the heater and defroster to 

warm up the window in order to prevent poor adhesion of the double-sided tape.

Double-sided tape cannot be re-applied once it is peeled off as peeling off weakens its adhesive 

strength. Be sure to temporarily fasten this product and 2nd camera and sufficiently consider 

routeing of cables before applying double-sided tape.

Содержание VREC-DZ700DC

Страница 1: ...English Owner s Manual VREC DZ700DC DASH CAMERA ...

Страница 2: ...nt Windscreen 15 Recommended Installation Position on Rear Windscreen 16 Connecting the Power Cable 19 Part Names 21 Inserting and Ejecting the microSD Card 22 Inserting the microSD Card 22 Ejecting the microSD Card 22 Backing Up Recorded Files 23 Folder and File Structure 23 Using this product 24 This product Power 24 System Indicator Display 24 Function Buttons 24 Status Display 25 Video Recordi...

Страница 3: ...verensstemmelseserklæringens fulde tekst kan findes på følgende internetadresse https www pioneer car eu eur compliance Deutsch Hiermit erklärt Pioneer dass der Funkanlagentyp Bezeichnung der Richtlinie 2014 53 EU entspricht Der vollständige Text der EU Konformitätserklärung ist unter der folgenden Internetadresse verfügbar https www pioneer car eu eur compliance Ελληνικά Με την παρούσα ο η Pionee...

Страница 4: ...l de echipamente radio este în conformitate cu Directiva 2014 53 UE Textul integral al declarației UE de conformitate este disponibil la următoarea adresă internet https www pioneer car eu eur compliance Български С настоящото Pioneer декларира че този тип радиосъоръжение е в съответствие с Директива 2014 53 ЕС Цялостният текст на ЕС декларацията за съответствие може да се намери на следния интерн...

Страница 5: ...nion For countries outside the European Union If you wish to discard these items please contact your local authorities or dealer and ask for the correct method of disposal CAUTION The graphical symbol placed on the product means direct current Safety Precautions Always observe the precautions described here to prevent harm to yourself and others and to prevent damage to property before it happens ...

Страница 6: ...handbrake before making the necessary adjustments Never set the volume of this product so high that you cannot hear outside traffic and emergency vehicles Keep this manual handy as a reference for operating procedures and safety information Certain functions such as viewing of screen and certain button operations offered by this product could be dangerous possibly resulting in serious injury or de...

Страница 7: ...or compatible ones are used they may damage internal parts of this product or they may work loose and the product may become detached Do not install this product where it may i obstruct the driver s vision ii impair the performance of any of the vehicle s operating systems or safety features including airbags hazard lamp buttons or iii impair the driver s ability to safely operate the vehicle Neve...

Страница 8: ...e in recorded video depending on the ambient conditions such as the weather and time LED traffic signals or street lamps on the road may appear as flashing or flickering when recorded with this product The colour may also not be correctly identifiable Pioneer Corporation accepts no responsibility whatsoever for these phenomena This product saves video before and after an accident occurs by detecti...

Страница 9: ...uct features Square brackets are used to indicate selectable items displayed on the screen Quotation marks are used to indicate references and settings The illustrations and example screens used in this manual may differ from the actual product The actual screens of the product may be changed without prior notification for the purpose of improvements to product performance and features In this man...

Страница 10: ...e recommend that you back up any important files you want to keep Backing Up Recorded Files To ensure that important files such as files containing records of accidents are not overwritten always turn the power off before removing the microSD card and store the card in a safe place Inserting and Ejecting the microSD Card You can view video files on your PC However the video may stutter or stop dep...

Страница 11: ...ors or an error may occur and the card will no longer be usable On rare occasions a microSD card that is recognised by your computer may not be recognised by this product In this case depending on the problem with the microSD card this product may be able to recognise the card by formatting it with this product format feature This product Settings Configurable Features System Format SD Card Howeve...

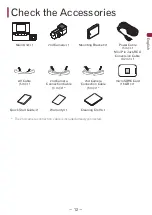
Страница 12: ...1 Power Cable 5 m 1 Mini Pin Jack RCA Conversion Cable 0 2 m 1 AV Cable 5 m 1 2nd Camera Connection Cable 3 m 1 2nd Camera Connection Cable 6 m 1 microSDHC Card 16 GB 1 Quick Start Guide 1 Warranty 1 Cleaning Cloth 1 The 2nd camera connection cable is included already connected ...

Страница 13: ...on heating wires on windscreens If the vehicle is provided with a rear wiper install so that it is within the wiping range of the wiper Install the 2nd camera as far as possible from the high mount stop lamp Depending on the vehicle installation at the specified location and within the specified dimensions may not be possible For details consult with your dealer Do not cover this product and 2nd c...

Страница 14: ...emporarily connect this product and confirm that it operates correctly and then install it If the product does not operate correctly check again if there is a mistake in the connection Before Applying Double sided Tape Clean the location where the double sided tape will be applied ...

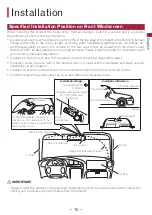
Страница 15: ...osition where the lens part of this product does not hang over the sunshade and black ceramic lines black ceramic pattern A position where this product faces in the horizontal direction to the front and side to side A position where the power cable can be routed without unnecessary force Installation Direction Horizontal Direction This product Front Windscreen Ground This product Horizontal Direct...

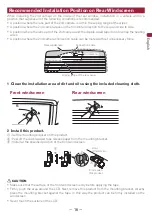
Страница 16: ...ut unnecessary force 2nd camera Rear windscreen Connection cable Heating wires Wiping range of the rear wiper 1 Clean the installation area of dirt and oils using the included cleaning cloth Front windscreen Rear windscreen 2 Install this product Set the mounting bracket on this product Peel off the double sided tape release paper from the mounting bracket Install at the specified position of the ...

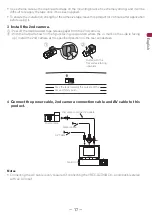
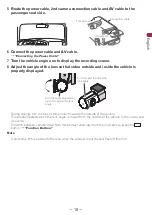
Страница 17: ... the 2nd camera With the flat part shown in the figure facing up position where the mark on the side is facing up install the 2nd camera at the specified position on the rear windscreen 1 2 Install with the flat surface facing upwards Face the lens towards the outside of the car and firmly push 4 Connect the power cable 2nd camera connection cable and AV cable to this product 2nd camera 2nd camera...

Страница 18: ...side and inside the vehicle is properly displayed Turn the angle adjustment jog dial to adjust the lens angle Turn this part to adjust the lens angle During driving turn the lens of this product towards the outside of the vehicle This product restarts when the lens angle is moved from the outside of the vehicle to the inside and vice versa To switch between camera video from this product and video...

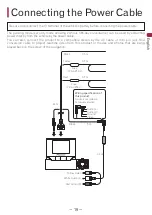
Страница 19: ... cable You can also connect the product to a compatible stereo by the AV cable or mini pin jack RCA conversion cable to project realtime video from this product or movies and photos that are being played back on the screen of the navigation Black 0 5 m Yellow 0 5 m Red 0 5 m 4 5 m Fuse F 2 AL 250 V Fuse F 2 AL 250 V 0 2 m Wiring specification of this product Audio is recorded in monaural sound Aud...

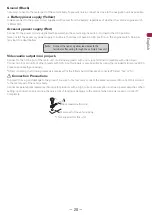
Страница 20: ... output mini pin jack Connect to the AUX input of the main unit of a Pioneer product with a mini jack terminal compatible with video input Connection to main units of other brands with RCA input terminals is also possible by using the included mini pin jack RCA conversion cable figure below After connecting the following message is displayed Is the 3 5mm Audio Video Jack Connected Select Yes or No...

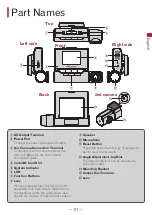
Страница 21: ... cable 4 microSD Card Slot 5 System Indicator 6 LCD 7 Function Buttons 8 Lens Pioneer polarised filter AD PLF100 sold separately can help reduce reflections of the dashboard onto the windscreen and enable the capture of high contrast videos 9 Speaker a Microphone b Reset Button Press this button with the tip of a ballpoint pen to reset this product c Angle Adjustment Jog Dial The angle of the lens...

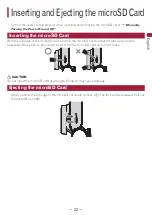
Страница 22: ... the top edge of the microSD card position the microSD card so that the label is facing the backside of this product and slowly insert it into the microSD card slot until it clicks CAUTION Do not insert the microSD card at an angle Doing so may cause damage Ejecting the microSD Card Slowly push in the top edge of the microSD card until it clicks 1 The lock will be released Pull out the microSD car...

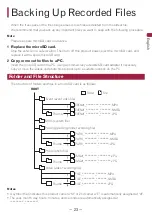
Страница 23: ... a commercially available SD card adapter if necessary Copy or move the videos and photo files to back up to a suitable location on the PC Folder and File Structure The structure of folders and files in a microSD card is as follows ROOT Event event video file File Folder Thumb EVEN _ _ MP4 EVEN _ _ NMEA EVEN _ _ JPG MISC system file Parking parking mode recording file Thumb PARK_ _ MP4 PARK_ _ NME...

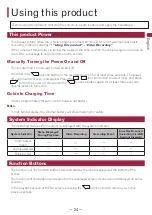
Страница 24: ...t Yes and press to turn the power off Hold down the function button again for at least three seconds and the power is turned on Guide to Charging Time It takes approximately three hours to charge a flat battery Note In high temperatures the internal battery will stop charging for safety System Indicator Display The operating status of this product is displayed with the system indicator System Indi...

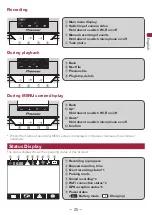
Страница 25: ...c 9 Back a Up Hold down to switch Wi Fi on off b Down Hold down to switch microphone on off c Confirm When the volume or sensitivity MENU screen is displayed increase or decrease the volume or sensitivity Status Display The status display shows the operating status of this product 00 00 1 2 3 5 4 6 7 8 1 Recording in progress 2 Elapsed recording time 3 Event recording status 1 4 Parking mode 5 Sou...

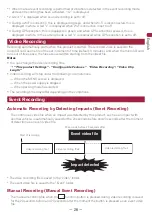
Страница 26: ...ding time This product Settings Configurable Features Video Recording Video Clip Length Video recording will stop under the following circumstances When the MENU screen is displayed When the power supply is stopped When parking mode has started The recording time may differ depending on the conditions Event Recording Automatic Recording by Detecting Impacts Event Recording The continuous video fil...

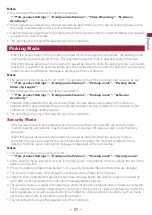
Страница 27: ...utes before power supply is started is not covered by the notification message display feature The recording time may differ depending on the conditions Security Mode If the pre set operation time elapses when the security mode is turned ON the security mode in which parking surveillance is performed 24 hours per day 365 days per year is automatically activated When this device detects vehicle mov...

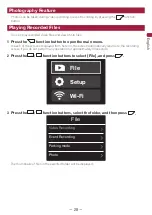
Страница 28: ...en the main menu In each of the screens displayed from here on the screen automatically returns to the recording screen if you do not perform any operation for approximately 30 seconds 2 Press the function buttons to select File and press Wi Fi Setup File 3 Press the function buttons select the folder and then press File Video Recording Event Recording Photo Parking mode The thumbnails of files in...

Страница 29: ...tion buttons select the file and then press Video Recording The selected file will play 00 00 00 25 Note In the screens in Steps 2 to 4 excluding the playback screen pressing the function button returns you to the previous screen ...

Страница 30: ...ll stop while the MENU screen is displayed 1 Press the function button to open the main menu In each of the screens displayed from here on the screen automatically returns to the recording screen if you do not perform any operation for approximately 30 seconds 2 Press the function buttons then select Setup or Wi Fi and press The following describes an example for when Setup has been selected Wi Fi...

Страница 31: ...ip Length Video Resolution WDR Exposure Compensation 5 Press the function buttons select the setting value and then press Video Resolution This completes setting and you are returned to the previous screen Note In the screens in Steps 2 to 4 pressing the function button returns you to the previous screen ...

Страница 32: ...here is a large difference between light and dark ON Exposure Compensation Sets the exposure of video recording 0 G Sensor Sensitivity Sets the sensitivity for detecting vibration or impact Level4 Parking Mode Parking Mode Video Length Sets the operation time of the parking mode security mode This can also be set to OFF 40 min G Sensor Sensitivity Sets the sensitivity for detecting vibration or im...

Страница 33: ...deo Audio Output Sets the video audio output connection ON OFF OFF Language Sets the language used to display the screen English Format SD Card All files on the microSD card can be deleted 2 Restore to Factory Mode Settings can be reset to the default settings Version Allows you to check the version information of this product firmware 1 When the parking mode security mode is activated LCD Standby...

Страница 34: ... minutes Approx 400 photos 720p Approx 48 minutes Approx 8 minutes Approx 25 minutes Approx 400 photos 79 10 10 1 1080p Approx 55 minutes Approx 7 minutes Approx 7 minutes Approx 400 photos 720p Approx 1 hour 5 minutes Approx 8 minutes Approx 8 minutes Approx 400 photos Guide to Recording Time and No of Photos with an 128 GB microSD Card SD Card Partition Resolution Video Recording Event Recording...

Страница 35: ...martphone Android device can be connected to this product at any one time When a second device is connected the first device is disconnected While a Wi Fi connection is made no operations can be performed on this product If a function button is pressed while a Wi Fi connection is made a message will be displayed prompting you to break the Wi Fi connection If you select Yes the Wi Fi connection wil...

Страница 36: ...hts microSDHC Logo is a trademark of SD 3C LLC microSDXC Logo is a trademark of SD 3C LLC Android is a trademark of Google Inc The Wi Fi CERTIFIED Logo is a certification mark of the Wi Fi Alliance iPhone is a trademark of Apple Inc ...

Страница 37: ...io signals from GPS satellites The GPS satellite signals cannot pass through solid matter except glass The signals from GPS satellites may be blocked when this product is in the following locations Inside tunnels and parking structures On the bottom level of a two level highway Around concentrations of skyscrapers In dense forests ...

Страница 38: ...e vehicle and the movement of people are being detected Adjust the sensitivity of the sensors to use for detection This Product Settings Configurable Features Values Parking mode G Sensor Sensitivity There are many videos where nothing happens in the files recorded while parked The sensitivity of impact detection may not be appropriate My vehicle was hit while parked but a video file wasn t record...

Страница 39: ... level can be set in 6 steps during parking mode level can be set in 6 steps Recording Methods Video recording event recording manual event recording parking mode recording Video File Structure 1 min 3 min 5 min Display 2 inch LCD Sound Recording Can be set to ON or OFF Frame Rate 27 5 fps Compression Method Video MP4 H 264 photo JPG Video Playback Method iOS Android exclusive apps etc Power Suppl...

Страница 40: ...CORPORATION 28 8 Honkomagome 2 Chome Bunkyo ku Tokyo 113 0021 Japan PIONEER EUROPE NV Haven 1087 Keetberglaan 1 9120 Melsele Tel 32 3 570 0511 Fax 32 3 570 0886 https www pioneer car eu eur Visit www pioneer car eu uk or www pioneer car eu eur to register your product ...

Отзывы: