3
En
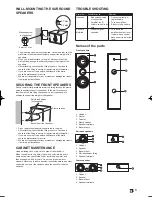
WALL-MOUNTING THE SURROUND
SPEAKERS
Mounting screw
(not supplied)
5 mm to 7 mm
3.7 mm
9.3 mm
• The mounting screws are not supplied. Use screws that suit the
wall material and that can sufficiently support the weight of the
speakers.
• When you intend to attach to the wall, first ensure that the
wall is strong enough to sufficiently support the weight of the
speakers.
• After attaching, check that the fitting is secure. Continue to
check that the fitting is secure at regular intervals thereafter.
• If you are unsure of the quality and strength of the walls,
consult a professional for advice.
• We are not responsible for any accidents or damage that result
from improper installation.
SECURING THE FRONT SPEAKERS
Pass a commercially-available reinforced string through the plastic
catch to securely support the speaker to the wall. Also ensure
that the wall you are fixing the speaker to is strong enough to
sufficiently support the weight of the speaker.
Reinforced strings
(not supplied)
Plastic catches
Backside of front speaker
• Do not attach the plastic catches directly to the wall.
• After attaching, check that the fitting is secure. Continue to
check that the fitting is secure at regular intervals thereafter.
• If you are unsure of the quality and strength of the walls,
consult a professional for advice.
• We are not responsible for any accidents or damage that result
from improper installation.
CABINET MAINTENANCE
Use a polishing cloth or dry cloth to wipe off dust and dirt.
When the cabinet is very dirty, clean with a soft cloth dipped in
some neutral cleanser diluted five or six times with water, and
then wipe again with a dry cloth. Do not use furniture wax or
cleaners. Never use thinners, benzine, insecticide sprays and other
chemicals on or near the cabinets, since these will corrode the
surfaces.
TROUBLESHOOTING
Symptom
Possible cause
Remedy
No sound.
• Bad speaker cable
or connection.
• Amplifier is off.
• Volume control is at
zero.
• Connect correctly or
replace cable.
• Turn on amplifier.
• Slowly turn up volume.
Sound is
distorted.
• Extreme signal
condition.
• Turn down the
amplifier's output level
(volume, bass control,
bass boost) to lower the
level.
Names of the parts
Front speakers
1. Cabinet
2. Woofer
3. Tweeter
4. Plastic catches
5. Speaker terminals
6. Bass ref duct
Surround speakers
1. Cabinet
2. Speaker
3. Bass ref duct
4. Wall attachment fitting
5. Speaker terminals
Center speaker
1. Cabinet
2. Speaker
3. Bass ref duct
4. Speaker terminals
S-RS55TB_EnEs.indb 3
2017/08/24 13:39:10


