5
En
English
Installation and Placement
How to install
Please observe the following points when installing speakers:
These speakers are bookshelf-type speakers. They will provide best
performance when placed on a solid level surface away from the
floor. If placed directly on the floor, reverberation will be amplified,
producing a boomy, undefined sound. Ideally, the high-range
speakers (tweeters) should be placed at a height roughly the same
level as the listener’s ears. We recommend using the CP-4EX
speaker stand for optimum sound and stability. When using the
CP-4EX speaker stand, be sure to secure the speaker to the stand
with the provided screws to prevent the speaker from falling.
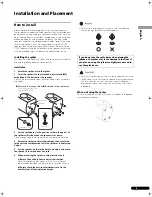
Installing the spikes
This speaker is provided with spikes and spike bases that should
be used to produce optimum sound quality.
Installation
1
Attach the spike nuts to the spikes.
2
Twist the spikes into the threaded metal inserts (M6)
embedded in the bottom of the speaker.
Consult the drawing and select either of the positions noted to fix
the spikes.
3
Set the spike bases in the positions where the points of
the spikes will strike when the speaker is set down.
Place enough spike bases to match the number of spikes used.
4
Rotate the spikes to adjust their height, then rotate the
spike nuts counterclockwise to fix the spikes at the adjusted
height.
5
Set the speaker on the spike bases and adjust to be sure
the speaker is level and does not rock.
6
When mounting the spikes in three locations only.
a) Rotate the auxiliary feet to adjust their height.
Adjust the height so that about 1 mm to 2 mm of space
remains open between the feet and the installation surface.
b) Rotate the spike nuts counterclockwise to fix the
auxiliary feet at their adjusted height.
• Always use the spike bases as shown, with the indented
surface facing up to receive the spike point.
• As this unit weighs some 20 kg, it is very dangerous to try and
set the spike nut while tilting the speaker. Be sure to place the
unit on a soft area (such as a blanket) so that it does not
damage the floor, and carry out the installation with at least
two people.
When not using the spikes
To assure stable installation, affix the non-skid pads to the bottom
surface of each speaker.
Attach the auxilia
r
y feet
to
pr
event
r
ocking.
■
Attached in three positions
■
Attached in four positions
S
p
ike
S
p
ike nut
Auxilia
r
y feet
Bottom of
s
p
eake
r
If you do not use the spike bases when placing the
speakers, the spikes may cause damage to the floor. If
you plan on using the spikes we highly recommend to
use the spike bases.
S-4EX_EN.book 5 ページ 2008年7月16日 水曜日 午後2時2分


