background image

9

Remote Controller and Care

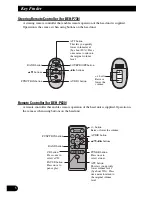
Using the Steering Remote Controller (for DEH-P730)

Precaution:

• Do not operate this unit while manipulating the steering wheel as it might result in a traffic acci-

dent.

• If you have to operate this unit unavoidably when driving, look ahead carefully to avoid the risk of

being involved in a traffic accident. 

• If any of the following troubles occur, immediately stop using this unit and consult with the dealer

from whom you purchased it:
– the unit is smoking.
– the unit is emitting abnormal odor.
– a foreign object has entered the unit.
– liquid has been spilled on or into the unit.
If you continue to use this unit without finding a remedy, the unit may be damaged badly, resulting
in a serious accident or fire.

• Do not leave this unit free (unattached) inside the car. When the car stops or turns a curve, the unit

might drop on the floor. If the unit rolls under the brake pedal, it might prevent the driver from
braking well, causing serious trouble. Be sure to fix this unit to the steering wheel.

• Do not disassemble or modify this unit. To do so may cause a fault.

Battery

7

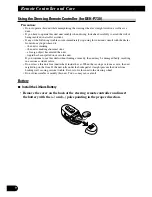
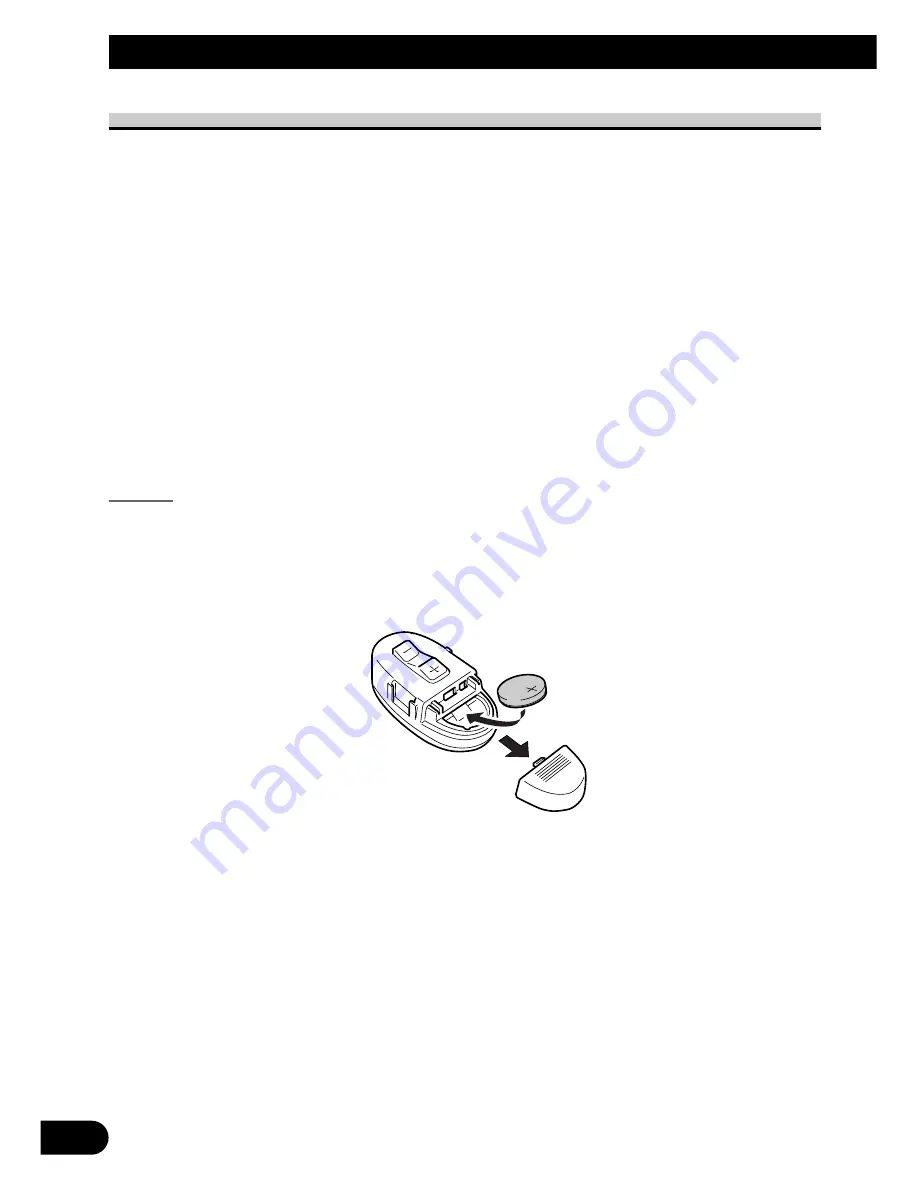
Install the Lithium Battery

• Remove the cover on the back of the steering remote controller and insert

the battery with the (+) and (–) poles pointing in the proper direction.

Содержание Premier DEH-P630

Страница 1: ...r CD player with FM AM tuner Syntoniseur FM AM et lecteur de CD Puisance élevée avec contrôleur pour lecteur de CD à chargeur DAB Operation Manual DEH P730 DEH P630 Mode d emploi ENGLISH FRANÇAIS DEUTSCH FRANÇAIS ITALIANO NEDERLANDS ...

Страница 2: ...g the Front Panel Replacing the Front Panel Warning Tone Basic Operation 13 To Listen to Music 13 Basic Operation of Built in CD Player 15 Switching the Display Open Track Search and Fast Forward Reverse Disc Loading Slot Eject Basic Operation of Tuner 17 Manual and Seek Tuning Preset Tuning Band Basic Operation of Multi CD Player 18 Track Search and Fast Forward Reverse Disc Search Disc Number Se...

Страница 3: ...justment NonFad High Pass Filter HPF Source Level Adjustment SLA Automatic Sound Levelizer ASL Function Initial Setting 44 Entering the Initial Setting Menu 44 Initial Setting Menu Functions 45 Setting the Time CLOCK Setting the Warning Tone WARN Switching the AUX Mode AUX Setting the Dimmer DIM Selecting the Brightness BRIGHT Setting the Rear Output and Subwoofer Controller SW Switching the Hands...

Страница 4: ...t the dial and leave it there Taking a minute to do this now will help to prevent hearing damage or loss in the future After all we want you listening for a lifetime We Want You Listening For A Lifetime Used wisely your new sound equipment will provide a lifetime of fun and enjoyment Since hearing damage from loud noise is often undetectable until it is too late this manufacturer and the Electroni...

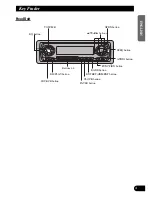
Страница 5: ... 6 E B SFEQ SELECT 4 ENGLISH ESPAÑOL DEUTSCH FRANÇAIS ITALIANO NEDERLANDS DISPLAY button FUNCTION button VOLUME Buttons 1 6 AUDIO button PAUSE button SOURCE button EQ button SFEQ button CLOCK button OPEN button ENTERTAINMENT button BAND button 5 2 3 buttons ...

Страница 6: ...head unit FUNCTION button 5 2 3 buttons AUDIO button button Raise or lower the volume BAND button ATT button This lets you quickly lower volume level by about 90 Press once more to return to the original volume level TUNER button Press once to select a tuner CD button Press once to select a CD PAUSE button Press once to pause play FUNCTION button 2 3 buttons SOURCE OFF button 5 buttons AUDIO butto...

Страница 7: ...cord this number on the enclosed warranty card About the Demo Mode This product features two demonstration modes One is the Reverse Demo mode the other is the Feature Demo mode Reverse Demo If you do not perform an operation within about 30 seconds screen indications start to reverse and then continue reversing every 10 seconds Pressing button 5 when power to this product is switched OFF while the...

Страница 8: ...ddresses listed below for repair without advance contact For warranty information please see the Limited Warranty sheet included with your product When using the 50 Disc Type Multi CD Player The available functions of the 50 Disc Type Multi CD Player are described in this Operation Manual Note that other 50 Disc Type Multi CD Player functions cannot be used with this product CAUTION USE OF CONTROL...

Страница 9: ...d to this product For operation of the XM tuner refer to the XM tuner owner s manual Note XM Satellite Radio is developing a new band of radio in the U S A The system will use direct satellite to receiver broadcasting technology to provide listeners in their cars and at home with crystal clear sound seamlessly from coast to coast XM will create and package up to 100 channels of digital quality mus...

Страница 10: ...n object has entered the unit liquid has been spilled on or into the unit If you continue to use this unit without finding a remedy the unit may be damaged badly resulting in a serious accident or fire Do not leave this unit free unattached inside the car When the car stops or turns a curve the unit might drop on the floor If the unit rolls under the brake pedal it might prevent the driver from br...

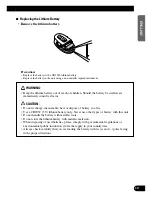
Страница 11: ...iately consult a doctor CAUTION Do not recharge disassemble heat or dispose of battery in a fire Use a CR2032 3 V lithium battery only Never use other types of battery with this unit Do not handle the battery with metallic tools Do not store the lithium battery with metallic materials When disposing of used batteries please comply with governmental regulations or environmental public institution s...

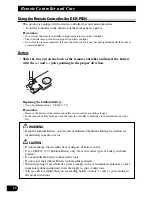
Страница 12: ...lithium battery CR2025 3 V Precaution Remove the battery if the remote controller is not used for a month or longer If the event of battery leakage wipe the remote controller completely clean and install a new bat tery WARNING Keep the Lithium Battery out of reach of children Should the Battery be swallowed immediately consult a doctor CAUTION Do not recharge disassemble heat or dispose of battery...

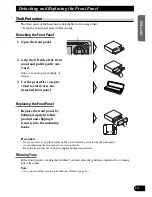
Страница 13: ...ne If the front panel is not detached within 5 seconds after the ignition is turned off a warning tone will sound Note You can cancel the warning tone function Refer to page 45 Replace the front panel by holding it upright to this product and clipping it securely into the mounting hooks 3 Use the protective case pro vided to store carry the detached front panel 2 Grip the left side of the front pa...

Страница 14: ... product Two External Units can be controlled by this product although External is displayed whether you select External Unit 1 or External Unit 2 When two External Units are connected the allocation of them to External Unit 1 or External Unit 2 is automatically set by this product In the following cases the sound source will not change When a product corresponding to each source is not connected ...

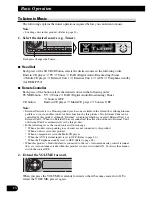
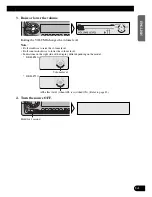
Страница 15: ...Roll clockwise to raise the volume level Roll counterclockwise to lower the volume level Indications on the right side of the display differ depending on the model DEH P630 DEH P730 4 Turn the source OFF Hold for 1 second SOURCE DISP EQ 1 2 3 4 5 6 ASL effect level when ASL is switched ON Refer to page 43 Volume level EQ 1 2 3 4 5 6 ...

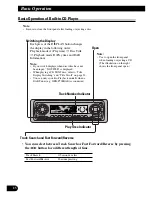
Страница 16: ... Track Number Indicator Play Time Indicator Open Note Use to open the front panel when loading or ejecting a CD The illustration on the right shows the front panel open Switching the Display Each press of the DISPLAY button changes the display in the following order Playback mode A Play time Disc Title Playback mode B Play time and DAB Information Note If you switch displays when disc titles have ...

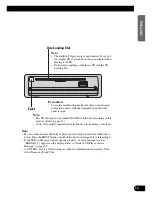
Страница 17: ... a CD featuring recorded text information such as Disc Title Artist Name and Track Title Disc Loading Slot Note The Built in CD player plays one standard 12 cm or 8 cm single CD at a time Do not use an adapter when playing 8 cm CD Do not insert anything other than a CD into the CD Loading Slot Eject Note The CD function can be turned ON OFF with the disc remaining in this product Refer to page 13 ...

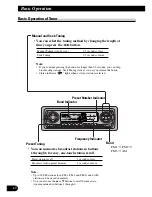
Страница 18: ...tations Seek Tuning starts as soon as you release the button Stereo indicator lights when a stereo station is selected Preset Tuning You can memorize broadcast stations in buttons 1 through 6 for easy one touch station recall Preset station recall 2 seconds or less Broadcast station preset memory 2 seconds or more Note Up to 18 FM stations 6 in FM 1 FM 2 and FM 3 and 6 AM stations can be stored in...

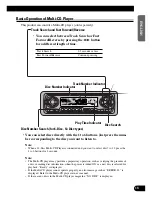
Страница 19: ...d ON or a new disc is selected for playback Ready is displayed If the Multi CD player cannot operate properly an error message such as ERROR 14 is displayed Refer to the Multi CD player owner s manual If there are no discs in the Multi CD player magazine NO DISC is displayed Basic Operation of Multi CD Player This product can control a Multi CD player sold separately SOURCE DISP EQ FUNC AUDIO 1 2 ...

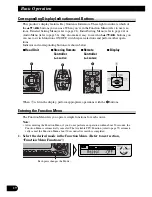
Страница 20: ...shown below 7Head Unit 7Steering Remote 7 Remote 7Display Controller Controller for DEH P730 for DEH P630 When 1 is lit in the display perform appropriate operations with the z buttons Entering the Function Menu The Function Menu lets you operate simple functions for each source Note After entering the Function Menu if you do not perform an operation within about 30 seconds the Function Menu is au...

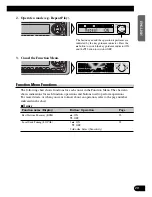
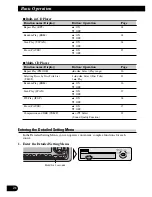
Страница 21: ...ions For more details or when you want to know about an operation refer to the page number indicated in the chart 7 Tuner Function name Display Button Operation Page Best Stations Memory BSM 5 ON 23 OFF Local Seek Tuning LOCAL 1 5 ON 23 3 OFF 2 2 or 3 Select Sensitivity FUNC AUDIO 3 4 5 6 E B SFEQ SELECT The button used and the operation it performs are indicated by the key guidance indicator Pres...

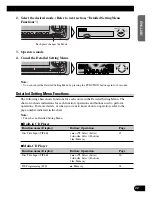
Страница 22: ...lect Play range 26 Selecting Discs by Disc Title List 1 2 or 3 Select Disc Title 31 T LIST 2 5 Play Random Play RDM 5 ON 26 OFF Scan Play SCAN 5 ON 27 OFF ITS Play ITS P 5 ON 28 OFF Pause PAUSE 5 ON 27 OFF Compression and DBE COMP 5 or Select 32 Sound Quality Function Entering the Detailed Setting Menu In the Detailed Setting Menu you can operate convenient complex functions for each source 1 Ente...

Страница 23: ... each function operations and buttons used to perform operations For more details or when you want to know about an operation refer to the page number indicated in the chart Note Tuner has no Detailed Setting Menu 7 Built in CD Player Function name Display Button Operation Page Disc Title Input TITLE 1 5 or Select Letter 25 2 2 or 3 Select Position 3 3 Memory 7 Multi CD Player Function name Displa...

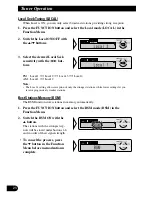
Страница 24: ...ngs let you receive progressively weaker stations Best Stations Memory BSM The BSM function stores stations in memory automatically 1 Press the FUNCTION button and select the BSM mode BSM in the Function Menu To cancel the process press the button in the Function Menu before memorization is complete 2 Switch the BSM ON with the 5 button The stations with the strongest sig nals will be stored under...

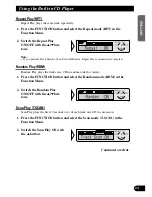
Страница 25: ...r variety Scan Play T SCAN Scan Play plays the first 10 seconds or so of each track on a CD in succession Continued overleaf 2 Switch the Scan Play ON with the 5 button 1 Press the FUNCTION button and select the Scan mode T SCAN in the Function Menu 2 Switch the Random Play ON OFF with the 5 but tons 1 Press the FUNCTION button and select the Random mode RDM in the Function Menu 2 Switch the Repea...

Страница 26: ...bed on page 30 under Using Multi CD Players Note After the title for 48 discs have been entered data for a new disc will overwrite the oldest one If you connect a Multi CD player you can input disc titles for up to 100 discs When playing a CD TEXT disc on this product you cannot switch to this mode 2 Switch the Pause ON OFF with the 5 buttons 1 Press the FUNCTION button and select the Pause mode P...

Страница 27: ... Track Search or Fast Forward Reverse during One track Repeat the repeat play range changes to Disc Repeat Random Play RDM Tracks are played at random within the selected repeat play range as explained in Repeat Play above 1 Press the FUNCTION button and select the Random mode RDM in the Function Menu Display Play range D RANDOM Disc Repeat RANDOM Multi CD player Repeat Note One track Repeat chang...

Страница 28: ...e track Repeat changes to the Disc Repeat when you switch the Scan Play ON Pause PAUSE Pause pauses the currently playing track 1 Press the FUNCTION button and select the Pause mode PAUSE in the Function Menu Note You can also switch the Pause function ON OFF by pressing the PAUSE button 2 Switch the Pause ON OFF with the 5 buttons 3 When you find the desired track or disc cancel the Scan Play wit...

Страница 29: ...ogram 2 Select the ITS Programming mode ITS in the Detailed Setting Menu Refer to page 21 Note After 100 discs have been programmed data for a new disc will overwrite the data for the disc that has not been played back for the longest time ITS Play ITS P ITS play of tracks is performed within the play range explained in the Repeat Play sec tion 1 Press the FUNCTION button and select the ITS Play m...

Страница 30: ...can Erase a Disc Program 1 Select the disc you wish to erase while the disc is playing 2 Select the ITS Programming mode ITS in the Detailed Setting Menu Refer to page 21 3 Erase the disc program with the button 3 Erase the track program with the button ITS is canceled and playback of the next ITS programmed track begins If there are no more programmed tracks in the current range ITS Empty is disp...

Страница 31: ...fer to page 21 Note When playing a CD TEXT disc on a CD TEXT compatible Multi CD player you cannot switch to this mode A CD TEXT disc is a CD featuring recorded text information such as Disc Title Artist Name and Track Title Note You can select to input Numbers and Symbols by pressing button 2 Continued overleaf 5 Move the box left and right with the 2 3 buttons 4 Select letters numbers and symbol...

Страница 32: ...Disc Title on page 32 Selecting Discs by Disc Title List T LIST Follow the procedures below to play a disc for which you have input the title in a Multi CD player or a CD TEXT disc on a CD TEXT compatible Multi CD player 1 Press the FUNCTION button and select the Disc Title List mode T LIST in the Function Menu 3 Play the selected disc with the 5 button 2 Select the desired disc title with the 2 3...

Страница 33: ...he functions enables two step adjust ment 7 COMP The COMP Compression function adjusts imbalances between loud and subdued sounds at higher volumes 7 DBE DBE Dynamic Bass Emphasis boosts bass levels to give a fuller sound COMP DBE ON OFF Switching 1 Press the FUNCTION button and select the COMP DBE switching mode COMP in the Function Menu Note You can use these functions with a Multi CD player tha...

Страница 34: ...ner e g GEX P700DAB is connected Title Scroll This product displays the first 16 letters only of Disc Title Artist Name and Track Title With text longer than 16 letters you can see the rest of the text by scrolling Scroll the title display by pressing the DISPLAY button for 2 seconds Select the desired title display with the DISPLAY button Each press of the DISPLAY button changes the display in th...

Страница 35: ...ss on the rear output The bass boost is the same for both front and rear For both FRT1 and FRT2 the H setting provides a more pronounced effect than the L setting 1 Select the desired SFEQ mode FRT1 H front 1 high FRT1 L front 1 low FRT2 H front 2 high FRT2 L front 2 low CUSTOM custom SFEQ OFF off 2 Select the desired Position LEFT left Ô CENTER center Ô RIGHT right Note If you adjust the bass or ...

Страница 36: ...7 and Equalizer Curve Fine Adjustment on page 38 7 CUSTOM 1 A separate CUSTOM 1 curve can be created for each source The Built in CD player and Multi CD player are set to the same Equalizer Curve Adjustment setting automatical ly If you make adjustments when a curve other than CUSTOM 2 is selected the equalizer curve settings are memorized in CUSTOM 1 7 CUSTOM 2 A CUSTOM 2 curve can be created com...

Страница 37: ...fer Controller on page 47 1 Select the desired mode in the Audio Menu 2 Operate a mode 3 Cancel the Audio Menu Audio Menu Functions The Audio Menu features the following functions Balance Adjustment Fad This function allows you to select a Fader Balance setting that provides ideal listening con ditions in all occupied seats 1 Press the AUDIO button and select the Fader Balance mode Fad in the Audi...

Страница 38: ...ettings as desired 1 Press the AUDIO button and select the Equalizer mode EQ Low EQ Mid EQ High in the Audio Menu Note If you make adjustments when a curve other than CUSTOM 2 is selected CUSTOM 1 curve is updated CSTM 3 Boost or attenuate the selected band with the 5 buttons The display shows 6 6 2 Select the band you want to adjust with the 2 3 buttons EQ Low EQ Mid EQ High 3 Adjust left right s...

Страница 39: ...onds to select Equalizer Curve Fine Adjustment Note If you make adjustments when a curve other than CUSTOM 2 is selected CUSTOM 1 curve is updated 4 Select the desired Q factor with the 5 buttons 2N 1N 1W 2W 3 Select the desired frequency with the 2 3 buttons LOW 40 Ô 80 Ô 100 Ô 160 Hz MID 200 Ô 500 Ô 1k Ô 2k Hz HIGH 3 15k Ô8k Ô10k Ô12 5k Hz 2 Press the AUDIO button to select the desired band for ...

Страница 40: ...equency and the Treble level In FRT1 and FRT2 modes treble adjustment affects only the front output rear output cannot be adjusted 1 Press the AUDIO button and select the Treble mode Treble in the Audio Menu 3 Boost or attenuate the treble level with the 5 buttons The display shows 6 6 2 Select the desired frequency with the 2 3 buttons 2 5K Ô 4K Ô 6 3K Ô 10K Hz 3 Boost or attenuate the bass level...

Страница 41: ... be switched between normal or 0 Normal and reverse or 180 Rev 0 is the default phase Note When the Subwoofer Controller setting is S W Control EXT you cannot switch the Subwoofer ON OFF mode In this case this setting is not necessary Refer to page 47 Select the OFF setting when you do not want the Subwoofer to operate 1 Press the AUDIO button and select the Subwoofer ON OFF mode Sub W1 in the Aud...

Страница 42: ...low pass filter for the Subwoofer but is output through the RCA output Note When the Subwoofer Controller setting is only S W Control EXT you can switch the Non Fading Output ON OFF mode Refer to page 47 2 Switch the Non Fading output ON OFF with the 5 but tons 1 Press the AUDIO button and select the Non Fading Output ON OFF mode NonFad in the Audio Menu 3 Increase or decrease the out put level wi...

Страница 43: ...ncies than those in the selected range are output from the front and rear speakers 1 Press the AUDIO button and select the H P F mode HPF in the Audio Menu Note If you switch the SFEQ mode the H P F function is automatically switched OFF By switching the H P F function ON after selecting the SFEQ mode you can combine H P F function with SFEQ function 3 Select the desired frequency with the 2 3 but...

Страница 44: ...same volume adjustment setting auto matically External Unit 1 and External Unit 2 are set to the same volume adjustment setting automatically Automatic Sound Levelizer ASL Function for DEH P730 During driving noise in the car changes according to the driving speed and road condi tions The automatic sound levelizer ASL monitors such varying noise and automatically increases the volume level if this...

Страница 45: ...3 Select a desired mode 4 Operate a mode 5 Cancel the Initial Setting Menu Note Holding down the FUNCTION button for 2 seconds also cancels the Initial Setting Menu FUNC AUDIO 3 4 5 6 E B SFEQ SELECT Each press changes the Mode FUNC AUDIO 3 4 5 6 E B SFEQ SELECT Hold for 2 seconds FUNC AUDIO 3 4 5 6 E B SFEQ SELECT 44 ENGLISH ESPAÑOL DEUTSCH FRANÇAIS ITALIANO NEDERLANDS ...

Страница 46: ...ton and select the Time setting mode CLOCK in the Initial Setting Menu As soon as you switch to Minute the seconds start counting from 00 Setting the Warning Tone WARN You can switch the Warning Tone function ON OFF Refer to Warning Tone on page 12 1 Press the FUNCTION button and select the Warning Tone mode WARN in the Initial Setting Menu 2 Switch the Warning Tone ON OFF with the 5 but tons 3 Se...

Страница 47: ... being too bright at night when the vehicle s head lights are turned ON the display is dimmed You can switch this function ON OFF 1 Press the FUNCTION button and select the Dimmer mode DIM in the Initial Setting Menu Selecting the Brightness BRIGHT You can select the display brightness Initially this mode is set to 12 The display shows 0 15 2 Select the desired Brightness with the 2 3 buttons 1 Pr...

Страница 48: ...ntrol INT or the auxiliary S W Control EXT Note Even if you change this setting there is no output unless you switch the Non Fading Output refer to page 41 or Subwoofer Output refer to page 40 in the Audio Menu ON If you change the Subwoofer Controller Subwoofer output and Non Fading output in the Audio Menu return to the factory settings Both rear speaker leads output and RCA Rear output are swit...

Страница 49: ...tenuated You can select between mut ing and attenuation when using the Handsfree Telephone Unit when Hands Free OFF is selected 1 Press the FUNCTION button and select the Telephone Muting Attenuation mode TEL 2 in the Initial Setting Menu Switching the Telephone Standby TEL 2 for DEH P730 If you want to use the Handsfree Telephone unit without playing other sources of this product activate the Tel...

Страница 50: ...oving source icon during a source play When OFF is selected the moving source icon disappears after the opening screen is dis played 1 Press the FUNCTION button and select the Motion Screen mode DISP in the Initial Setting Menu 2 Switch the Motion Screen ON OFF with the 5 buttons ...

Страница 51: ... of the ENTERTAINMENT button changes the display in the following order SOURCE ICON DISPLAY BGV 1 BGV 2 BGV 3 BGV 4 SPECTRUM ANALYZER MODE 1 SPECTRUM ANALYZER MODE 2 LEVEL INDICATOR MOVIE SCREEN MODE 1 MOVIE SCREEN MODE 2 Note SPECTRUM ANALYZER MODE 1 and SPECTRUM ANALYZER MODE 2 are not displayed in DEH P630 s display BGV stands for Back Ground Visual The LEVEL INDICATOR provides the indications ...

Страница 52: ...nterconnector s Owner s Manual Selecting the AUX Source Select AUX Refer to page 13 AUX Title Input TITLE The display title for AUX source can be changed 1 Select the AUX Title Input mode TITLE in the Detailed Setting Menu 2 Input the AUX Title Refer to Disc Title Input on page 30 and perform procedures 3 to 6 in the same way Hold for 2 seconds FUNC AUDIO 3 4 5 6 E B SFEQ SELECT Each press changes...

Страница 53: ...ed Handsfree Telephoning Function When a call is received or made using a handsfree telephone unit sound from this system is muted automatically and the voice of the person you talk to come from the speakers When Hands Free ON in the Handsfree Telephoning mode is selected in the Initial Setting Menu Handsfree Telephoning mode is activated Refer to page 48 Note When a call is made or received no so...

Страница 54: ... in Canada About This Product s Indications The following is an explanation of this product s indications 7Indications that light when Function is switched ON Indicator Function W THR Area Weather Flash Weather A NNC Announce Announce News Flash News Road Traffic Flash or Transport Flash If the set Announcement Support is received the letters in parentheses light If the set Announcement Support is...

Страница 55: ... the display in the following order Service Label Service Label Service Component Label SC Label Dynamic Label DAB TEXT Ensemble Label Ensemble Label PTY Label PTY Note With a Service Component that has no Service Component Label or Dynamic Label switching to Service Component Label and Dynamic Label is not possible With displays other than Service Label if you do not perform an operation within 8...

Страница 56: ...Press the FUNCTION button and select the PTY Search Setting mode PTY in the Function Menu 2 Select one from among the PTY 3 Start PTY Search DAB receives the desired PTY Service Note The PTY method displayed is Narrow The Wide method cannot be selected when using DAB as source SFEQ SELECT SFEQ SELECT FUNC AUDIO 3 4 5 6 E B SFEQ SELECT ...

Страница 57: ...e more or press the BAND button and the Dynamic Label mode is canceled When no Dynamic Label is currently being received NO TEXT is displayed 2 Recalling the three latest Dynamic Label broadcasts from the tuner s memory Pressing the button switches between the four Dynamic Label data displays Note If there is no Dynamic Label data stored in the tuner this button does not operate 3 Scroll the Dynam...

Страница 58: ...f buttons 1 6 for 2 seconds to store the desired Dynamic Label e g Press button 4 for 2 seconds 7 Recalling Preset Dynamic Label 1 Switch to the Dynamic Label mode 2 Press one of buttons 1 6 to recall a Dynamic Label preset under that button e g Press button 4 SOURCE DISP EQ 1 2 3 4 5 6 Current FUNC AUDIO 3 4 5 6 E B SFEQ SELECT Hold for 2 seconds SOURCE DISP EQ 1 2 3 4 5 6 ...

Страница 59: ... to disc characteristics or scratches or dirt on the disc Dirt or condensation on the lens inside this product may also prevent playback Titles and other text information recorded on a CD R disc may not be displayed by this product This product conforms to the track skip function of the CD R disc The tracks containing the track skip information are skipped over automatically Read the precautions w...

Страница 60: ...sts contact your dealer or your nearest PIONEER Service Center Message Possible cause Recommended action ERROR 11 12 17 30 Dirty disc Clean the disc ERROR 11 12 17 30 Scratched disc Replace the disc ERROR 14 Unrecorded CD Check the disc ERROR 10 11 12 14 Electrical or mechanical Turn the ignition ON and OFF or 17 30 A0 problem switch to a different source then back to the CD player ERROR 44 All tr...

Страница 61: ... 100 Hz 3 dB 10 kHz Mid 10 dB 100 Hz 6 5 dB 10 kHz High 11 dB 100 Hz 11 dB 10 kHz volume 30 dB Tone controls Bass Frequency 40 63 100 160 Hz Gain 12 dB Treble Frequency 2 5k 4k 6 3k 10k Hz Gain 12 dB HPF Frequency 50 80 125 Hz Slope 12 dB oct Subwoofer output Frequency 50 80 125 Hz Slope 18 dB oct Gain 12 dB Phase Normal Reverse CD player System Compact disc audio system Usable discs Compact disc ...

Страница 62: ... fréquences Gamme Opérations de base sur les lecteurs de CD à chargeur 18 Recherche d un plage musicale et déplacement rapide du capteur Recherche d un disque Recherche d un disque par son numéro lecteurs à chargeur 6 disques ou chargeur 12 disques Correspondance entre les indications affichées et les touches 19 Affichage du menu des fonctions 19 Fonctions du menu des fonctions 20 Affichage du men...

Страница 63: ...CK Réglage de la tonalité d alarme WARN Utilisation ou non de la source auxiliaire AUX Réglage de la luminosité DIM Choix de la luminosité BRIGHT Réglage de la sortie arrière et du contrôleur de l enceinte d extrêmes graves SW Utilisation ou non du téléphone mains libres TEL 1 Utilisation ou non de la sourdine atténuation audio téléphonique TEL 2 Utilisation ou non de la veille téléphonique TEL 2 ...

Страница 64: ...es pertes de sensibilités d écoute dans le futur Après tout nous voulons que vous écoutiez pendant toute votre vie Nous voulons que vous écoutiez pendant toute votre vie Utilisé avec sagesse votre nouvel équipement sonore sera une source de plaisir pendant toute votre vie Comme les dommages de l ouïe provenant d un bruit fort ne sont souvent détectables que lorsqu il est trop tard ce fabricant et ...

Страница 65: ...O NEDERLANDS Élément central SOURCE DISP EQ FUNC AUDIO 1 2 3 4 5 6 E B SFEQ SELECT Touche DISPLAY Touche FUNCTION VOLUME Touches 1 6 Touche AUDIO Touche PAUSE Touche SOURCE Touche EQ Touche SFEQ Touche CLOCK Touche OPEN Touche ENTERTAINMENT Touche BAND Touches 5 2 3 ...

Страница 66: ... sur cette touche pour commander une pause Touches 5 2 3 Touche AUDIO Touche Augmentez ou diminuez le niveau d écoute Touche BAND Touche TUNER Appuyez une fois sur cette touche pour choisir le syntoniseur Touche CD Appuyez une fois sur cette touche pour choisir un CD Touche ATT Cette touche permet d atténuer rapidment le niveau de sortie environ 90 Appuyez une nou velle fois sur cette touche pour ...

Страница 67: ...tration Cet appareil possède deux modes de démonstration démonstration inverse et démonstra tion des possibilités Démonstration inverse Si vous n effectuez aucune opération pendant environ 30 secondes les indications s af fichent sur l écran dans l ordre inverse et cela à intervalle de 10 secondes Vous pouvez annuler le mode de démonstration inverse en appuyant sur la touche 5 alors que l appareil...

Страница 68: ... ou lorsque l in formation recherchée n est pas disponible veuillez contacter Pioneer aux adresses suivantes N envoyez pas le produit à réparer sans avoir au préalable contacté nos bureaux Pour de plus amples informations relatives à la garantie référez vous au feuillet Garantie Limitée livrée avec l appareil Lors de l utilisation du lecteur de CD à changeur 50 disques Les fonctions disponibles du...

Страница 69: ...et appareil Pour le fonctionnement du tuner XM reportez vous à son mode d emploi Remarque La radio satellite XM utilise une nouvelle bande radio aux États Unis Le système utilisera une technologie de diffusion directe du satellite à l utilisateur et offrira aux auditeurs dans leur voiture un son pur comme du cristal sans raccord d une côte à l autre XM créera et proposera jusqu à 100 canaux de pro...

Страница 70: ...e un objet a pénétré dans l unité un liquide a été renversé sur ou dans l unité Si cette unité continue à être utilisée sans prendre aucune mesure elle peut être sérieusement endommagée et provoquer un grave accident ou un incendie Ne pas laisser cette unité non fixée dans la voiture Lors d un arrêt ou d un virage elle peut tomber sur le plancher Si l unité roule et se place sous la pédale de frei...

Страница 71: ... consulter immediatement un médecin ATTENTION Ne pas recharger démonter chauffer une pile ni la jeter dans un feu N utiliser qu une pile au lithium CR2032 3 V N utiliser jamais d autre type de pile avec cette unité Ne pas manipuler la pile avec un outil métallique Ne pas ranger une pile au lithium avec des objects métalliques Lorsque vous désirez mettre eu rebut une pile faites le en respectant le...

Страница 72: ...m Remplacez la pile par une pile au lithium CR2025 3 V Précaution Retirez la pile si la télécommande n est pas utilisée pendant un mois ou plus En cas de fuite de pile essuyez bien la télécommande et chargez de pile neuves ATTENTION Conservez les piles au lithium hors de portée des enfants En cas d ingestion d une pile consultez immédiatement un médecin PRÉCAUTION Ne tentez pas de charger démonter...

Страница 73: ...face avant n est pas retirée dans les 5 secondes qui suivent la coupure de l allumage Remarque Il est possible de supprimer la tonalité d alarme Reportez vous à la page 45 Replacez la face avant en la tenant droite par rapport à l appareil puis en l en gageant soigneusement dans les crochets de montage 3 Rangez la face avant dans le coffret de protection qui vous servira également à la transporter...

Страница 74: ... peuvent être commandés par ce produit bien qu External uniquement apparaisse quand vous choisissez l appareil extérieur 1 ou l appareil extérieur 2 Quand deux appareils extérieurs sont connectés leur affectation en première ou seconde position est réglée automatiquement par cet appareil Dans les cas suivants la source n est pas modifiée Quand un appareil correspondant à une source n est pas conne...

Страница 75: ...augmenter le niveau d écoute Roulez la commande dans le sens contraire des aiguilles d une montre pour diminuer le niveau d écoute Les indications sur le côté droit de l affichage diffèrent selon le modèle DEH P630 DEH P730 4 Mettez la source hors service Appuyez pendant 1 seconde SOURCE DISP EQ 1 2 3 4 5 6 Niveau de l effet ASL quand la fonction ASL est en service Reportez vous à la page 43 Nivea...

Страница 76: ...cale Ouverture Remarque Utilisez cette commande pour ouvrir la face avant afin de mettre en place ou d éjecter un CD L illustration de droite montre la face avant quand elle est ouverte Choix des indications affichées Chaque pression sur la touche DISPLAY change les indications affichées dans l ordre suivant Mode de lecture A Durée de lecture Titre du disque Mode de lecture B Durée de lecture et i...

Страница 77: ...informations alphanumériques telles que le titre du disque le nom de l artiste et le titre de chaque plage musicale Fente pour le disque Remarque Le lecteur de CD intégré accepte un seul disque 12 cm ou 8 cm N utilisez aucun adaptateur pour la lecture d un disque de 8 cm N introduisez aucun objet autre qu un CD dans la fente pour le CD Ejection Remarque Il n est pas nécessaire de retirer le disque...

Страница 78: ...autées L accord automatique commence dès que vous cessez d appuyer sur la touche Le témoin s éclaire quand vous choisissez une station émettant en stéréophonie Mise en mémoire des fréquences Les mémoires associées aux touches 1 à 6 permettent de conserver les fréquences des stations Rappel d une présélection 2 secondes ou moins Mise en mémoire d une fréquence 2 secondes ou plus Remarque La mémoire...

Страница 79: ...us pouvez choisir un disque directement grâce aux touches 1 à 6 Il vous suffit pour cela d appuyer sur la touche correspondant au numéro du disque Remarque Si vous possédez un lecteur à chargeur 12 disques et si vous désirez choisir un disque dont le numéro est compris entre 7 et 12 il vous suffit d appuyer pendant 2 secondes sur la touche 1 à 6 correspondante Remarque Quand vous mettez l appareil...

Страница 80: ...s témoins et les touches correspondantes sont indiqués ci dessous 7Élément central 7Télécommande 7 Télécommande 7Affichage monté sur le volant pour le DEH P630 pour le DEH P730 Lorsque le témoin 1 est éclairé effectuez les opérations au moyen de la touche z Affichage du menu des fonctions Le menu des fonctions permet de choisir les conditions de fonctionnement pour chaque source Remarque Si vous n...

Страница 81: ...plus amples détails concernant une opération reportez vous à la page mentionnée dans le tableau 7Syntoniseur Fonction Indication affichée Touche Résultat Page Mémoire des meilleures stations BSM 5 En 23 Hors Accord automatique sur les seules stations 1 5 En 23 puissantes LOCAL 3 Hors 2 2 ou 3 Choisissez Sensibilité FUNC AUDIO 3 4 5 6 E B SFEQ SELECT La touche utilisée et l opération réalisée sont ...

Страница 82: ...té de lecture 26 Choix d un disque sur la liste des titres 1 2 ou 3 Choisissez Titre du disque 31 T LIST 2 5 Lecture Lecture au hasard RDM 5 En 26 Hors Examen rapide des disques SCAN 5 En 27 Hors Lecture ITS ITS P 5 En 28 Hors Pause PAUSE 5 En 27 Hors Compression et DBE COMP 5 ou Choisissez 32 Fonction de réglage de la restitution Affichage du menu des réglages détaillés Le menu des réglages détai...

Страница 83: ... tableau fournit également la liste des fonctions opérations et touches Pour de plus amples détails concernant une opération reportez vous à la page mentionnée dans le tableau Remarque Le syntoniseur ne possède pas de menu des réglages détaillés 7Lecteur de CD intégré Fonction Indication affichée Touche Résultat Page Frappe du titre d un disque TITLE 1 5 ou Choisissez Caractère 25 2 2 ou 3 Choisis...

Страница 84: ...la touche FUNCTION puis choisissez le mode de BSM BSM grâce au menu des fonctions Pour interrompre la mise en mémoire appuyez sur la touche le menu des fonc tions étant affiché avant que cette mise en mémoire ne soit terminée 2 Mettez la mémoire des meilleurs stations en service au moyen de la touche 5 Les fréquences des stations dont le signal reçu par le syntoniseur est puissant sont sauvegardée...

Страница 85: ...l examen rapide du disque les 10 premières secondes de chaque plage musicale sont lues successivement à suivre 2 Mettez la lecture d examen rapide des disques en service au moyen de la touche 5 1 Appuyez sur la touche FUNCTION puis choisissez le mode d examen rapi de du disque T SCAN grâce au menu des fonctions 2 Mettez la lecture au hasard en service ou hors service au moyen des touches 5 1 Appuy...

Страница 86: ...D à chargeur Remarque Après avoir entré les titres de 48 titres les données d un nouveau disque écraseront le plus ancien titre Si l installation comporte un lecteur de CD à chargeur le nombre de disques que vous pouvez titrer est porté à 100 Vous ne pouvez pas adopter ce mode lors de la lecture d un CD TEXT sur cet appareil 2 Mettez la pause en service ou hors service au moyen des touches 5 1 App...

Страница 87: ... une seule plage la plage de la lecture répétée change sur le disque entier Lecture au hasard RDM Les plages musicales du disque sont lues au hasard à l intérieur du champ de la lecture répétée comme l explique Répétition de la lecture ci dessus 1 Appuyez sur la touche FUNCTION puis choisissez le mode de hasard RDM grâce au menu des fonctions Indication affichée Possibilité de lecture D RANDOM Rép...

Страница 88: ... répétition d un disque quand vous mettez la lecture d examen rapide du disque Pause PAUSE Pause permet d arrêter momentanément la lecture d une plage musicale 1 Appuyez sur la touche FUNCTION puis choisissez le mode de pause PAUSE grâce au menu des fonctions Remarque Vous pouvez aussi mettre en hors service la fonction de pause en appuyant sur la touche PAUSE 2 Mettez la pause en service ou hors ...

Страница 89: ...n ITS ITS grâce au menu des réglages détaillés Reportez vous à la page 21 Remarque Après programmation de la lecture du 100e disque toutes les données concernant un nouveau disque remplacent celles du disque dont la lecture est la plus ancienne Lecture ITS ITS P La lecture ITS tient compte des conditions définies au paragraphe Répétition de la lecture 1 Appuyez sur la touche FUNCTION puis choisiss...

Страница 90: ...ez effacer un numéro de disque 1 Pendant la lecture d un disque choisissez le disque dont le numéro doit être effacé 2 Grâce au menu des réglages détaillés choisissez le mode de programmation en temps réel ITS Reportez vous à la page 21 3 Appuyez sur la touche pour effacer le numéro du disque 3 Appuyez sur la touche pour effacer la référence à cette plage musicale La lecture ITS se poursuit avec l...

Страница 91: ...r de CD à chargeur compatible CD TEXT vous ne pouvez pas faire usage de ce mode Un CD TEXT est un disque compact qui porte en outre des informations alphanumériques telles que le titre du disque le nom de l artiste et le titre de chaque plage musicale Remarque Vous pouvez choisir l entrée des chiffres et des symboles en appuyant sur la touche 2 à suivre 5 Déplacez le curseur vers la gauche ou vers...

Страница 92: ...ue Choix d un disque sur la liste des titres T LIST Procédez de la manière indiquée ci dessous pour écouter un disque d un lecteur de CD à chargeur dont vous avez tapé le titre ou un disque CD TEXT sur un lecteur compatible CD TEXT 1 Appuyez sur la touche FUNCTION puis choisissez le mode d affichage de la liste des titres des disques T LIST grâce au menu des fonctions 3 Commandez la lecture du dis...

Страница 93: ...x de réglage 7 COMP La fonction COMP Compression ajuste les déséquilibres entre les sons forts et bas à volume élevé 7 DBE La fonction DBE Dynamic Bass Emphasis accentue les niveaux des graves pour donner un son plus étoffé Mise en hors service de la fonction COMP DBE 1 Appuyez sur la touche FUNCTION puis choisissez le mode permettant la sélec tion COMP ou DBE COMP grâce au menu des fonctions Rema...

Страница 94: ...cté Défilement du titre Cet appareil ne peut afficher que 16 caractères du titre du disque du nom de l interprète et du titre de la plage musicale Si le texte comporte plus de 16 caractères vous devez le faire défiler pour en prendre connaissance Faites défiler le texte en appuyant sur la touche DISPLAY pendant 2 secondes Choisissez l affichage conven able avec la touche DISPLAY Chaque pression su...

Страница 95: ...arrière L accentuation des graves est la même pour l avant et l arrière Pour FRT1 et FRT2 le réglage H offre un effet plus prononcé que le réglage L 1 Choisissez le mode SFEQ désirée FRT1 H avant 1 fort FRT1 L avant 1 faible FRT2 H avant 2 fort FRT2 L avant 2 faible CUSTOM personnalisé SFEQ OFF hors service 2 Choisissez la position désirée LEFT gauche Ô CENTER centre Ô RIGHT droite Remarque Si vou...

Страница 96: ...à la page 37 et à Réglage fin de la courbe d égalisa tion à la page 38 7 CUSTOM 1 Une courbe CUSTOM 1 séparée peut être créée pour chaque source Le lecteur de CD intégré et le lecteur de CD à changeur sont réglés automatiquement sur le même réglage d ajustement de courbe d égalisation Si vous réalisez un ajustement quand une autre courbe que CUSTOM 2 est choisie les réglages de la courbe d égalisa...

Страница 97: ...ez le paramètre à régler 2 Procédez aux réglages requis 3 Abandonnez le menu des réglages sonores Paramètres du menu des réglages sonores Le menu des réglages sonores permet d agir sur les paramètres suivants Réglage de l équilibrage Fad Le réglage de l équilibrage permet d obtenir les conditions d écoute optimales quel que soit le siège occupé 1 Appuyez sur la touche AUDIO puis choisissez le mode...

Страница 98: ...puis choisissez le mode d égalisation EQ Low EQ Mid EQ High grâce au menu des réglages sonores Remarque Si vous modifiez une courbe d égalisation autre que CUSTOM 2 la courbe CUSTOM 1 set mise à jour CSTM 3 Augmentez ou diminuez l ampli tude dans la plage de fréquence au moyen des touches 5 L affichage indique 6 6 2 Au moyen des touches 2 3 choisissez la plage de fréquence que vous désirez modifie...

Страница 99: ...DIO pour choisir le mode permettant le réglage fin de la courbe d égalisation Remarque Si vous modifiez une courbe d égalisation autre que CUSTOM 2 la courbe CUSTOM 1 set mise à jour 4 Choisissez le facteur Q qui convient au moyen des touches 5 2N 1N 1W 2W 3 Choisissez la fréquence qui con vient au moyen des touches 2 3 LOW 40 80 100 160 Hz MID 200 500 1k 2k Hz HIGH 3 15k 8k 10k 12 5k Hz 2 Appuyez...

Страница 100: ...t le niveau des aigus En mode FRT1 et FRT2 l ajustement des aigus affecte uniquement la sortie avant la sortie arrière ne peut pas être ajustée 1 Appuyez sur la touche AUDIO puis choisissez le mode de réglage des aigus Treble grâce au menu des réglages sonores 3 Accentuez ou atténuez le niveau des aigus avec les touches 5 L affichage indique 6 6 2 Choisissez la fréquence qui con vient au moyen des...

Страница 101: ... degré Normal ou inversée 180 degrés Rev Par défaut la phase est normale 0 degré Remarque Quand le réglage du contrôleur de l enceinte d extrêmes graves est sur S W Control EXT vous ne pouvez pas mettre en hors service ON OFF le mode de l enceinte d extrêmes graves Dans ce cas ce réglage n est pas nécessaire Reportez vous à la page 47 Mettez hors service OFF la sortie vers le haut parleur d extrêm...

Страница 102: ... graves mais est sorti directement par les prises de sortie RCA Remarque Quand le réglage du contrôleur de l enceinte d extrêmes graves n est que S W Control EXT vous pouvez mettre en hors service la sortie de ligne préamplifiée Reportez vous à la page 47 2 Mettez en hors service la sortie de ligne préamplifiée avec les touches 5 1 Appuyez sur la touche AUDIO puis choisissez le mode de mise en hor...

Страница 103: ...le les fréquences supérieures à celles de la plages choisies sont sorties par les enceintes avant et arrière 1 Appuyez sur la touche AUDIO puis choisissez le mode du filtre passe haut HPF grâce au menu des réglages sonores Remarque Si vous changez le mode SFEQ la fonction H P F est mis automatiquement hors service En met tant en service la fonction H P F après avoir choisi le mode SFEQ vous pouvez...

Страница 104: ...réglé automatique ment sur la même valeur Le niveau d écoute de l appareil extérieur 1 et de l appareil extérieur 2 est réglé automatiquement sur la même valeur Fonction de réglage automatique du niveau d écoute ASL pour le DEH P730 Tandis que le véhicule circule le bruit qui atteint l habitacle varie par exemple en fonc tion de la vitesse de l état de la chaussée etc La fonction de réglage automa...

Страница 105: ... 2 Affichez le menu des réglages initiaux 3 Choisissez le mode de fonctionnement désiré 4 Procédez aux réglages requis 5 Abandonnez le menu des réglages initiaux Remarque Pour abandonner le menu des réglages initiaux appuyez pendant 2 secondes sur la touche FUNCTION FUNC AUDIO 3 4 5 6 E B SFEQ SELECT Chaque pression change le mode FUNC AUDIO 3 4 5 6 E B SFEQ SELECT Appuyez pendant 2 secondes FUNC ...

Страница 106: ...lages initiaux Dès que vous choisissez de régler les minutes les secondes sont comptées à partir de 00 Réglage de la tonalité d alarme WARN Vous pouvez mettre en service ou hors service la tonalité d alarme Reportez vous à la page 12 Tonalité d alarme 1 Appuyez sur la touche FUNCTION puis choisissez le mode de fonction nement de la tonalité d alarme WARN grâce au menu des réglages initiaux 2 Mette...

Страница 107: ...ès allumage des feux de route Vous pouvez mettre en service ou hors service l atténuateur de luminosité 1 Appuyez sur la touche FUNCTION puis choisissez le mode d atténuation de la luminosité DIM grâce au menu des réglages initiaux Choix de la luminosité BRIGHT Vous pouvez choisir la luminosité de l afficheur Initialement la luminosité a la valeur 12 L affichage indique 0 15 2 Choisissez la lumino...

Страница 108: ... présent en sortie aussi longtemps que vous n avez pas mis en service la sortie sans équilibrage reportez vous à la page 41 ou la sortie vers le haut parleur d extrêmes graves reportez vous à la page 40 à l aide du menu des réglages sonores Si vous modifiez le réglage du contrôleur de l enceinte d extrêmes graves la sortie pour l enceinte d extrêmes graves et la sortie de ligne préamplifiée du men...

Страница 109: ...ou l atténuation téléphonique quand vous utilisez le téléphone mains libres quand Hands Free OFF est choisi 1 Appuyez sur la touche FUNCTION puis choisissez le mode de sourdine atténuation audio téléphonique TEL 2 grâce au menu des réglages initiaux Utilisation ou non de la veille téléphonique TEL 2 pour le DEH P730 Si vous souhaitez utiliser le module téléphonique mains libres sans reproduire les...

Страница 110: ...urce Quand OFF hors service est choisi l icône animé de la source disparaît après que l animation d ouverture de la source est affiché 1 Appuyez sur la touche FUNCTION puis choisissez le mode d affichage du fond DISP grâce au menu des réglages initiaux 2 Mettez en ou hors service l affichage du fond avec les touches 5 49 Réglages initiaux ...

Страница 111: ...ertissement désirée Chaque pression sur la touche ENTERTAINMENT change comme suit les indications affichées Affichage d icône de la source BGV 1 BGV 2 BGV 3 BGV 4 Mode 1 Analyseur de spectre Mode 2 Analyseur de spectre Indicateur de niveau Mode 1 Écran de cinéma Mode 2 Écran de cinéma Remarque Mode 1 Analyseur de spectre et Mode 2 Analyseur de spectre n apparaissent pas sur l affichage du DEH P630...

Страница 112: ...ntrée AUX Reportez vous à la page 13 Frappe du nom de l entrée AUX TITLE Vous avez la possibilité de modifier le nom affiché de l entrée AUX 1 Choisissez le mode permettant de frapper le nom de l entrée auxiliaire TITLE grâce au menu des réglages détaillés 2 Tapez le nom de cette entrée Reportez vous à la page 30 Frappe du titre d un disque et effectuez les opérations 3 à 6 Appuyez pendant 2 secon...

Страница 113: ... normales lorsque la communication télé phonique est terminée Fonction de téléphone mains libres Quand vous placez ou recevez un appel en utilisant le module téléphonique mains libres le son de ce système est coupé automatiquement et la voix de votre correspondant sort par les haut parleurs Quand Hands Free ON est choisi pour le mode de téléphone mains libres dans le mode des réglages initiaux le ...

Страница 114: ...e numérique au Canada Quelques mots sur les indications affichées Voici quelques explications concernant les indications affichées 7Indications qui apparaissent lorsque la fonction est en service Indication Fonction W THR Bulletin météo Weather A NNC Annonce Announce Bulletin d informations News Bulletins d informations routières et bulletins d informations sur les transports Si le support d annon...

Страница 115: ...les indications sont présentées dans l ordre suivant Etiquette de Service Service Label Etiquette d Elément de Service SC Label Etiquette dynamique DAB TEXT Etiquette d Ensemble Ensemble Label Etiquette PTY PTY Remarque Avec un composant de service qui n a pas d étiquette de composant de service ou d étiquette dynamique la commutation sur l étiquette de composant de service et sur l étiquette dyna...

Страница 116: ... et choisissez le mode de recherche PTY PTY dans le menu de fonction 2 Choisissez un des types d émission PTY 3 Commandez la recherche PTY Le DAB reçoit le service PTY désiré Remarque La méthode d affichage PTY est étroite La méthode large ne peut pas être choisie lors de l utilisation du tuner DAB comme source SFEQ SELECT SFEQ SELECT FUNC AUDIO 3 4 5 6 E B SFEQ SELECT ...

Страница 117: ...uche PAUSE ou appuyez sur la touche BAND pour abandonner le mode d étiquette dynamique Si aucune étiquette dynamique n est reçue l indication NO TEXT s affiche 2 Rappel des trois dernières étiquettes dynamiques de la mémoire du syntoniseur Une pression sur la touche change l affichage des données des quatre étiquettes dynamiques Remarque Si aucune étiquette dynamique n est en mémoire cette touche ...

Страница 118: ...ser l étiquette dynamique Par exemple appuyez sur la touche 4 pendant 2 secondes 7 Rappel d une étiquette dynamique prédéfinie 1 Choisissez le mode d étiquette dynamique 2 Appuyez sur une des touches 1 à 6 pour rappeler l étiquette dynamique mise en mémoire grâce à cette touche Par exemple appuyez sur la touche 4 SOURCE DISP EQ 1 2 3 4 5 6 Current FUNC AUDIO 3 4 5 6 E B SFEQ SELECT Appuyez pendant...

Страница 119: ...la lecture Les titres et autres informations gravées sur un CD R ne sont pas toujours affichés par l appareil Ce produit est conforme avec la fonction de saut de plage des disques CD R Les plages contenant des informations de saut de plage sont sautées automatiquement Lisez les précautions relatives aux disques CD R avant d utiliser de tels disques Essuyez soigneusement tout disque sale ou humide ...

Страница 120: ... pose à vous prenez contact avec le distributeur PIONEER ou un centre d entretien agréé Messages Causes possibles Actions correctives ERROR 11 12 17 30 Disque sale Nettoyez le disque ERROR 11 12 17 30 Disque rayé Utilisez un autre disque ERROR 14 Disque non enregistré Vérifiez le disque ERROR 10 11 12 14 Anomalie électrique ou Coupez le contact au moyen de la clé 17 30 A0 mécanique pour rétablisse...

Страница 121: ...z 3 dB 10 kHz Médium 10 dB 100 Hz 6 5 dB 10 kHz Aigus 11 dB 100 Hz 11 dB 10 kHz Niveau 30 dB Commandes de tonalité Graves Fréquence 40 63 100 160 Hz Gain 12 dB Aigus Fréquence 2 5k 4k 6 3k 10k Hz Gain 12 dB Filtre passe haut Fréquence 50 80 125 Hz Pente 12 dB octave Sortie vers le haut parleur d extrêmes graves Fréquence 50 80 125 Hz Pente 18 dB octave Gain 12 dB Phase Normal ou inverse Lecteur de...

Страница 122: ......

Страница 123: ......

Страница 124: ...CS AUSTRALIA PTY LTD 178 184 Boundary Road Braeside Victoria 3195 Australia TEL 03 9586 6300 PIONEER ELECTRONICS OF CANADA INC 300 Allstate Parkway Markham Ontario L3R OP2 Canada TEL 905 479 4411 PIONEER ELECTRONICS DE MEXICO S A de C V San Lorenzo 1009 3er Piso Desp 302 Col Del Valle Mexico D F C P 03100 TEL 5 688 52 90 Published by Pioneer Corporation Copyright 2000 by Pioneer Corporation All ri...

Отзывы: