background image

3

English

English

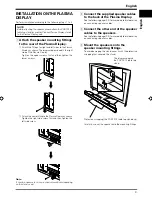
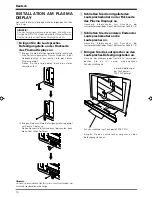
INSTALLATION ON THE PLASMA
DISPLAY

Perform installation according to the following steps 1 to 5.

NOTE:

Before attaching the speaker, please attach the PDK-TS12
table top stand (or another Pioneer Plasma Display stand)
to the Plasma Display unit.

1

Attach the speaker mounting fittings
to the rear of the Plasma Display.

Note:

It may be necessary to use a short screwdriver depending
on the stand used.

2

Connect the supplied speaker cables
to the back of the Plasma Display.

See the following page (P.5) for more detailed information
on connecting speaker cables.

3

Connect the other end of the speaker
cables to the speakers.

See the following page (P.5) for more detailed information
on connecting speaker cables.

4

Mount the speakers onto the
speaker mounting fittings.

To avoid damaging the stand, cover it with the protective
wrapping that covered the stand.

Protective wrapping (the PDK-TS12 table top stand only)

Carefully, mount the speaker onto the mounting fittings.

This diagram depicts
the PDK-TS12 table top
stand.

1

Attach the fittings for right and left sides to the Plasma
Display as shown. The diagram below depicts the right
side of the Plasma Display.
Tighten the upper screws first and then tighten the
lower screws.

2

Attach the center fitting to the Plasma Display as shown.
Tighten the right side screw first and then tighten the
left side screw.

 SRD1303A_01-07/En

6/16/05, 7:04 PM

3

Содержание PDP-S39

Страница 1: ...ructions Mode d emploi Bedienungsanleitung Istruzioni per l uso Gebruiksaanwijzing Manual de instrucciones Speaker System Enceintes acoustiques Lautsprechersystem Sistema di diffusori Luidsprekersysteem Sistema de altavoces ...

Страница 2: ...ze loud sounds of a high frequency range do not use excessive amplifier volume Do not force a low powered amplifier to produce a loud volume of sound the amplifier s harmonic distortion will be increased and you may damage the speaker Please handle the speakers with sufficient care as the grille net and the cabinet can become damaged or broken when they are subjected to strong external impacts Pla...

Страница 3: ...t the other end of the speaker cables to the speakers See the following page P 5 for more detailed information on connecting speaker cables 4 Mount the speakers onto the speaker mounting fittings To avoid damaging the stand cover it with the protective wrapping that covered the stand Protective wrapping the PDK TS12 table top stand only Carefully mount the speaker onto the mounting fittings This d...

Страница 4: ...the speaker mounting fittings and speaker cable attached to the display and then attach the speaker 1Connect the speaker cable to the speaker terminal This illustration shows the PDK TS12 table top stand 2Place the speaker on the speaker mounting fittings and then tighten from below using the screws provided 3 locations CAUTION If you want to move the Plasma Display unit make sure that you remove ...

Страница 5: ...r Speaker Cables to the speaker Warning If you insert the speaker cable too far so that the insulation is touching the speaker terminal you may not get any sound Connecting your Speaker Cables to the display Connect the cables correctly with respect to the polarity of the Plasma Display and the speaker terminals that is ª cable to ª terminals and cable to terminals To do so connect the cable with ...

Страница 6: ...e due to improvements Published by Pioneer Corporation Copyright 2005 Pioneer Corporation All rights reserved If you want to dispose this product do not mix it with general household waste There is a separate collection system for used electronic products in accordance with legislation that requires proper treatment recovery and recycling Private households in the 25 member states of the EU in Swi...

Страница 7: ...7 English English ...

Страница 8: ...un volume sonore poussé la distorsion harmonique de l amplificateur sera accrue ce qui risquerait d endommager les enceintes Manipuler les enceintes avec suffisamment de soin car autrement l enjoliveur frontal et le coffret risqueraient d être endommagés ou hors d usage en les soumettant à des chocs externes exagérés Si un écran d ordinateur à écran cathodique CRT ou un moniteur à écran cathodique...

Страница 9: ...ixez le support central à l Écran Plasma comme montré Serrez d abord la vis du côté droit puis serrez celle du côté gauche Remarque Selon le pied utilisé il peut s avérer nécessaire d utiliser un tournevis court 2 Connectez les câbles d enceinte fournis au dos de l Écran Plasma Pour plus de détails sur la connexion des câbles d enceinte reportez vous à la page suivante p 11 3 Connectez l autre ext...

Страница 10: ... sur le mur avec seulement les supports de montage et les câbles d enceinte fixés à l écran puis installez les enceintes 1Connecter les câbles aux bornes d enceinte 2Installez les enceintes sur les supports de montage puis fixez les par en dessous avec les vis fournies 3 endroits ATTENTION Si vous voulez déplacer l Écran Plasma veillez à enlever d abord les enceintes De plus ne déplacez pas l écra...

Страница 11: ...possible qu aucun son ne soit obtenu CONNEXION À UN ÉCRAN PLASMA CONNEXION DES ENCEINTES Connexion des câbles d enceinte aux enceintes Noir Rouge Connexion des câbles d enceinte à l écran Connectez les câbles correctement par rapport à la polarité des bornes de l écran plasma et des enceintes c est à dire câbles ª aux bornes ª et câbles aux bornes Pour ce faire connectez le câble portant le trait ...

Страница 12: ...de 4 8 13 cm Haut parleur d aigus Type à semi dôme de 2 5 cm Impédance nominale 8 Ω Plage de fréquences 70 à 30 000 Hz Sensibilité 1 w 1 m 81 dB Entrée admissible Entrée max 13 W Entrée nominale 4 W Fréquence de recouvrement 3 kHz Encombrement 1076 L 83 H 92 P mm Poids 2 7 kg Pièces accessoires pour 2 enceintes Câbles d enceinte 2 Supports Latéraux 2 Central 1 Vis M5 10 9 Mode d emploi 1 REMARQUE ...

Страница 13: ... nicht ausreichender Kapazität wiederzugeben dies führt zu einer Verstärkung des Klirrfaktors außerdem kann eine Beschädigung der Lautsprecher die Folge sein Die Lautsprecher sind vorsichtig zu behandeln da Ziergitter und Gehäuse durch starke Stöße und Erschütterungen verkratzt bzw beschädigt werden können Bei unzureichender Entfernung von CRT Computer Monitoren oder CRT Monitoren können die Lauts...

Страница 14: ...Befestigungsteil wie gezeigt am Plasma Display an Ziehen Sie zuerst die Schrauben auf der rechten dann die auf der linken Seite fest Hinweis Je nach verwendetem Gestell wird unter Umständen ein kurzer Schraubendreher benötigt 2 Schließen Sie die mitgelieferten Lautsprecherkabel an der Rückseite des Plasma Displays an Genauere Informationen zum Anschluss der Lautsprecherkabel finden Sie auf der näc...

Страница 15: ... Display nur mit angebrachten Lautsprecher Befestigungsteilen und Lautsprecherkabeln und bringen Sie dann erst den Lautsprecher an 1Schließen Sie das Lautsprecherkabel an die Lautsprecherklemme an 2Setzen Sie den Lautsprecher auf die Lautsprecher Befestigungsteile und sichern Sie ihn dann durch Eindrehen und Festziehen der mitgelieferten Schrauben 3 Stellen von unten VORSICHT Wenn die Plasma Displ...

Страница 16: ...en Sie unter Umständen keine Klangwiedergabe ANSCHLUSS AN EIN PLASMA DISPLAY ANSCHLIEßEN DER LAUTSPRECHER Anschließen der Lautsprecherkabel an Lautsprecher Schwarz Rot Anschließen der Lautsprecherkabel an Display Schließen Sie die Kabel richtig bezüglich der Polarität des Plasma Displays und der Lautsprecherklemmen an d h Pluskabel ª an positive Klemmen ª und Minuskabel an negative Klemmen Es gilt...

Страница 17: ...te Nennimpedanz 8 Ω Frequenzgang 70 bis 30 000 Hz Empfindlichkeit 1w 1m 81 dB Zulässige Eingangswerte Maximaler Eingangswert 13 W Nenn Eingangswert 4 W Übergangsfrequenz 3 kHz Äußere Abmessungen 1076 B 83 H 92 T mm Gewicht 2 7 kg Zubehörteile für 2 Lautsprecher Lautsprecherkabel 2 Halterung Seite 2 Mitte 1 Schraube M5 x 10 9 Bedienungsanleitung 1 HINWEIS Die technischen Daten und das Design können...

Страница 18: ... Si prega di maneggiare con cura gli altoparlanti la griglia di schermo e la cassa esterna possono danneggiarsi o rompersi se sottoposte a colpi esterni molto forti Sistemando il video di un computer a tubo catodico CRT o un monitor a tubo catodico CRT vicino agli altoparlanti è possibile che si verifichino delle interferenze o delle alterazioni di colore Se ciò si dovesse verificare distanziare i...

Страница 19: ...issaggio centrale Serrate innanzi tutto le viti di destra e quindi quelle di sinistra Nota In funzione del supporto impiegato potrebbe essere necessario utilizzare un cacciavite corto 2 Collegate al lato posteriore dello schermo al plasma i cavi dell altoparlante forniti in dotazione Per maggiori informazioni sul collegamento dei cavi dell altoparlante leggete la pagina che segue P 21 3 Collegate ...

Страница 20: ...nstallate lo schermo alla parete con solamente gli elementi di fissaggio e i cavi degli altoparlanti collegati allo schermo stesso e quindi installate gli altoparlanti 1Collegate i cavi dell altoparlante ai corrispondenti terminali 2Applicate l altoparlante agli elementi di fissaggio e serrate bene dal basso le viti fornite in dotazione in 3 punti ATTENZIONE Prima di spostare lo schermo in un altr...

Страница 21: ... ottiene alcun suono COLLEGAMENTO ALLO SCHERMO AL PLASMA COLLEGAMENTO DEGLI ALTOPARLANTI Collegamento agli altoparlanti del cavo degli altoparlanti Nero Rosso Collegamento allo schermo del cavo degli altoparlanti I cavi devono essere collegati correttamente allo schermo al plasma rispettando le polarità dello stesso e quelle dei terminali degli altoparlanti vale a dire cavo ª ai terminali ª e cavo...

Страница 22: ...parlante per toni alti A semi cupola 2 5 cm Impedenza nominale 8 Ω Gamma di frequenze Da 70 a 30 000 Hz Sensibilità 1w 1m 81 dB Ingresso tollerabile Ingresso massimo 13 W Ingresso nominale 4 W Frequenza di transizione 3 kHz Dimensioni esterne 1076 L 83 A 92 P mm Peso 2 7 kg Parti accessorie per 2 altoparlanti Cavo dell altoparlante 2 Staffe Laterali 2 Centrale 1 Viti M5 x 10 9 Istruzioni per l uso...

Страница 23: ...met een overmatig hoog volume weer te geven de harmonische vervorming van de versterker zal anders verhogen en u zou het luidsprekersysteem kunnen beschadigen Wees uitermate voorzichtig met de luidsprekers Het rooster en de behuizing zouden kunnen worden beschadigd wanneer het luidsprekersysteem aan schokken of stoten onderhevig wordt gesteld Wanneer u een CRT computerbeeldscherm of CRT scherm dic...

Страница 24: ...de rechterkant vast en vervolgens die aan de linkerkant Opmerking Afhankelijk van de standaard is het mogelijk dat u een korte schroevendraaier moet gebruiken 2 Sluit de meegeleverde luidsprekerkabels aan op de achterkant van het Plasmascherm Zie de volgende bladzijde blz 26 voor meer informatie omtrent het aansluiten van de luidsprekerkabels 3 Sluit het andere uiteinde van de luidsprekerkabels aa...

Страница 25: ...ruik van de eenheid voor wandbevestiging Installeer eerst alleen het Plasmascherm met de bevestigingsmaterialen en de kabels voor de luidsprekers reeds gemonteerd aan de wand en bevestig vervolgens de luidsprekers 1Verbind de luidsprekerkabel met de luidspreker aansluiting 2Plaats de luidspreker op de bevestigingspunten en draai vervolgens van onder vast met de meegeleverde schroeven 3 plekken PAS...

Страница 26: ...AANSLUITEN OP EEN PLASMASCHERM AANSLUITEN VAN DE LUIDSPREKERS Aansluiten van de luidsprekerkabels op de luidspreker Zwart Rood Aansluiten van de luidsprekerkabels op het scherm Sluit de kabels op de juiste manier aan wat betreft de polariteit zowel op het Plasmascherm als bij de luidspreker aansluitingen datwilzeggenmetdeªdraad naar de ª aansluiting en de draad naar de aansluiting Omditmakkelijker...

Страница 27: ...er voor hoge tonen 2 5 cm halfbolvormig type Nominale impedantie 8 Ω Frequentiebereik 70 t m 30 000 Hz Gevoeligheid 1w 1m 81 dB Toelaatbare invoer Maximaal ingangsvermogen 13 W Nominaal ingangsvermogen 4 W Crossover frequentie 3 kHz Externe afmetingen 1076 B 83 H 92 D mm Gewicht 2 7 kg Bijgeleverde onderdelen voor 2 luidsprekers Luidsprekerkabel 2 Beugel Zijkant 2 Midden x 1 Schroef M5 10 9 Gebrui...

Страница 28: ...ducir un volumen sonoro de sonido la distorsión armónica del amplificador aumentará y podría dañar los altavoces Manipule los altavoces con mucho cuidado ya que la red de rejilla y el gabinete pueden dañarse o romperse cuando se encuentran sujetos a fuertes impactos externos Si coloca una pantalla de ordenador de tubo catódicos CRT o un monitor de tubo catódicos CRT cerca de los altavoces podrían ...

Страница 29: ...como se muestra Apriete los tornillos del lado derecho primero y a continuación apriete los tornillos del lado izquierdo Nota Puede que se requiera utilizar un destornillador corto dependiendo del soporte que se utilice 2 Conecte los cables de altavoz suministrados a la parte posterior de la pantalla de plasma Vea la página siguiente P 31 para más detalles sobre la conexión de los cables de altavo...

Страница 30: ...ared Primero instale la pantalla de plasma en la pared solamente con los accesorios de montaje de altavoz y el cable de altavoz fijado en la pantalla y a continuación instale el altavoz 1Conecte el cable de altavoz al terminal de altavoz 2Coloque el altavoz en los accesorios de montaje montaje de altavoz y a continuación apriételo desde abajo utilizando los tornillos suministrados 3 ubicaciones PR...

Страница 31: ...s posible que no pueda obtener sonido CONEXIÓN A UNA PANTALLA DE PLASMA CONEXIÓN DE LOS ALTAVOCES Conexión de los cables de altavoz al altavoz Negro Rojo Conexión de los cables de altavoz a la pantalla Conecte los cables siguiendo las polaridades correctas de la pantalla de plasma y de los terminales de altavoz o sea cable ª a los terminales ª y cable a los terminales Para hacerlo conecte el cable...

Страница 32: ...ma de frecuencias 70 a 30 000 Hz Sensibilidad 1w 1m 81 dB Entrada permisible Entrada máxima 13 W Entrada nominal 4 W Frecuencia de cruce 3 kHz Dimensiones exteriores 1076 An 83 Al 92 Pr mm Peso 2 7 kg Partes accesorias para los dos altavoces Cable de altavoz 2 Ménsula Lateral 2 Central 1 Tornillo M5 x 10 9 Manual de instrucciones 1 NOTA Las especificaciones y diseño están sujetos a posibles cambio...

Страница 33: ... 當使用圖形等化器來加強某高頻帶的響聲時 請勿使用過大的放大器音量 請勿強制低功率放大器產生高音量 放大器的 諧波失真將會增加 您可能會損壞揚聲器 當揚聲器受到外部的影響時 請充分注意揚聲器 的處理 以免損壞護網和音箱 在揚聲器附近放置CRT電腦屏幕或CRT監視器可能會導 致干擾或色彩失真 如果出現這種情況 請使監視器 遠離揚聲器 安裝 如果安裝遇到困難 請與經銷商聯絡 對於因安裝不當 使用不當 更改或自然災害引 起的損害 先鋒概不負責 檢查附件 7 揚聲器電纜 x 2 7 揚聲器安裝配件 左右側托架 x 2 中央托架 7 揚聲器安裝螺絲 M5 x 10 mm 黑色 x 9 7 使用說明書 小心 在安裝揚聲器前 請先將等離子顯示器安裝到支架 上 請參見隨支架附帶的使用說明書 獲知有關裝配 支架的方法 由於可能會損壞面板護網或揚聲器本身 請勿向揚聲 器面板護網施加力量或將手指或其他物體插入揚...

Страница 34: ... 1如圖所示 在等離子顯示器左右兩側上安裝配件 下圖顯示離子顯示器的右側 首先固定上部螺絲 然後固定下部螺絲 2如圖所示 在等離子顯示器中部安裝配件 首先固定右側螺絲 然後固定左側螺絲 注意 根據所用的支架不同 可能要用到短螺絲刀 2 將附送的揚聲器電纜連接到離子顯示器 背面 有關連接揚聲器電纜的詳細資訊 請參閱以下第 36 頁 3 將揚聲器電纜的另一端連接到揚聲器 有關連接揚聲器電纜的詳細資訊 請參閱以下第 36 頁 4 將揚聲器安裝到揚聲器安裝配件上 為避免損壞支架 請在支架上覆蓋以保護性纏繞材 料 保護性纏繞材料 僅限於 PDK TS12桌面支架 小心將揚聲器安裝到安裝配件上 本圖顯示 PDK TS12 桌面支架 ...

Страница 35: ...的螺絲將揚聲器固定於安裝配件 3 個位置 本圖顯示 PDK TS12 桌面支架 注意 請勿使用位於安裝配件下方的螺絲孔來固定揚聲器 使用壁掛式裝置時 首先將僅帶有揚聲器安裝配件與揚聲器電纜的等離子顯 示器安裝到牆壁上 然後安裝揚聲器 1將揚聲器電纜連接到揚聲器端子 2將揚聲器放置於揚聲器安裝配件上 然後使用所提 供的螺絲從下方固定 3 個位置 小心 如果要移動等離子顯示器 務必首先拆除揚聲器 此外 請勿透過握住安裝配件來移動顯示器 否則可 能導致人身傷害或設備損壞 ...

Страница 36: ... 連接揚聲器電纜 到揚聲器 推動鎖桿 將揚聲器電纜末端插入孔中 然後釋 放鎖桿 連接時注意揚聲器端子的極性 灰色線條代表 ª 端子 連接揚聲器電纜 到顯示器 依照等離子顯示器及揚聲器端子的極性正確連接 電纜 即 ª電纜接 ª端子 電纜接 端子 為此 請將帶灰線的電纜連接到 ª端子 而將白 色電纜連接到 端子 壓下拉桿 插入電纜末端 釋放拉桿時 它又會夾在揚 聲器電纜上 灰色線條 灰色線條 白色 白色 黑色 紅色 灰色線條 白色 警告 若揚聲器導線過於插入深處而造成絕緣外皮 接觸揚聲器端子 可能不會獲得任何聲音 ...

Страница 37: ...使用含化學製品的拭布時 請仔細閱讀該拭布的注 意事項 規格 機殼 低音反射型 所用揚聲器 兩路系統 低音喇叭 用於低音 4 8 x 13 cm 圓型 高音喇叭 用於高音 2 5 cm 半球頂型 標稱阻抗 8 Ω 頻率範圍 70 to 30 000 Hz 靈敏度 1 w 1 m 81 dB 容許輸入功率 最大輸入功率 13 W 額定輸入功率 4 W 交叉頻率 3 kHz 外形尺寸 1076 寬 x 83 高 x 92 深 mm 重量 2 7 kg 附件 用於2個揚聲器 揚聲器電纜 x 2 托架 側邊 x 2 中央 x 1 螺絲 M5 x 10 x 9 使用說明書 x 1 注意 因產品改進 規格和設計若有變更 恕不另行通知 先鋒公司發行 版權 2005先鋒公司 版權所有 SYSTEM CABLE WHITE BLACK 束帶 揚聲器電纜 揚聲器電纜 ...

Страница 38: ... advance contact for these companies are not repair locations AMERICA PIONEER ELECTRONICS USA INC CUSTOMER SUPPORT DIVISION P O BOX 1760 LONG BEACH CA 90801 1760 U S A EUROPE PIONEER EUROPE NV EUROPEAN SERVICE DIVISION HAVEN 1087 KEETBERGLAAN 1 B 9120 MELSELE BELGIUM ASEAN PIONEER ELECTRONICS ASIACENTRE PTE LTD SERVICE DEPARTMENT 253 ALEXANDRA ROAD 04 01 SINGAPORE 159936 JAPAN AND OTHERS PIONEER C...

Отзывы: